Note
Before starting configuration, a new module instance must be created. Click here for more information about creating Module instances.
Client Configuration
Client configuration defines the settings for connections to the California ISO Automated Dispatch System (ADS).
.png)
As shown in the above screenshot, new connections to the ADS API can be created by clicking on the burger menu icon in the Model panel. Each connection is named Client.
Each client requires the following properties or parameters to be set:
.png)
Section | Property |
|---|---|
ADS |
|
Connection |
|
Options > Connection |
|
Authentication |
|
Batch storage |
|
Timing |
|
Tag Configuration
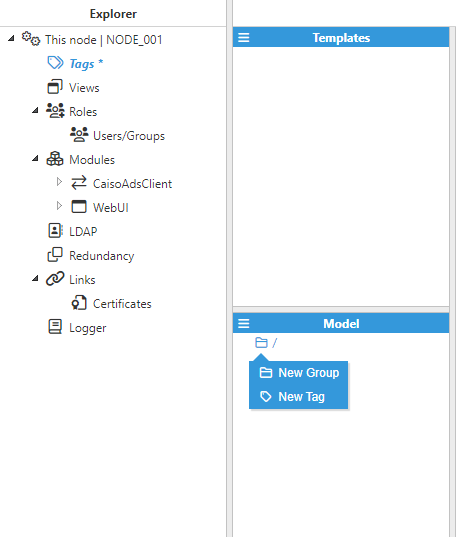
After configuring the Client, users will be able to create and configure any Tags associated with the data received from the ADS API, as shown below.
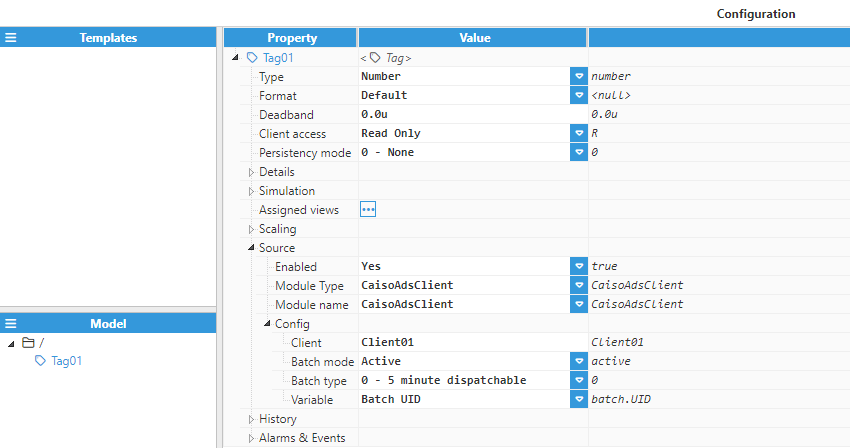
Source configuration settings contain the following parameters:
Settings | Description |
|---|---|
Enabled | When Disabled, tags won’t be updated with the values received from the server and will essentially act as memory tags. When set to Enabled, the tag value will be continuously updated with the values received from the server. The default value is Disabled. |
Module type | Defines the driver type used to retrieve values. In this example, CaisoAdsClient must be selected from the drop-down menu. If CaisoAdsClient does not appear in the drop-down menu, this means that the driver has not yet been installed on the machine and therefore must be installed. |
Module name | Selects which instance of the CAISO ADS Client module will provide the data for this tag. |
Config |
|
Element/Attribute | Description |
|---|---|
Batch | |
Batch UID | Unique identifier for ADS Dispatch Batch. |
Market ID | Market Run Identifier |
Batch status | The batch status. One of the following integer values: 0 = New 1 = Active 2 = Time Out (hourly only). 3 = Closed 4 = Emergency Cancelled 5 = Operator Response Period (hourly only) 6 = Deferred. |
Batch received | Time batch was received into the ADS system. |
Batch sent | Time batch was set to Active (batchStatus = 1). |
Batch expires | Time the batch expires/times out or alternatively transitions the batch status from its current status to the next. This differs depending on the batch type. |
Batch type | The batch type. 0 = 5 minute dispatchable 1 = Hourly Pre-Dispatch 2 = Commitment (Startup/Shutdown) 3 = AS Awards 4 = OOS Instructions 5 = Pre-Dispatch Hourly AS Awards 10 = 5 minute Flex Ramp Award 11 = 15 minute Energy Award 12 = Unannounced AS Test 13 = Operational Instructions |
Batch start time | The start time associated with the batch. This time should correspond to the start time of the interval for which the batch is targeted. |
Dispatch mode | The source system’s dispatch mode: 0 = Interval 1 = Manual 2 = Contingency |
Binding flag | Whether or not the batch is a binding batch. For the first release of ADS MRTU, this will always be Y (binding). |
Batch revision number | A revision number used to track incremental changes to the batch. Each time an instruction within the batch changes or the batch status changes, this value is incremented. |
Outdated batch warning | - |
Communication failure | - |
Instruction | |
Instruction UID | ADS Unique identifier for each instruction. Unique across all batches. |
Resource ID | Either the MF registered resource ID or the dynamic Intertie TransactionID |
Configuration ID | MSG Configuration ID if applicable. |
Instruction start time | Start time for instruction. Aka target time for DOT instructions. |
Instruction end time | End time for instruction. Does not apply to all instruction types. |
DOT | DOT for 5 minute, hourly and OOS instructions. |
AS MW award | AS MW Award for Ancilary Service Award instructions. |
AS cleared MW | AS Cleared MW for AS Award instructions. Cleared MW is the total MW amount; equal to awardMW + daMW + selfSchedMW. |
AS self-scheduled MW | AS Self Scheduled MW for AS Award instructions |
OOS energy code | OOS Energy Code for Out-Of-Stack Instructions. |
AS type | AS Type for Ancillary Service Award instructions: EN = Energy RU = Regulation Up RD = Regulation Down SR = Spinning Reserve NR = Non-Spinning Reserve RC = Residual Unit Commitment SR = Spinning Reserve LFU = Load Following Up LFD = Load Following Down FRU = Flexible Ramp Up FRD = Flexible Ramp Down |
Prod type | EN = Energy. This attribute is only applicable for the batchtype = 11 |
Instruction type | Instruction Type. One of the following values: 0 = DOT (5 minute/Hourly/OOS) 1 = Min Constraint (OOS) 2 = Max Constraint (OOS) 3 = Fixed Constraint (OOS) 4 = Start up (Commitment) 5 = Shut down (Commitment) 6= Capacity Award (AS Award) 7 = MSG Transition Instruction 8 = FMM Energy Award 9 = Unannounced AS Test 10 = Operational Instruction |
Transition from configuration ID | Defines the “from” configuration id for an MSG transition instruction (instructionType=7). Note that the startTime and endTime elements will define the transition period. |
Transition to configuration ID | Defines the “to” configuration id for an MSG transition instruction (instructionType=7). Note that the startTime and endTime elements will define the transition period. |
AGC flag | The AGC flag will communicate when a resource was on AGC (Automatic Generation Control) at the start of the real-time market run. Y/N. |
RMR flag | The RMR flag will communicate when a resource is being incremented beyond the day- ahead schedule in real time, due to a RMR (Reliability Must Run) contract. Y/N. |
Hourly MW threshold | Accept/decline MW threshold |
EIM resource hourly base schedule | EIM resource hourly base schedule |
Registered intertie flag | Y: Physical resource has a MF registered resource Id. N: Physical resource does not have a MF registered resource Id. |
Previous DOT | Previous DOT if available. |
Min. accept DOT | Minimum Accept DOT for Intertie instructions. May be null if not applicable. |
Accept DOT | Accepted DOT for intertie instructions. |
Accept status | Accept Status for intertie instructions. |
Responder | Responder for intertie instructions. |
Reason code | Reason Code for declined or partially accepted intertie instructions. Valid values are: 10 - Line down 11 - Economic Considerations 12 - Bad Bid Submitted 13 - Unit Derate 14 - No Available Transmission 15 - Timed Out: Minimum Accepted 16 - Timed Out: Forced Decline Reason Code for Unannounced AS Test Instructions: 17 - Unannounced A/S Test |
Operator accept DOT | Operator Accept DOT for intertie instructions. |
Operator accept status | Operator Accept Status for intertie instructions. |
Operator responder | Operator responder for intertie instructions. |
Operator reason code | Operator Reason Code for declined or partially accepted intertie instructions. |
Validated | Time instruction was validated by ADS Client. If null, the instruction was not received by an ADS Client with Primary access to the resource. |
Validated by | The user common name responsible for the instruction validation. |
API validated | Time instruction was validated by ADS API Client. If null, an ADS API Client did not receive the instruction with Primary access to the resource OR the ADS API client has not been coded to call validateDispatchBatch. See the pseudo code for an example. |
API validated by | The common name for the client certificate responsible for instruction validation. |
Instruction revision number | Each time an instruction is updated, its revision number is incremented. |
Instruction status code | The status of the instruction. Should always correspond to the instruction’s batch status but may differ during Emergency cancel situations. |
Bid delay | Minutes to sync |
RMR test requestor | - |
Operation instruction reason | Reason for Operation Instruction. This attribute is only applicable to batchType= 13 |
Follow DOT flag | The followDotFlag will communicate whether a EIR resource is required to follow DOT. (Y indicates resource is required to follow DOT). This attribute will be included in the 5 min DOT instructions issued during the operational instruction time frame. Note: followDotFlag included in the response only if the value is “Y” |
Resource bid option | "DYNAMIC" - The resource is a dynamic resource. "EB15MIN" - Economic bid with participation in 15-minute market. "EBHB" - Economic bid hourly block’ "EBHBCHG" - Economic bid hourly block with single intra-hour economic schedule change. "SSHB" - Self scheduled hourly block. This attribute is only applicable for the batchType= 11 |
Pass indicator | - |
Hourly MW | The MW amount. |
SCHD | The SCHED MW reflects the real-time energy self schedule for that resource in the SIBR clean bid. |
SUPP | This MW is the difference between DOT and SCHED calculated by (DOT – SCHED). It is effectively the incremental (positive) or decremental (negative) from the self schedule MW. |
RMPS | Standard Ramp. |
SPIN | If this resource gets dispatched out of spin capacity (either in contingency or non-contingency mode2), this value will reflect the dispatched SPIN capacity amount. Otherwise, this amount is zero. SPIN MW can be used for available reserve calculation. |
NSPN | If this resource gets dispatched out of non-spin capacity (either in contingency or non-contingency mode3), this value will reflect the dispatched Non-Spin capacity amount. Otherwise, this amount is zero. Non-SPIN MW can be used for available reserve calculation. |
Outdated instruction warning | - |
CAISO Certificate Update Guide
This section describes the CAISO ADS root CA migration and client certificate re-encryption procedure required for N3uron v1.22.2+.
Action required - CAISO Root CA switch: March 10, 2026.
CAISO is switching its server certificate root from Entrust to Sectigo. Both actions below must be completed before this date to maintain uninterrupted ADS communication.
Required Actions
Step A - Update N3uron to v1.22.2+. The Sectigo root CA is included in the certificate bundle of this version.
Step B - Re-encrypt the CAISO client certificate. CAISO issues client certificates in .p12 format using legacy or deprecated encryption algorithms that are no longer supported by the newer OpenSSL version bundled with N3uron v1.22.2+. The certificate must be re-exported from Windows using AES256-SHA256 encryption before loading it into N3uron.
Update N3uron to v1.22.2+
Note:
An active S&M contract is required. A free 30-day trial is available at https://licenses.n3uron.com/trial/.
Follow the official N3uron installation and upgrade documentation: Installation and Upgrade.
Re-encrypt the CAISO Client Certificate
CAISO client certificates in .p12 format may be encrypted with RC2-40-CBC for certificate bags and 3DES-SHA1 for the private key bag. These algorithms are no longer supported by default in OpenSSL 3.x. As a result, CAISO ADS Client may report an ERR_CRYPTO_UNSUPPORTED error when loading the original certificate.
The solution is to import the original CAISO certificate into Windows and re-export it using AES256-SHA256 encryption before configuring it in N3uron.
PKCS#12 Layer | Current CAISO default | Required after re-export |
|---|---|---|
Certificates | RC2-40-CBC - Not supported | AES-256-CBC - Supported |
Certificate Re-encryption Procedure
Open Windows Certificate Manager.
Press Win + R, type certmgr.msc, and press Enter.
Navigate to Personal -> Certificates.
Import the original CAISO .p12 certificate.
Right-click Certificates, then select All Tasks -> Import....
Click Next and browse to the .p12 file.
If the file is not visible, change the file type filter to All Files (*.*). .p12 and .pfx use the same format.
Enter the certificate passphrase when prompted.
Select Place all certificates in the following store -> Personal.
Click Finish.
Export the certificate with AES256-SHA256 encryption.
Locate the imported certificate in Personal -> Certificates.
Right-click the certificate, then select All Tasks -> Export....
Click Next.
Select Yes, export the private key -> Next.
Select Personal Information Exchange - PKCS #12 (.PFX).
Check Include all certificates in the certification path if possible.
Under Encryption, select AES256-SHA256. Do not use the default TripleDES-SHA1 option.
Set a passphrase and save the file as a new .pfx file.
Click Finish.
Load the new certificate in N3uron.
Open the N3uron WebUI and navigate to CaisoAdsClient -> Configuration.
In Authentication -> Certificate, select the new .pfx file. If it is not visible, change the filter to All Files (*.*).
In Authentication -> Passphrase, enter the passphrase set during export.
Click Save and restart the Module instance.