Note
Before starting configuration, a new module instance must be created. Click here for more information about creating Module instances.
Channel
The first step to configuring communication through the Custom Client is to create a new channel. In the following example, the name of the new channel is CLI, since it will be used to send commands to the operating system.
.png)
Enable data collection: Channels can be enabled or disabled by configuring this field. When disabled, the channel will be skipped (no data will be sent, and all associated tags will be set to Bad - Uninitialized).
Encoding: This field determines the encoding used to convert data into byte arrays. Valid encodings are ASCII, UTF-8, UTF-16, UCS-2, Base64 and Hexadecimal. Examples:
//Transmit the string "getData" using hex encoding:
The string transmitted is: "67657444617461"
//using UTF-8 encoding:
The string transmitted is: "getData"
//using Base64 encoding:
The string transmitted is: "Z2V0RGF0YQ=="
Connection settings are used to determine the endpoint of the Custom Client. The connection type can be set to a TCP connection, a serial port, or a command line interface (CLI).
TCP
.png)
TCP channels have the following configuration options:
Host: The host name or IP address of the endpoint.
Port: The TCP port used to connect to the endpoint.
Reconnect delay: The time between reconnect attempts after a failed attempt, displayed in milliseconds. The minimum value is 1000ms.
Serial
.png)
The following options are available to serial port endpoints:
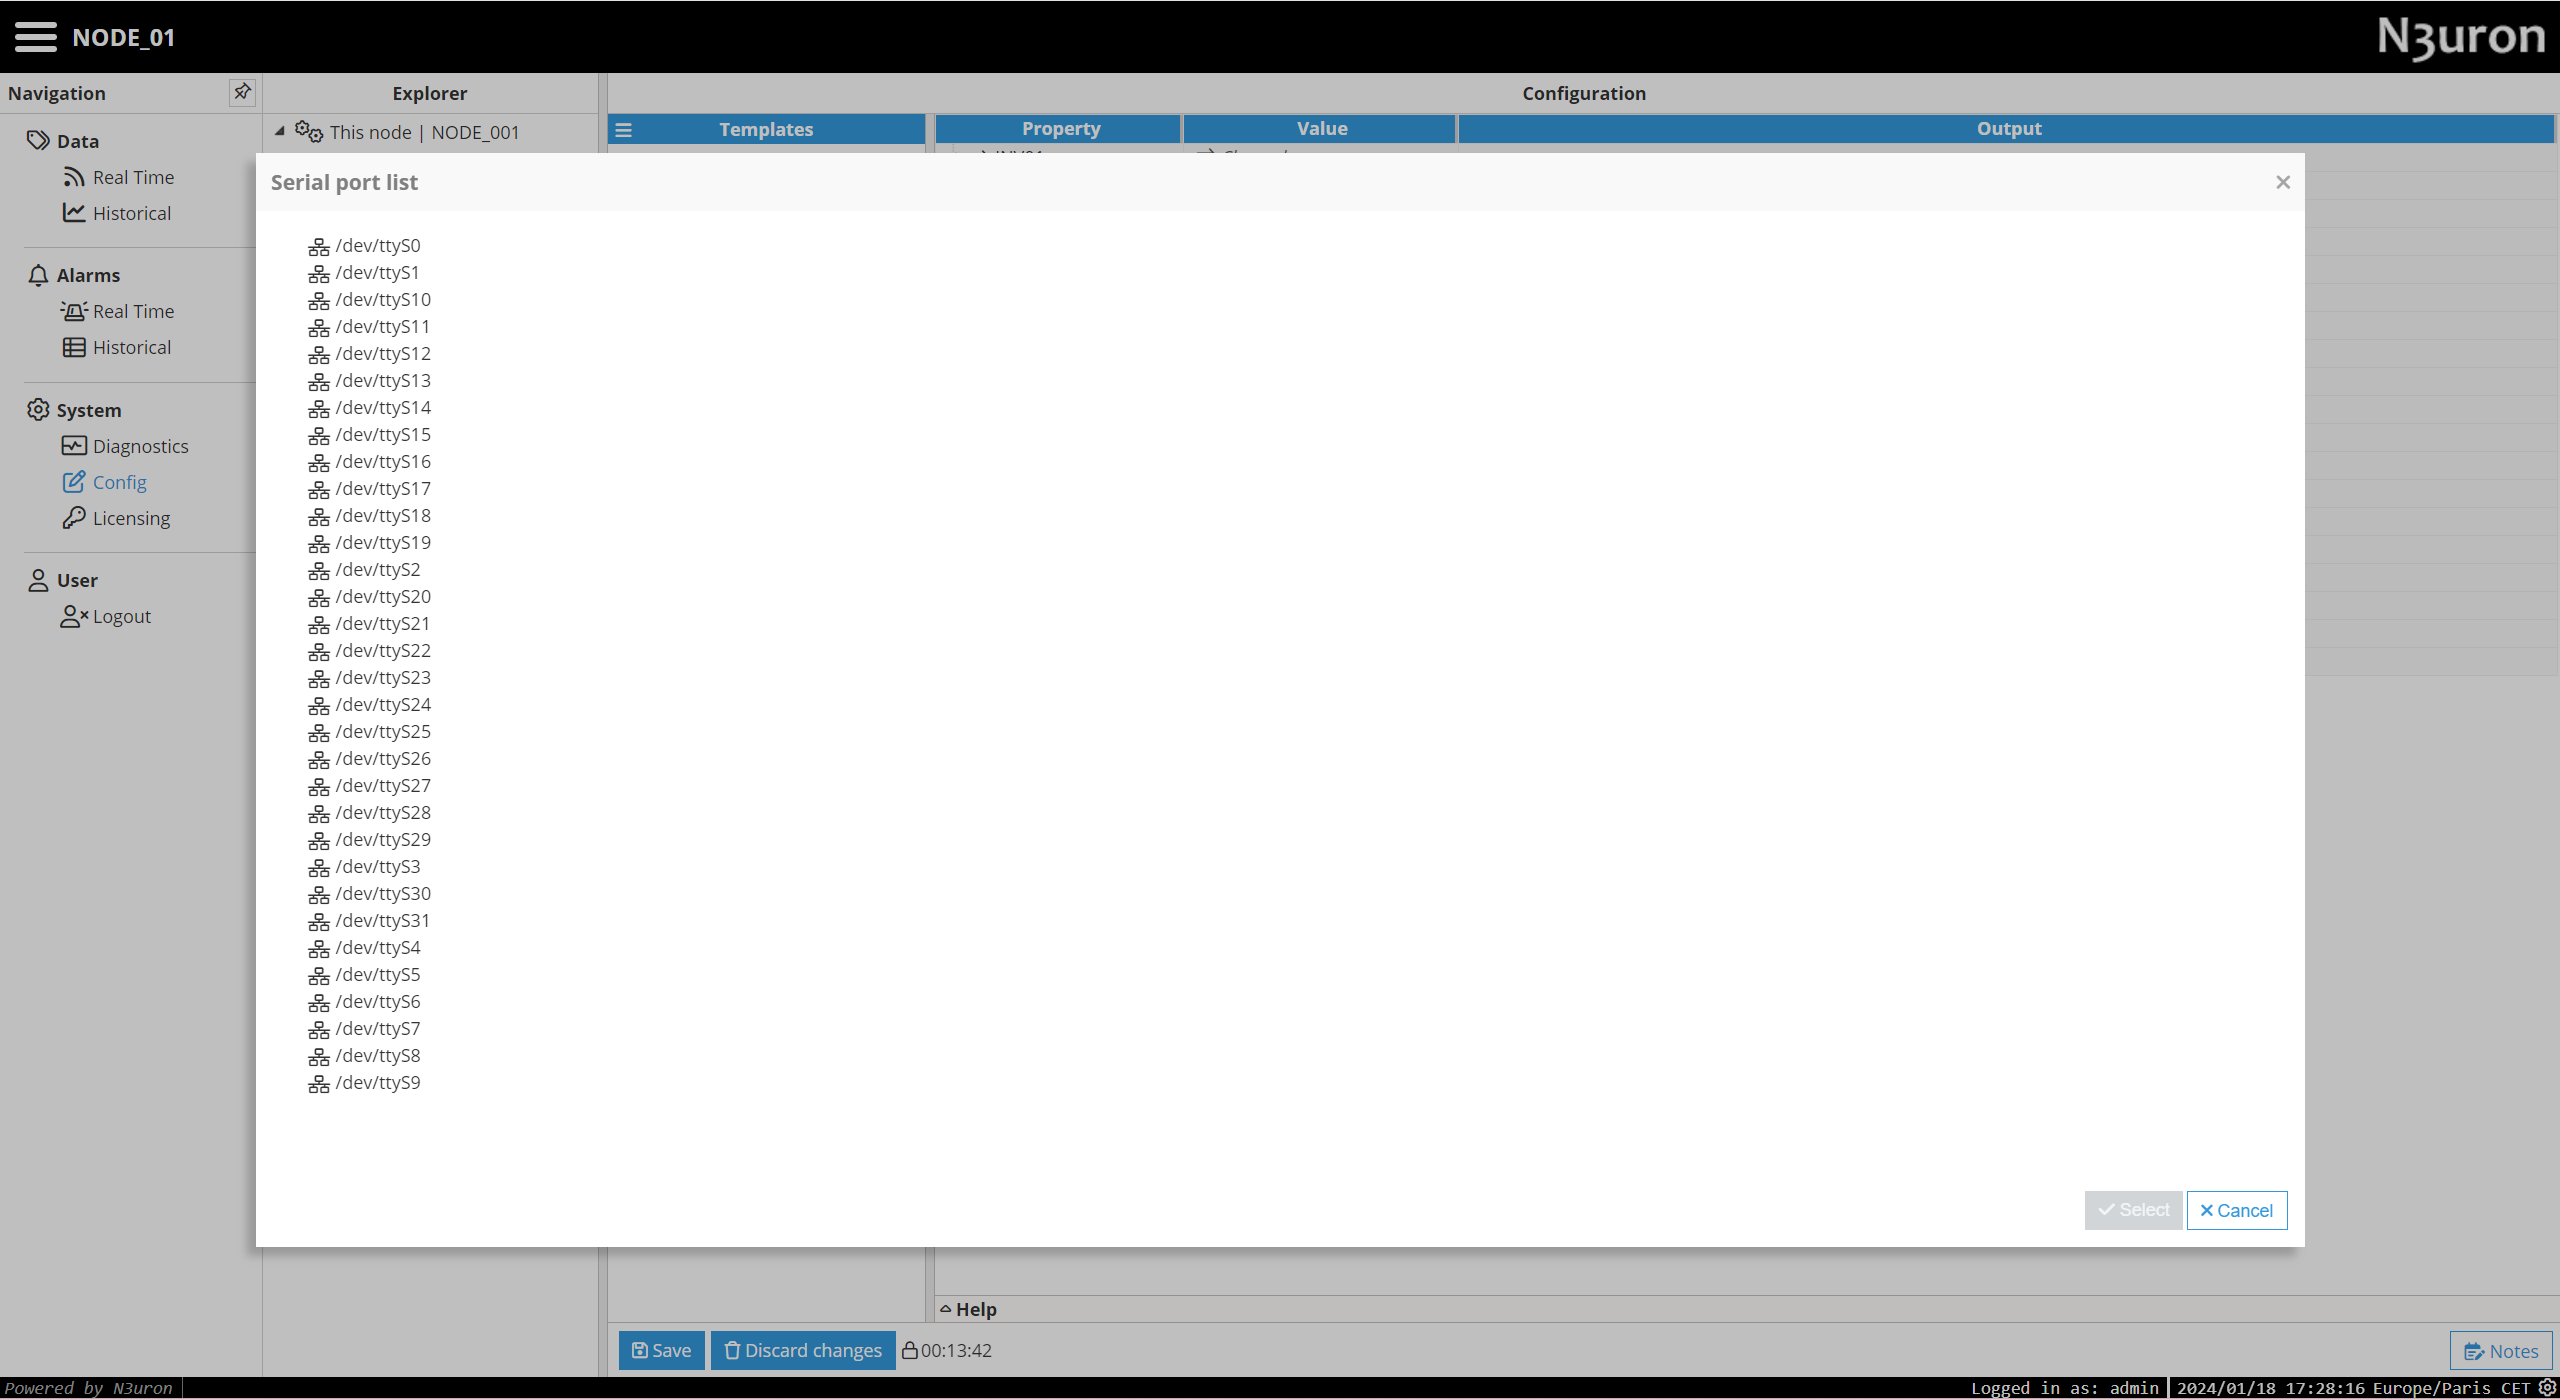
Port name: Name of the serial port, as shown in the operating system. This is usually COMx on Windows or /dev/ttySx on Unix systems, where X is the port number.
Note:
The dropdown menu for serial port selection is available from N3uron version V1.21.7 onwards.
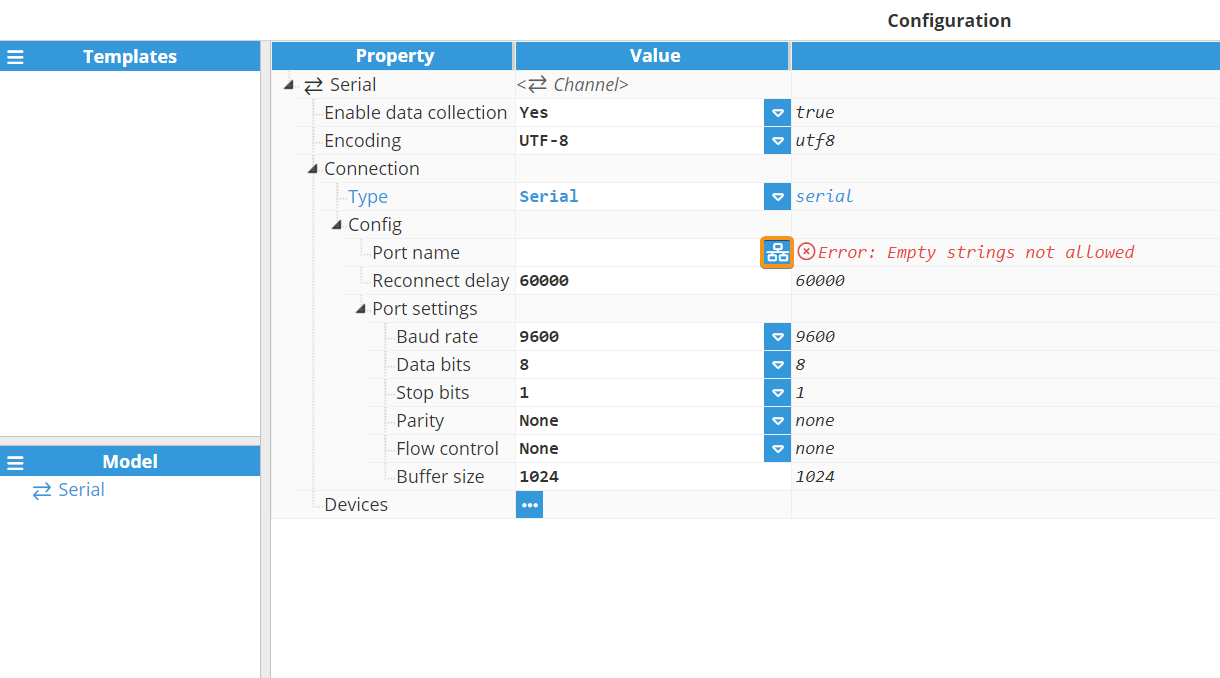
Reconnect delay: Time between attempts to re-open the serial port after a failed attempt, displayed in milliseconds. The minimum value is 1000ms.
Baud rate: Transfer speed of the serial port, in bauds per second.
Data bits: Number of data bits per word. Valid values are 5,6,7, or 8 bits
Stop bits: The number of stop bits per word. Can be 1 or 2.
Parity: Data parity type. Can be None, Even, Odd, Mark, or Space .
Flow control: Enables the use of RTS and DTR control lines, as required for some serial devices. Valid options are None, RTS/CTS, or RTS.
Buffer size: Size of the serial communication buffer. The valid range is 128 to 65536 bytes.
Command Line Interface (CLI)
.png)
The Command Line Interface has the following configuration options:
Persistent session: If enabled, the channel will open a CLI session and keep it running in the background for all commands. If disabled, a new session is launched for each command. In the latter case, an additional message will be added to the RX buffer to inform users about the process exit code. The format of this message is [exitcode=X], where X is the exit code.
Reconnect delay: Delay before trying to re-open the persistent session after a failed attempt, displayed in milliseconds. The minimum value is 1000ms.
Devices
Each channel can have one or more devices. These devices are scanned in alphabetic order, and scanning is sequential, meaning that a device will not be scanned until the previous one has finished. For each device the following settings are available:
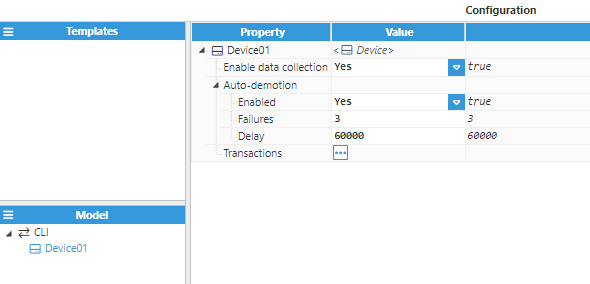
Enable data collection: Enables or disables data collection for this device. If disabled, the device will be skipped during scanning.
Auto-demotion:
Enabled: Enables auto-demotion on this device to prevent it from affecting other devices in the same channel. When enabled, data collection will be paused after a number of successive failures on this device.
Failure: Number of successive failures before the device is demoted.
Delay: Time that this device will remain on pause for after a demotion, displayed in milliseconds. After this time has elapsed, the device will resume data collection. The minimum value is 1000ms.
Transaction
In order to exchange data with other systems, a specific procedure usually needs to be followed. For example, users may be required to send a request, receive the response, and parse the data received into tags. These communication processes are represented in the Custom Client as Transactions. Each Device may contain one or more Transactions.
![]()
Enabled: Enables or disables the transaction.
Mode: Selects how the transaction will be triggered. It can either be set to Read (periodic - generally used for read transactions) or Write (started by a trigger - generally used for write transactions).
Scan rate: The scan rate is used to periodically start a transaction that is set to Read mode. The value is shown in milliseconds. The minimum value is 100 ms.
Trigger variables: A comma-separated list of variables that can start this transaction if set to Write mode. Any whitespaces between the comma and the variable name will be ignored. A write request on any of the tags bound to these variables will automatically launch the transaction. If left blank, any tag write on this device will launch the transaction.
Initial step name: Specifies the first step in this transaction.
Step
A transaction is composed of several steps, each of which can be configured to either send data out, wait, receive data, parse data using a regular expression, or execute a script. Each step shares the following configuration settings:
.png)
Description: A description of the current step, for readability purposes. This does not affect the step in any way.
Type: The action to be taken in this step. It can be any of the following:
Wait: Waits a specified amount of time before continuing.
Send: Sends data to the channel.
Receive: Receives data from the channel.
Regular expression: Extracts data from the RX buffer using a regular expression.
Script: Executes JavaScript code. This code has access to an object called $, with several variables used to interface with the channel, such as $.tx, $.rx, $.logger, $.nextStep, etc. More information can be found in the following chapters.
Next step: These two fields are used to specify the next step depending on whether the current step ended successfully (On success) or with an error (On error).
Config: This section contains configuration options that are dependent on the current step. For example, in the case of a Send step, this is used to specify what data to send. More information about the different step types can be found in the following chapters.
Step types
Wait
A wait step is used to pause the execution of the transaction for a configurable period. For instance, this step can be used to wait for a device to wake up after sending a command. A wait step has the following configuration settings:
.png)
Time: Specifies how much time to wait before continuing to the next step. The value is displayed in milliseconds.
Send
A send step is used to send data to the channel. This can be both printable and control characters (for example NUL or EOT). The following example shows the configuration settings for a send step when sending the UNIX "ls ." command, followed by a new line, to a command line interface in order to receive a list of the current files in the directory:
.png)
Data: This field is used to define what data to send. Any printable characters, along with line feed (<\n>) and carriage return (<\r>), can be written as a string, while any control characters can be written using an expression (using the escape sequence "\xNN", where NN is the ASCII character code). This line can also be left blank, in which case it will send the $.tx buffer defined in the previous Script step.
The below example shows how to include non-printable characters in the payload to be sent using an expression and its ASCII hexadecimal value:
//Send "getData" followed by an NUL (character code 0x00)
="getData\x00"
Receive
A receive step is the opposite of a send step, as it is used to receive data from the channel. The received data is saved to $.rx , and can be processed with Regular Expression or Script steps.
.png)
Length: Specifies how many bytes to read before the step finishes. The receive step finishes after receiving the specified number of bytes, even if it receives more bytes than specified. In this case, $.rx will only contain the specified number of bytes, and a new receive step needs to be used to extract the rest of the bytes. Set to 0 if only using the delimiter to check for the end of the message.
Frame delimiter: The string to be used at the end of the frame. When this string is received, the receive step has successfully finished.
Timeout: Time to wait for data to be received. If the length is not reached, or the frame delimiter isn’t received during this time, the receive step will finish with an error.
When both Length and Frame delimiter are used, the receive step will only finish after it has received both the minimum Length bytes and the delimiter. In this case, the $.rx buffer may contain more than the specified Length bytes where the delimiter is not received until after the Length condition has been
fulfilled. Examples:
//Message -> Hello\nWorld!\r\n
//Length = 10; Frame delimiter = "" (empty)
RX -> Hello\nWorl (10 bytes)
//Length = 0; Frame delimiter = \r\n
RX -> Hello\nWorld!\r\n (14 bytes)
//Length = 10; Frame delimiter = \r\n
RX -> Hello\nWorld!\r\n (14 bytes)
//Length = 10; Frame delimiter = \n
RX -> Hello\n (6 bytes)
//Length = 100; Frame delimiter = \r\n
RX -> Timeout
//Length = 10; Frame delimiter = NUL (0x00)
RX -> Timeout
Regular Expression
A regular expression step is used after a receive step to extract data from the $.rx buffer using capturing groups.
.png)
The following configuration options are available for regular expression steps:
Regular expression: The pattern used to extract data from the $.rx buffer. In this example, the pattern is (\d+), which means that it’s capturing one or more consecutive digits. More information about regex, as well as a regex testers, can be found online. Lookbehinds and atomic groups are not supported.
Ignore case: Sets the ignore case flag (//i) for this regex. When set, the regex will match letters regardless of the letter case.
Global match: Sets the global match flag (//g) for this regex. When enabled, the regex will not stop after matching the expression and will continue matching until the end of the $.rx buffer has been reached. Variables are captured based on the order in which they match the regex.
Captured variables: These variables are used to associate capturing groups to tags. This is a comma separated list of variables, ignoring any leading whitespaces. If the global flag is disabled, there can only be, at most, the same number of captured variables as capturing groups in the regex. If the global flag is enabled, the number of captured variables can exceed the number of capturing groups.
Strict mode: When enabled, all captured variables must be matched, otherwise the step will return an error. When disabled, at least one match is required for the step to end successfully and any non-matched variables will be set to Bad – Device failure.
Force update: By default, in order for a variable to be updated there needs to be a change either in the value of the variable, or in the quality. This setting will force an update even if the value and quality have not changed, updating the timestamp accordingly.
Script
A script step is used to execute JavaScript code by accessing the $.tx and $.rx buffers, as well as offering the possibility of extracting data from the $.rx buffer and transforming it before updating a variable. The following script step configuration options are available:
.png)
Code: Specifies the code to be executed by this script. This can be any valid JavaScript code. Additionally, each script has access to a special "$" object that contains the $.tx and $.rx buffers, as well as different functions to improve the functionality of this step. More information about the "$" object can be found in the following chapters.
Script steps, apart from accepting any valid JavaScript code, also offer additional utilities to interface with Custom Client, as well as several functions to simplify the development of these steps. The following three objects are present in the global script scope:
Buffer
Sprintf
Moment
Buffer
A Buffer represents an array of binary data. This can be used as an alternative to a string when sending binary data. The $.tx object can be set to a Buffer, which will send the buffer in the next Send step. Buffer objects have access to the following functions from the Node.js API. It also has access to two additional functions which are not present in the API: writeInt64(value, offset[, noAssert]) and writeUint64(value, offset[, noAssert]).
Sprintf
Sprintf is a JavaScript function similar to the C SprintF function. It takes a format string followed by a list of arguments, and returns a new string with the placeholders replaced by the arguments.
This function has the following signature: sprintf(format, …args).
The format is a string with one or more placeholder arguments, that is, special characters escaped using the "%" character. See below for the full list of placeholders:
Integer: %d or %i
String: %s
Binary: %b
Boolean: %t
JSON: %j
ASCII character in decimal: %c
Scientific notation: %e
Floating point: %f
Fixed point: %g
Octal: %o
Unsigned integer: %u
Hexadecimal lowercase: %x
Hexadecimal uppercase: %X
Buffer: %r
If the integer and the unsigned integer format type receive a decimal number, they will truncate the decimal part. All formats that admit decimal numbers, such as floating point or scientific notation, can also be configured to specify the number of decimals that they should show by using %.xY, where x is the number of decimals, and Y is the format used (f for floating point, e for exponential, etc). For example, format %.2f shows a floating-point number with 2 decimals. When using sprintf, the same number of arguments as placeholders must be used. If there are fewer arguments than required, any missing arguments will be set to NUL. The following code snippet shows the different format options:
$.logger.info("Numbers are: %d and %i", 10, 15.7)
//Numbers are: 10 and 15

$.logger.info("String is: %s", "Hello world!");
//String is: Hello world!

$.logger.info("The binary representation of 5 is: %b", 5);
// The binary representation of 5 is: 101

$.logger.info("The ASCII character with decimal value 48 is %c", 48);
// The ASCII character with decimal value 48 is 0

$.logger.info("1000 in scientific notation is: %e", 1000);
//1000 in scientific notation is: 1e3

$.logger.info("1234 in scientific notation and 2 dec. is: %.2e", 1234);
//1234 in scientific notation and 2 dec. is: 1.23e3

$.logger.info("12.34 in floating point notation is: %f", 12.34)
//12.34 in floating point notation is: 12.34

$.logger.info("12.3456 in fixed point notation is: %.3g", 12.3456);
//12.3456 in fixed point notation is: 12.3

$.logger.info("12 in octal is: %o", 12);
//12 in octal is: 14

$.logger.info("-10 in unsigned integer format is: %u", -10)
//-10 in unsigned integer format is: 4294967286

$.logger.info("30 in hexadecimal is: %x", 30);
//10 in hexadecimal is: 1e

$.logger.info("30 in uppercase hexadecimal is: %X", 30);
//30 in uppercase hexadecimal is: 1E

let buf = Buffer.from(["Hello world!"]);
$.logger.info("The buffer is: %r", buf);
//The buffer is: <48 65 6c 6c 6f 20 77 6f 72 6c 64 21>;
Moment
Moment is a JavaScript library that includes an extra functionality for working with dates, as opposed to the native Date object. This includes date parsing, formatting, date operations and functionalities for working with timezones. The provided version of Moment includes both the regular Moment version, as well as Moment timezones which is used to work with timezones. Online documentation for Moment can be found at momentjs.com or momentjs.com/timezone for Moment timezones.
$ Object
The "$" object is used in scripts and contains the $.tx and $.rx buffers, as well as multiple other functions used to interact with the transaction and tags.
$.logger (message, …arguments)
The $.logger object is used to log messages to disk, which can be used for both debugging and informative purposes. The log file can be found at <installing folder>/N3uron/log/CustomClientInstance and is shared with the internal module log. The logger has five different logging levels:
$.logger.error(message, …arguments)
$.logger.warn(message, …arguments)
$.logger.info(message, …arguments)
$.logger.debug(message, …arguments)
$.logger.trace(message, …arguments)
The message can either be a string, or a format similar to sprint using the special character %. The following formats are valid for different data types:
Integer: %d or %i
String: %s
Binary: %b
Boolean: %t
JSON: %j
ASCII character in decimal: %c
Scientific notation: %e
Floating point: %f
Fixed point: %g
Octal: %o
Unsigned integer: %u
Hexadecimal lowercase: %x
Hexadecimal uppercase: %X
Buffer: %r
$.tx
Internal send buffer that can be used to send custom messages created using JavaScript code. This buffer will be sent in the next Send step (which must have a blank data field). This can either be a string, in which case it will use the channel Encoding to transform it to a byte array, or a Buffer instance.
$.rx
Internal receive buffer populated by the previous Receive step. Data can be extracted from this buffer which can then be saved to a variable after processing (using $.variableSet) or it can be used to select the next step depending on one or several conditions (using $.nextStep).
$.nextStep
This variable is used to override the setting for the next step. This allows the next step to be calculated dynamically at runtime. This step must exist within the transaction, otherwise it will return an error when attempting to continue to the next step and the transaction will be terminated (without going through the error step). If this value is left as an empty string ("") or set to nul, the transaction will finish. If this value is set to undefined, the next step will be the step configured in the transaction.
$.err
This variable can be used to finish any scripts with an error and go to the error step (unless overridden by $.nextStep). This value must be a string. By leaving it blank or setting to nul, the current step will finish without errors.
$.lastErr
This variable contains the error that occurred in the previous step. It is either set by an error in the step (such as a timeout) or by setting $.err. This is a read only variable.
$.start
This variable contains the timestamp of when the current step started, in UNIX epoch with milliseconds.
$.user
This is an object that can contain user defined key-value pairs. This value is local to each transaction and is maintained between transaction executions (but not between module restarts). The value of each key can be anything from a variable, array, object or even a function.
$.persistSave
Function: $.persistSave(key, value)
This function is used to save a variable to disk, meaning it is maintained between module restarts, unlike variables saved in $.user. If no value exists or the value is undefined, this variable will be deleted from disk.
$.persistLoad
Function: $.persistLoad(key)
This function is used to load a variable from disk. If the variable exists, it will return the value of the variable. If it doesn’t exist, it will return undefined.
$.variableSet
Function: $.variableSet(variableName, value, [quality], [timestamp], [force])
This function is used to update the given variable to the given value, and can also accept quality and timestamp as optional arguments. This function can take the following arguments:
(String) variableName: The name of the variable that will be updated. If the variable doesn’t exist, no action will be taken.
(String | Number | Boolean) value: The value that the variable will be updated to.
(Number) quality: The quality that the variable will be updated to. If omitted, it will be assumed Good (192).
(Number) timestamp: The timestamp that the variable will be updated to, in UNIX Epoch with milliseconds. If omitted, the timestamp will be set to the current time.
(Boolean) force: By default, a tag will only be updated if either the value or the quality change. By setting this to true, an update will automatically be forced, even if neither the value nor the quality have changed.
An example of this function can be seen in the following pseudocode snippet:
//Tag = /CustomClient/Data -> Bound read variable: data
// Value 15 is received: RX -> 15
let tagData = $.rx;
$.variableSet("data", tagData)
// /CustomClient/Data -> {value:15, quality:192 (Good), timestamp: }
// Value -1 is received: RX -> -1
let tagData = $.rx;
$.variableSet("data", tagData, 0)
// /CustomClient/Data -> {value:-1, quality:0 (Bad), timestamp: now}
$.variableGet
Function: $.variableGet(variableName)
This function obtains the tag value from the associated variable. This is mostly used in Write transactions to obtain the trigger value, although it can also be used in Read transactions. If the variable is not found, it will return a nul value.
An example of this function can be seen in the following pseudocode snippet:
//Tag = /CustomClient/NumberTag -> Bound write variable: Tag1
//Write value 123 to /CustomClient/NumberTag
$.tx = $.variableGet("Tag1");
//Sends the value: TX -> 123

//Write value 1000 to /CustomClient/NumberTag
$.tx = $.variableGet("Tag1");
//Sends the value: TX -> 1000