Expression Tags:
The following examples show the different expressions that can be used in an Expression Tag.
Sum of Two Tags:
//Returns the sum of the value of tags a and b
$.output= $.input.a.value + $.input.b.value;
Set a Value Based on a Condition:
 //If the value of a is above the threshold, it will return 1,
//otherwise it will return 0
if ($.input.a.value > threshold) $.output =1;
else $.output = 0;
Diagnosing Unresponsive Devices in Poll/Response Protocols using Tag Timestamps:
To determine whether a device is unresponsive or experiencing problems when communicating on a polling/response protocol like Modbus, you can implement a monitoring strategy using tag timestamps and specific expression tags for tracking the device status.
It is key to set a deadband slightly greater than 0.0u, for instance, 0.001u. This adjustment ensures that the device tag is only updated when there is a real change in its value, preventing unnecessary timestamp changes with each scan rate.
We will use three tags:
Derived tag (DeviceStatusOK): This tag monitors whether the value of the device tag remains unchanged for a specified period of time. It is an Expression tag with a periodic trigger set to 1000ms. In this example, the input Aliases are Tag for the tag we read from the device and Timeout for the timeout value.
.png)
Device tag (DeviceTag): This tag represents the value read from the device and, as explained above, its input alias will be Tag for the derived tag.
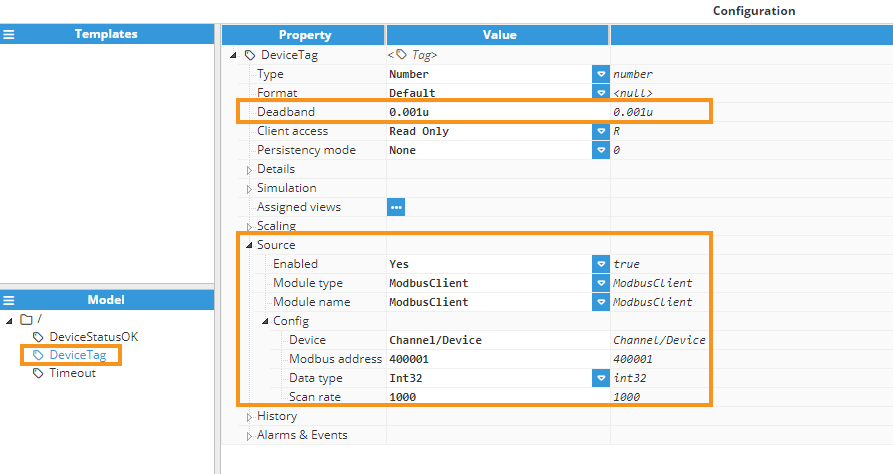
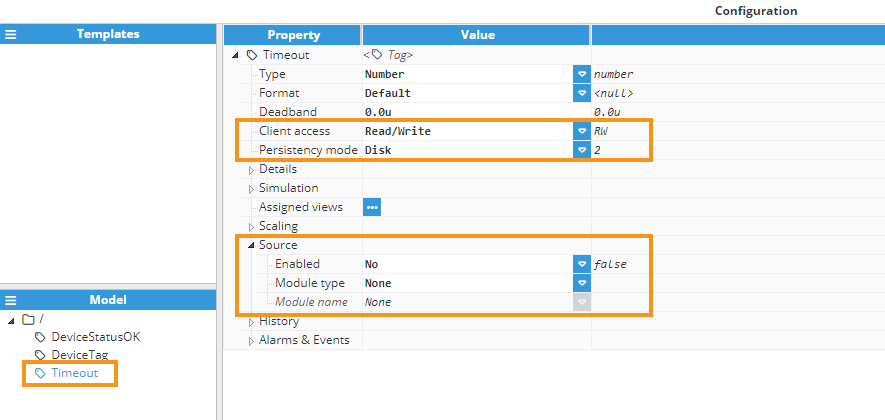
Timeout tag (Timeout): This memory tag sets the duration used to determine if the device has a problem or is frozen. Its input alias for the derived tag will be named Timeout. Additionally, we will set the Persistency mode of this tag to Disk to ensure its value remains persistent even after a node restart.
By configuring these tags and using the expression below, we can effectively monitor the status of the device and identify any issues related to it being frozen or unresponsive.
/*
This script checks if the tag value remains uchanged for the period of time specified by the tag named 'Timeout'.
If the tag value remains unchanged beyond the timeout, the output will be 0 (indicating a potential issue).
Otherwise, the output will be 1 (indicating normal operation).
*/

if ((Date.now() - $.input.Tag.ts) > $.input.Timeout.value) {
  $.output = 0;
} else {
  $.output = 1;
}
Diagnose Connectivity issues using single or multiple Tag Quality:
In this example, we will use Derived Tags to check the quality values of several tags read from a device to determine if there are connectivity issues. While setting an alarm to monitor the quality of a single tag with a delay for activation is possible, checking multiple tags offers a more reliable method for identifying potential problems. By monitoring several tags simultaneously, we can more confidently identify a connectivity issue if multiple quality values indicate problems.
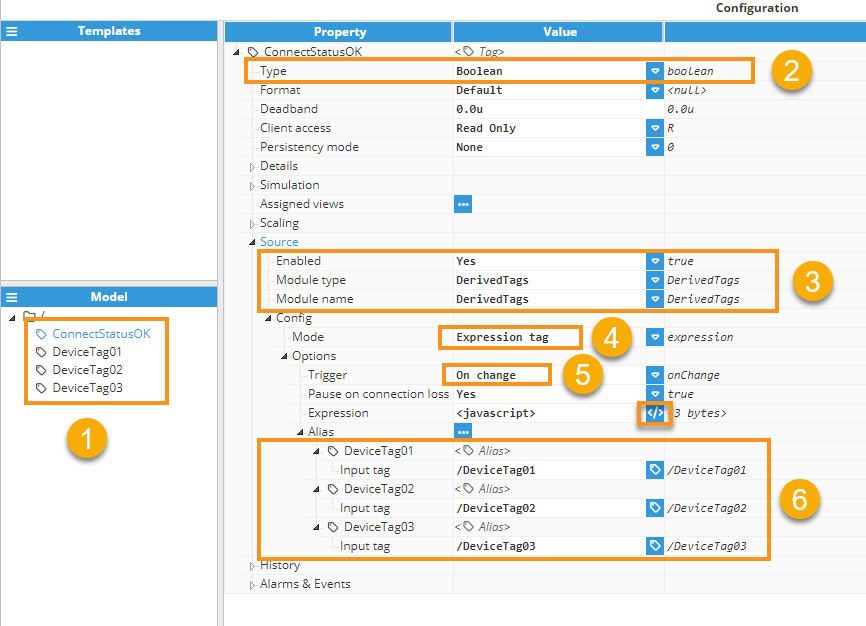
Step 1: Create a tag named ConnectStatusOK of type Derived Tag.
Step 2: Assign its Type as Boolean .
Step 3: Assign the appropriate module type and name.
Step 4: Configure the Mode as Expression Tag.
Step 5: Set the Trigger to 'On Change' so that the expression executes every time there is an update in the input tags.
Step 6: Select all the tags necessary for quality checking.
Click the editor icon next to the Expression JavaScript to enter the code. The code will be simple: each time the expression is executed, it will check the quality of the tags. It is assumed that if any tag's quality is not equal or greater than 192 (indicating good quality), communication with the device is lost. For further information about quality codes, please refer to, quality codes.
const result = (
  $.input.DeviceTag01.quality >= 192 &&
  $.input.DeviceTag02.quality >= 192 &&
  $.input.DeviceTag03.quality >= 192
);

$.output= {value: result, quality:192};
Create an Alarm With an Active Delay Attribute:
//If the Process value is above or below the Setpoint
//for a set period of time, defined by another tag named Delay, it will return 1,
//once the alarm condition is not met it will return 0

if ($.input.Process_Value.value-$.input.Setpoint.value==0)

  $.output=0;

else if (($.currentValue.value==0) && (Math.floor((Date.now()-$.currentValue.ts)/1000)<Delay.value))

  $.output={value:0, ts:$.currentValue.ts};

else

  $.output=1;
Configuring a Dynamic Parameterized Alarm for a Process Value:
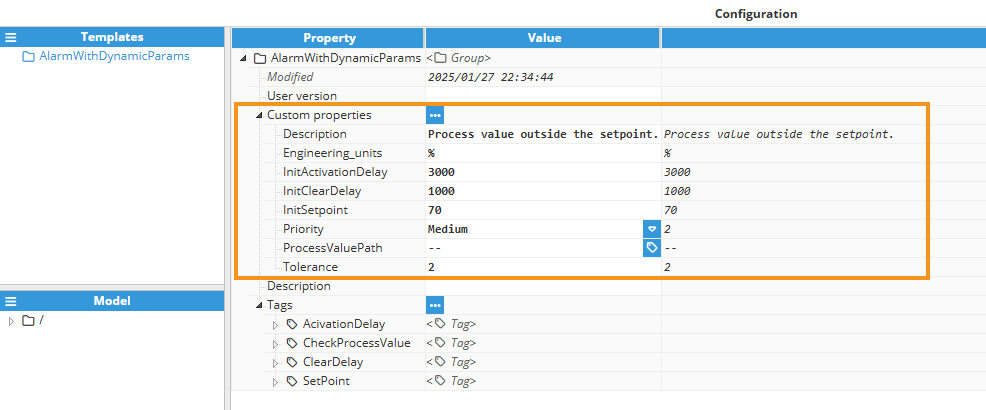
This example illustrates how to configure a dynamic, parameterized alarm to monitor a process value (ProcessValue) and ensure it remains within a defined range. The range is determined by a setpoint, a tolerance, and configurable activation and clearing delays. The implementation leverages a Template for scalability and flexibility, while memory tags (without source) and Read/Write permissions are used for SetPoint (SetPoint), Activation Delay (ActivationDelay), and Clear Delay (ClearDelay). These tags allow parameters to be dynamically adjusted and include disk persistence to retain their values across system restarts, ensuring reliability and continuity.
The template has the following Custom properties:
ProcessValuePath: A tag path representing the monitored process value. Tag picker custom property.
InitSetpoint: The initial or default value for the setpoint value.
Tolerance: The acceptable range (±) around the setpoint.
InitActivationDelay: Time (in milliseconds) that the process value must remain outside the acceptable range before activating the alarm.
InitClearDelay: Time (in milliseconds) that the process value must return within the acceptable range before clearing the alarm.
Priority: Specifies the severity of the alarm (e.g., Low, Medium, High, Critical). Dropdown menu custom property.
Engineering_units: Indicates the unit of the process value (e.g., %, °C, etc.).
Description: A textual description of the alarm, visible in the alarm controls (e.g. Alarms>Realtime, Alarms>Historical, Web Vision Alarm Table).
Within the template the following tags are declared:
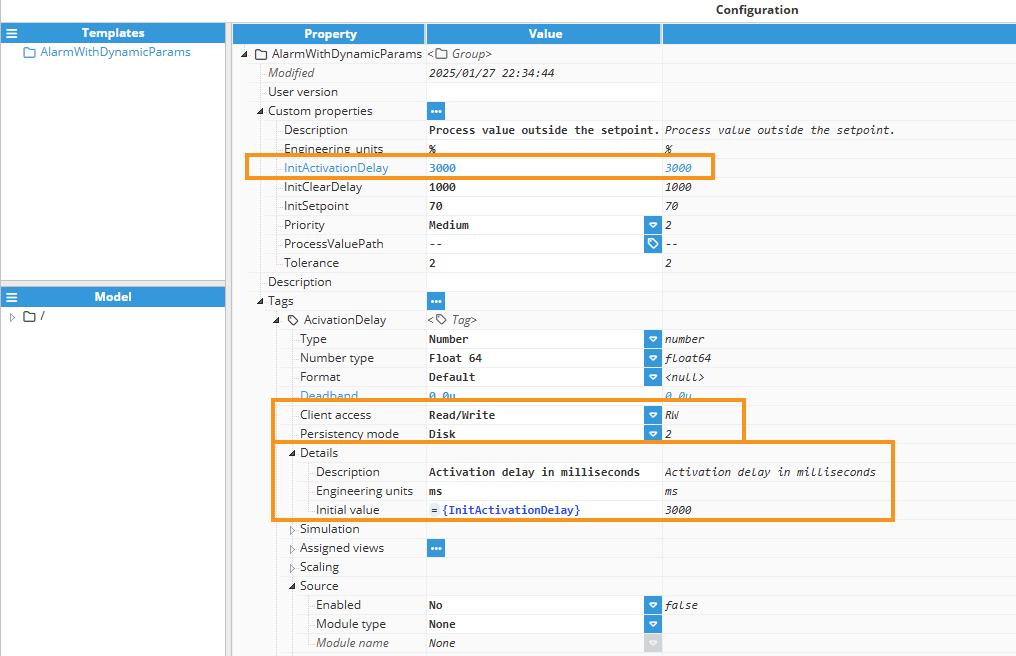
ActivationDelay: It is a memory tag with disk persistence that retains its value across system restarts. It has Read/Write permissions, allowing dynamic updates, and its initial value is set by the InitActivationDelay custom property during configuration.
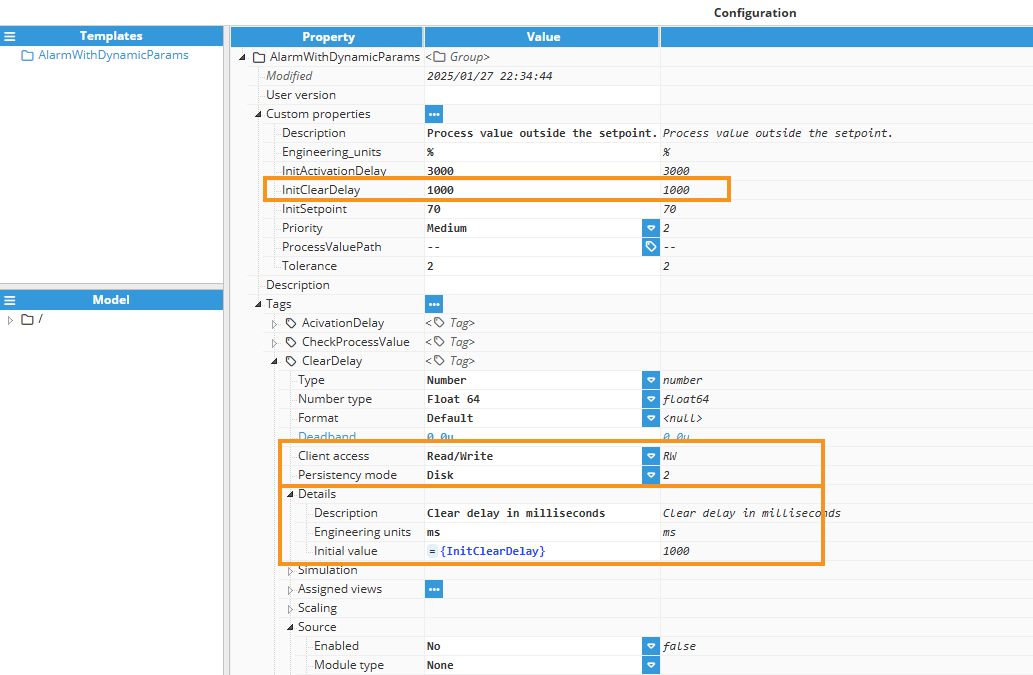
ClearDelay: It is a memory tag with disk persistence that retains its value across system restarts. It has Read/Write permissions, allowing dynamic updates, and its initial value is set by the InitClearDelay custom property during configuration.
SetPoint: It is a memory tag with disk persistence that retains its value across system restarts. It has Read/Write permissions, allowing dynamic updates, and its initial value is set by the InitSetpoint custom property during configuration.
.png)
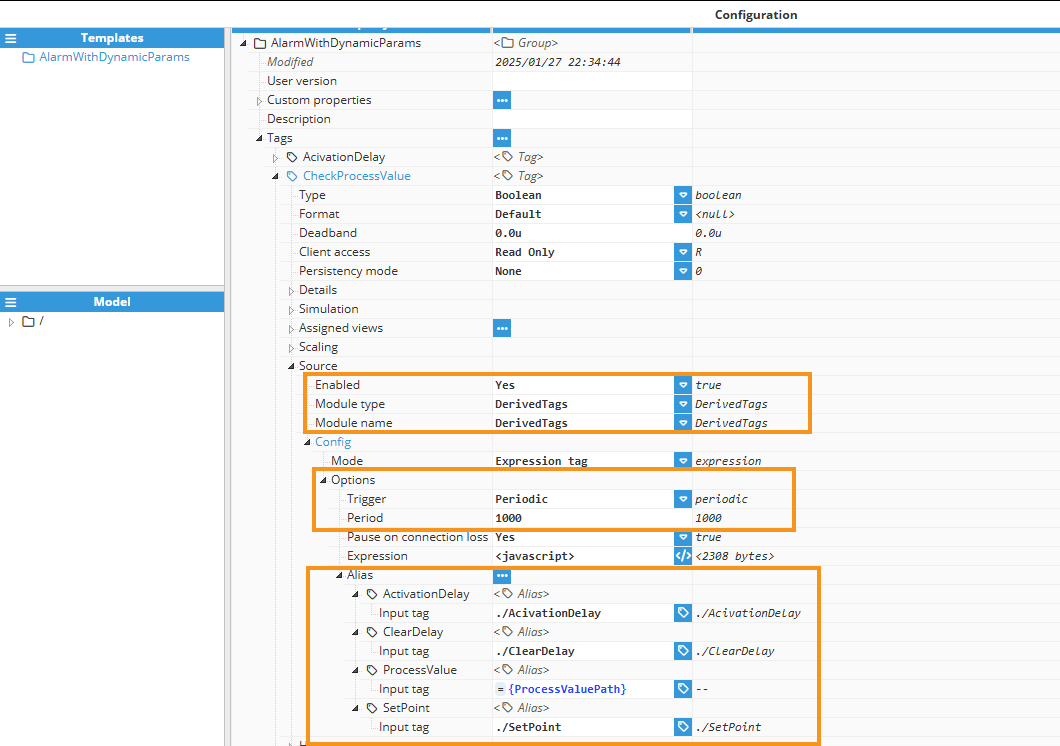
CheckProcessValue: It is a Derived Tag that evaluates whether the ProcessValue is within the range of SetPoint ± Tolerance. It returns true if within range or false otherwise, functions as a dynamic driver for alarm activation and clearing. It is read-only and calculated at a time interval based on input tags. Its alias input paths are configured using relative paths, ensuring flexibility and adaptability within the tag model hierarchy.
JavaScript code:
// Get the current timestamp in milliseconds for delay calculations
const now = Date.now();
//=======================================================
// Safely extract input values or assign default values
const processValue =
  $.input.ProcessValue && $.input.ProcessValue.value !== undefined
    ? $.input.ProcessValue.value
    : undefined;

const setPoint =
  $.input.SetPoint && $.input.SetPoint.value !== undefined
    ? $.input.SetPoint.value
    : undefined;

const activationDelay =
  $.input.ActivationDelay && $.input.ActivationDelay.value !== undefined
    ? $.input.ActivationDelay.value
    : 0; // Default delay to 0 if undefined

const clearDelay =
  $.input.ClearDelay && $.input.ClearDelay.value !== undefined
    ? $.input.ClearDelay.value
    : 0; // Default delay to 0 if undefined
//=======================================================
// Initialize default output values
let ouputValue = $.currentValue.value; // Default to inactive state
let outputQuality = $.currentValue.quality; // Default to bad quality
//=======================================================
// Validate critical inputs (processValue and setPoint)
if (processValue === undefined || setPoint === undefined) {
  // Log an error and keep default output if inputs are missing or undefined
  $.logger.error(
    "Invalid inputs: 'ProcessValue' or 'SetPoint' is missing/undefined."
  );
  ouputValue = null; // Set to null
  outputQuality = 4; // Bad [Configuration Error]
} else {
  // Check if processValue is outside the tolerance range of the setPoint
  if (
    processValue > setPoint + {Tolerance} ||
    processValue < setPoint - {Tolerance}
  ) {
    // Activate if not active and activation delay has elapsed
    if (!$.currentValue.value && now - $.currentValue.ts >= activationDelay) {
      ouputValue = true; // Set to active state
      outputQuality = 192; // Good quality output
    }
  } else {
    // Deactivate if active and clear delay has elapsed
    if ($.currentValue.value && now - $.currentValue.ts >= clearDelay) {
      ouputValue = false; // Set to inactive state
      outputQuality = 192; // Good quality output
    }
  }
}
//=======================================================
// Set final output with state and quality
$.output = {
  value: ouputValue, // Active/inactive state
  quality: outputQuality, // Output quality
};
This code implements the logic that monitors a ProcessValue against a SetPoint with a specified Tolerance, incorporating activation and clear delays. Here's a breakdown of the main points:
First, the current timestamp is obtained using Date.now() to handle delay calculations. The script then safely extracts the necessary inputs: ProcessValue, SetPoint, ActivationDelay, and ClearDelay. If these inputs are missing, default values are assigned (undefined for ProcessValue and SetPoint, and 0 for the delays).
The Derived Tag initializes its output state and quality using $.currentValue.value and $.currentValue.quality.
Next, the code validates the critical inputs by checking if ProcessValue or SetPoint is undefined. If either is missing, an error is logged using $.logger.error, and the output remains in its .
If the inputs are valid, the script evaluates whether the ProcessValue is outside the acceptable range defined by SetPoint ± {Tolerance}. The {Tolerance} is accessed as a custom property using curly braces, allowing dynamic configuration. If the ProcessValue exceeds this range and the ActivationDelay has elapsed since the last state change (now - $.currentValue.ts >= activationDelay), the output state is set to active (true) with good quality (192). Conversely, if the ProcessValue returns within the acceptable range and the ClearDelay has passed, the output state is set to inactive (false) with good quality.
Finally, the script sets the final output object with the determined value and quality, ensuring that the alarm state is accurately reflected based on the real-time process conditions.
Access Notes:
Current Value and Timestamp: Use $.currentValue.value to access the current state (active/inactive) and $.currentValue.ts to get the timestamp of the last update.
Custom Properties: Reference custom properties like Tolerance using curly braces {Tolerance} to dynamically incorporate their values into expressions.
This setup ensures that the alarm responds appropriately to changes in the process value, activating and clearing based on configured tolerances and delays while handling input validation effectively.
Increment a Global Counter Based on a Condition:
//First, the global variable counter needs to exist. The counter //then needs to be incremented when the condition is set to true //(a.value must be even)
if ($.input.a.value % 2 === 0) counter++;
//Return counter so that it is saved to the tag;
$.output=counter;
Capture a Tag Value at Midnight in a Given Time Zone:
const currentDay = moment.tz($.currentValue.ts, "Europe/Madrid").get("day");
const newDay = moment.tz($.input.Captured_tag.ts, "Europe/Madrid").get("day");

if(currentDay !== newDay){
    $.output = $.input.Captured_tag.value;
} else {
    $.output = $.currentValue;
}
Bit Extraction From a 16-bit-integer Value:
$.output = ($.input.source.value & 0xF000) >> 12;
// bits 15 to 12 from unit16

$.output = ($.input.source.value & 0xE0) >> 5;
// bits 7 to 5 from unit16

$.output = ($.input.source.value & 0xF00) >> 8;
// bits 11 to 8 from unit16

$.output = ($.input.source.value & 0xE000) >> 13;
// bits 15 to 13 from unit16

$.output = ($.input.source.value & 0x1C) >> 2;
// bits 4 to 2 from unit16
Get the Total RAM for This Machine:
Note:
From N3uron version 1.21.4 onwards, it is possible to retrieve this information through a Node Tag.
//os.totalmem() returns the total memory of the machine in
//bytes, divided twice by 1024 to obtain MB.
$.output = os.totalmem()/1024/1024;
Get Free RAM for This Machine:
Note:
From N3uron version 1.21.4 onwards, it is possible to retrieve this information through a Node Tag.
//os.freemem() returns the free memory of the machine in
//bytes, divided twice by 1024 to obtain MB.
$.output = os.freemem()/1024/1024;
Get Hostname:
Note:
From N3uron version 1.21.4 onwards, it is possible to retrieve this information through a Node Tag.
//os.hostname() returns the hostname as a string
$.output = os.hostname();
Get Uptime:
Note:
From N3uron version 1.21.4 onwards, it is possible to retrieve this information through a Node Tag.
//os.uptime() returns the host machine in seconds as a number
$.output =  os.uptime();
Get Derived Tags Memory Usage:
Note:
From N3uron version 1.21.4 onwards, it is possible to retrieve this information through a Node Tag.
//process.memoryUsage() returns an object with memory
//information. The rss property holds the total memory usage
//of the process (in this case DerivedTags), in bytes
$.output =  process.memoryUsage().rss/1024/1024;
Assigning a Quality Based on a Condition:
//If the value of the tag is above 100, we set the quality
//to 16 (BAD_SENSOR_FAILURE)
if ($.input.a.value > 100) $.output = {value: -1, quality:16}
else $.output = {value: a.value, quality:192};
Redundant Tags:
In this example, the Derived Tags module is used to provide an output tag after evaluating the quality of two redundant tags coming from two redundant nodes linked to a central node.
Note:
From N3uron version 1.21.4 onwards, it is possible to create a Redundant Tag without requiring an Expression Tag by selecting the Redundant Tag mode.
Step 1: Add a new module in the “Modules” section, give it a name, and select “DerivedTags” in the “Module type” field.

Step 2: Configure the Logger and API for the Derived Tags module. In this example, the default configuration settings have been left unedited, since (in most cases) this is a valid configuration option.
Step 3: Configure the module. In this example, the default configuration settings have been left unedited.
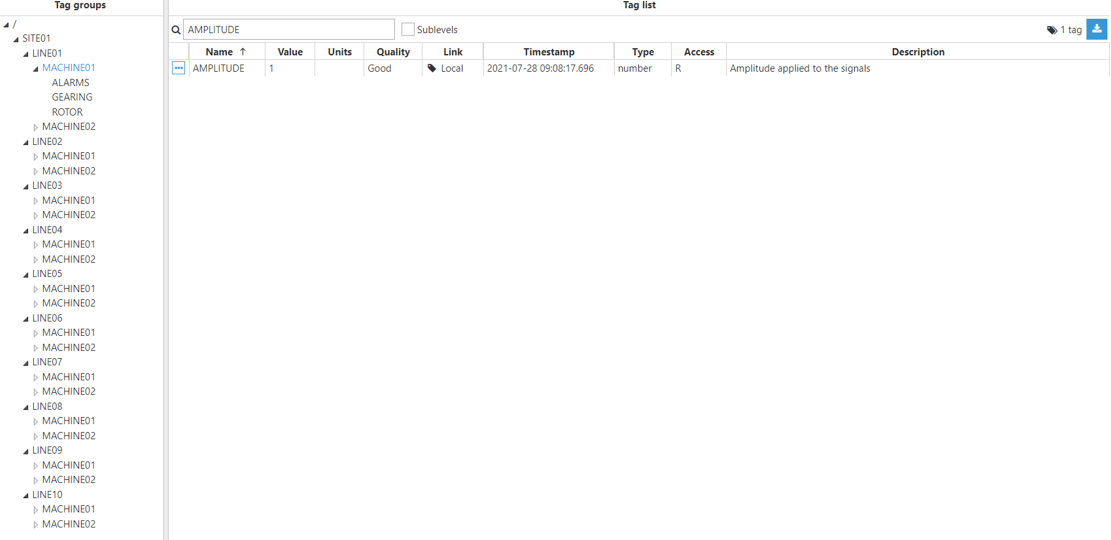
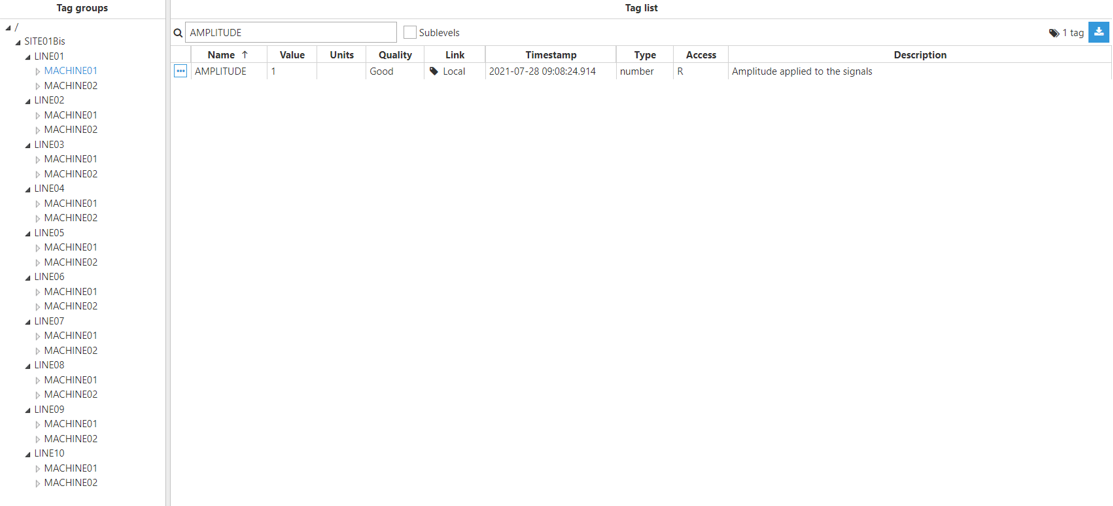
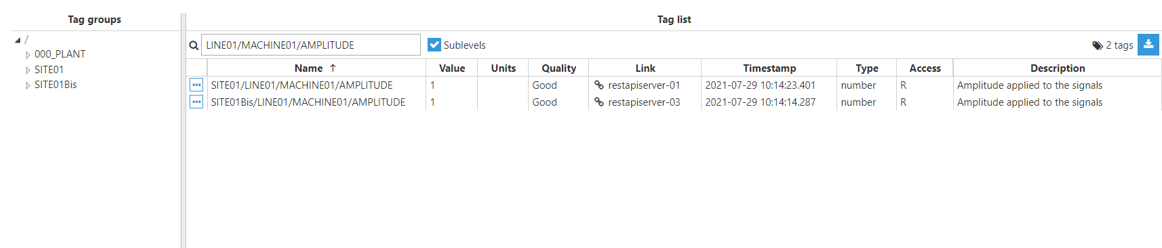
Step 4: Configure the tag Source section. In this example, Mode is set to Expression tag and Trigger is set to Periodic. The Aliases created are “Amplitude”, which has the Input tag /SITE01/LINE01/MACHINE01/AMPLITUDE of the main node, and “AmplitudeBis”, which has the Input tag /SITE01Bis/LINE01/MACHINE01/AMPLITUDE of the redundant node.
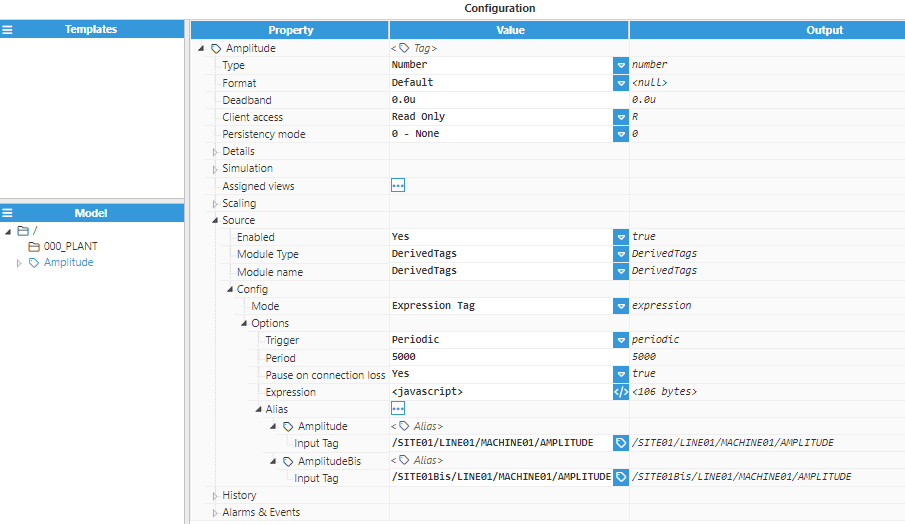
if($.input.Amplitude.quality >= $.input.AmplitudeBis.quality)
{
    $.output = {value:$input.Amplitude.value, quality:$input.Amplitude.quality, ts:$input.Amplitude.ts};
}else{
    $.output = {value:$input.AmplitudeBis.value, quality:$input.AmplitudeBis.quality, ts:$input.AmplitudeBis.ts};
}
Result:
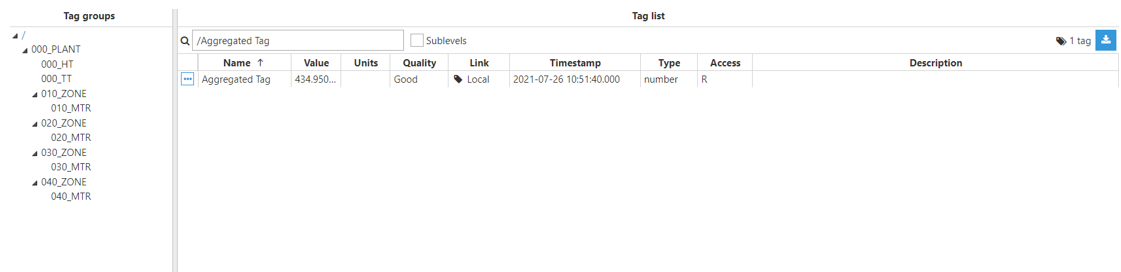
Aggregated Tag
In this example, the Derived Tags module will be used to output the result of an aggregation of a source tag in a tag value over a period of time.

Step 1: Add a new module in the “Modules” section, give it a name, and select “DerivedTags” in the “Module type” field.
Step 2: Configure the Logger and API for the Derived Tags module. In this example, the default configuration settings have been left unedited, since (in most cases) this is a valid configuration option.
Step 3: Configure the module. In this example, the default configuration settings have been left unedited.

Step 4: Configure the tag Source section. In this example, Mode is set to Aggregated tag, Aggregation method is set to Average, and the Source Tag is /000_PLANT/010_ZONE/010_MTR/AP.

Result:
Custom Aggregation:
In this example, we will use the Derived Tags module to sum all values from a source tag over a specified aggregation period, using the Custom Aggregation.
Follow these steps to achieve this:
Step 1: Create a new tag.
Step 2: Once the tag is created, enable its source.
Step 3: Choose the appropriate module type and specify the module name for the Derived Tags module.
Step 4: Set the tag's mode to Aggregation Tag.
Step 5: Select Custom as the aggregation method.
Step 6: Choose the Period type. This can be a Cron expression or Periodic interval.
Step 7: Specify the Aggregation period / Cron expression.
Step 8: From the data model, select the Source Tag.
.png)
After configuring the source, you need to write the custom JavaScript code to sum all the values from the source tag. Here is an example:
/****************************************************************************************************************
 * This code is just an example on how to use execute a custom calculation given a buffer of tag events.
 * In this case, the calculation is a sum of all the events that occured in the tag interval, skipping the
 * first and last events if they are virtual (meaning they did not occur in this interval, they were pulled
 * from the last interval and from the last sample in this interval respectively).
 * Feel free to modify it or replace it completely to adapt it to your specific needs.
 * The ultimate goal is to return a value that is the result of the custom calculation.
*****************************************************************************************************************/

let sum = 0;
let goodCount=0;
for (const tagEvent of buffer){
  if (tagEvent.virtual){
    $.logger.trace("Ignoring virtual tag event: %j", tagEvent)
    continue;
  } else if (tagEvent.quality >= 192){
    sum += tagEvent.value;
    goodCount += 1;
  }
}
$.logger.debug("Added %d good events", goodCount);
if (goodCount === 0){
  throw new Error("Unable to calculate sum, only bad events available");
} else {
  return sum;
}
Node tag
In this example, the Derived Tags module will be used to get information about the disk and the RAM usage in our node.
Step 1: Add a new module in the “Modules” section, give it a name, and select “DerivedTags” in the “Module type” field.

Step 2: Configure the Logger and API for the Derived Tags module. In this example, the default configuration settings have been left unedited, since (in most cases) this is a valid configuration option.
Step 3: Configure the module. In this example, the default configuration settings have been left unedited.
Step 4: Configure the tag Source section. In this example, Mode is set to Node tag, Type is set to Node information, and the Variable is set to Disk usage and RAM usage respectively in both tags.
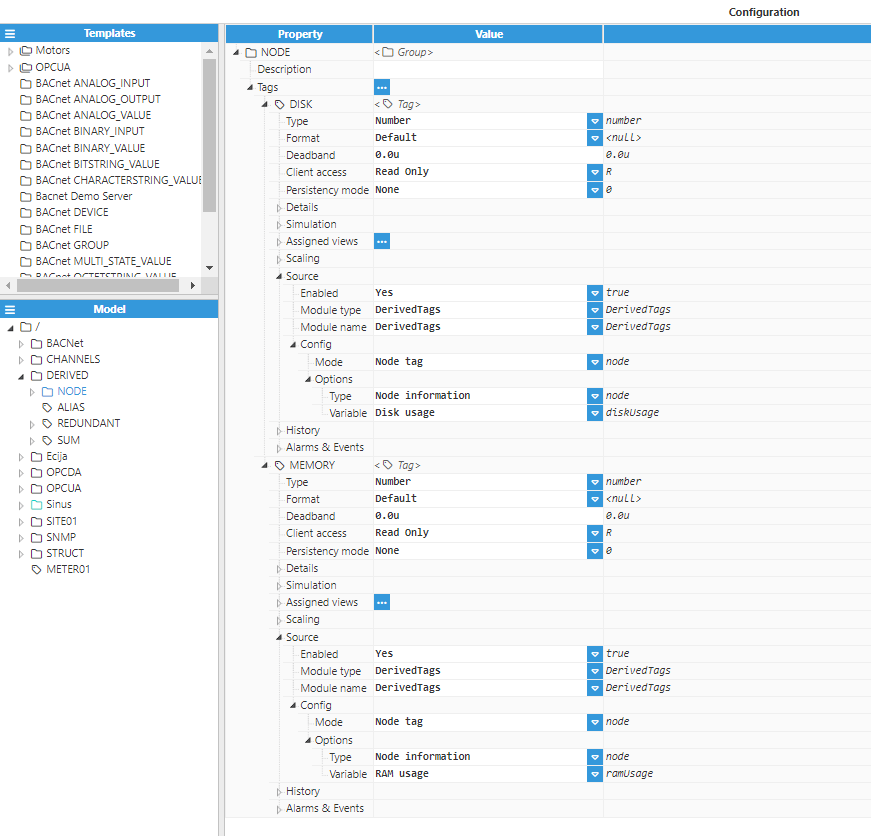
Result:

Alias Tag
In this example, the Derived Tags module will be used to make a copy of the value of an input tag.
Step 1: Add a new module in the Modules section, give it a name, and select DerivedTags in the Module type field.

Step 2: Configure the Logger and API for the Derived Tags module. In this example, the default configuration settings have been left unedited, since (in most cases) this is a valid configuration option.
Step 3: Configure the module. In this example, the default configuration settings have been left unedited.
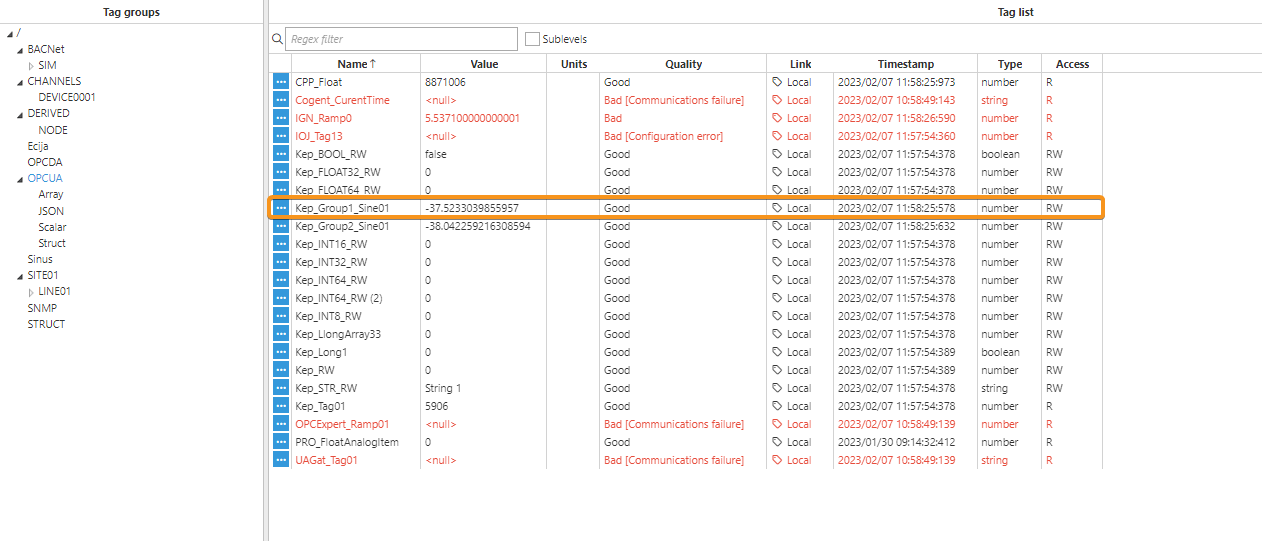
Step 4: Configure the tag Source section. In this example, Mode is set to Alias tag, and the Input tag is /OPCUA/Kep_Group1_Sine01.
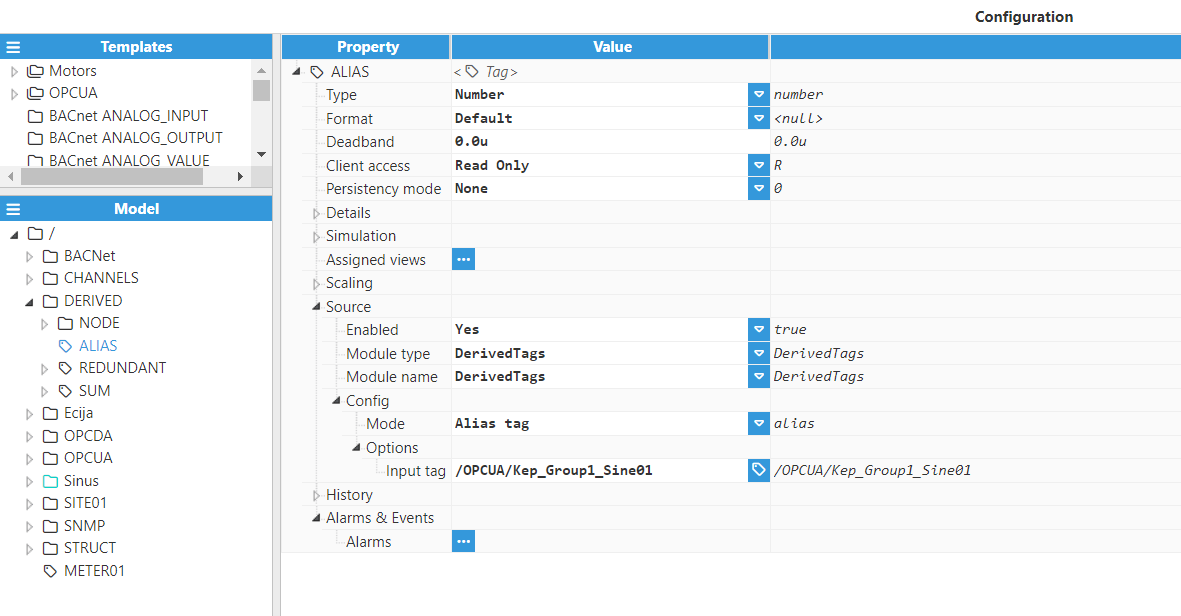
Result:
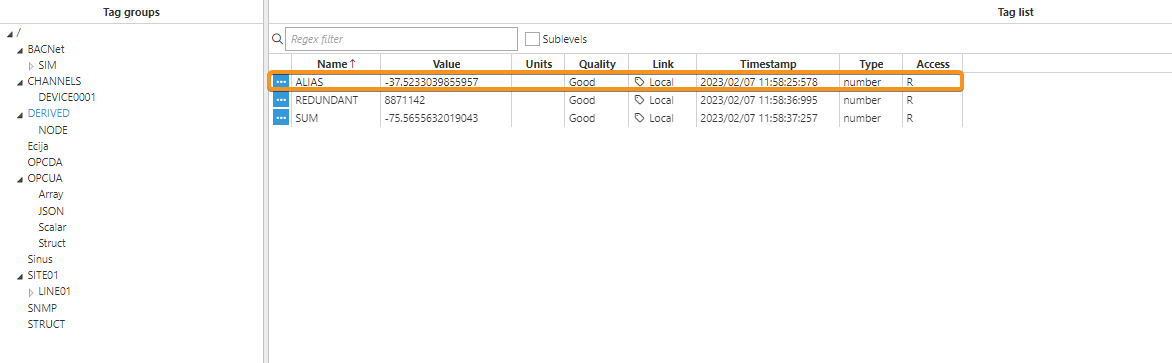
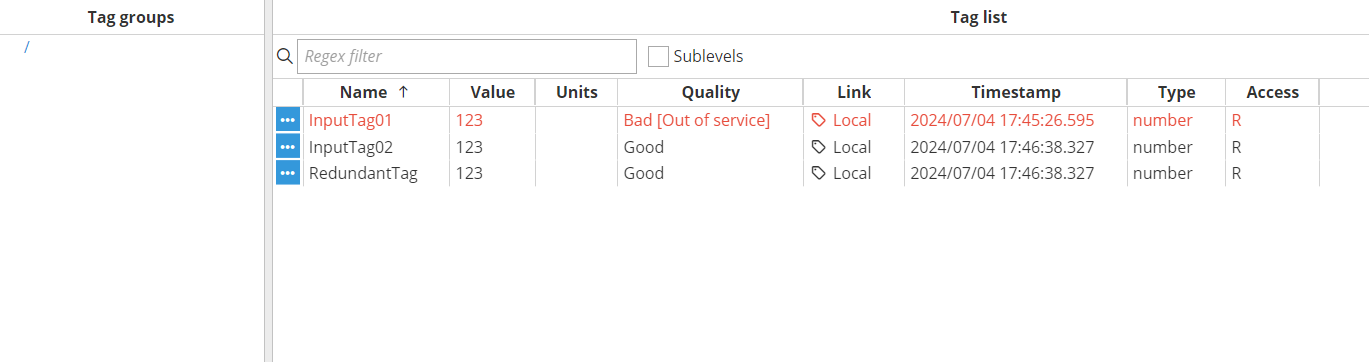
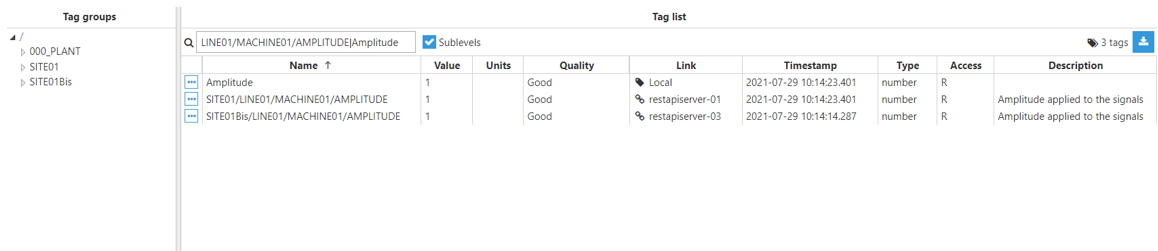
Redundant Tag
In this example, we will use the Derived Tags module to create a Redundant Tag. The output value, quality, and timestamp of the Redundant Tag will reflect those of the highest quality input tag. If two or more tags have the same quality, the system will select the first tag listed among the Sources for the output.
.webp)
Result: