Note
Before starting configuration, a new module instance must be created. Click here for more information about creating Module instances.
Module Configuration
As shown in the screenshot below, multiple connections can be created in the Model Panel by clicking on the burger menu icon. Each connection is named Device. See below for an explanation of the different configuration options.
.png)
Device Configuration
The available configuration parameters are as follows:
Enable data collection: When Disabled, all connections will remain inactive. The default value is set to Enabled.
Protocol: Specifies the protocol used to communicate with the device. The Domino Client module uses the Codenet protocol.
Timing
Timeout: Maximum amount of time to wait for a valid response, displayed in milliseconds. The valid range is 100ms to 600,000ms. The default value is set to 3,000ms.
Retry attempts: Number of communication retry attempts before considering the target device unreachable. The valid range is 0 to 100. The default value is 3.
Inter-request delay: Delay before sending subsequent requests to the target device, displayed in milliseconds. The valid range is 0ms to 600,000ms. The default is 0ms.
Connection
Type: Specifies which connection type will be established:
TCP: TCP socket.
Serial: Serial Port.
When connecting via TCP, the following options are displayed:
Config
Host: Hostname or IP address of the target device.
TCP port: Determines which TCP Port to connect to. Valid values range from 1 to 65535.
Reconnect delay:Time before trying to re-open the connection after a failed attempt, displayed in milliseconds. The minimum value is 1,000ms.
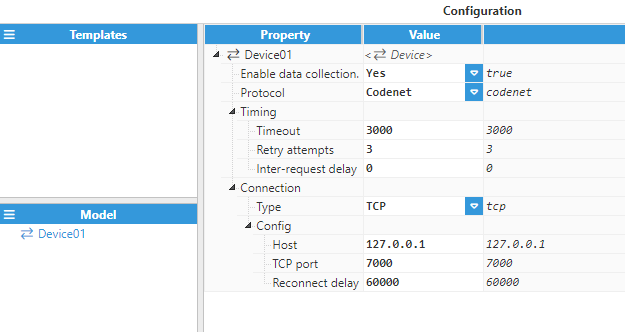
The following image shows an example TCP connection:
Serial channels include the following available options:
Config
Port name: Serial port, as displayed by the operating system. For example, if N3uron is running on Windows, valid port names would be COM1, COM2, and so forth. If running on Linux, valid port names would be /dev/ttyS0, /dev/ttyS1 and so forth.
Note:
The dropdown menu for serial port selection is available from N3uron version V1.21.7 onwards.
.png)
Reconnect delay: Time before trying to re-open the serial port after a failed attempt, displayed in milliseconds. The minimum value is 1,000ms.
Port settings:
Baud rate: Serial port transfer speed, displayed in milliseconds. Valid values are 110, 300, 1200, 2400, 4800, 9600, 19200, 38400, 57600, and 115200.
Data bits: Specifies the number of data bits per data word. Valid values are 5, 6, 7, or 8.
Stop bits: Specifies the number of stop bits per data word. Valid values are 1 or 2.
Parity: Specifies the type of data parity. Valid values are None, even, mark, odd, or space.
Flow Control: Enables the use of RTS and DTR control lines. There are 3 options: None, RTS/CTS (RS232), and RTS (RS485/RS422).
Buffer size: Specifies the Serial communication buffer capacity. The valid range is 128 to 65536.
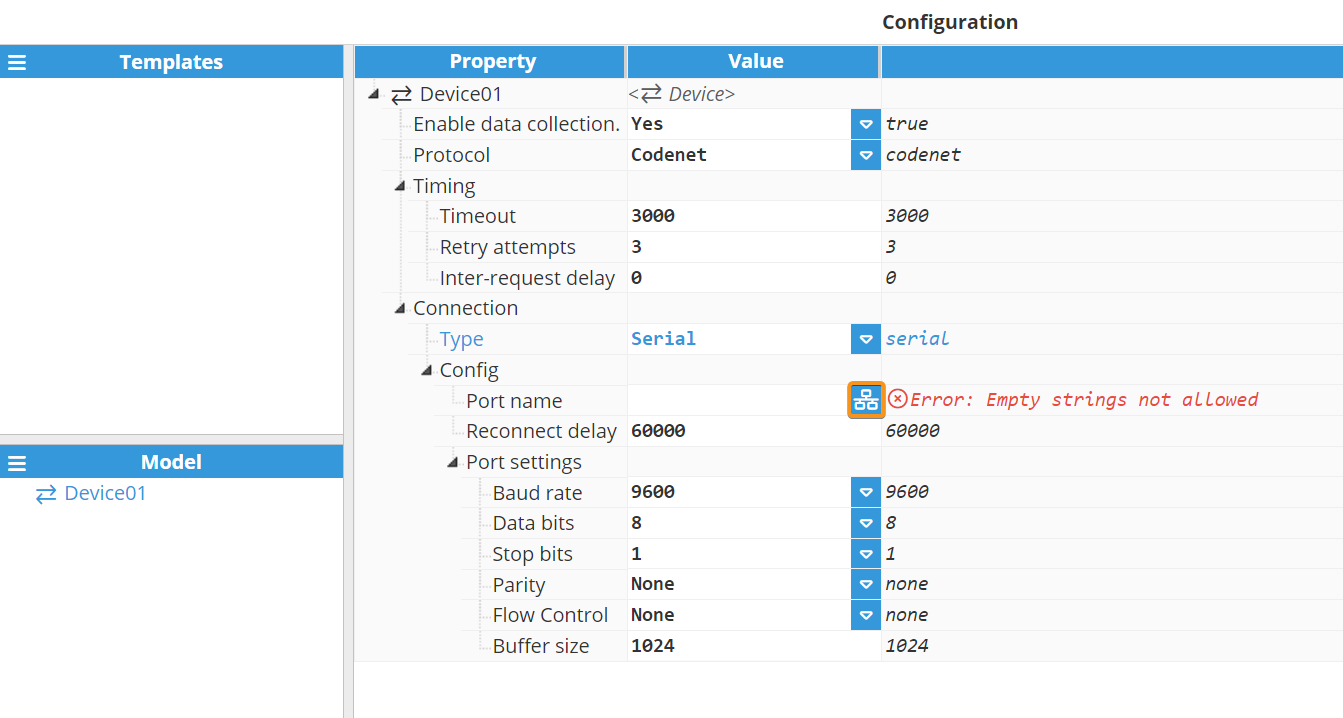
The following image shows an example serial connection:.png)
At this point, the connection should be fully configured and the user can now move on to creating tags.
Tag Configuration
After configuring the Device, users will be able to create and configure any Tags associated to the data exchanged with the Domino printer.
Each Tag requires the following parameters to be configured
Source
Enabled: When Disabled, tags will not be updated with the values received from the device, but instead, will essentially act as memory tags. When set to Enabled, the tag value will be continuously updated with the values received from the field device. The default value is set to Disabled.
Module type: Defines the driver type used to retrieve values from the field. In this example, DominoClient must be selected from the drop-down menu. If DominoClient does not appear in the drop-down menu, it means that this driver has not yet been installed on this machine and must be installed.
Module name: Enter the name of the Domino Client module instance that we previously created.
Config
Device: Specifies the previously created device that will act as the data source.
Group: Specifies the data group from which the data will be gathered. Available options are as follows:
Information: These commands perform functions such as requesting the printer’s identity and setting up the real time clock, etc.
Control: These commands control the printer's operational features. For example, they identify which product detector to use for which print head.
Status: These commands allow the host system to control the unsolicited generation of status change reports and to obtain such reports on demand.
Global Format: These commands exert control over the orientation of printed labels and affect all characters printed.
Extensions: These commands are embedded within the text of stored print labels.
Variable: Select the relevant variable to be assigned to the Tag.
The following tables show the available Variables for each Group:
Group: | Variables: | Description: |
Information | Printer Type | Two digits specifying the printer type. For example, 00 (3030) = Codebox. |
Printer Firmware Part Number | Five digits specifying the SBC software part number. | |
Printer SBC Firmware issue number | Two digits specifying the SBC software issue number. | |
Real Time Clock | This command sets the printer’s internal real time clock to the date and time given in the command parameters. | |
Month Name Table | This command allows the text strings used for month name entries to be set up or returned to the terminal. | |
Day Name Table | This command allows the text strings used for day name entries to be set up or returned to the terminal. | |
Alpha hours characters | Read/Load Alpha hours characters. | |
Encoder Frequency | This Command will get and set the stroke rate of the internal shaft encoder. | |
Encoder Divide | This command will get and set the divide value that is used to scale down the external encoder frequency. | |
Encoder Signal Source | This command will set the source of the encoder. | |
Codenet Version Number | This command gets the current version of Codenet. |
Group: | Variables: | Description: |
Control | Get Label from store and put online | This command is used to set or query a label on-line from the store if its slot ID is known. |
Head enable | This command will set the print head to enable or disable printing. | |
Store Label with name as 3 digits | This command allows labels to be sent to the label store and stored using a 3 character/digit label name. | |
Product Count | This command resets or reads the specified product counter within the printer. |
Group: | Variables: | Description: |
Status | Reporting Mode | This command sets the mode for reporting printer status changes. |
Status | This command will cause the printer to send its current or historical status, whether unsolicited reporting is enabled or not. | |
Status Code | This command will get the status code. | |
Status Description | This command will extract the status description. | |
Ink Level | Three digits identifying the ink level. If the value 021 (303231) is reported, the ink level sensor is unplugged. | |
Make-up Level | Three digits identifying the ink level. If the value 021 (303231) is reported, the make-up level sensor is unplugged. |
Group: | Variables: | Description: |
Global Format | Label reverse | This command will cause all label fields in all labels to be printed in reverse until the command is switched off. |
Label Bold | This command will print all labels in bold characters until it is switched off. | |
Label Double space | This command will cause all labels to be printed with double spacing until it is switched off. | |
Barcode Thickness ratio | This command adjusts the ratio of bar and space element thickness employed in barcode printing. | |
Global Print Format | This command collectively sets the global attributes for printed label orientation. | |
Label Invert | This command will print all labels inverted until it is switched off. |
Group: | Variables: | Description: |
Extensions | Current status | This command is used to query the status of the printer and the condition of the printer cabinet LEDs. |
LED status | This command allows the LEDs on the printer cabinet to mimic the behaviour of different printer types. |
Head Select: Establish the printer head that will be queried. This is only available for Control and Global Format groups.
Note:
If the variable is Product Count, this property selects which register will be read (1 or 2).
Index: Specifies the index of the variable assigned to the Tag. This option is used in the following cases:
Store label: Selects the index where the variable will be stored. The valid range is 000-255 (All three digits are required).
Barcode thickness ratio: Selects the barcode type. The valid range is 0-4 (single digit).
Scan rate: Poll interval for the tag, displayed in milliseconds. The minimum value is 100ms.
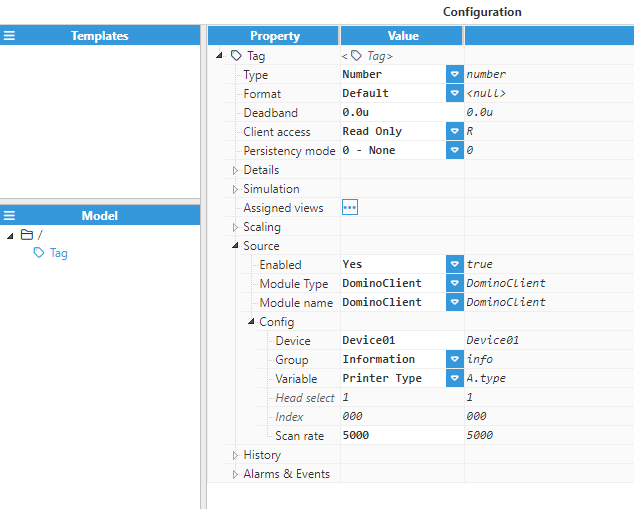
The following image shows a tag configuration example: