Creating Workspaces
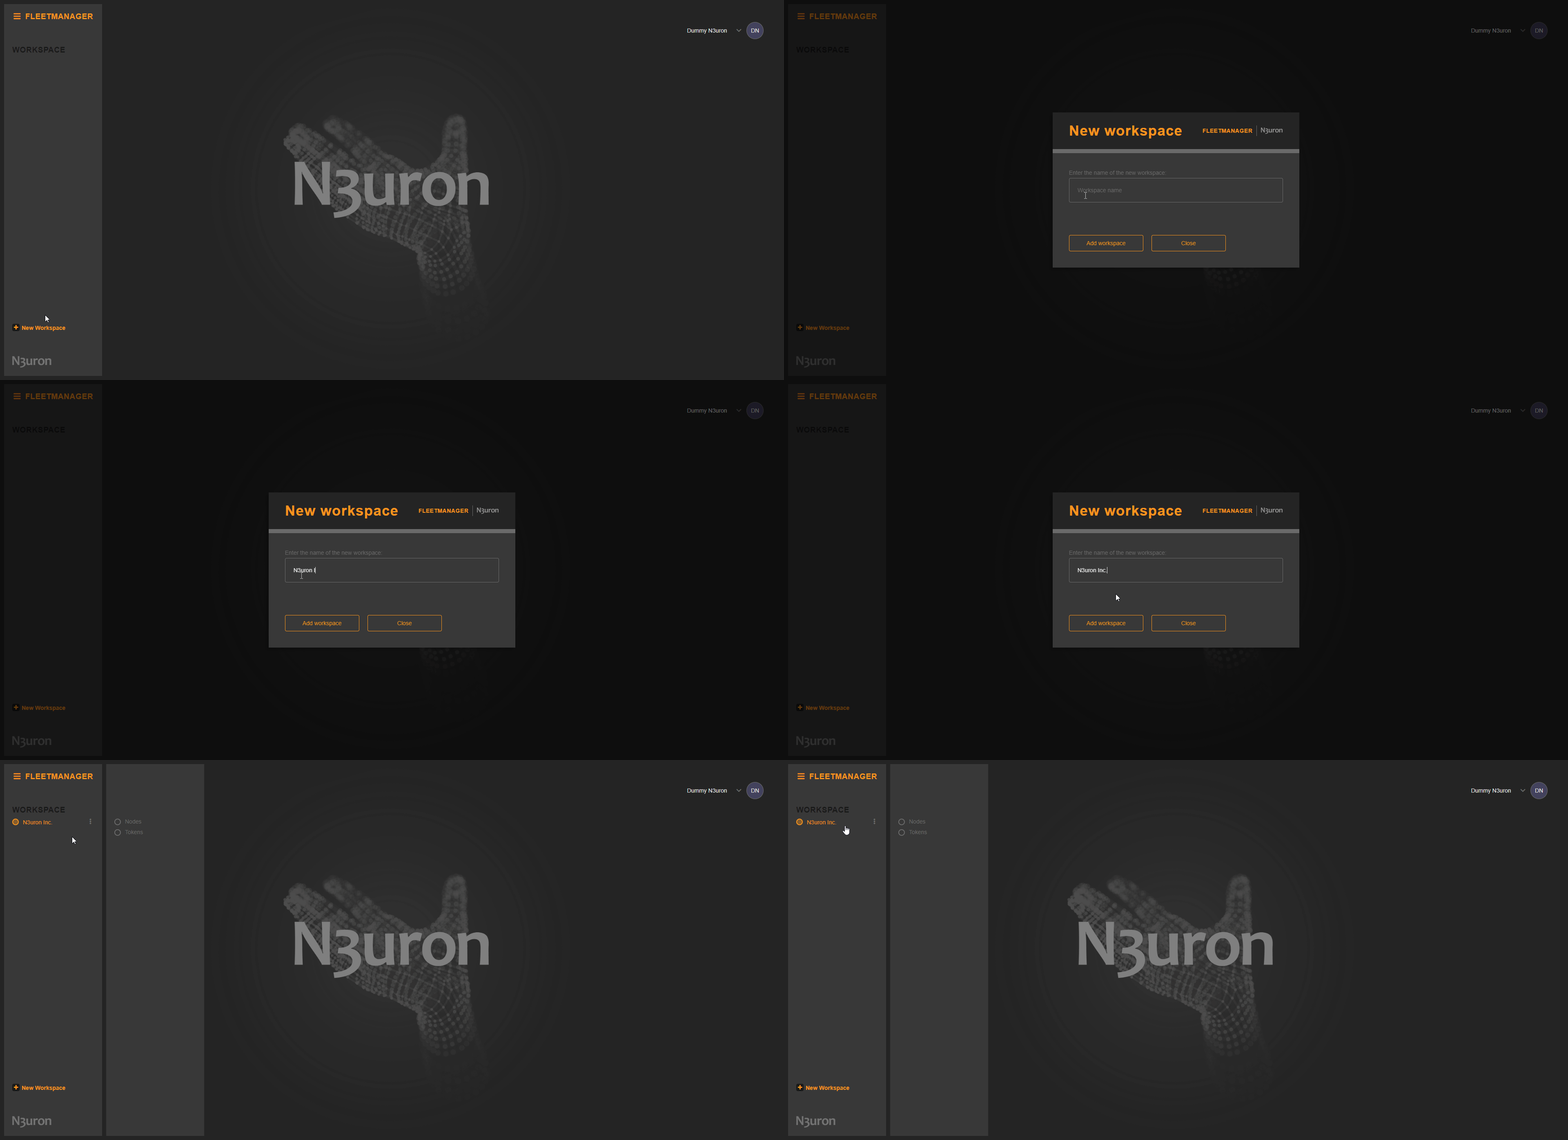
Fleet Manager utilizes workspaces to logically represent your organization. You can create as many workspaces as needed to organize your N3uron nodes.
The first step when starting to use Fleet Manager is to create a workspace, to do it proceed as follows:
- In the left menu, hit the + New Workspace button.
- Enter the name of the workspace.
- Press the Add workspace button.
Managing Roles/Users
Within every workspace, you have the flexibility to create roles and users, allowing you to efficiently control access to your nodes.
Once you have created a workspace, the next step is to add and configure roles according to your needs.
Managing roles
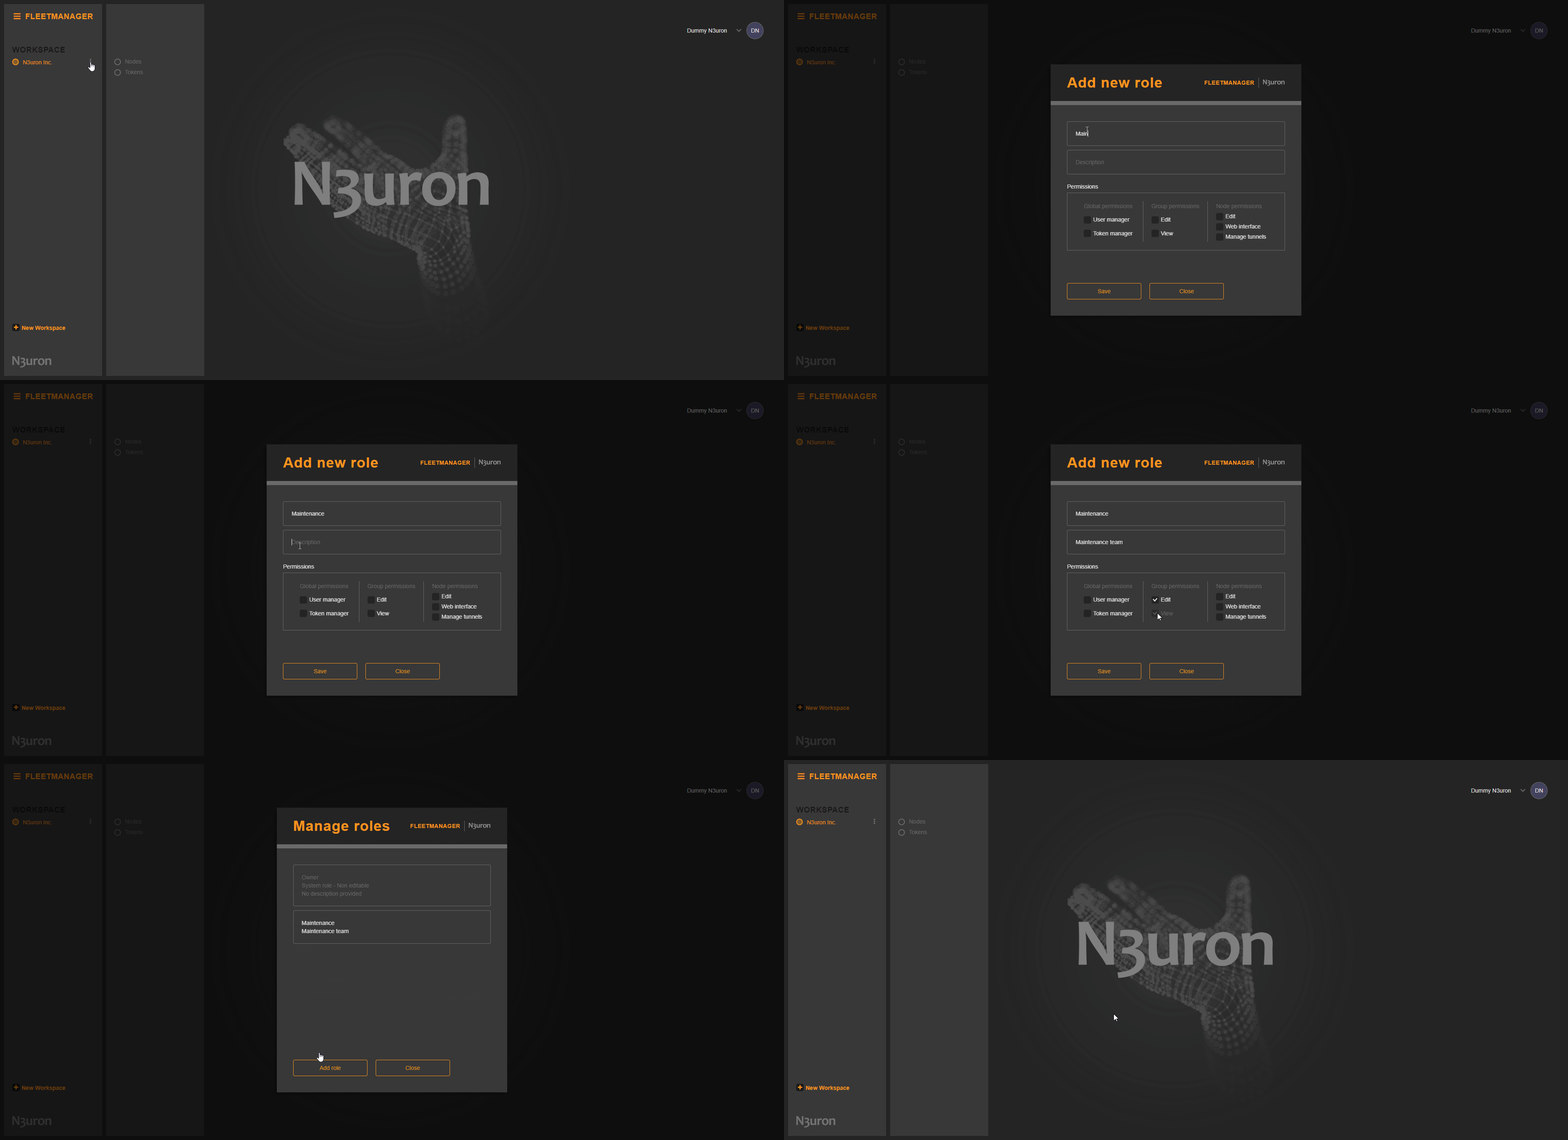
Roles define the permissions and access levels for users within a workspace. Follow these steps to add a new role:
- Click on the burger menu icon in your workspace and select Manage Roles.
- Select Add role.
- Provide a name, enter a description, and select the permissions for the new role.
- Hit the Save button.
Available permissions and options are:
- Global permission
- User manager:
- Manage workspace users and roles.
- Create, view, edit, and delete roles.
- Assign roles to workspace users.
- Invite and dismiss users from workspaces.
- Token manager:
- Manage workspace access tokens.
- Create, view, edit and delete tokens.
- User manager:
- Group permission
- Edit:
- Edit group properties and roles.
- Create children for the given group.
- Move the group inside another group (as long as you have permission on the destination group).
- Move a node inside another group (as long as you have permission on the destination group).
- Delete the group.
- View a group and its children, and also its nodes.
- View:
- View a group and its children, and also its nodes.
- Edit:
- Node permissions
- Edit:
- Add comments to a given node.
- Delete offline nodes.
- Web interface:
- Remotely control the node through the Web UI.
- Manage tunnels:
- Open and manage secure tunnels.
- Edit:
Inviting users to a workspace
After creating the workspace roles, the next step is to invite users. Follow these steps to send invitations:
- Click on the burger menu icon located to the right of the workspace In the left navigation panel.
- Choose Invite people from the menu.
- Enter the email address of the individual you wish to invite.
- Assign the roles you want the individual to have.
- Click on the Send Invite button to dispatch the invitation.
Invited individuals will promptly receive email notifications containing the invitation details. This enables them to seamlessly join your workspace, where they can actively contribute to the effective management and monitoring of your N3uron nodes.
For clients in North America, please use the following link: myfleet-na.n3uron.com.
.gif)
Manage users
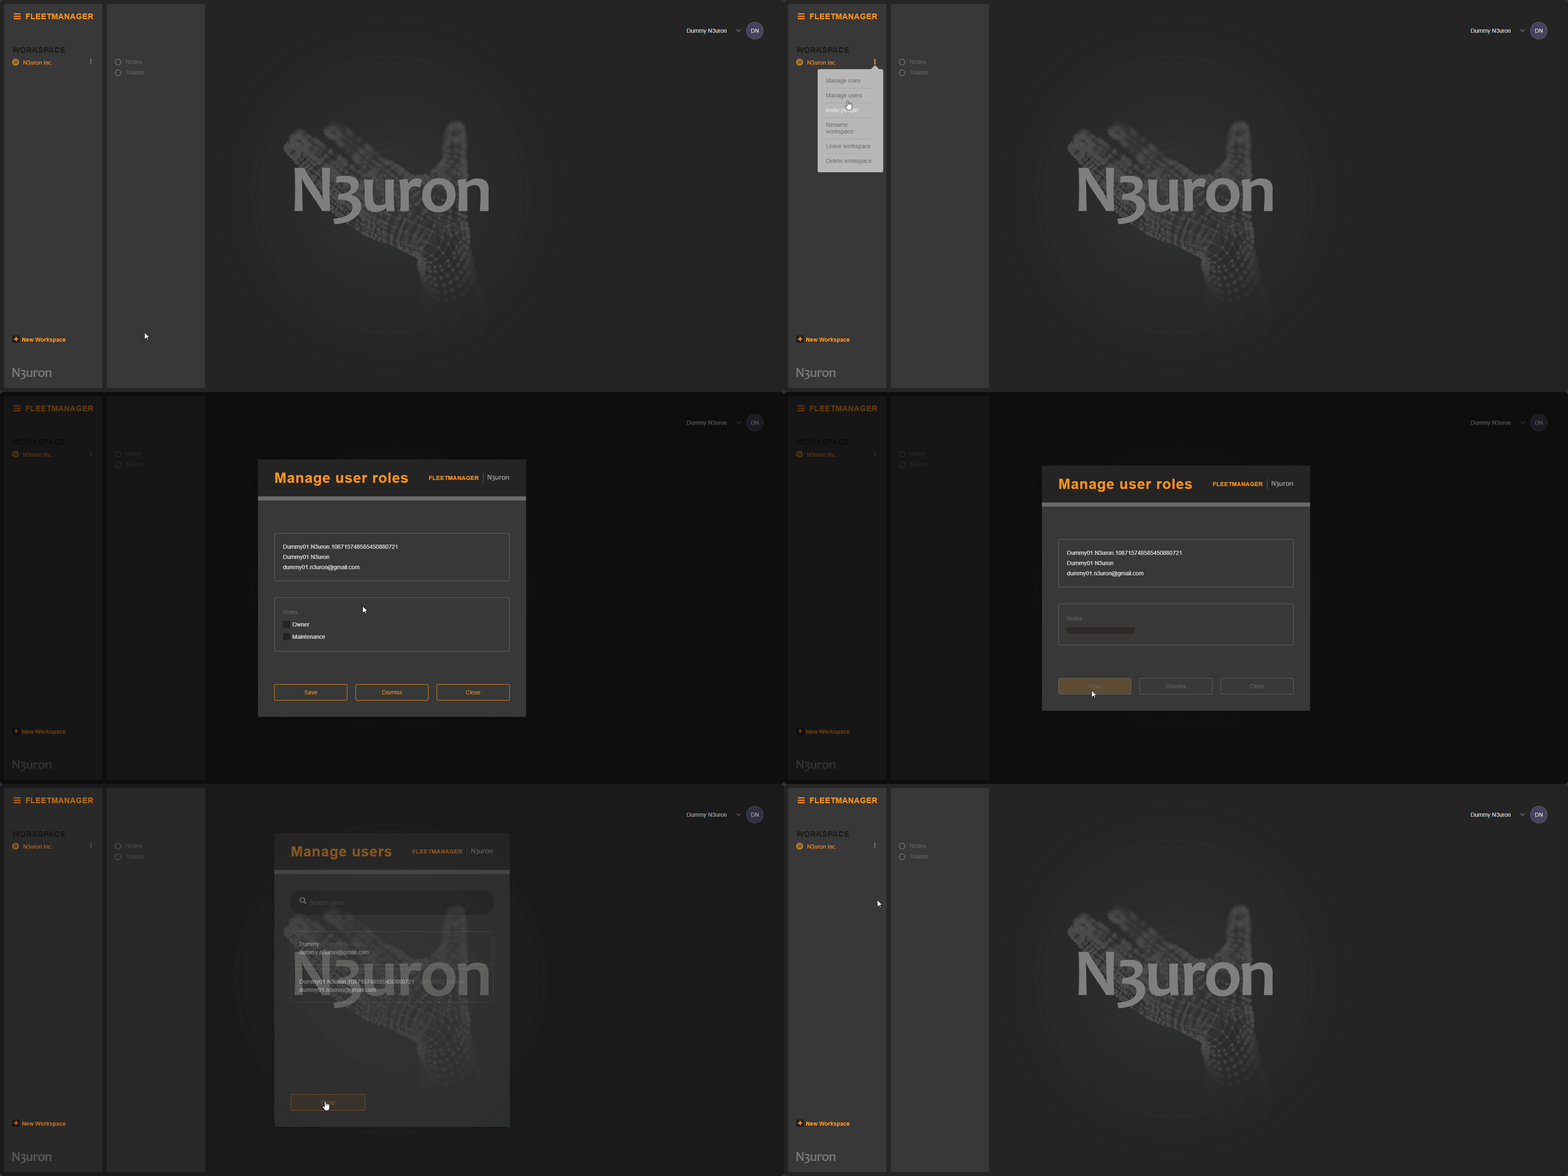
Fleet Manager provides a straightforward way to manage users. To modify roles and permissions for workspace users in Fleet Manager, follow these steps:
- Click on the burger menu icon located to the right of the workspace In the left navigation panel.
- Select Manage Users from the menu options. A list of users will be displayed, including the workspace owner and those invited to join.
- Choose a user from the list to proceed.
- Upon selection, you will be directed to a dedicated window providing the following options:
- Roles: Adjust or modify the user's permissions by enabling or disabling roles.
- Remove from Workspace: By clicking the Dismiss button and accepting the changes, users can be removed from the workspace, revoking their access and privileges.
Creating and Managing Tokens for the Workspace
For secure connections between N3uron nodes and Fleet Manager, tokens serve as the key authentication mechanism.
Creating Tokens
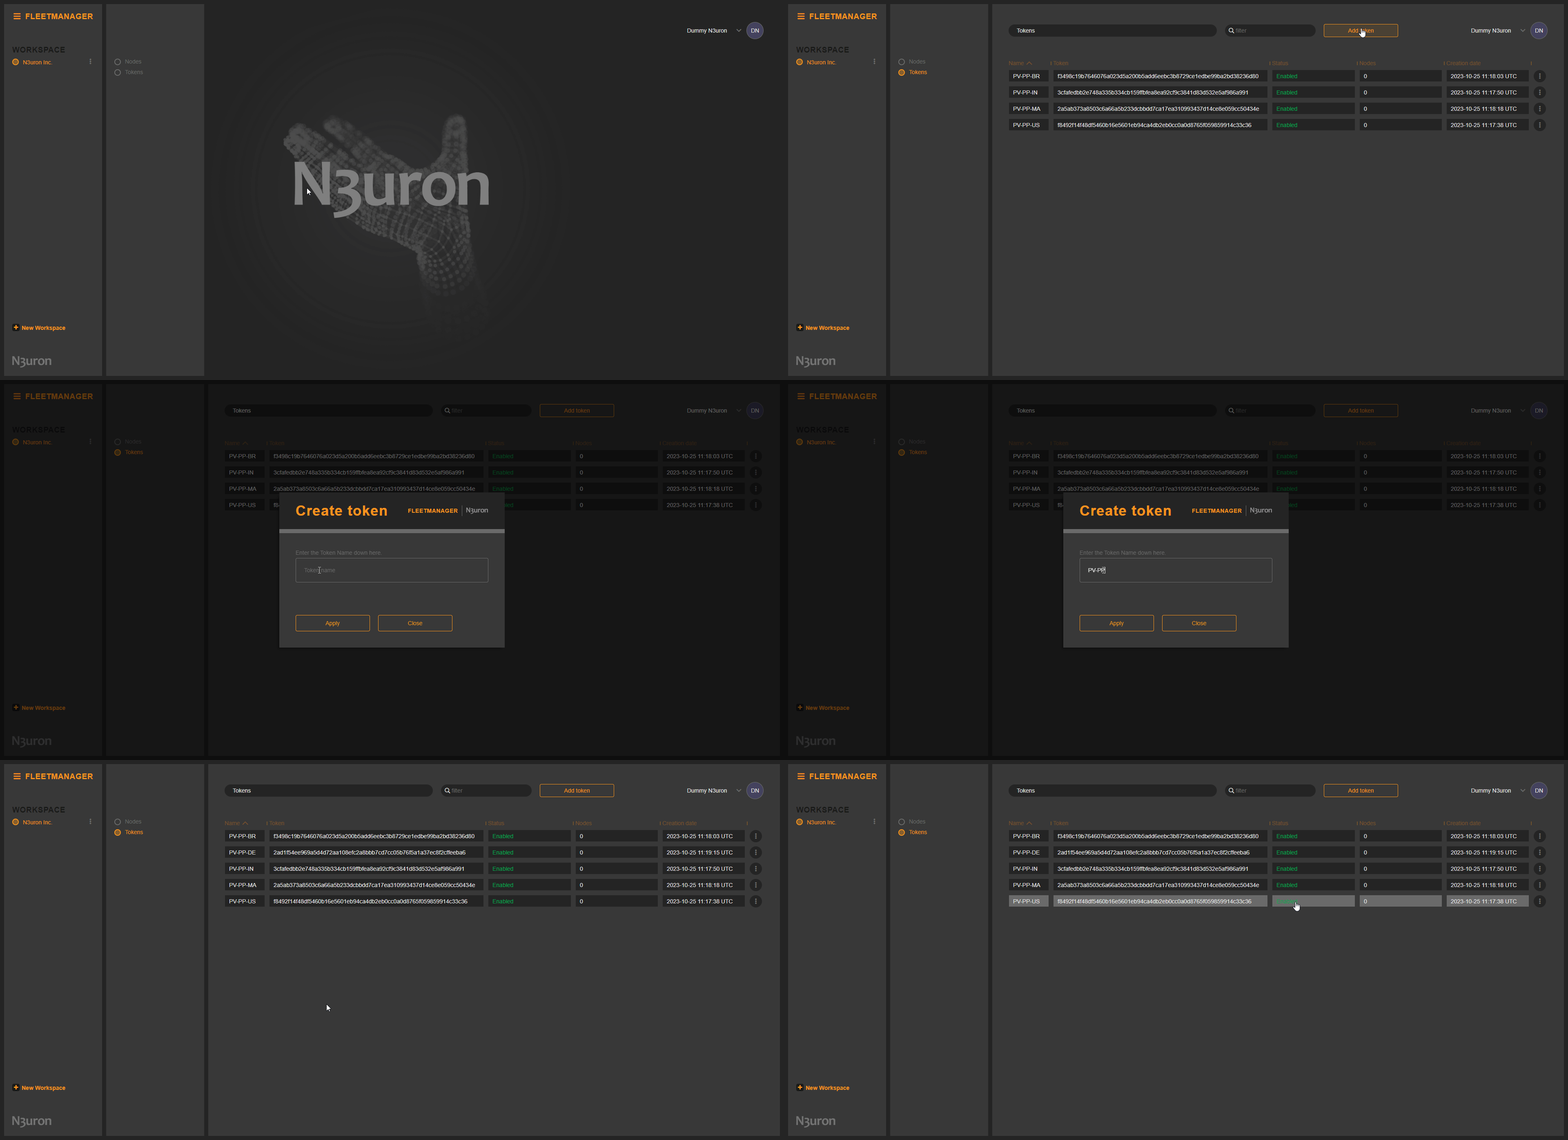
Follow these steps within your workspace to create a new token:
- Within your workspace, navigate to Tokens.
- Click on the Add token button.
- Enter the Token name and hit the Apply button.
Managing Tokens
Fleet Manager simplifies token management with an intuitive table displaying an overview of all workspace tokens and allowing users to seamlessly perform various actions:
- Check the status of each token.
- Execute essential actions, such as copying, disabling, and deleting tokens.
- Leverage the table's filtering capabilities to display only the tokens relevant to you.
- Gain insights into token usage by observing the total number of nodes connected to Fleet Manager through each token.
Adding a Node to Fleet Manager
Each module has an API and Logger section that need to be configured separately. The default settings will be sufficient for this, but users will need to actively open the API and Logger configuration settings and save the default values to fully apply the settings. Click here for more information about API and Logger Configuration.
To seamlessly and securely access your N3uron node through the Fleet Manager Portal, follow these steps:
- Create a new module instance of Fleet Manager in your N3uron node.
- Copy a previously generated Token in Fleet Manager Portal and paste it into your Fleet Manager Client's settings.
- Enable WebUI tunnel. This enables remote access to the Web UI of the node from Fleet Manager Portal.
- In the Fleet Manager Client's settings, specify the host address for your Fleet Manager Portal, myfleet.n3uron.com.Note:
- In the Fleet Manager Client's settings, specify the port number, 8883.
By performing these straightforward actions, you will establish a reliable connection to your N3uron node via the Fleet Manager Portal.
.gif)
After successfully establishing a connection between your N3uron node and the Fleet Manager Portal, you'll gain access to the following valuable information about your node:
- N3uron : UID, Support status, Status(Online/Connection lost), Process Pid, Bootstrap version, Executable version, Start Time, Uptime, Tag count and Comment.
- Installed Modules: Name of the modules, Type, Status(Online/Offline), License and Version.
- System Details: Host name, Remote IP, System Time, Boot Time, Uptime, CPU INFO: {Model, Speed and Count}, CPU usage, RAM usage and Disk usage.
- Security Token: The token used to connect to Fleet Manager.
- Links: Comprehensive information about the state of any Link configured between the node and other nodes.
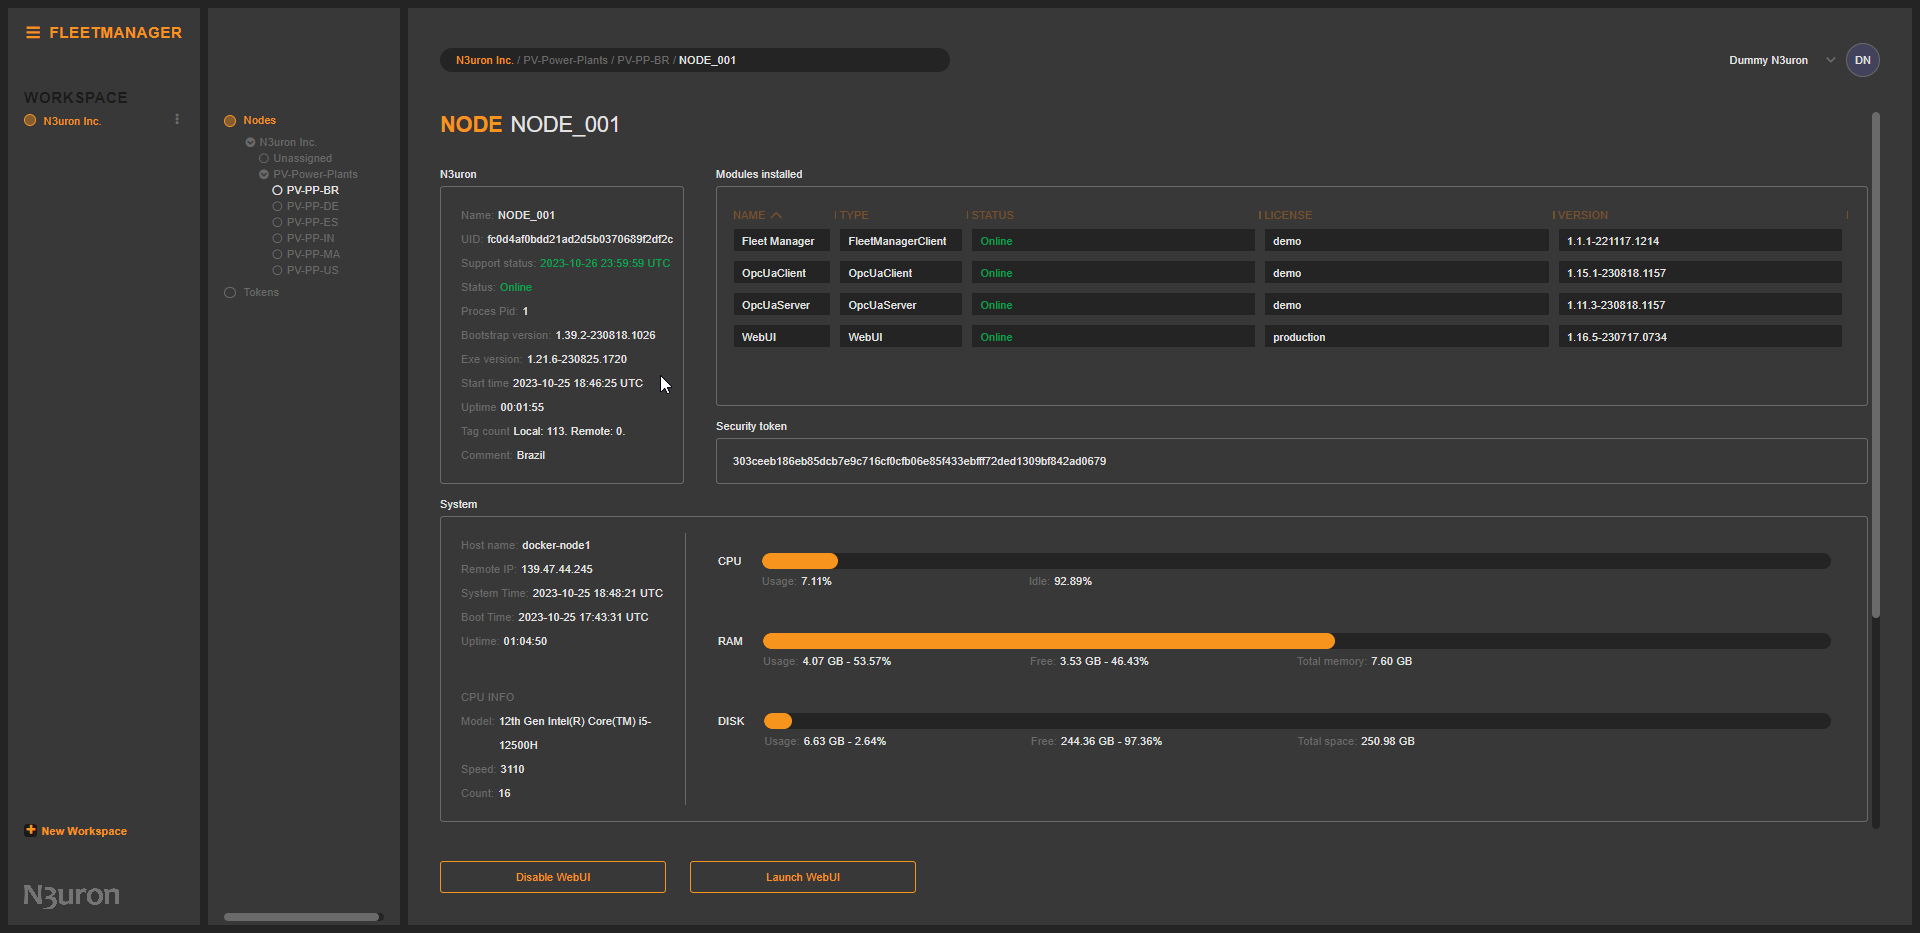
Launching the Web UI of a Node
As shown below, once a node is connected to Fleet Manager, launching its Web UI is a straightforward process, provided you've enabled the WebUI tunnel in the node's Fleet Manager client configuration. Additionally, you have the flexibility to enable or disable the remote launch of the Web UI.
.gif)
Grouping and Organizing Nodes
Fleet Manager enables you to organize your nodes into different groups, providing a hierarchical structure to effectively manage different areas of your business.
For instance, consider this example scenario, where you have five photovoltaic power generation plants in different countries, each with a N3uron node on site.
- N3uron Inc. (your Fleet Manager workspace)
- PV-Power-Plants
- PV Power Plant in United States: PV-PP-US
- PV Power Plant in India: PV-PP-IN
- PV Power Plant in Brazil: PV-PP-BR
- PV Power Plant in Morocco: PV-PP-MA
- PV Power Plant in Germany: PV-PP-DE
- PV-Power-Plants
To organize these nodes inside your workspace, called N3uron Inc., you can create a main group named PV-Power-Plants and five subgroups for each power plant location: PV-PP-US, PV-PP-IN, PV-PP-BR, PV-PP-MA and PV-PP-DE.
Nodes not yet assigned to a specific group, are placed within the Unassigned Group. You can easily manage them by dragging and dropping these nodes into their respective groups as shown below.
.gif)
Tunneling in Fleet Manager
Fleet Manager provides the capability to configure highly secure HTTP, HTTPS, and TCP tunnels, facilitating remote access to devices and machines on the remote LAN for monitoring and troubleshooting.
Tunnel Configuration in the Fleet Manager Client
Setting up a tunnel is straightforward and provides a secure way to establish a protected communication channel by following these steps:
- In the Model panel, click the menu icon and select New Tunnel
- Provide a name for the tunnel.
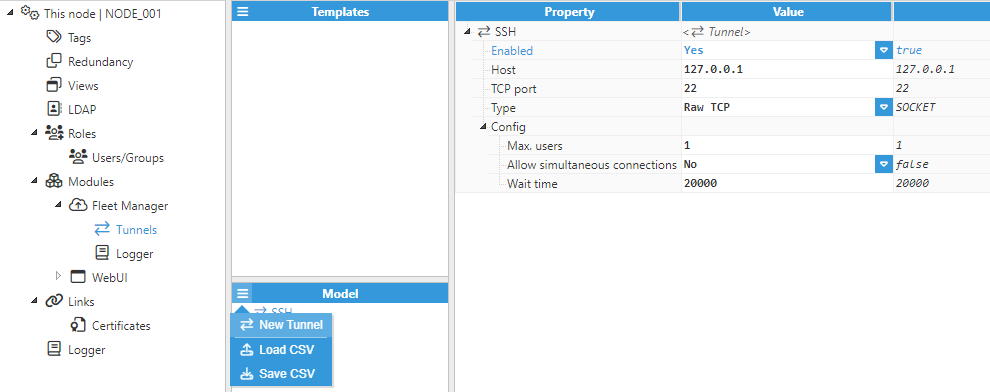
Each tunnel has the following settings:
- Enabled: Enable or disable the tunnel.
- Host: Specifies the Hostname or IP address of the forwarded port destination. For instance:
- 127.0.0.1 or localhost: the tunnel is forwarded to the same device running the Fleet Manager Client.
- Any other IP like 192.168.1.100: the tunnel is forwarded to another device reachable from the device running the Fleet Manager Client.
- Port: Specify the TCP port of the destination of the tunnel. Valid range: 1 to 65535.
- 22 for SSH connections.
- 502 for Modbus connections.
- 3389 for Remote Desktop Protocol connections.
- 5900 for VNC connections.
- Type:
- HTTP: The port is forwarded to a HTTP application. Use this option to connect to regular HTTP applications.
- HTTPS: The port is forwarded to a HTTP application. Use this option to connect to secure HTTPS applications.
- Raw TCP: Establishes a raw TCP tunnel with the target host. Use this option to connect using any protocol(SSH, SFTP, RDP, VNC, telnet, Modbus, etc.).
When using Raw TCP, the following setting must be provided:- Max. users: Maximum number of users allowed at one time. Default is 1 user.
- Allow simultaneous connections: Enables multiple simultaneous connections per user. Some applications may use more than one connection in the background. For instance, a SFTP client may use one connection to list the folders and parallel connections to transfer the files. When enabled, each tunnel permits up to 25 simultaneous connections. When disabled only one connection per tunnel is permitted so applications requiring more than one simultaneous connection may fail.
- Wait time: Specifies the maximum time to establish the tunnel after is enabled from the Fleet Manager server. During this time, the tunnel can only be established from the same internet connection used for its initial activation. After this interval, the tunnel will automatically deactivate. The minimum duration for this interval is set at 5000 milliseconds.
HTTP Tunneling: While HTTP itself is not inherently secure, Fleet Manager ensures data safety through added security and encryption layers.
Raw TCP Tunnels: Provide no inherent security. Users must implement necessary additional security measures
Fleet Manager Full Service Details