Internal Data Structure
TimescaleDB
The Historian module stores data in TimescaleDB using the table structure described below. N3uron automatically creates these tables and applies the required indexes, chunking, partitioning, and compression settings.
Optionally, you can create the tables in advance with custom settings. If the tables already exist when the Historian connects, N3uron will use them as-is and will not overwrite them.
tag_ids
The tag_ids is a standard PostgreSQL table that stores each tag name and its internal ID.
The tag_history table uses this ID in the tag_id column to associate historical records with a tag.
Column name | Data type | Description |
|---|---|---|
id | bigint | The internal ID of the tag used to reference its events in the tag_history table. |
tag | text | The full path of the tag in N3uron |
SQL statement to create the table
CREATE TABLE IF NOT EXISTS tag_ids (
                    id BIGINT PRIMARY KEY GENERATED ALWAYS AS IDENTITY,
                    tag TEXT UNIQUE NOT NULL
                    );
tag_history
The tag_history table is a TimescaleDB hypertable used to store the historical data of tags.
Column name | Data type | Description |
|---|---|---|
ts | timestamptz | Timestamp of the event. |
tag_id | bigint | ID of the tag from the tag_ids table. |
quality | smallint | Quality of the data. |
boolean_value | boolean | Value of the tag if the type is a boolean. |
number_value | double | Value of the tag if the type is a number. |
string_value | text | Value of the tag if the type is a string. |
sequence_number | bigint | Number used to sort events with the same timestamp. |
SQL statement to create the table
CREATE TABLE tag_history (
                    ts TIMESTAMPTZ NOT NULL,
                    tag_id BIGINT NOT NULL,
                    quality SMALLINT NOT NULL,
                    boolean_value BOOLEAN,
                    number_value DOUBLE PRECISION,
                    string_value TEXT,
                    sequence_number BIGINT GENERATED ALWAYS AS IDENTITY
                    )
                    WITH (
                    tsdb.hypertable,
                    tsdb.chunk_interval = '1 hour',
                    tsdb.partition_column = 'ts',
                    tsdb.segmentby = 'tag_id',
                    tsdb.orderby = 'ts ASC',
                    tsdb.create_default_indexes = false
                    );

                    ENCODING = 'UTF8'
                    LC_CTYPE = 'en_US.UTF8'
                    LC_COLLATE = 'en_US.UTF8';

                    CREATE INDEX tag_history__query
                    ON tag_history (tag_id, ts ASC);

                    ALTER TABLE tag_history
                    SET (timescaledb.compress_chunk_time_interval = '1 day');

                    CALL remove_columnstore_policy('tag_history', if_exists => true);
                    CALL add_columnstore_policy(
                    'tag_history',
                    created_before => INTERVAL '12 hours'
                    );
alarm_history
The alarm_history table is a TimescaleDB hypertable used to store alarm events.
Column name | Data type | Description |
|---|---|---|
ts | timestamptz | Timestamp when the alarm triggered. |
path | text | The full path of the alarm in N3uron. |
description | text | Description of the alarm. |
priority | smallint | Priority of the alarm:
|
status | smallint | Status of the alarm:
|
boolean_value | boolean | Value of the tag if the type is a boolean. |
number_value | double | Value of the tag if the type is a number. |
string_value | text | Value of the tag if the type is a string. |
quality | smallint | Quality of the tag when the alarm triggered. |
ack_msg | text | Acknowledgment message. |
ack_user | text | The user who acknowledged the alarm. |
ack_node | text | The name of the N3uron node used to acknowledge the alarm. |
ack_module | text | The name of the module used to acknowledge the alarm. |
sequence_number | bigint | Number used to sort events with the same timestamp. |
SQL statement to create the table
CREATE TABLE IF NOT EXISTS alarm_history (
                    ts TIMESTAMPTZ NOT NULL,
                    path TEXT NOT NULL,
                    description TEXT NOT NULL,
                    priority SMALLINT NOT NULL,
                    status SMALLINT NOT NULL,
                    boolean_value BOOLEAN,
                    number_value DOUBLE PRECISION,
                    string_value TEXT,
                    quality SMALLINT NOT NULL,
                    ack_msg TEXT,
                    ack_user TEXT,
                    ack_node TEXT,
                    ack_module TEXT,
                    sequence_number BIGINT GENERATED ALWAYS AS IDENTITY
                    )
                    WITH (
                    tsdb.hypertable,
                    tsdb.chunk_interval = '2 hours',
                    tsdb.partition_column = 'ts',
                    tsdb.segmentby = 'path',
                    tsdb.orderby = 'ts ASC',
                    tsdb.create_default_indexes = false
                    );
                    CREATE INDEX IF NOT EXISTS alarm_history__query ON alarm_history(ts ASC, path, status)
MongoDB
The Historian module uses a custom structure and compact binary format to efficiently store time-series data using a MongoDB database.
The structure is as follows:
A collection named tags stores the tag name and its internal ID.
A collection is created each day with the format --> yyyy-mm-dd.samples
In each collection, a document is created per tag and hour, the ID of each document is composed of the numeric ID of the tag stored in the tags collection and the hour in UTC. For example, all events for a tag with ID 23 between 7:00 and 8:00 UTC are stored in the document with ID 2307.
Events are stored as entries inside the document, the key represents the millisecond within the hour and the value is an encoded binary object that contains the event data.
The binary object is encoded using the following serialization:
The first byte contains the quality according to the OPC standard (0 to 192).
The second byte contains the opcode which indicates the data type.
if opcode = 0: A boolean with the value false.
if opcode = 1: A boolean with the value true.
if opcode = 2: The next 8 bytes contain a double value using big-endian ordering.
if opcode = 3: A null value.
if opcode = 4: The rest of the bytes contain a UTF8 string.
if opcode > 4: The value is an integer.
if bit 5 = 0: The value is smaller than 5 bits and is stored in the first 5 bits to the right.
if bit 5 = 1: The next bytes contain an integer with little-endian order.
if bit 6 = 0: The sign of the integer value is positive.
if bit 6 = 1: The sign of the integer value is negative.
Examples:
Opcode | Data type | Value |
00000000 | boolean | false |
00000001 | boolean | true |
00000010 | double | next 8 bytes as double |
00000011 | null | null |
00000100 | string | next bytes as UTF8 string |
10001011 | integer | 11 |
11010011 | integer | -19 |
10000011 | integer | 3 |
Renaming Tags
TimescaleDB
When using TimescaleDB as the Historian database, you can rename a tag while preserving its historical data by executing a simple SQL statement:
UPDATE public.tag_ids
        SET tag = :new_tag_name
        WHERE tag = :current_tag_name;
Example:
UPDATE public.tag_ids
        SET tag = '/PVSIM/BLUELAKE/PVG001/PST_10/INV001/ACTIVE_POWER_2'
        WHERE tag = '/PVSIM/BLUELAKE/PVG001/PST_10/INV001/ACTIVE_POWER';
Output:
UPDATE 1

        Query returned successfully in 57 msec.
We can verify the change with:
SELECT * FROM public.tag_ids WHERE tag = '/PVSIM/BLUELAKE/PVG001/PST_10/INV001/ACTIVE_POWER_2';Output:
id | tag |
|---|---|
1 | /PVSIM/BLUELAKE/PVG001/PST_10/INV001/ACTIVE_POWER_2 |
MongoDB
Note
Before proceeding with the following procedure, it is imperative to validate the CSV file. Ensuring the accuracy and integrity of the CSV file is crucial for the proper execution of the process.
Failure to validate the file may result in errors or unexpected outcomes. Take the necessary steps to validate the CSV file before proceeding further.
Note
This feature is new in N3uron version 1.21.5.
Changing tag names while keeping the historical data of the time series is possible. To do this, it is necessary to follow these steps:
Step 1: Prepare a CSV file named tags_rename.csv with the following format:
/oldName1,/newName1
/oldName2,/newName2
/oldName3,/newName3
Step 2: Stop the Historian module. (If data is received through links and Historian is configured with 'Pause links while unavailable'), remote nodes will pause sending data and will store it via S&F).
Step 3: Don't forget to make a backup of the module's configuration and the database.
Step 4: Make the corresponding changes in the data model and save them.
Step 5: Save the CSV file (tags_rename.csv) to the Historian module folder inside data (On Windows: C:/Program Files/N3uron/data/Historian and on Linux: /opt/n3uron/data/Historian).
Note
If the Historian instance to be renamed is different, then it should be stored in C:/Program Files/N3uron/data/<Historian module name> or /opt/n3uron/data/<Historian module name>.
Step 6: Restart the Historian module.
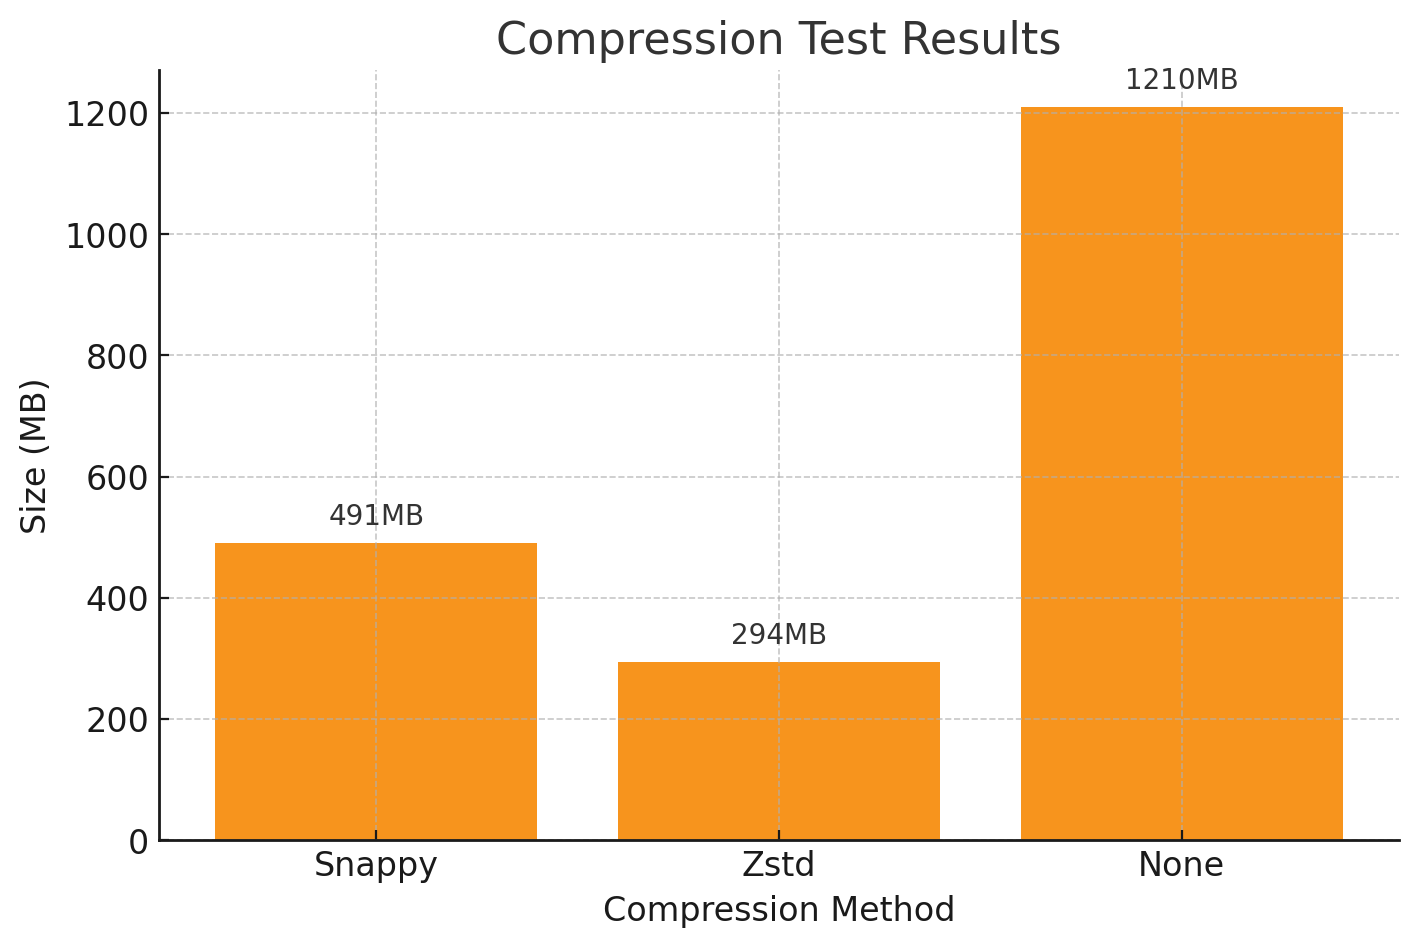
Enabling Zstd Compression in MongoDB
By default, MongoDB compresses data on disk using the Snappy compression algorithm. If you are using MongoDB 4.2 or later, you can enable Zstd compression and achieve up to a 40% reduction in disk space while maintaining a similar performance.
Note
Existing data will not be recompressed using Zstd. The compression change will only apply to new collections created after the configuration is updated.
There are two methods to enable Zstd as the default block compressor in MongoDB:
Update the mongod.conf file:
...
        storage:
        engine: wiredTiger
        wiredTiger:
        collectionConfig:
        blockCompressor: zstd
        ...
Use the command line:
mongod --wiredTigerCollectionBlockCompressor zstdHistorian Full Product Details