Amazon Web Services
Configuring AWS
First, log into the log into Amazon and Open AWS IoT Console.
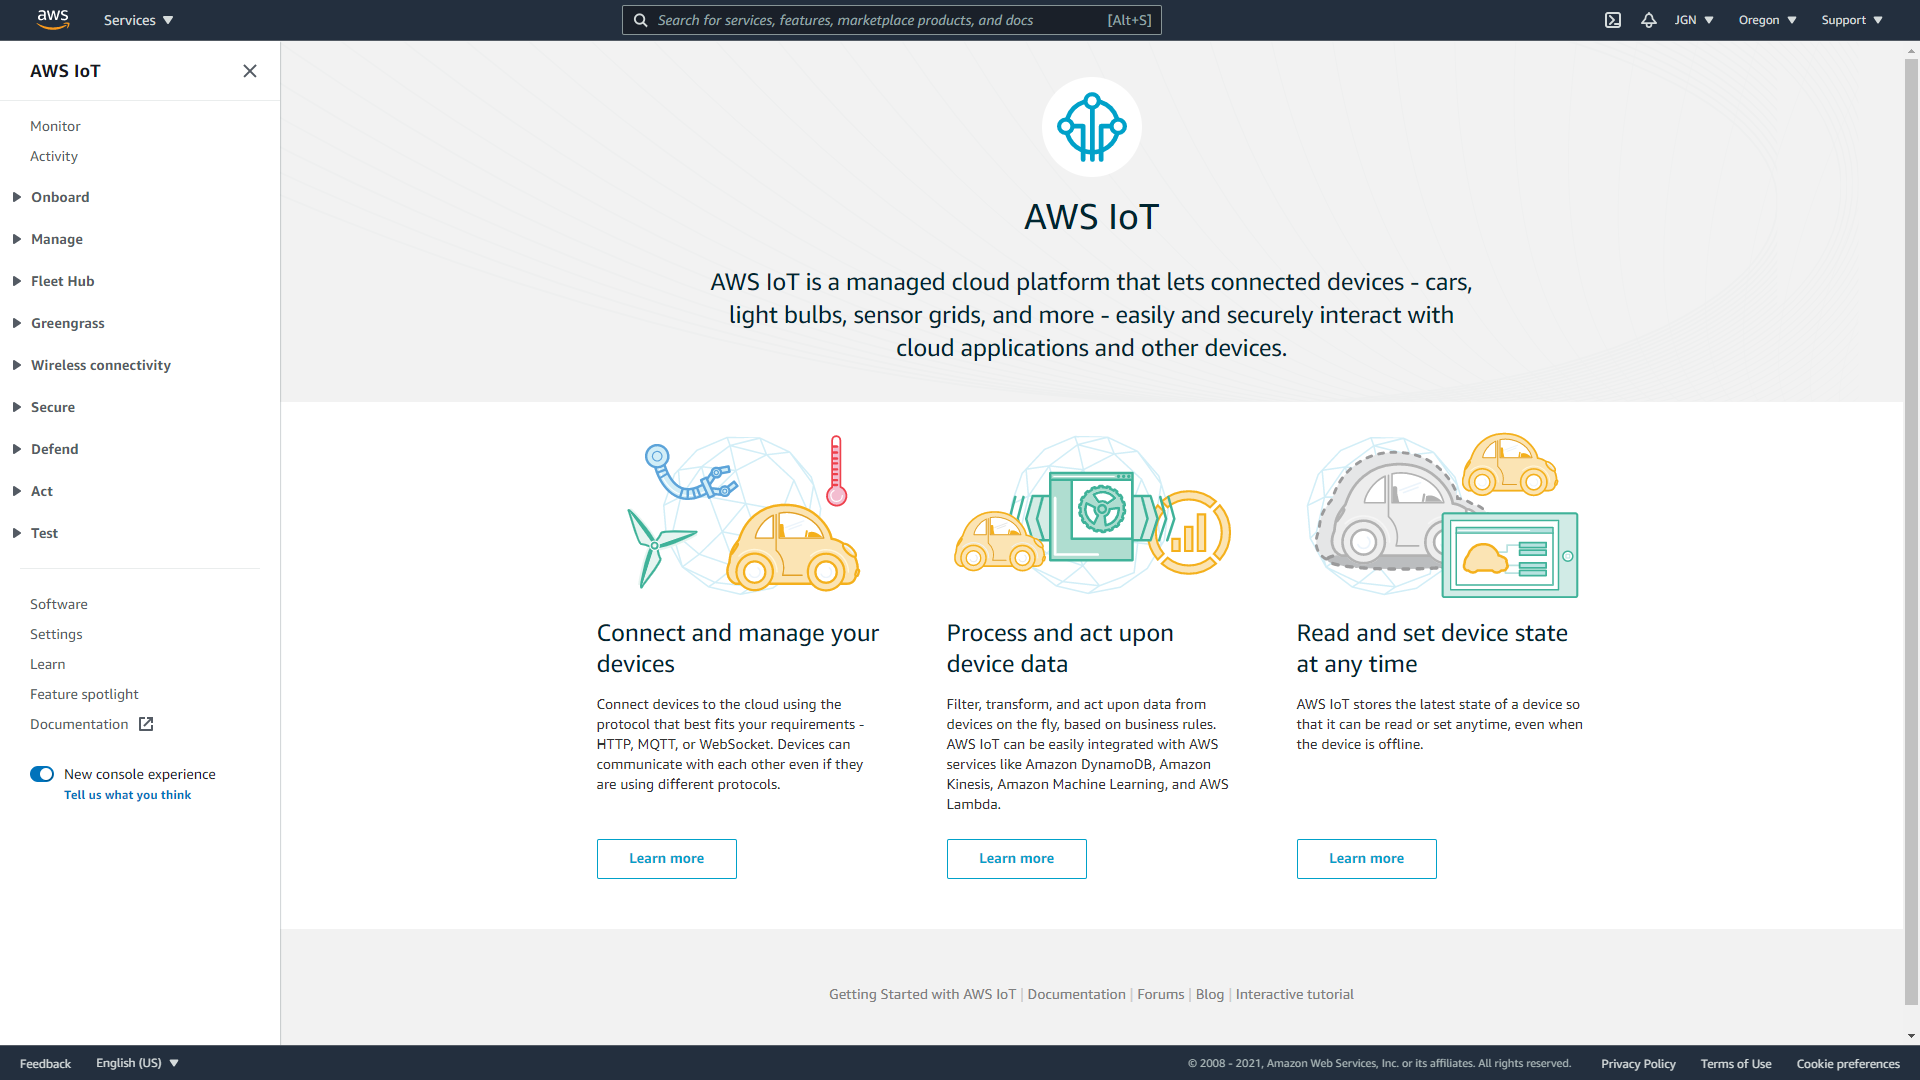
Once logged in, you’ll create the AWS IoT resources that a device will require to connect to AWS IoT and exchange messages.
Create a Policy using the AWS IoT Console
This policy will authorize your device to interact with AWS IoT services.
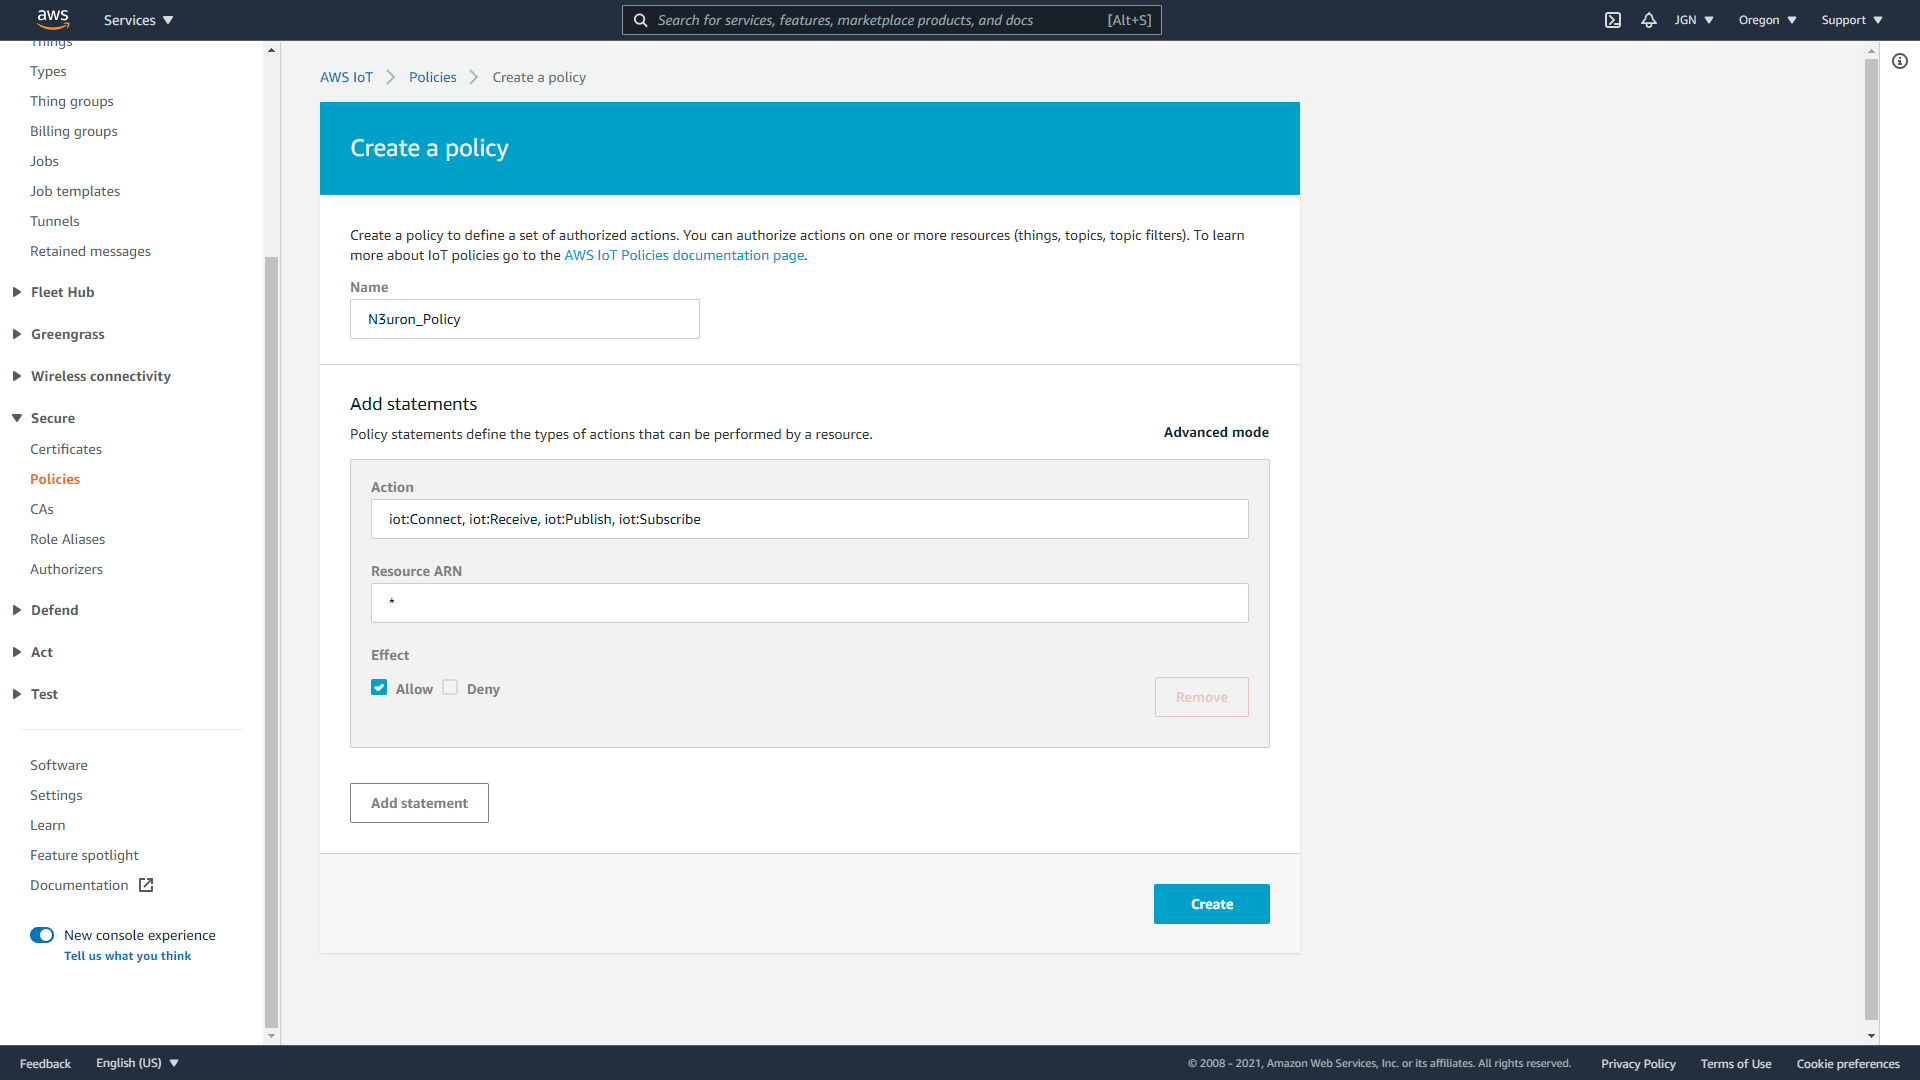
- Step 1: Within the AWS IoT Console, in the left-hand menu, first select Secure, and then Policies. On the You don't have a policy yet page, choose Create a policy. If your account has existing policies, choose Create.
- Step 2: On the Create a Policy page,
- In the Name field, enter a name for the policy (for example, N3uron_Policy).
- In the Action field, enter iot:Connect, iot:Receive, iot:Publish, iot:Subscribe.
- In the Resource ARN field, enter *.
- Select the Allow check box.
- Step 3: After you have entered the information for your policy, choose Create.
For more information, see IAM Policies.
Create Things Objects in the AWS IoT Console
Devices connected to AWS IoT are represented by Thing objects in the AWS IoT registry. A Thing object represents a specific device or logical entity.
- Step 1: Within the AWS IoT Console, in the left-hand menu, select Manage, then choose Things.
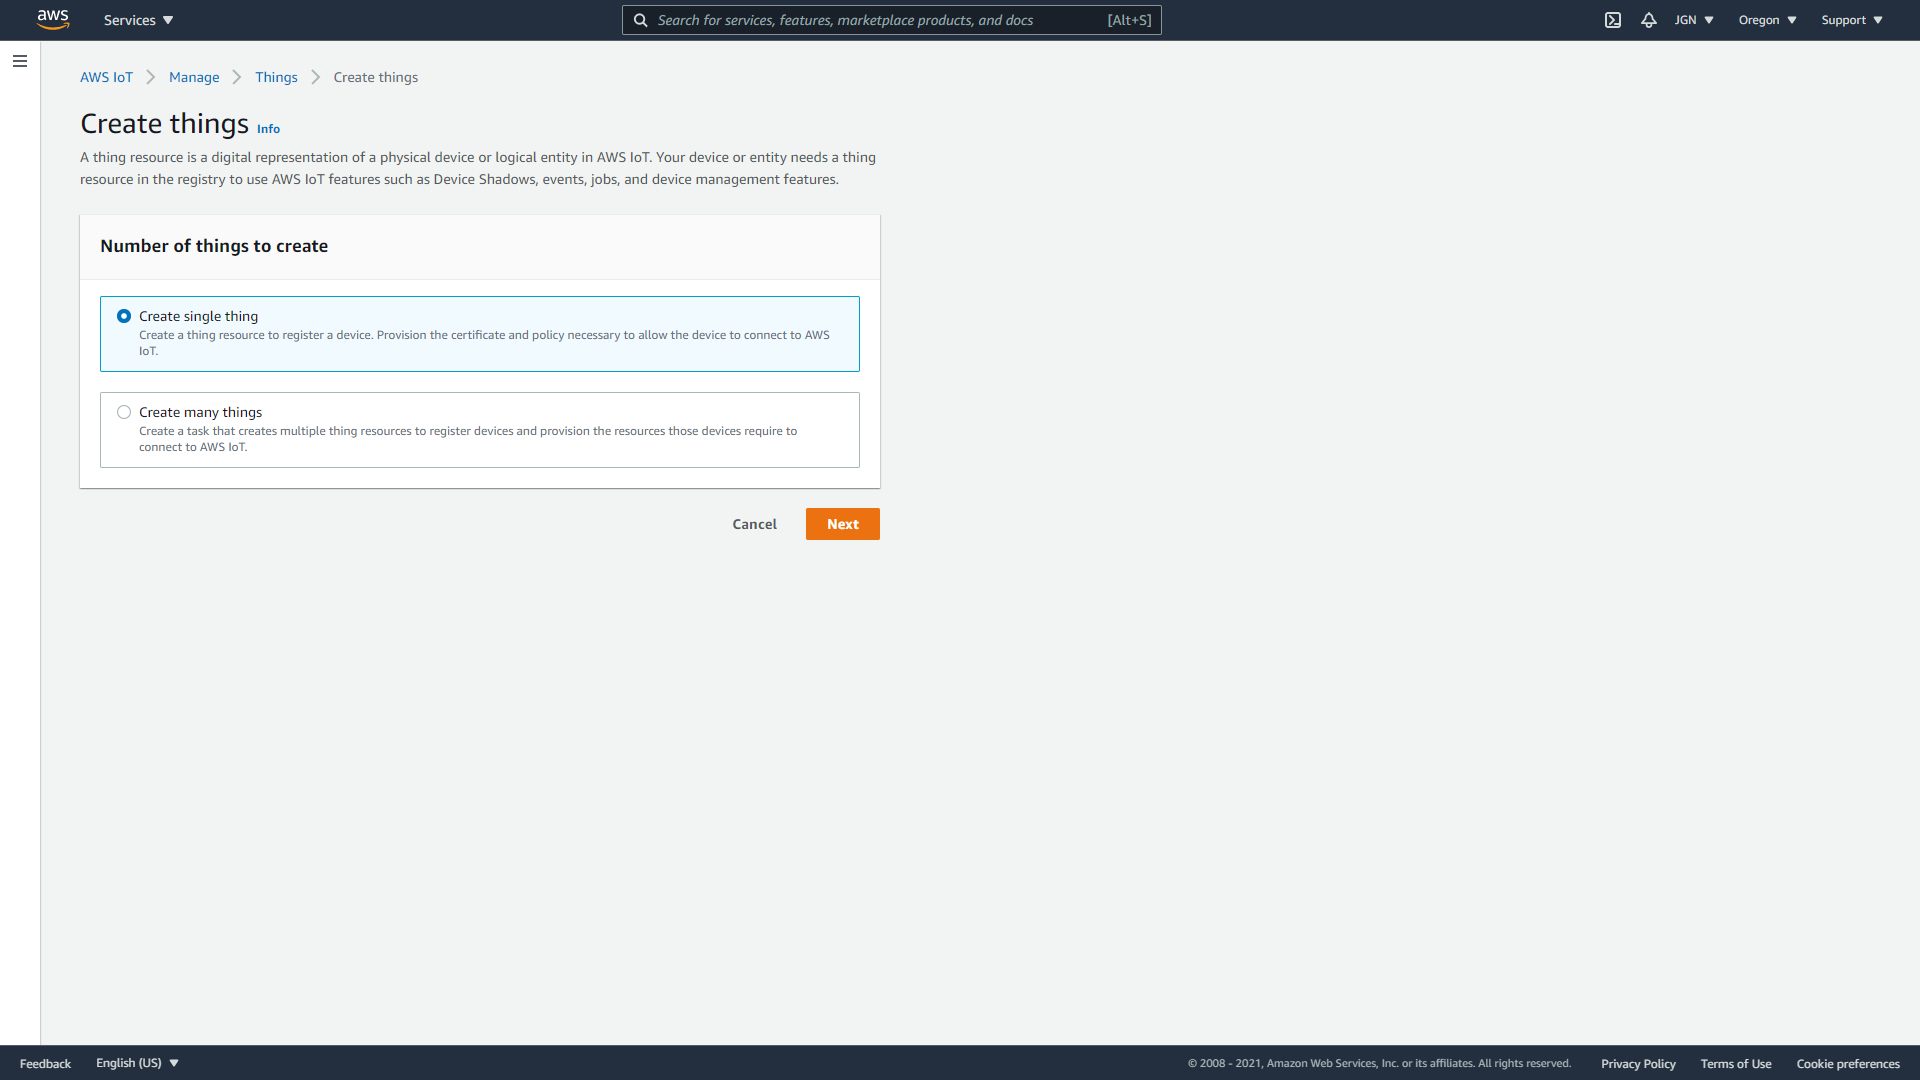
- Step 2: On the Things page, select Create Things.
- Step 3: On the Create Things page, select Create a single thing, then select Next.
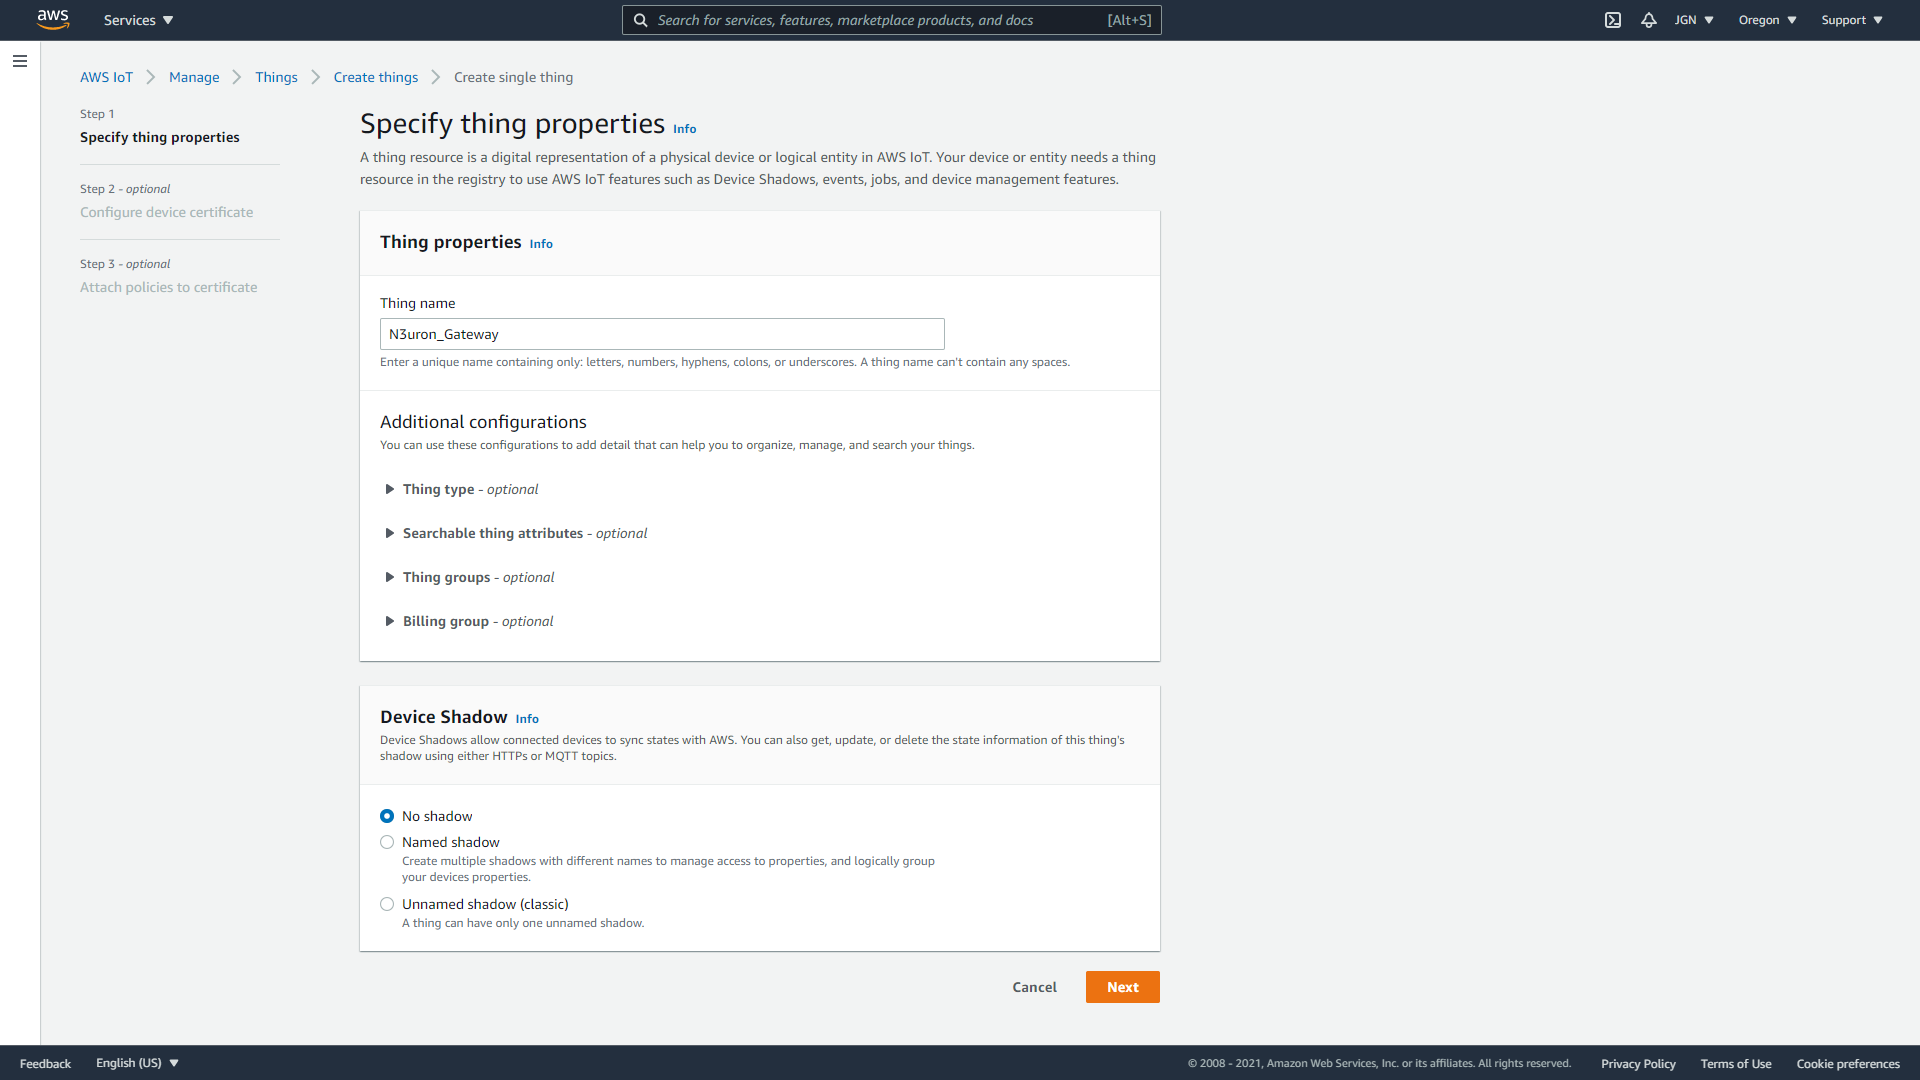
- Step 4: On the Specify thing properties page, for Thing name, enter a name for your Thing. In this example, we have named it “N3uron_Gateway”.
- Step 5: Leave the rest of the fields on this page empty. Select Next.
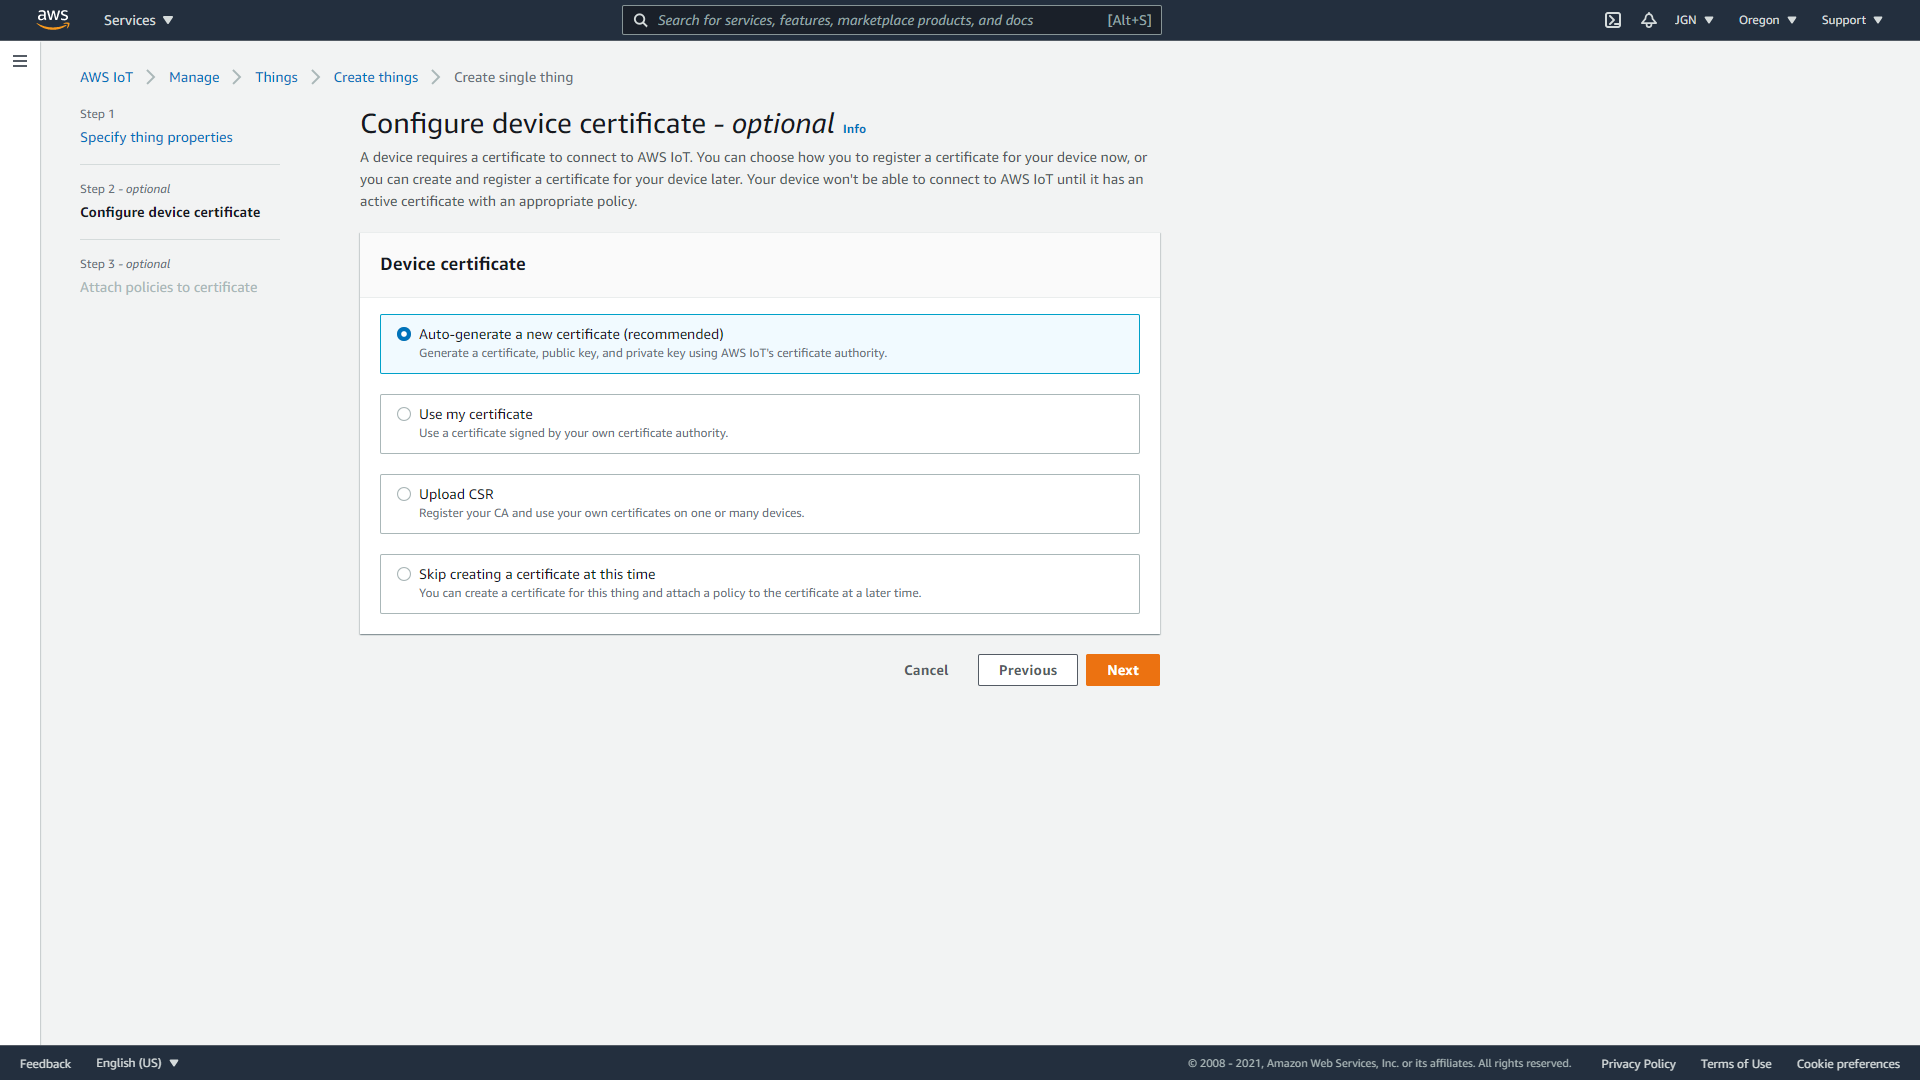
- Step 6: On the Configure device certificate – optional page, select Auto-generate a new certificate (recommended). Select Next.
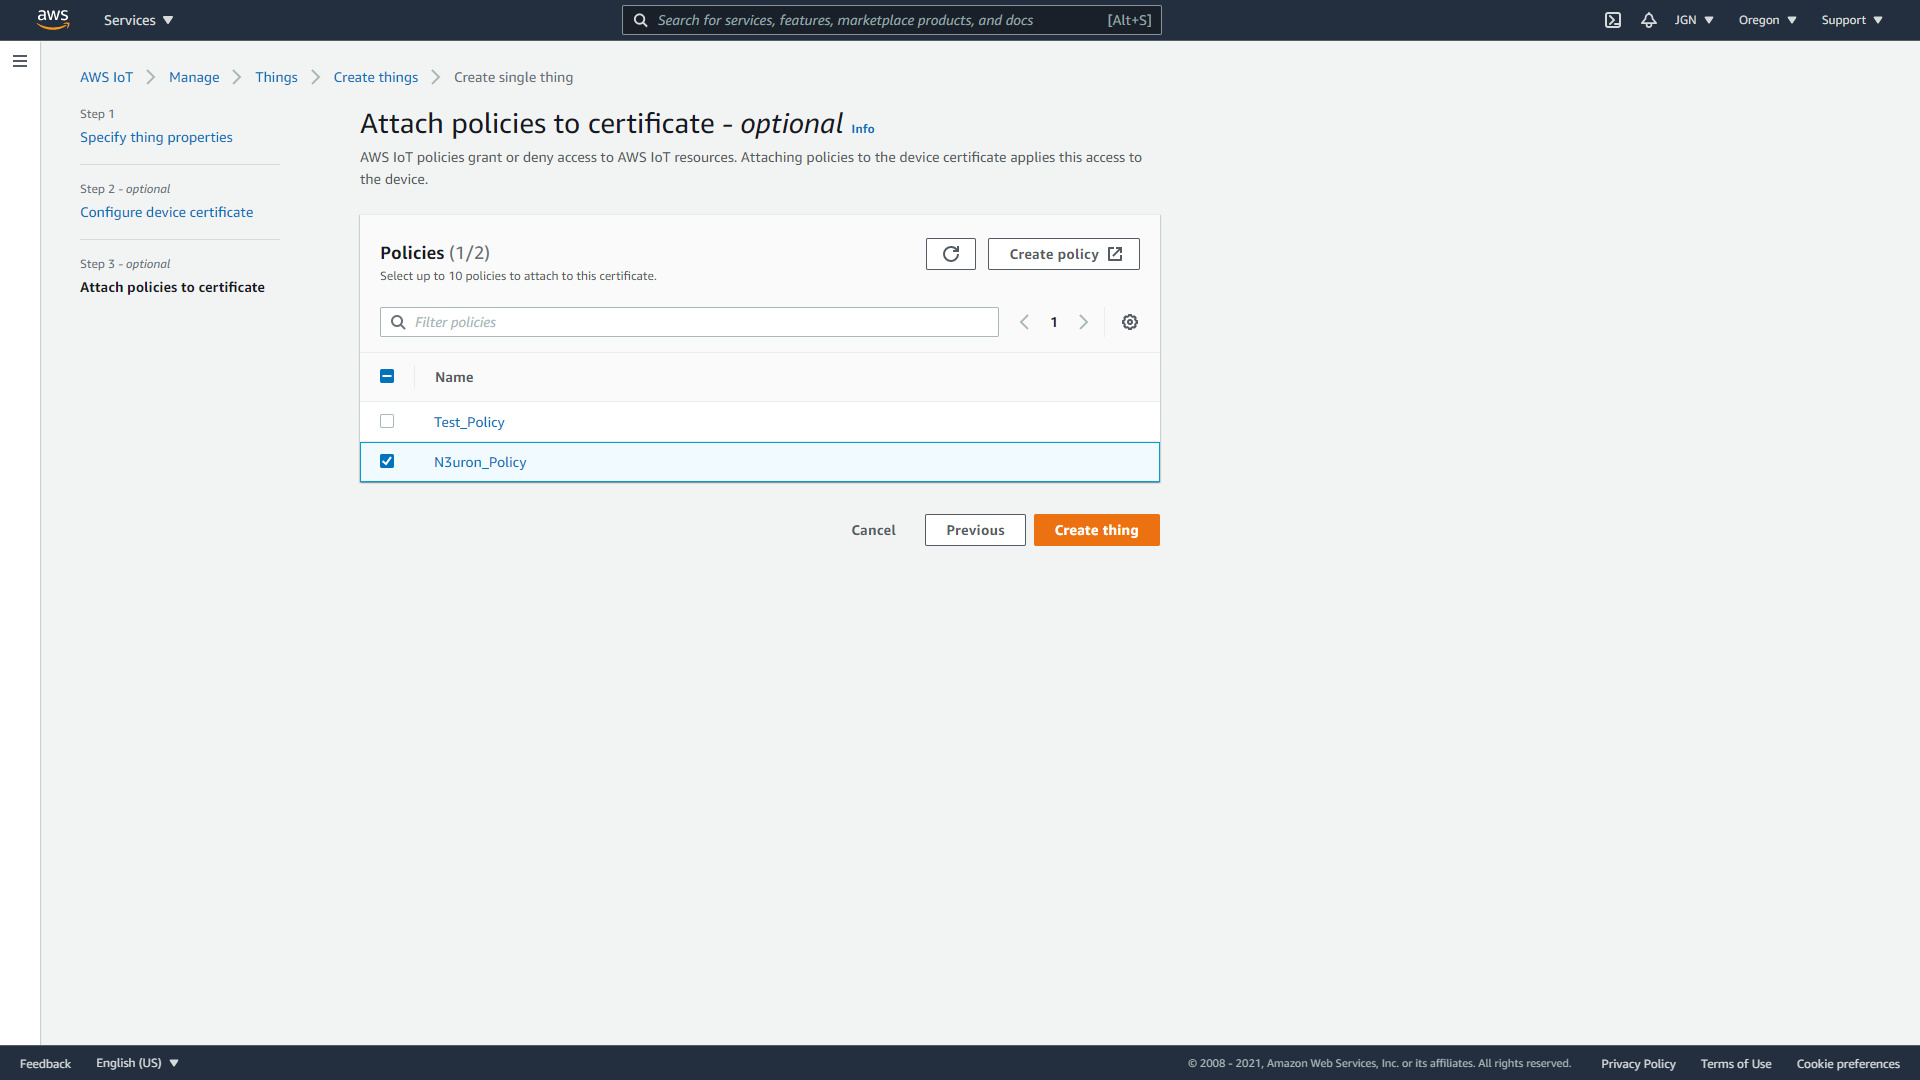
- Step 7: On the Attach policies to certificate – optional page, select the policy you created in the previous section. In this case, N3uron_Policy. Choose Create thing.
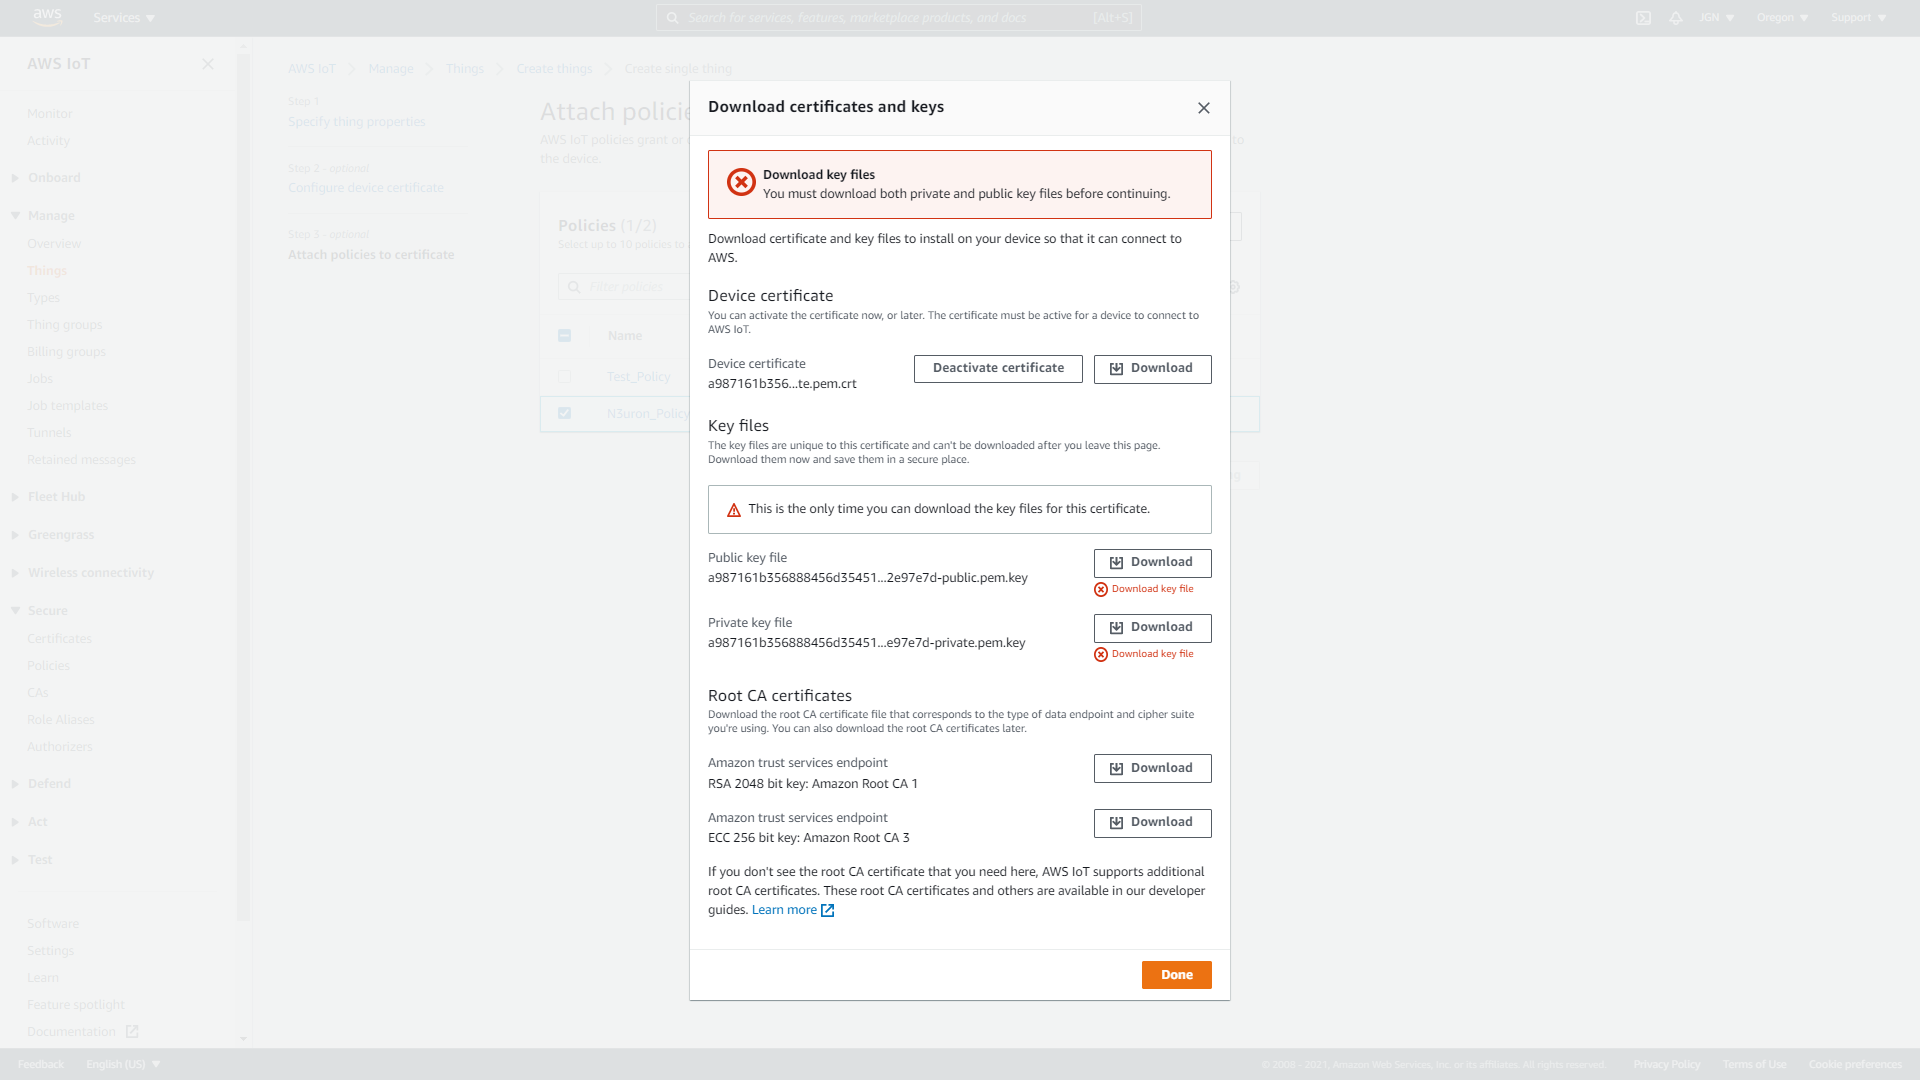
- Step 8: On the Download certificates and keyspage,
- Download each of the certificates and key files and save them for later. You'll need to install these files on your device. See below for the required files:
- Private key
- Public key
- Device certificate
- Root CA certificate
- Download the Amazon root CA 1.
- Choose Done.
- Download each of the certificates and key files and save them for later. You'll need to install these files on your device. See below for the required files:
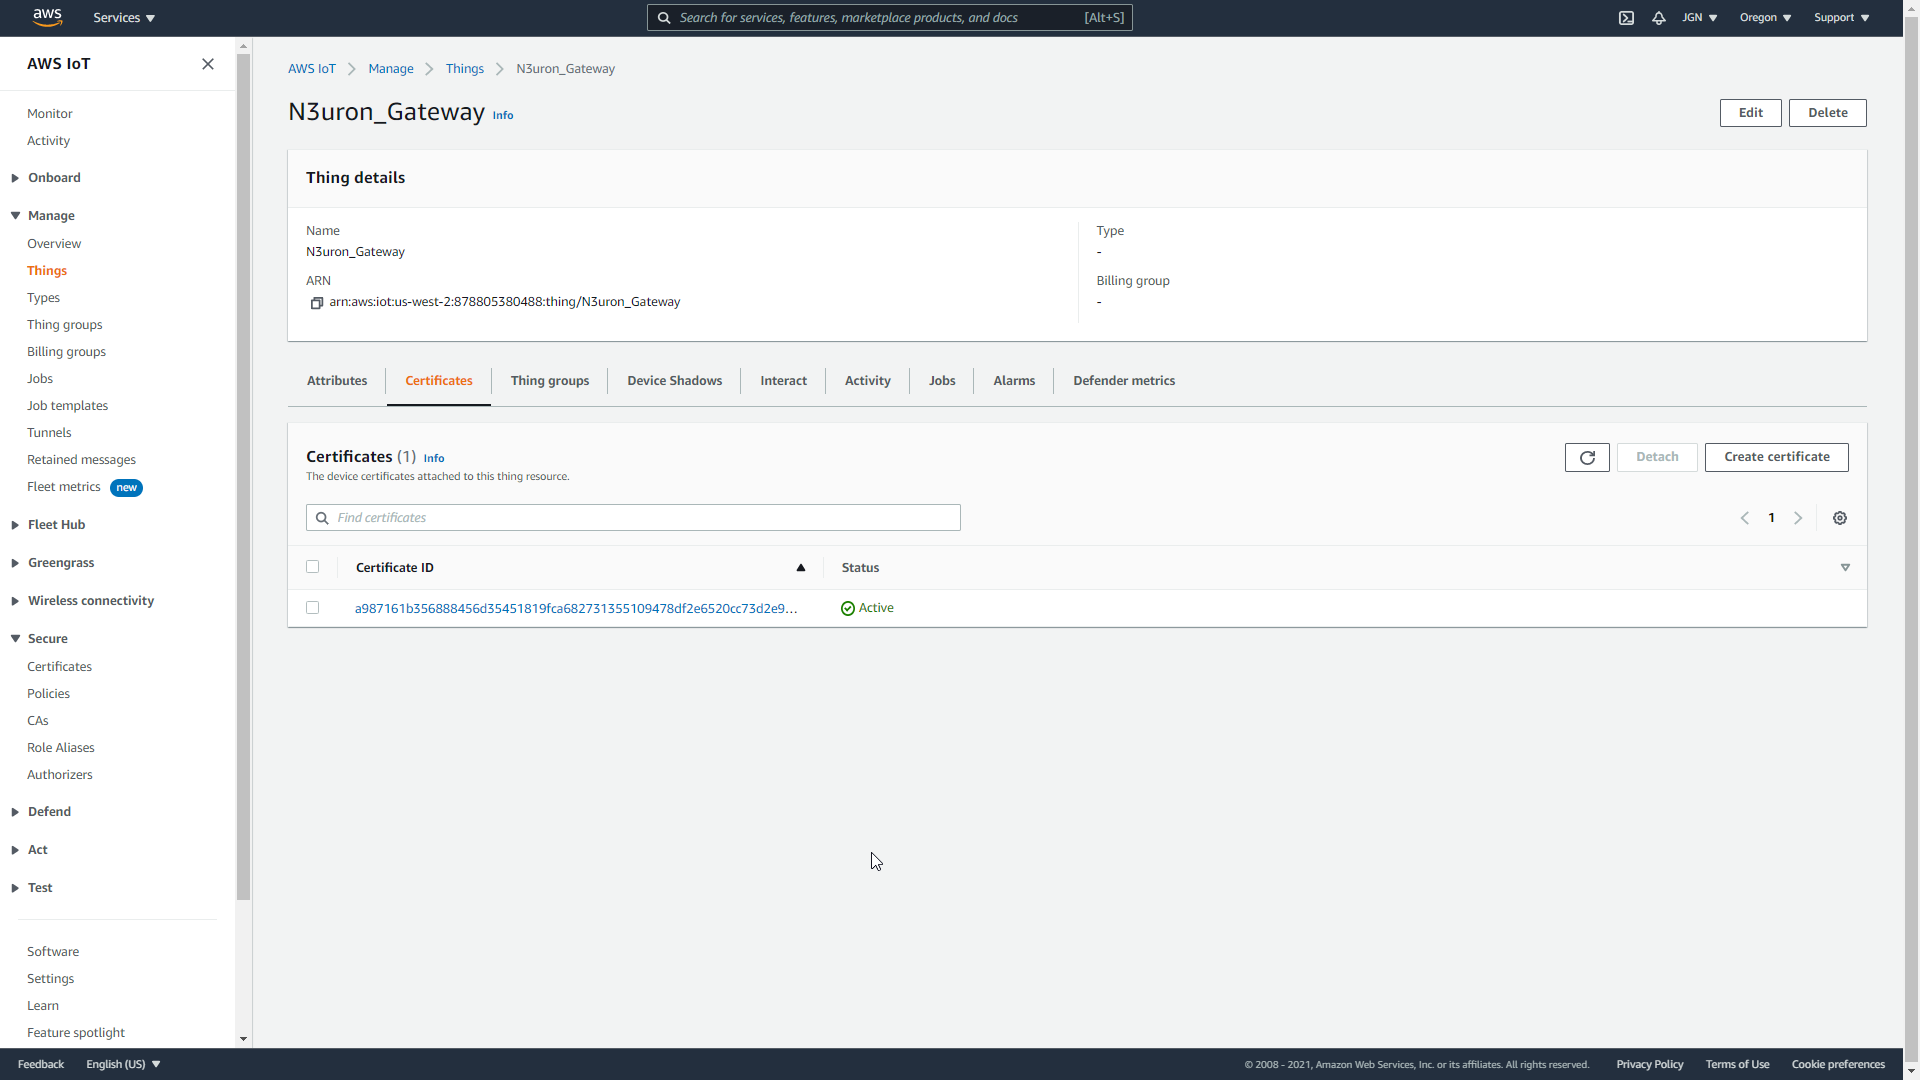
After this procedure is complete, you should be able to see the new thing object in your list of Things.
Click on the Thing you’ve just created, N3uron_Gateway, select the Certificates tab, and make sure the certificate is active.
Start Configuring N3uron IIoT Platform
Create a Module Instance Within N3uron's WebUI Interface
- Step 1: In the Navigation panel, select Config.
- Step 2: In the Explorer panel, select Modules.
- Step 3: Click on the Model menu and select New Module.
- Step 4: The instance can be given any name but for the example we will use MQTT.
- Step 5: Set the Module Type property to MqttClient. Leave the rest of the properties as their default values and click Save.
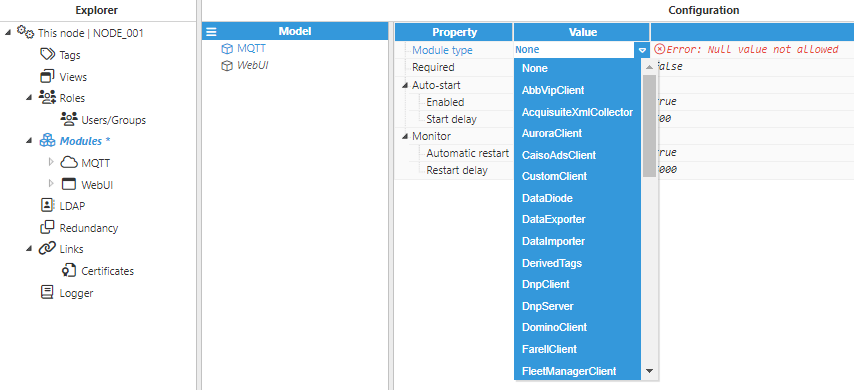
Configure N3uron's MQTT Module within the WebUI's Explorer Panel
- Step 1: In the Explorer panel, select the MQTT instance you have just created.
- Step 2: Click on the Model menu bottom bar and select New Connection.
- Step 3: Give the New connection a name. In this example, it has been named AWS.
- Step 4: Configure the connection properties:
- Select Amazon Web Services from the Destination Broker drop-down menu.
- Load the Certificate, Private key, and CA certificate you downloaded and saved when you created the Thing in the AWS IoT Console.
- In the AWS IoT Console, in the left-hand menu, go to Settings and copy your Device Data Endpoint. Go back to N3uron and paste it into the Broker URL field.
- Leave the rest of the properties as their default values and click on Save.
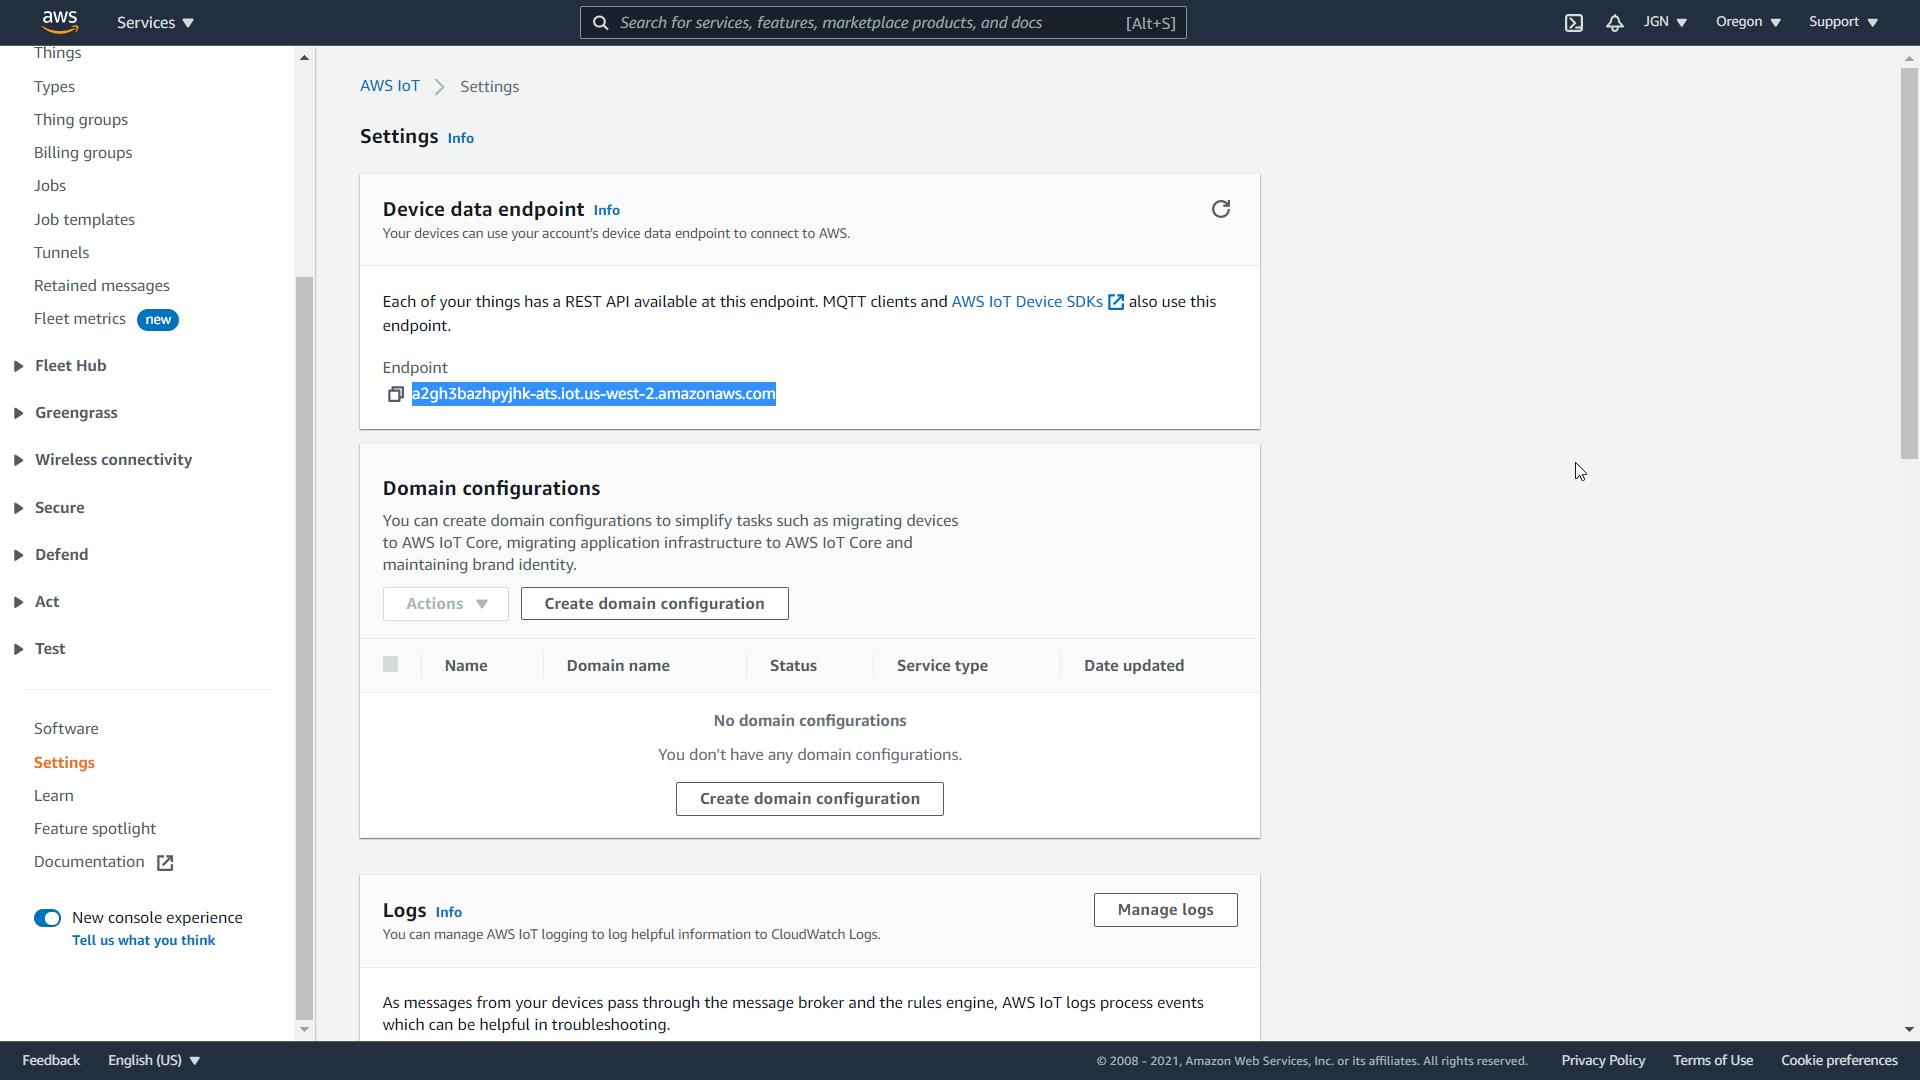
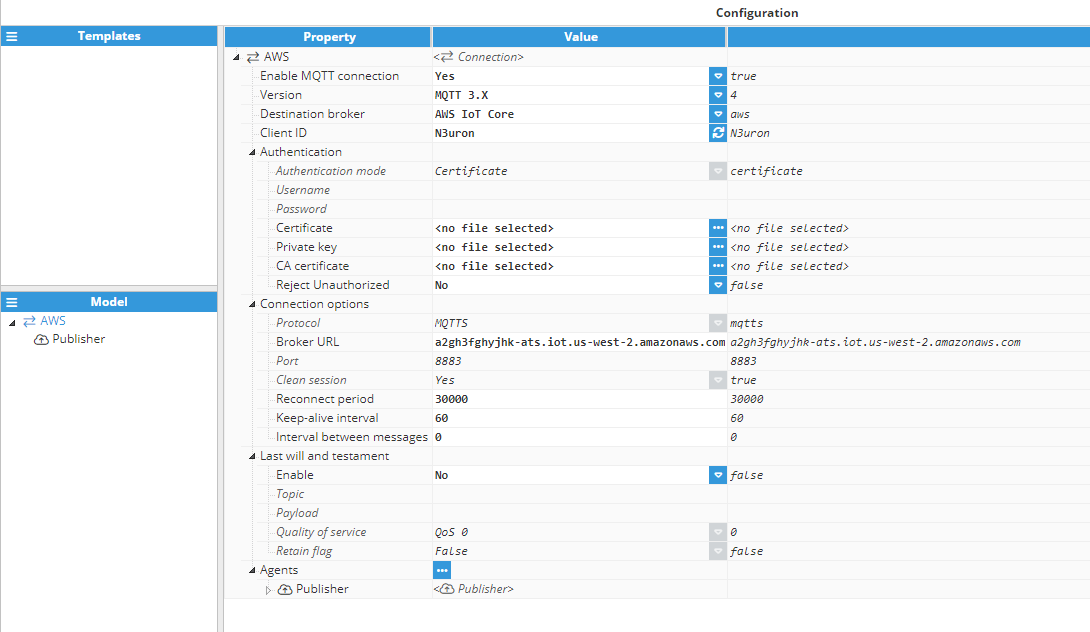
Publishing & Subscribing Data via N3uron and Amazon Web Services
Publish Data Using N3uron's MQTT Module
- Step 1: Within the Model panel, right-click on the AWS Connection you have just configured, select New Publisher, and give it a name. In this example, we will simply use Publisher.
- Step 2: Click on it and add a name in the Topic field. In this example, we have used N3uron.
- Step 3: Click on the Tag Filter button, select New Tag Filter, and change the default name. In this example, we have used Filter. Leave Mode, Path, and Regex patterns as their default values.
With this configuration, every tag configured in N3uron will be published to our AWS Broker.
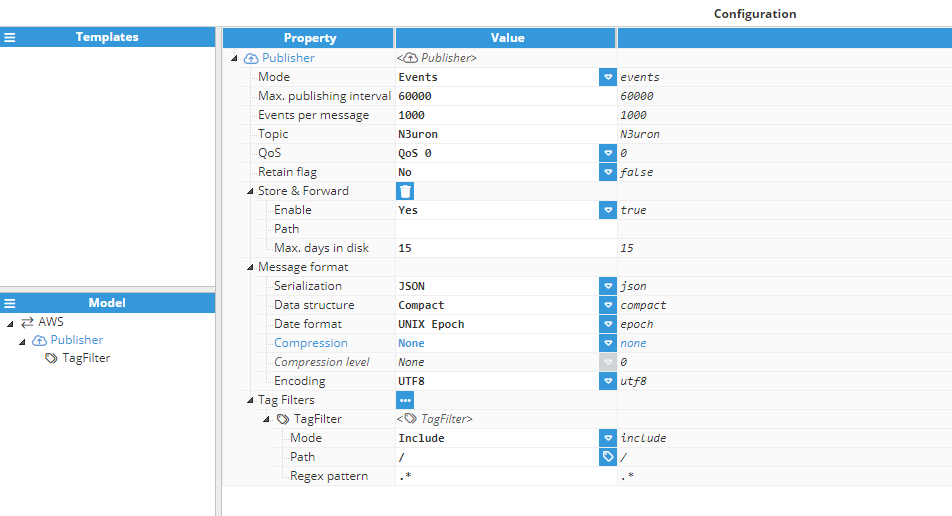
- Step 4: In the Explorer panel, select Tags.
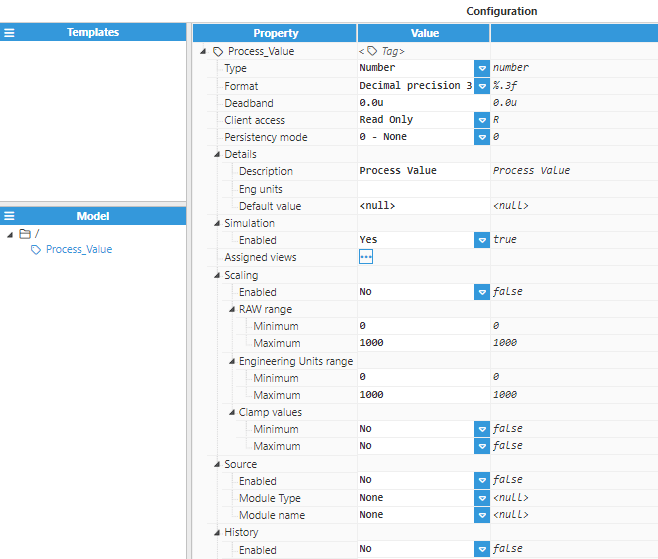
- Step 5: In the Model menu, right-click on the folder icon, select New Tag, and give it a name. In this example, we will use Process_value.
- Step 6: Within the Configuration panel, set the following properties using the values shown below, leaving the rest of them as their default values:
- Type: Number.
- Simulation/Enabled: Yes
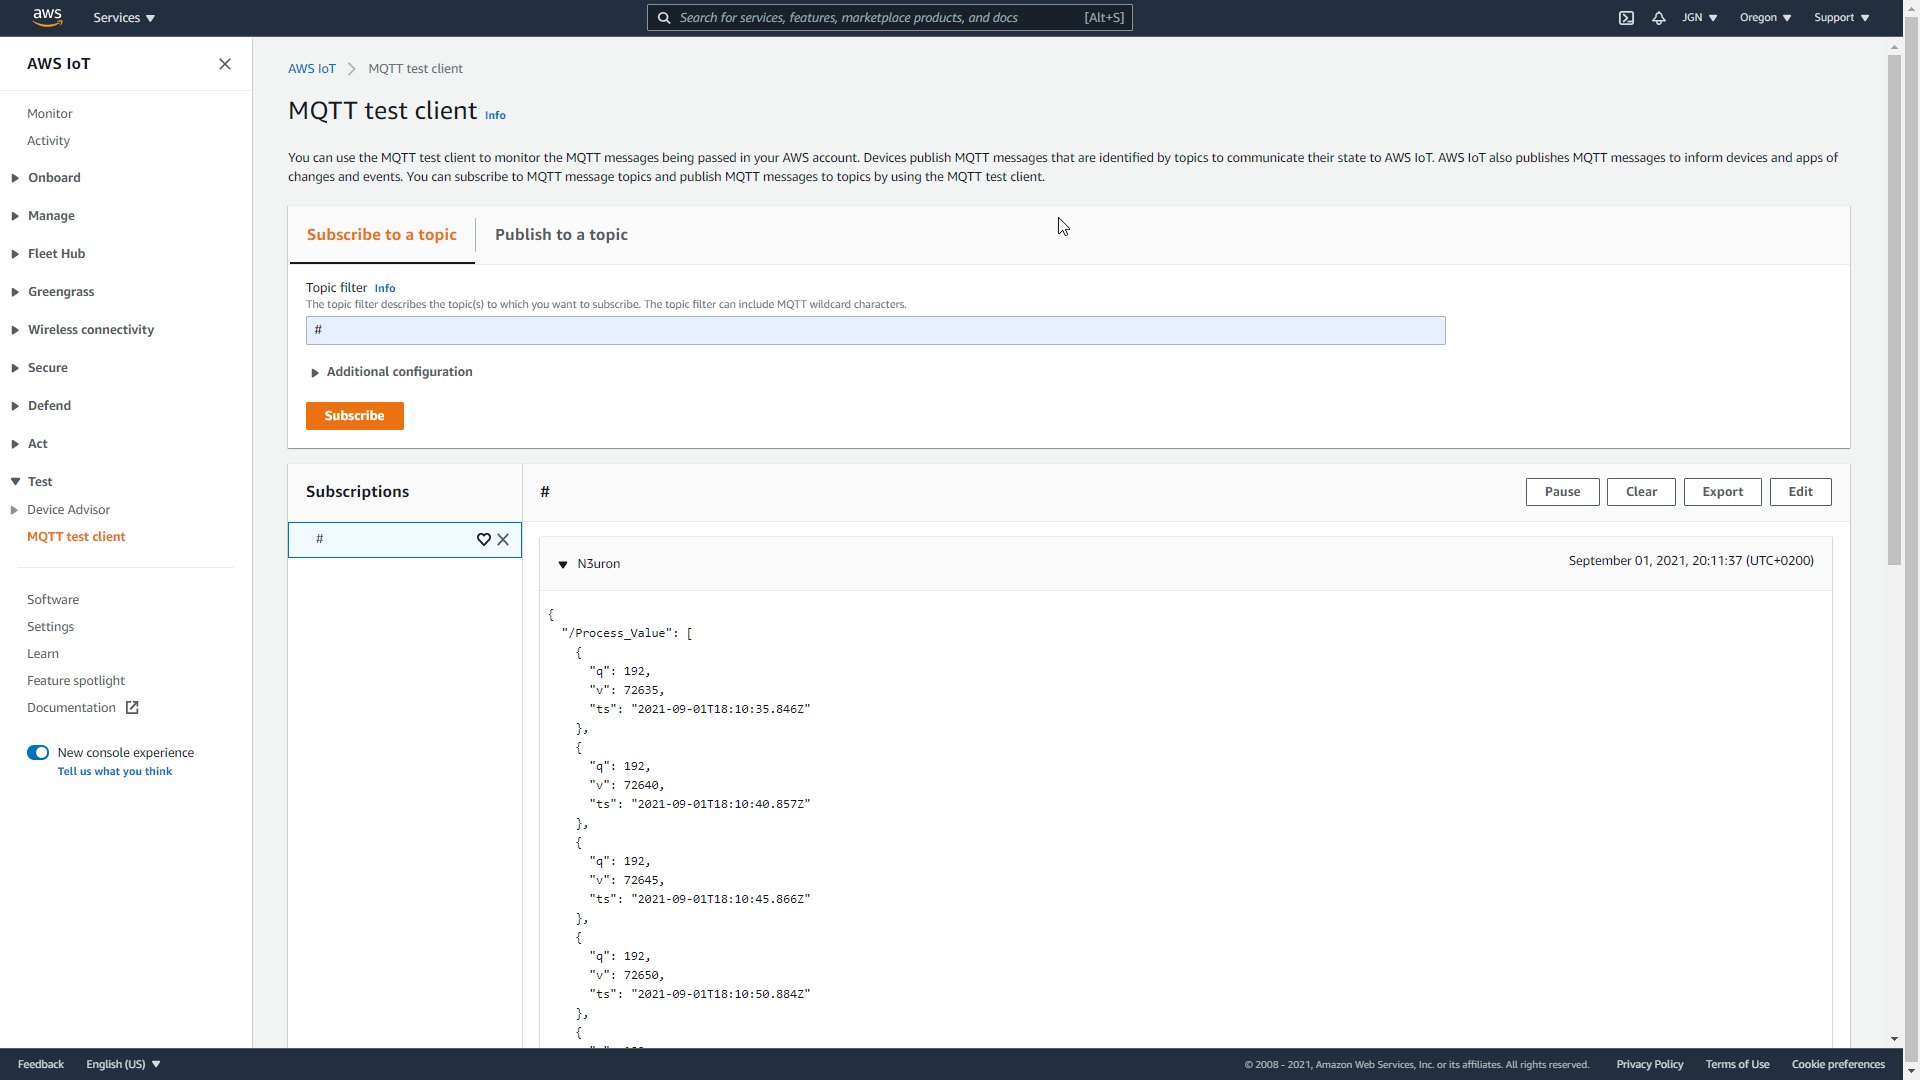
- Step 7: Go to the AWS IoT Console and in the left-hand menu, select MQTT test client.
- Step 8: Click on the Subscribe to a Topic tab, enter # in the Topic filter to subscribe to everything, and click on Subscribe. Within a few seconds, you should see the messages published to the N3uron/Process_Value topic that corresponds to our previous configuration.
Subscribe to a Topic Using N3uron's MQTT Module
- Step 1: In the Model panel, right-click on the AWS Connection, select New Subscriber, and give it a name. In this example, we will simply use Subscriber.
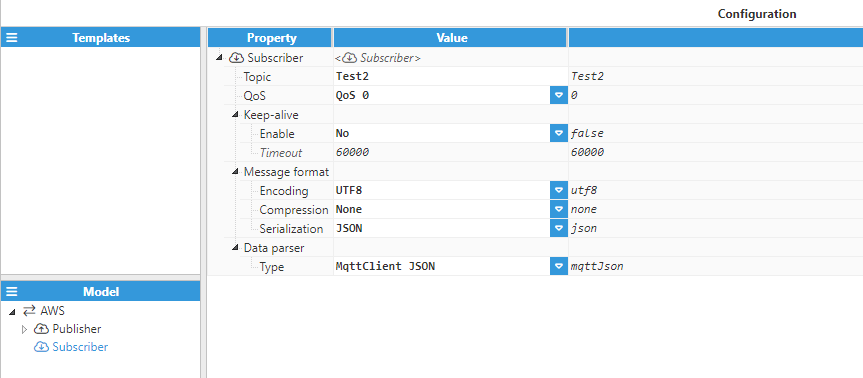
- Step 2: Click on it and add a name in the Topic field. In this example, we have used Test2.
- Step 3: Set the following properties using the values shown below, leaving the rest of them as their default values:
- Qos: Qos 0.
- Encoding: UTF8
- Compression: None
- Serialization: JSON
- Data parser/Type: MqttClient JSON
- Step 4: Within the Explorer panel, select Tags.
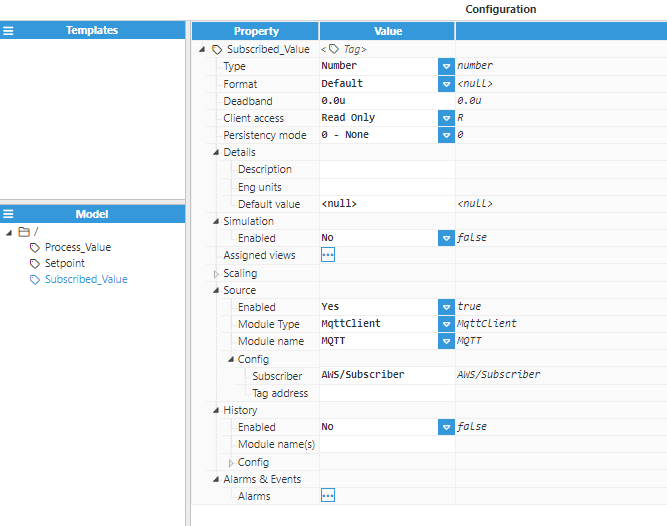
- Step 5: In the Model menu, right-click on the folder icon, select New Tag, and give it a name. In this example, we will use Subscribed_value.
- Step 6: In the Configuration panel, set the following properties using the values shown below, leaving the rest of them as their default values:
- Type: Number
- Source/Enabled: Yes
- Module Type: MqttClient
- Module name: MQTT
- Config/Subscriber: AWS/Subscriber
- Step 7: Click on Save.
- Step 8: Go to the AWS IoT Console and in the left-hand menu select MQTT test client.
- Step 9: Click on the Publish to a topic tab, enter Test2 in the Topic filter, and enter the following in Message Payload:
{
    "/Subscribed_value": [{
        "v": 3.14159,
        "q": 192,
        "ts": 1630668488618
    }]
}
- Step 10: Click on the Publish button.
- Step 11: Go back to the N3uron WebUI interface and in the left-hand panel, select Data/Real Time. You should now see the Subscribed_Value tag you created before with a value of 3.14159.

Create a Writer Using N3uron's MQTT Module
Writers are similar to Subscribers, the main difference between them being that Writers issue a write command to the underlying data provider for a specific tag, while a Subscriber acts directly as a data provider.
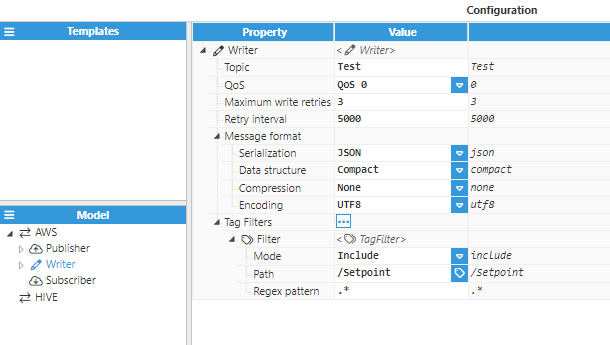
- Step 1: Within the Model panel, right-click on the AWS Connection, select New Writer, and give it a name. In this example, we will simply use Writer.
- Step 2: Click on it and add a name in the Topic field. In this example, we have used Test.
- Step 3: Set the following properties using the values shown below, leaving the rest of them as their default values:
- Qos: QoS 0.
- Serialization: JSON
- Data Structure: Compact
- Compression: None
- Encoding: UTF8
- Step 4: Click on the Tag Filter button, select New Tag Filter, and change the default name. In this example, we have used Filter.
- Step 5: Enter /Setpoint in the Path field and leave Mode & Regex pattern as their default values.
- Step 6: Within the Explorer panel, select Tags.
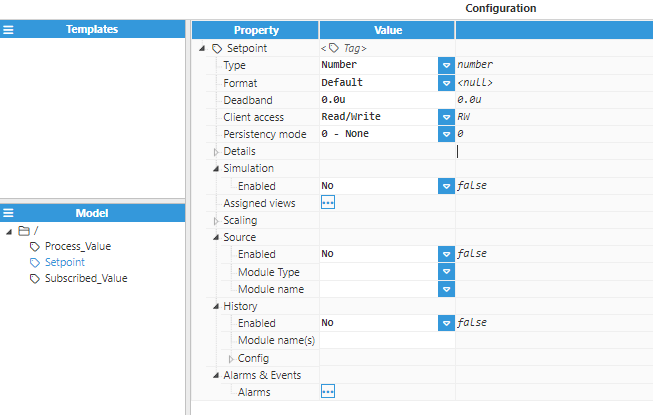
- Step 7: In the Model menu, right-click on the folder icon, select New Tag, and give it a name. In this example, we will use Setpoint.
- Step 8: In the Configuration panel, set the following properties using the values shown below, leaving the rest of them as their default values:
- Type: Number.
- Source/Enabled: No
- Client access: Read/Write
- Step 9: Click on Save.
- Step 1: Go to the AWS IoT Console and in the left-hand menu, select MQTT test client.
- Step 2: Click on the Publish to a topic tab, enter Test in the Topic filter, and enter the following in the Message Payload:
{
    "/Setpoint": 25.8
}
- Step 3: Click on the Publish button.
- Step 4: Go back to the N3uron WebUI interface and in the left-hand panel, select Data/Real Time. You should now see the Setpoint tag you created before with a value of 25.8.