Azure Event Grid
Creating a New Event Grid Namespace
- Step 1: Log into Microsoft Azure and go to Microsoft Azure Portal.
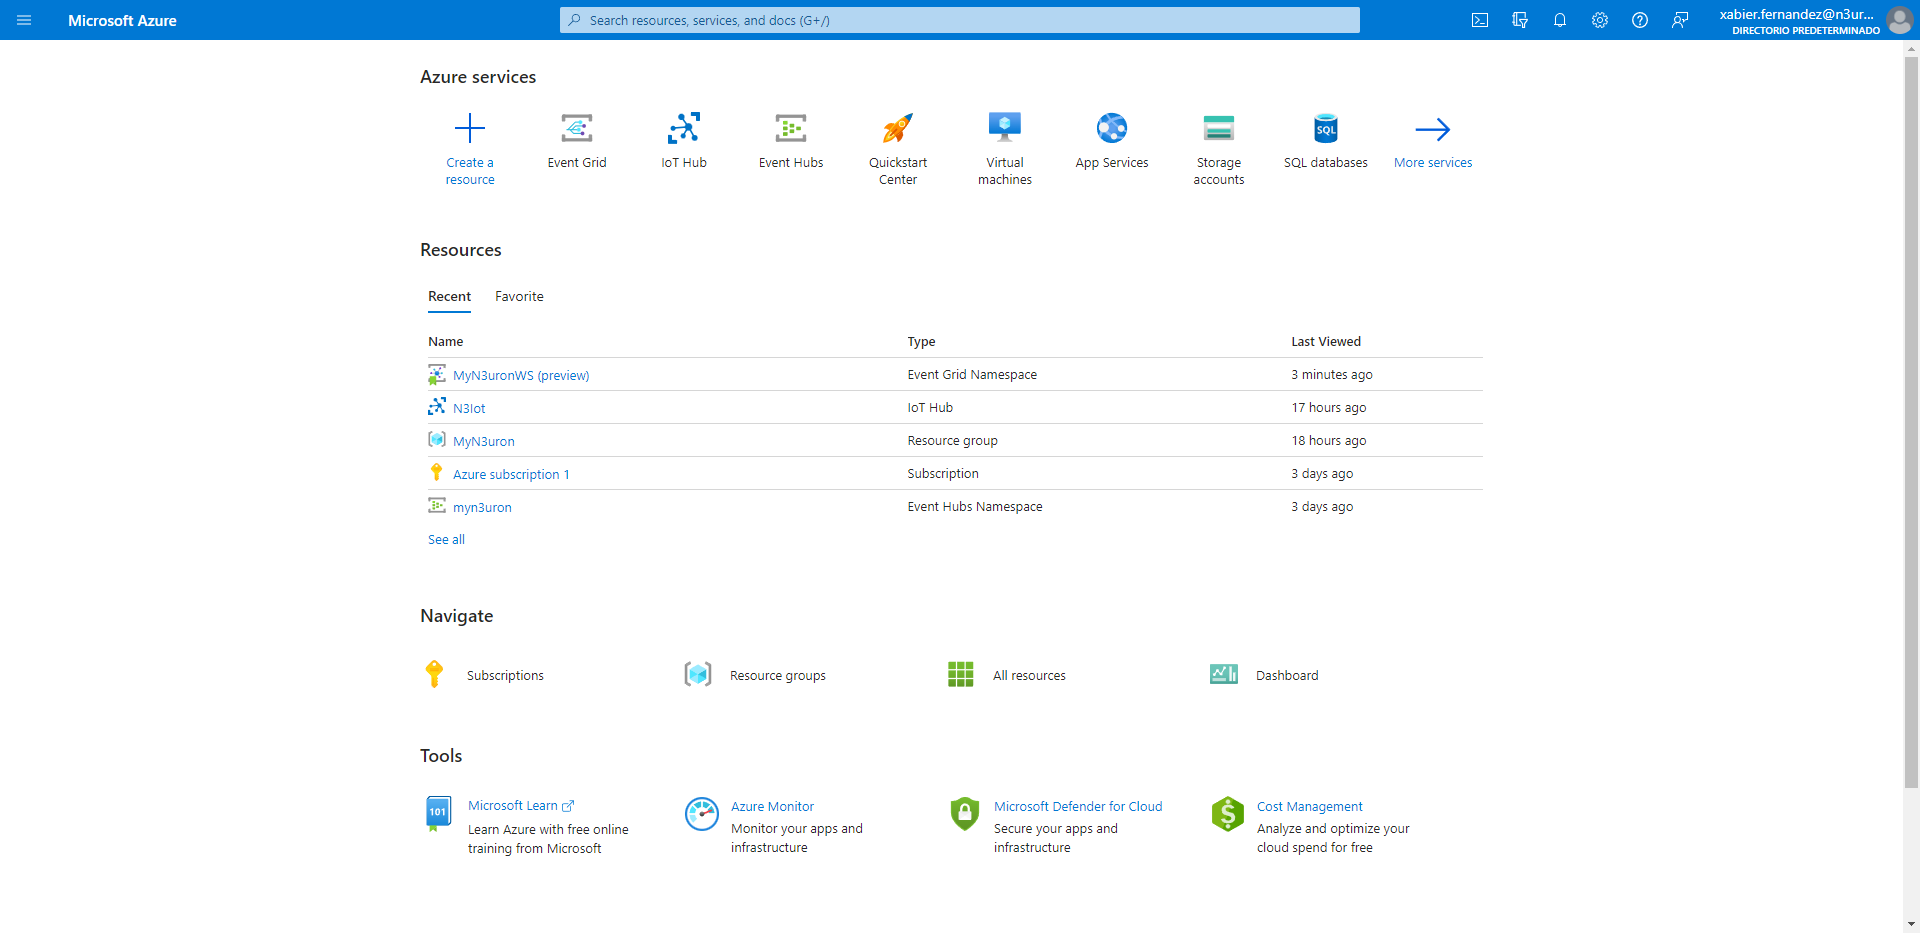
Once logged in, you’ll need to create the Azure resources that your device, in our case a N3uron node, will require in order to connect to the Azure Event Grid and start exchanging messages.
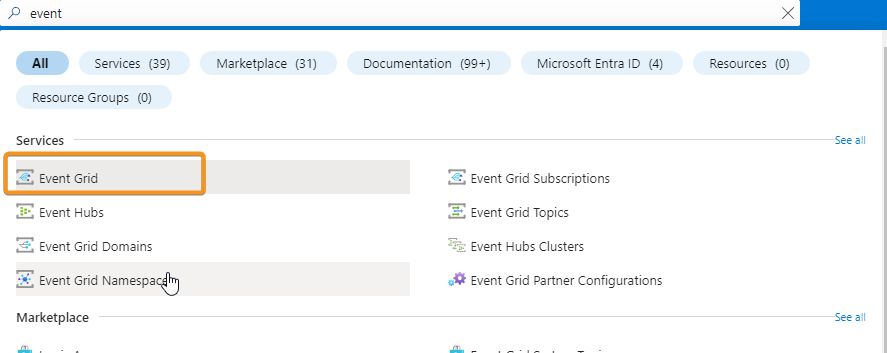
- Step 2: In the search box, enter Event and select Event Grid from the results.
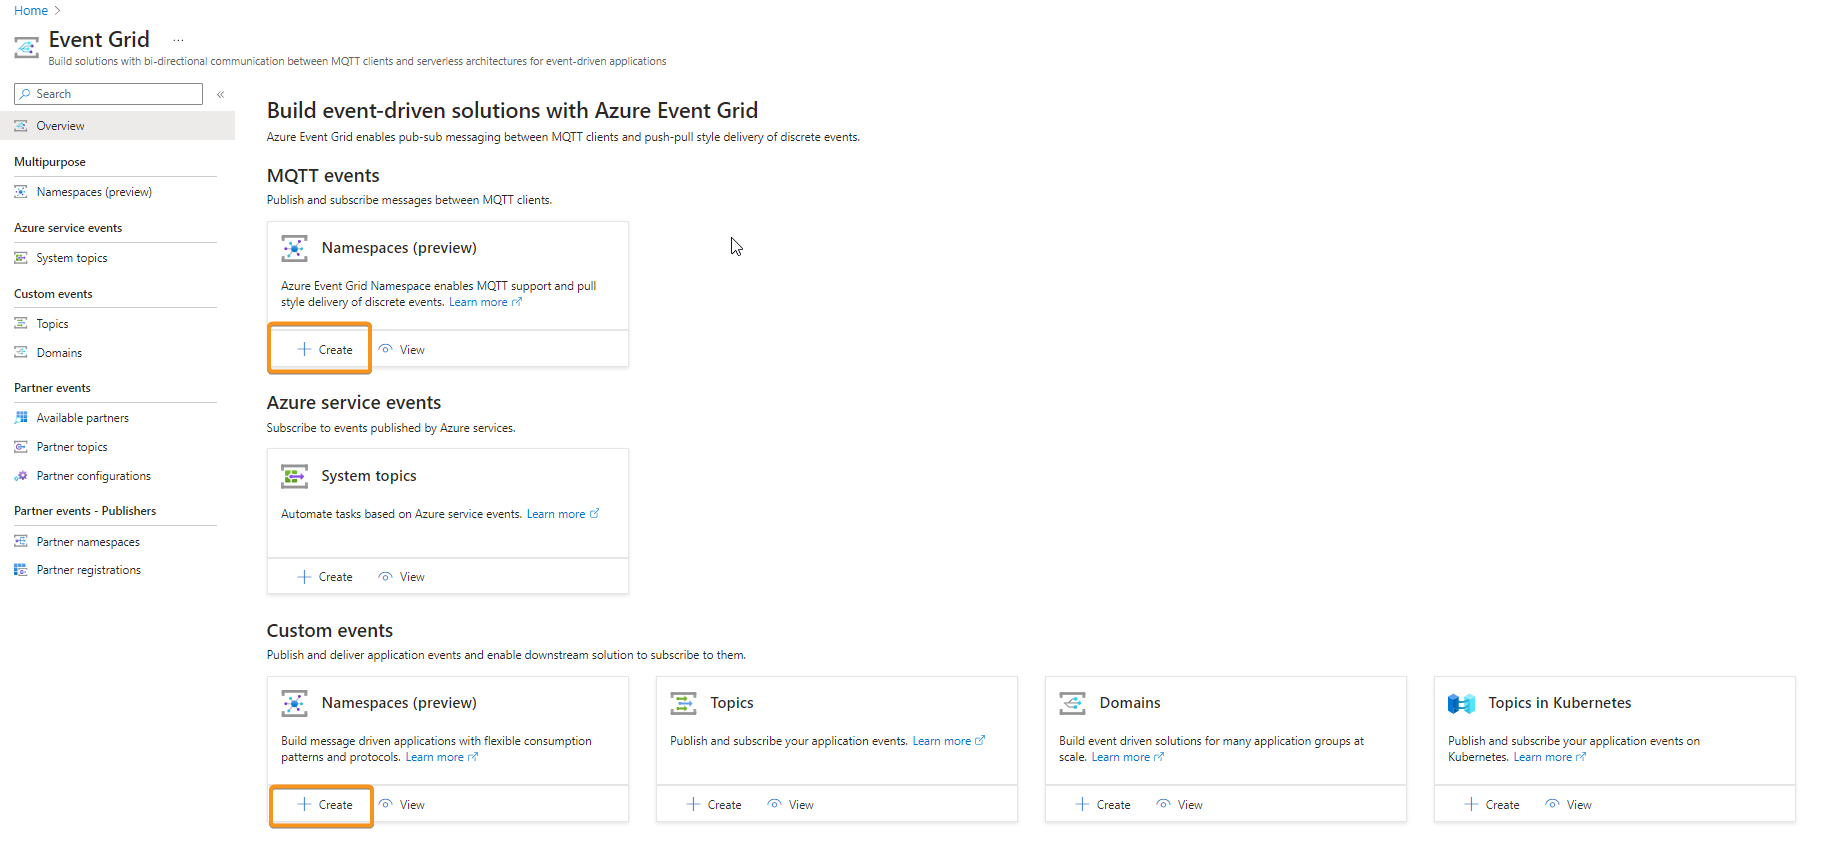
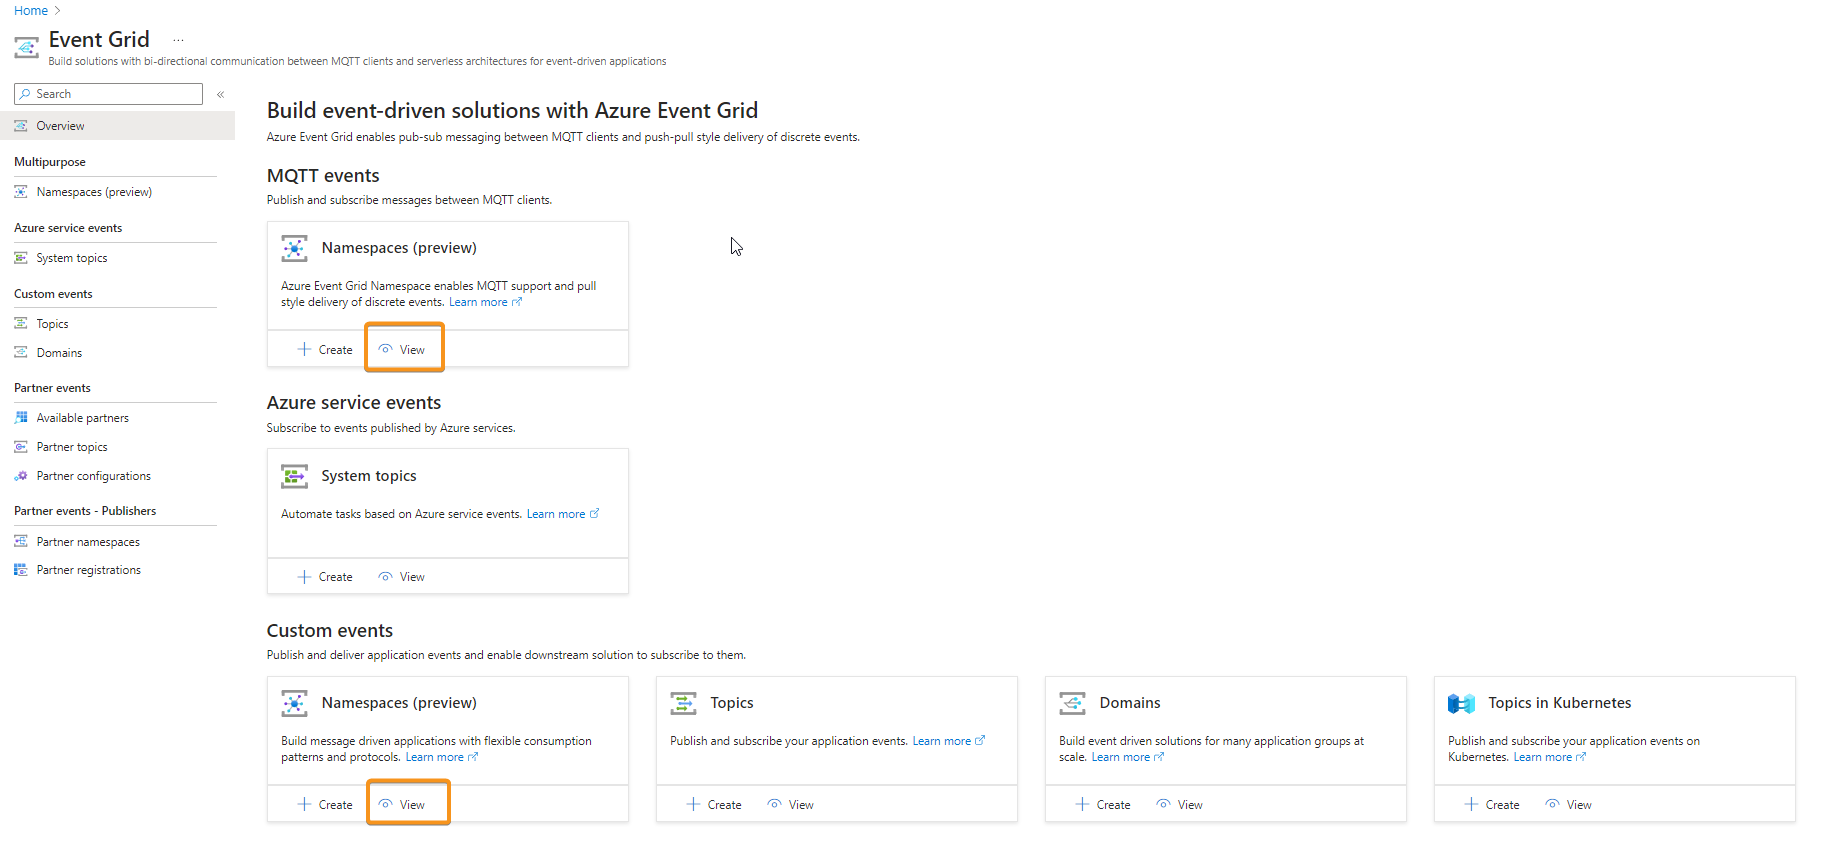
- Step 3: In the Overview page, select Create in any of the Namespaces cards available in the MQTT events or Custom events sections.
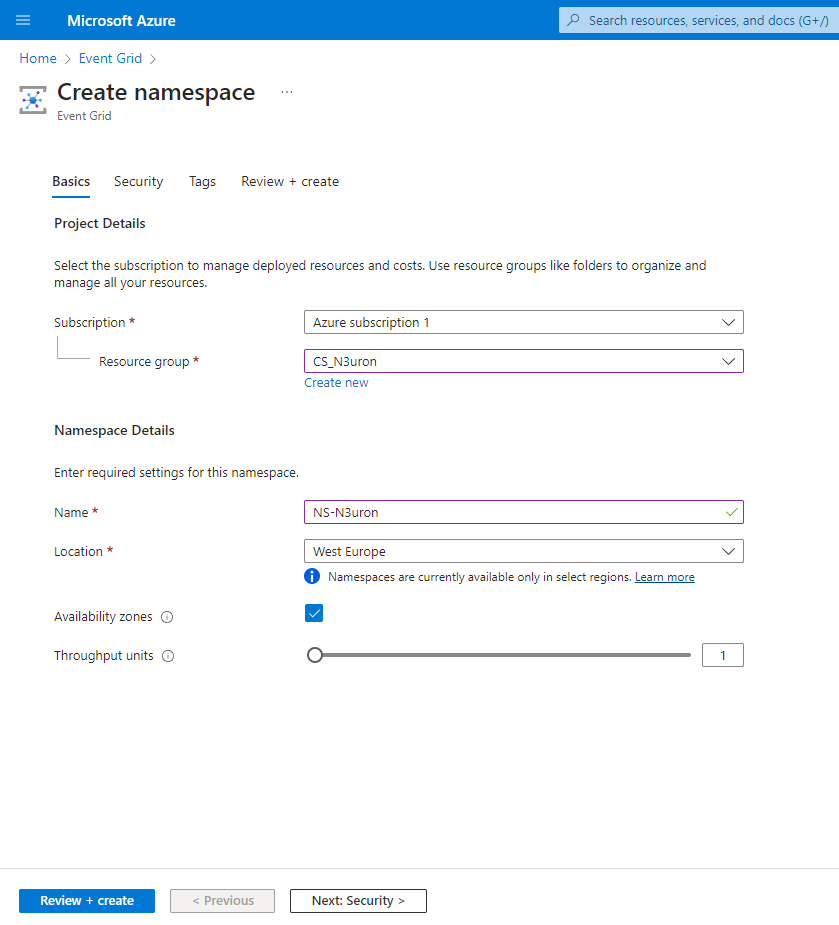
- Step 4: On the Basics tab, complete the fields as follows,
- Subscription: In this case, Azure subscription 1.
- Resource Group: In this case, CS_N3uron.
- Name: In this case, NS-N3uron.
- Location: Select the location closest to you.
- Availability zones: Select the checkbox if available. To learn more about it, follow this link, What are availability zones?
- Throughput units: This setting controls the capacity of your Event Grid. To learn more about it, follow this link, Throughput units.
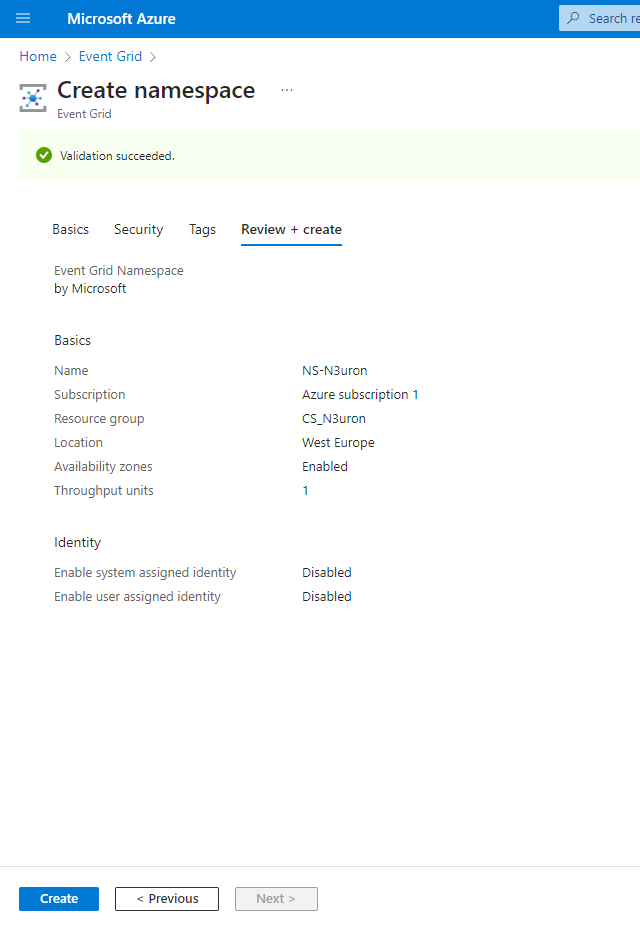
- Step 5: On the Review + create tab, review your settings and select Create.
Configure Namespaces Settings
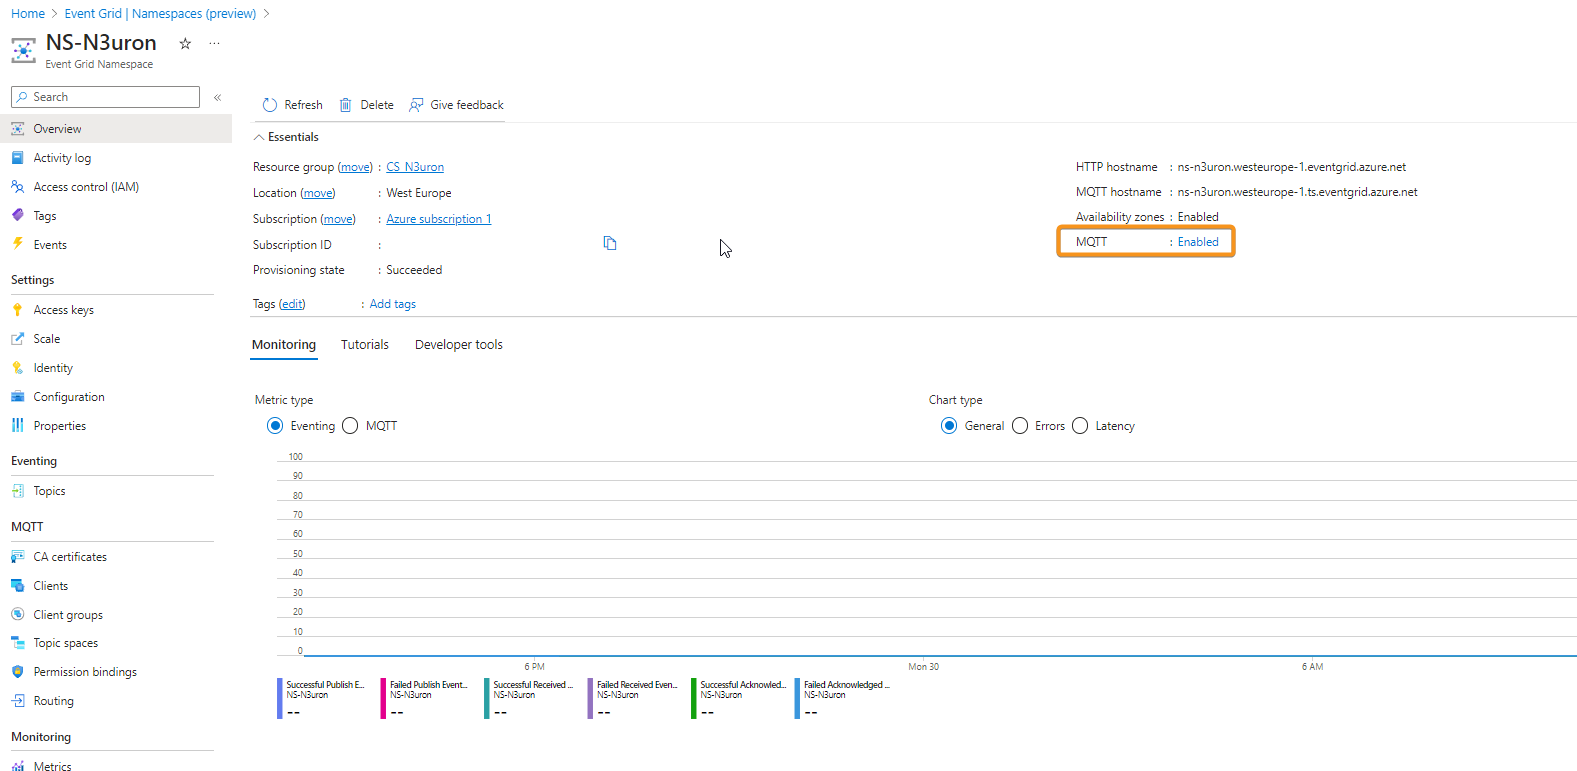
- Step 1: In the Overview page, select View in any of the Namespace cards available in the MQTT events or Custom events sections.
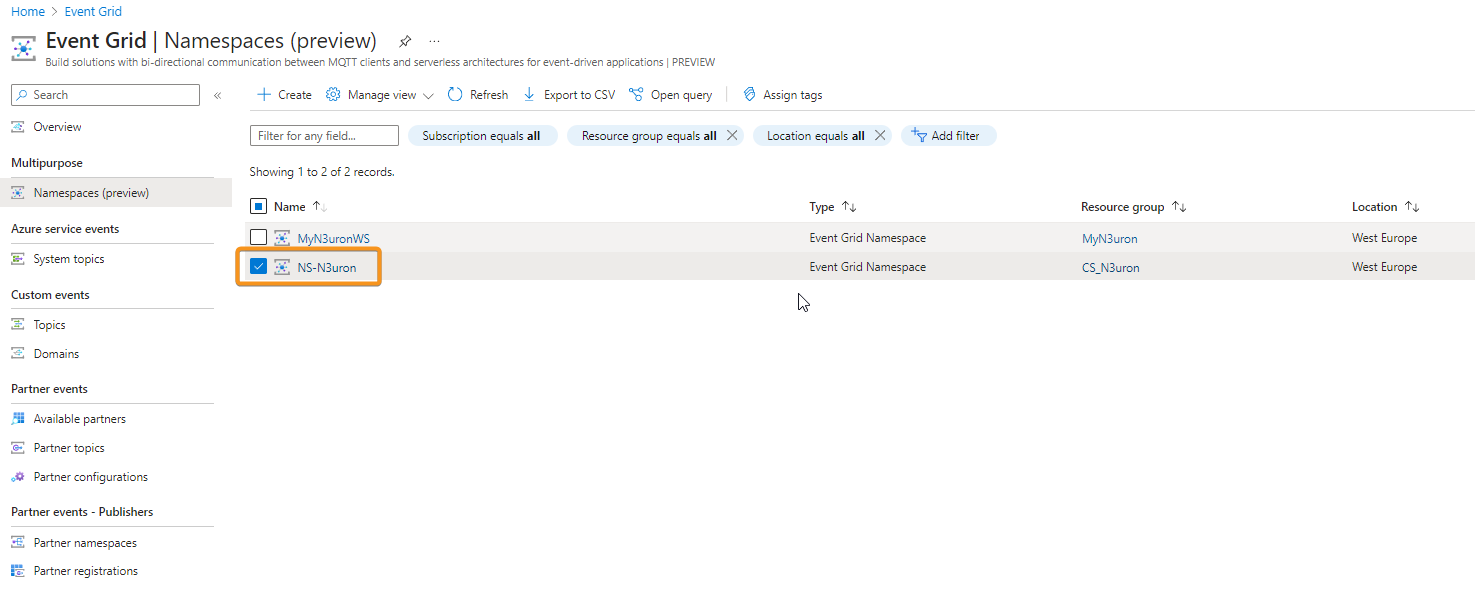
- Step 2: Select the namespace from the list of resources in the subscription.
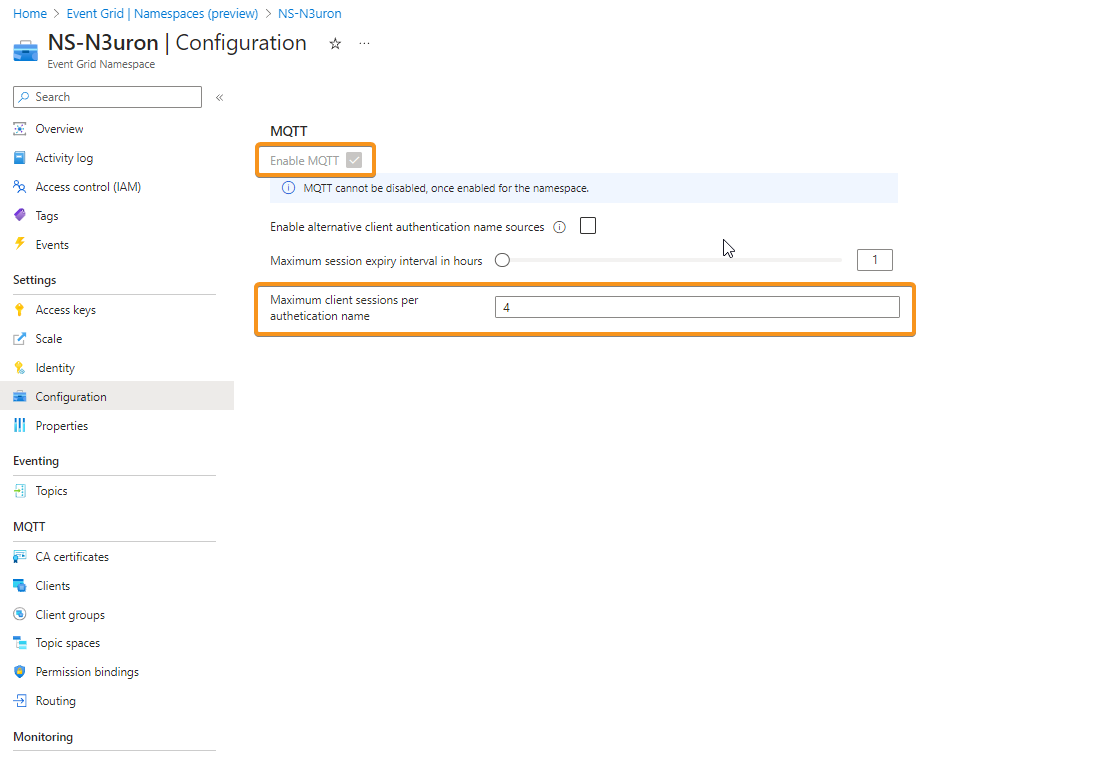
- Step 3: Enable MQTT in your configuration.
Step 4: Check the option Enable MQTT and specify the desired number of client sessions for each authentication name. For this example, we will configure 4 client sessions per authentication name.
Configure Publishing and Subscribing to MQTT messages
If you don't already have a certificate, you can create a sample certificate using the step CLI. Please follow this link for further information, Quickstart: Publish and subscribe to MQTT messages on Event Grid Namespace.
Generate Sample Client Certificate and Thumbprint
In this example, we will use self-signed X.509 certificates to generate the thumbprint and authenticate client connections for three different clients:
- client-n3uron-pub: This client has publisher permissions.
- client-n3uron-sub: This client has subscriber permissions.
- client-app: This client also has subscriber permissions.
- Step 1: To create root and intermediate certificates, run the following command. Remember the password for the next step.Shell
step ca init --deployment-type standalone --name MqttAppSamplesCA --dns localhost --address 127.0.0.1:443 --provisioner MqttAppSamplesCAProvisioner - Step 2: Use the CA files generated to create a certificate for the first client, client-n3uron-pub. Ensure you specify the correct paths for the cert and secrets files in the command.
step certificate create client-n3uron-pub client-n3uron-pub.pem client-n3uron-pub.key --ca .step/certs/intermediate_ca.crt --ca-key .step/secrets/intermediate_ca_key --no-password --insecure --not-after 8760h - Step 3: Use the CA files generated to create a certificate for the second client, client-n3uron-sub. Be sure to use the correct paths for the cert and secrets files in the command.
step certificate create client-n3uron-sub client-n3uron-sub.pem client-n3uron-sub.key --ca .step/certs/intermediate_ca.crt --ca-key .step/secrets/intermediate_ca_key --no-password --insecure --not-after 8760h - Step 4: Use the CA files generated to create a certificate for the third client, client-app. Make sure to specify the correct paths for the cert and secrets files in the command.
step certificate create client-app client-app.pem client-app.key --ca .step/certs/intermediate_ca.crt --ca-key .step/secrets/intermediate_ca_key --no-password --insecure --not-after 8760hCreate Clients in Event Grid Namespace
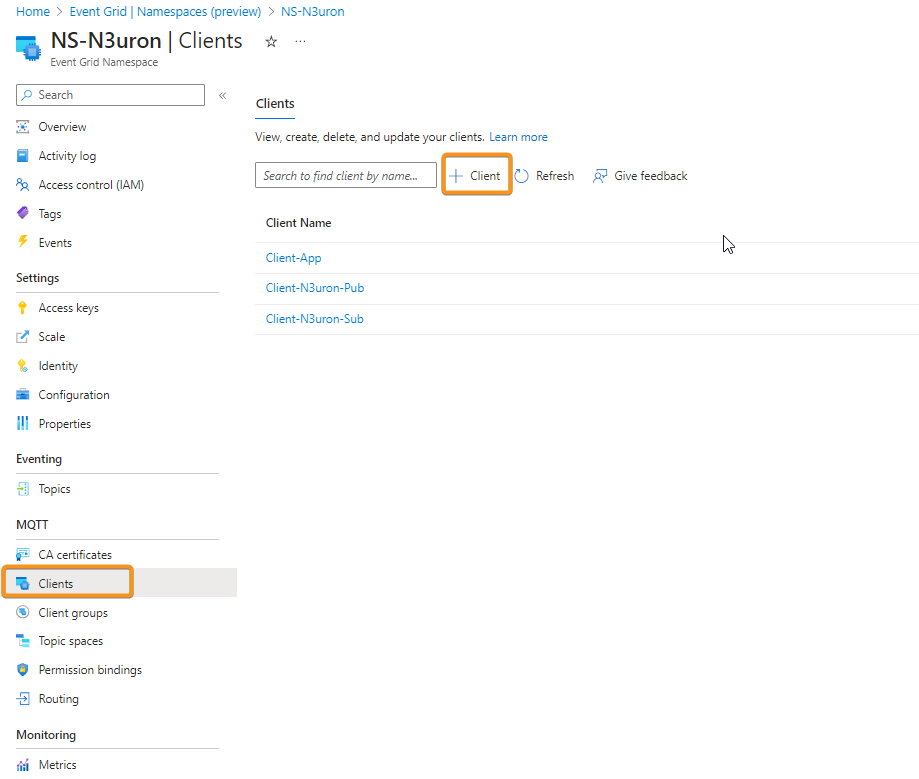
- Step 1: On the left menu, select Clients in the MQTT section.
- Step 2: On the Clients page, select the + Client on the toolbar.
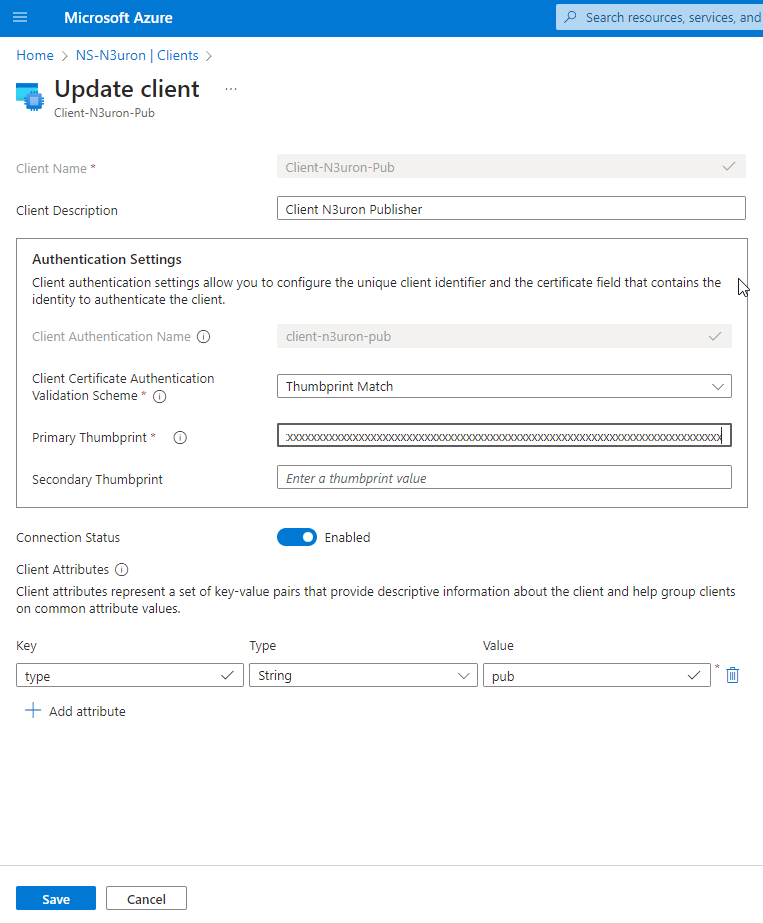
- Step 3: Go to the Create Client page, and fill in the following fields as follows:
- Client Name: Client names must be unique within a namespace. In this example, Client-N3uron-Pub.
- Description: Provide a short description for your client. In this case, Client N3uron Publisher.
- Client Authentication Name: The client authentication serves as a unique identifier for the client. In this example, client-n3uron-pub.
- Client Certificate Authentication Validation Scheme: Choose thumbprint-based authentication.
- Primary Thumbprint: To obtain the Primary Thumbprint, execute a command inside the directory where your client-n3uron-pub.pem file is located, then copy the string returned by the command and paste it.
step certificate fingerprint client-n3uron-pub.pem - Secondary Thumbprint: Leave it empty.
- Connection Status: Enabled.
- +Add Key: attribute = type, Type = String, Value = pub
- Step 4: Continue with the same process for the other two clients, Client-N3uron-Sub and Client-App adjusting the respective information.
Create Topic Spaces
- Step 1: On the left menu, select Topic spaces in the MQTT section.
- Step 2: On the Topic spaces page, select + Topic space on the toolbar.
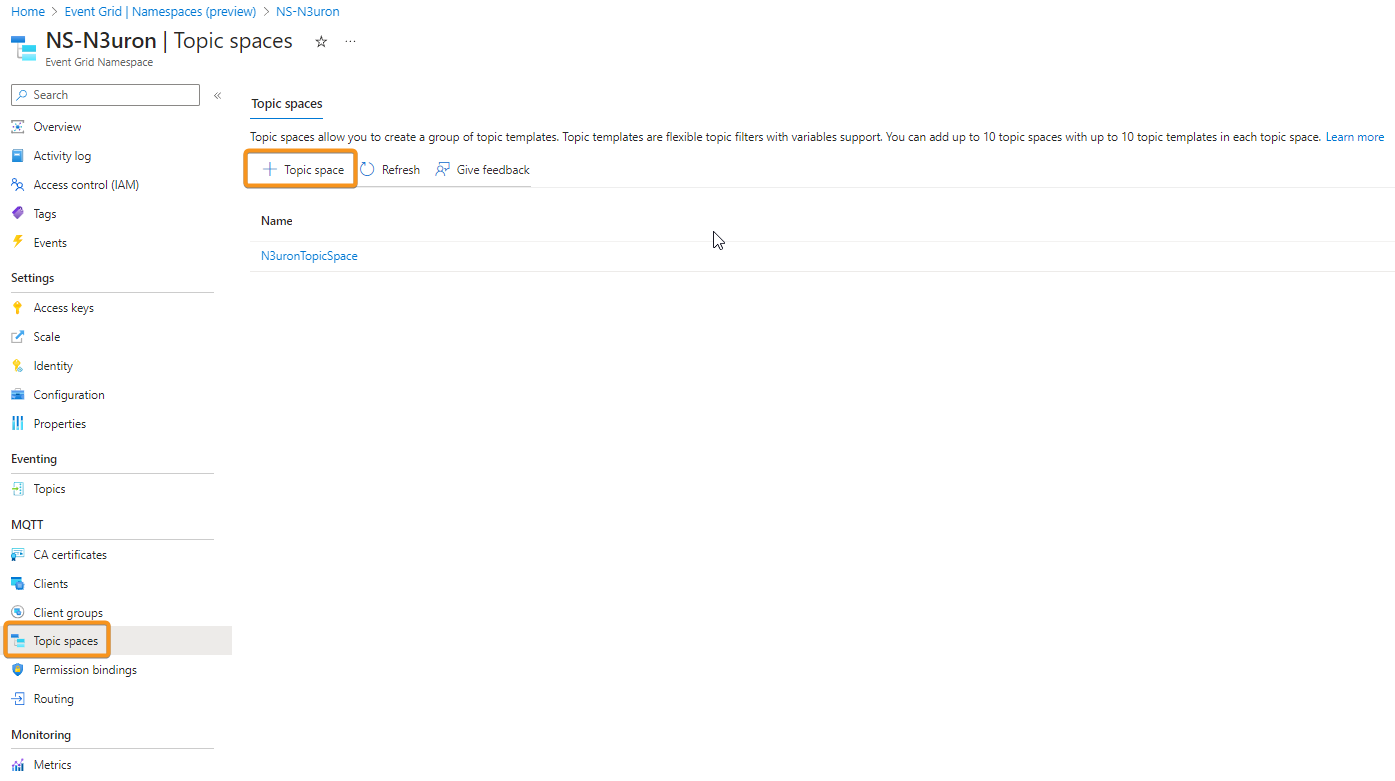
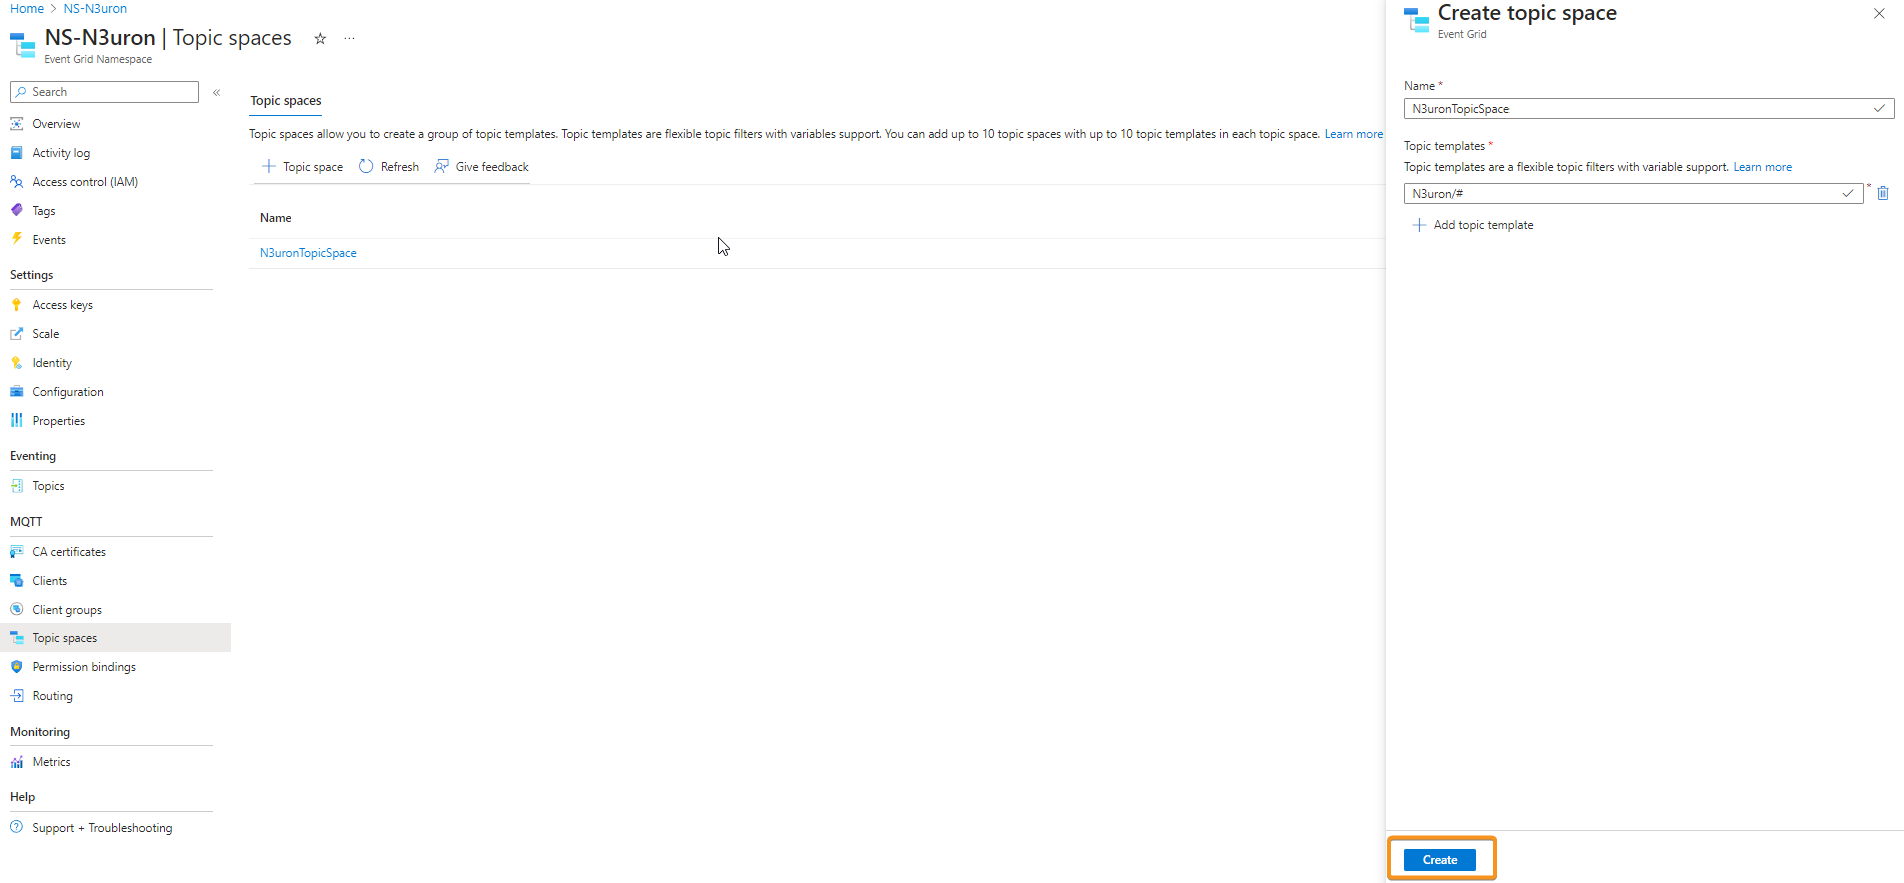
- Step 3: Provide a name for the topic space, on the Create topic space page.
- Step 4: Select + Add topic template.
- Step 5: Enter N3uron/# for the topic template, and then select Create to create the topic space.
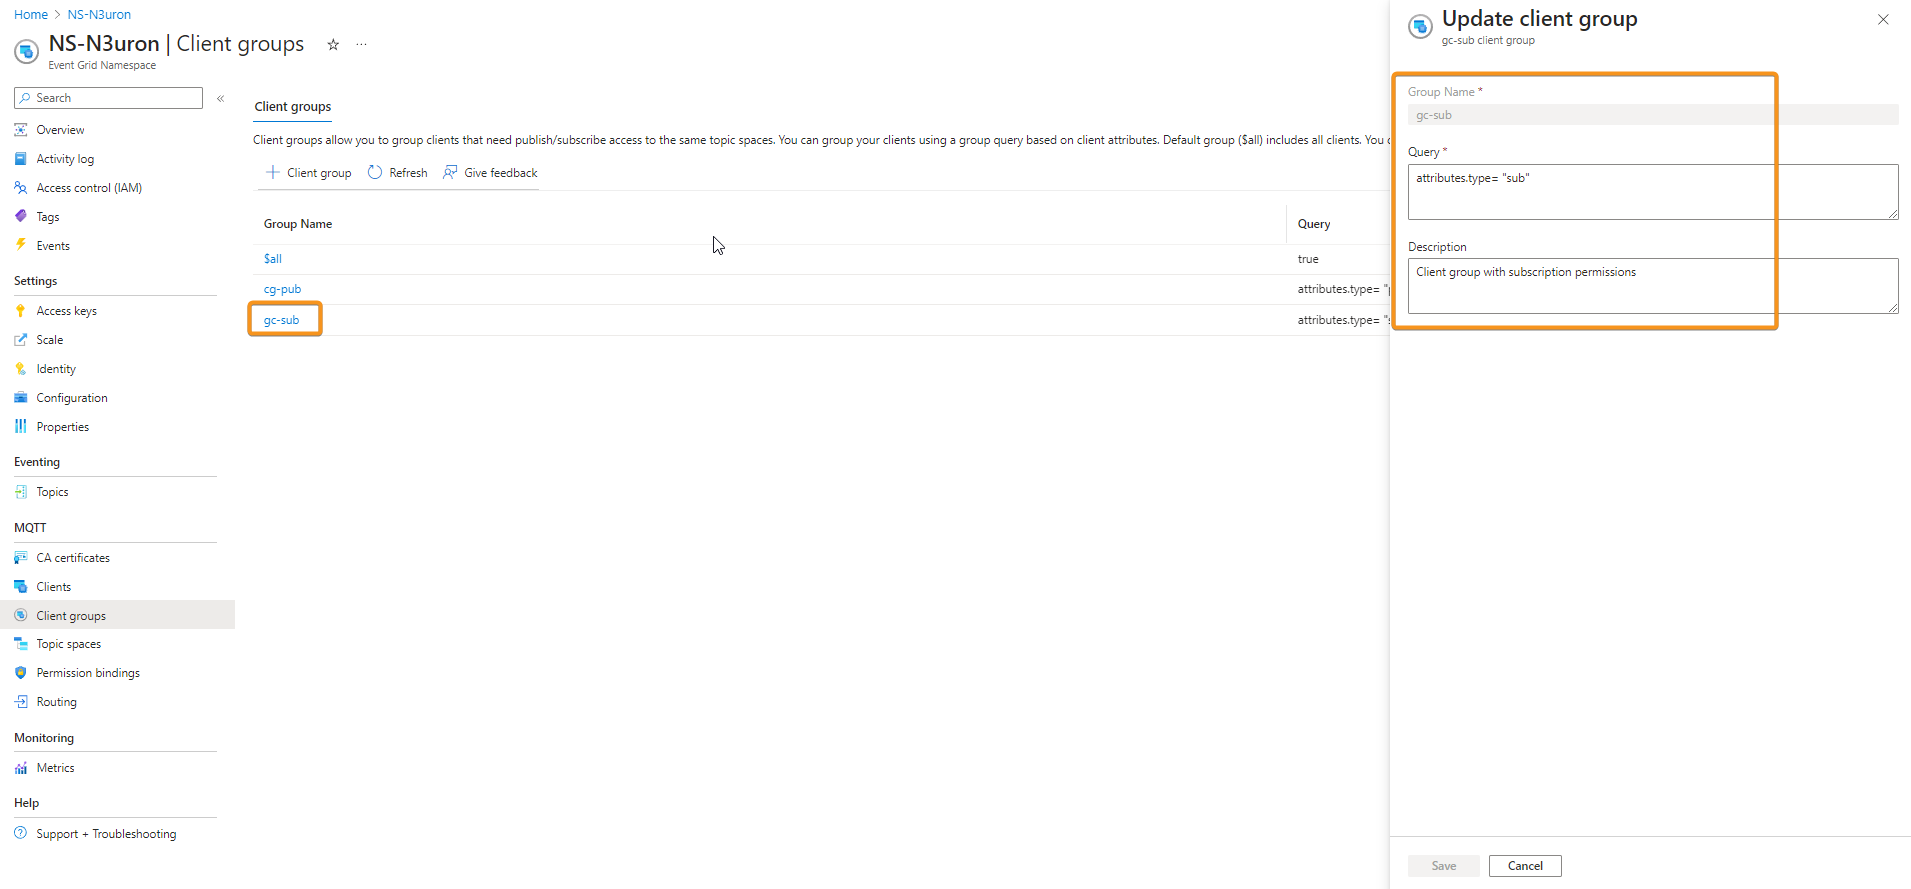
Creating Client Groups
Client groups allow you to group a set of clients together based on common characteristics. The primary purpose of client groups is to simplify the configuration of authorization. You can grant authorization to a client group for publishing or subscribing to a specific topic space. This means that all clients within the client group are authorized to perform the publish or subscribe actions on the specified topic space. Previously, we added an attribute to our clients. Client attributes consist of key-value pairs, and we will use the 'type' attribute to create permission bindings later.
- Step 1: Under Client groups, select + Client group.
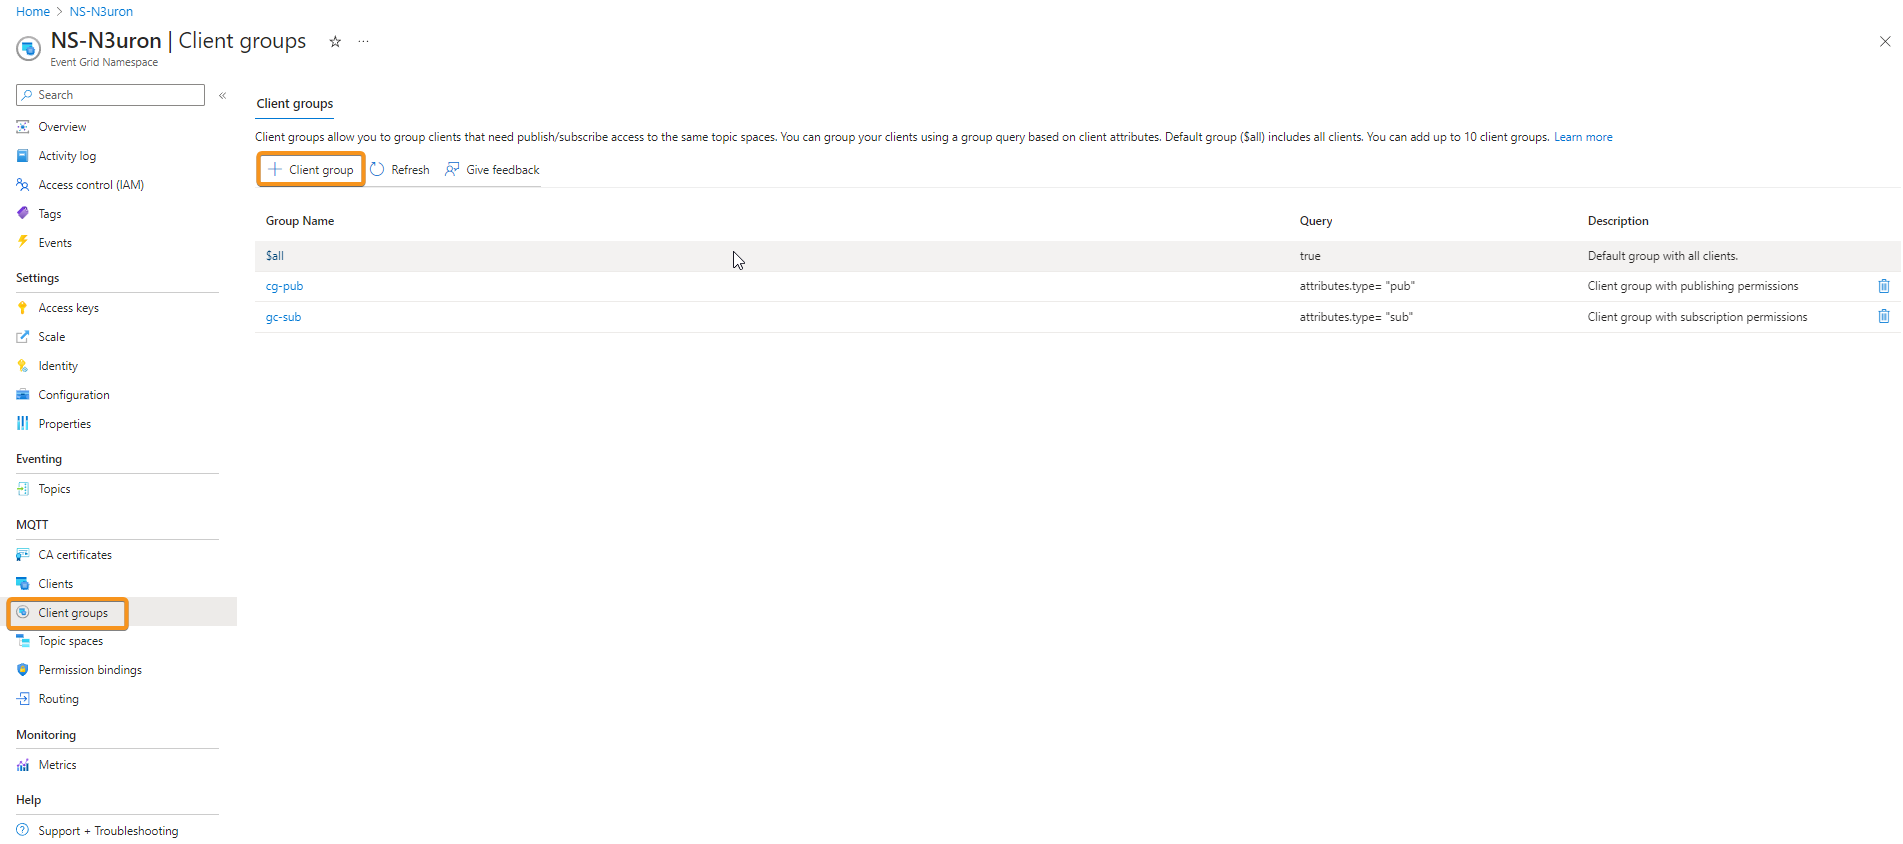
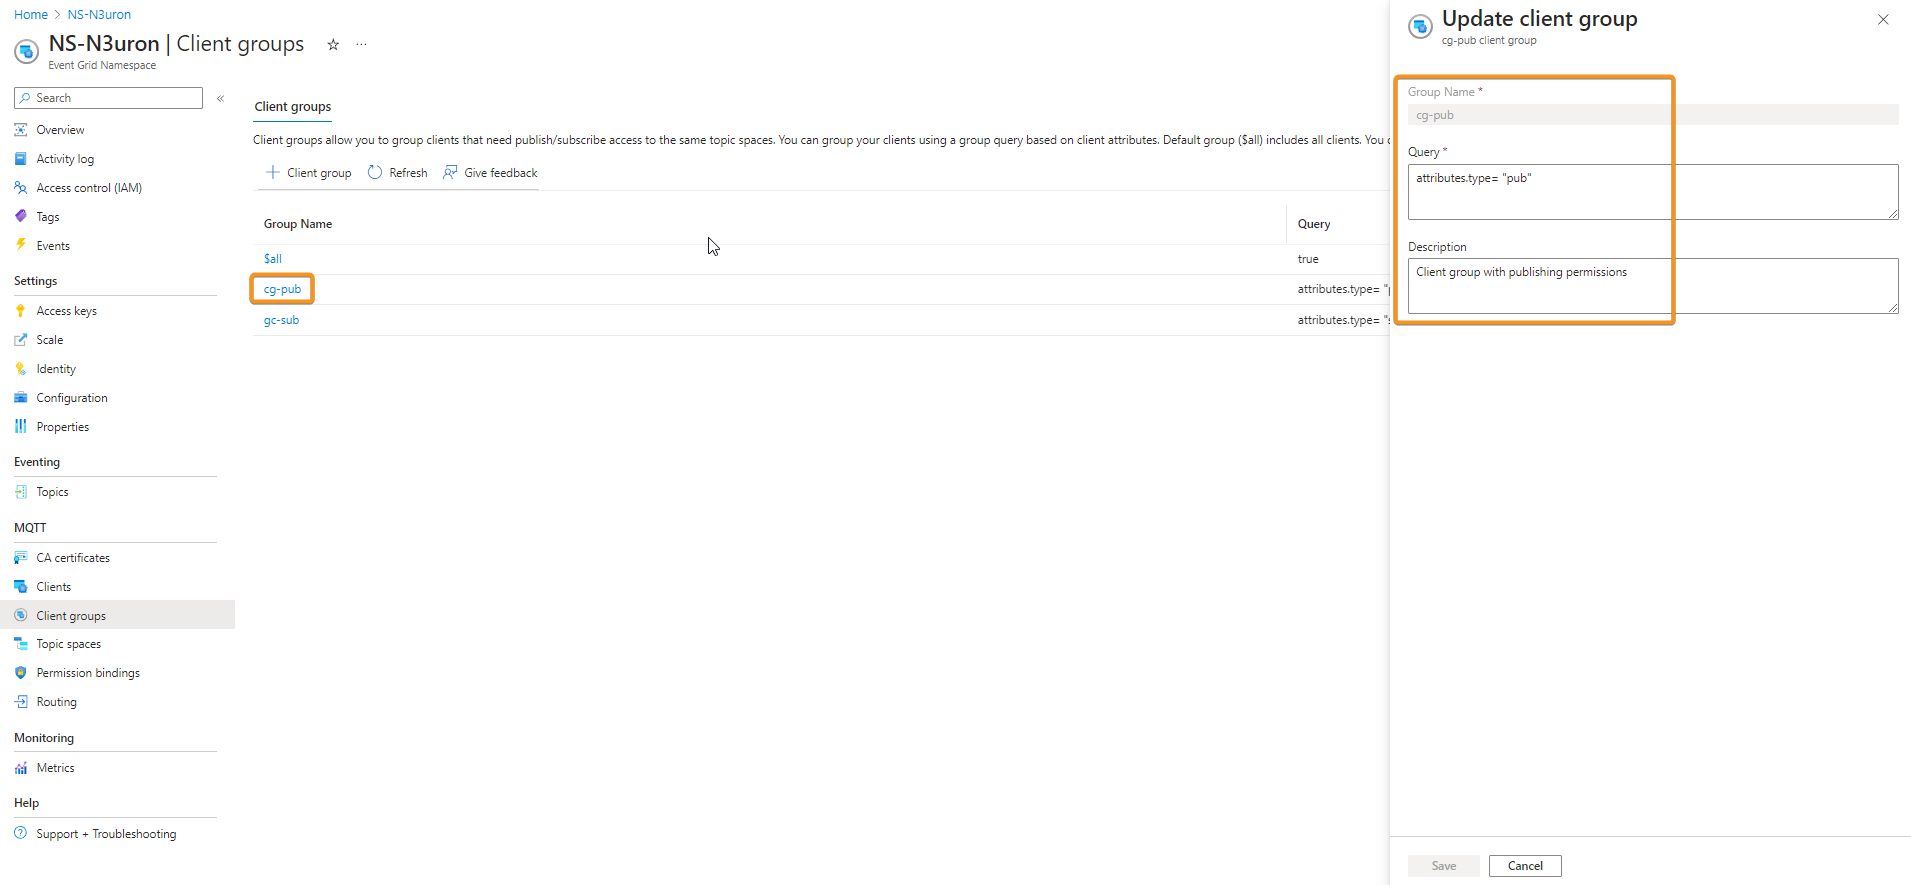
- Step 2: Add a client group name for cg-pub (client group publisher). In the query use attributes.type = "pub" and Description = Client group with publishing permissions.
- Step 3: Add client group name for cg-sub (client group subscriber). In the query use attributes.type = "sub" and Description = Client group with subscription permissions.
Configuring Access Control Using Permission Bindings
- Step 1: On the left menu, select Permission bindings in the MQTT section.
- Step 2: On the Permission bindings page, select + Permission binding on the toolbar.
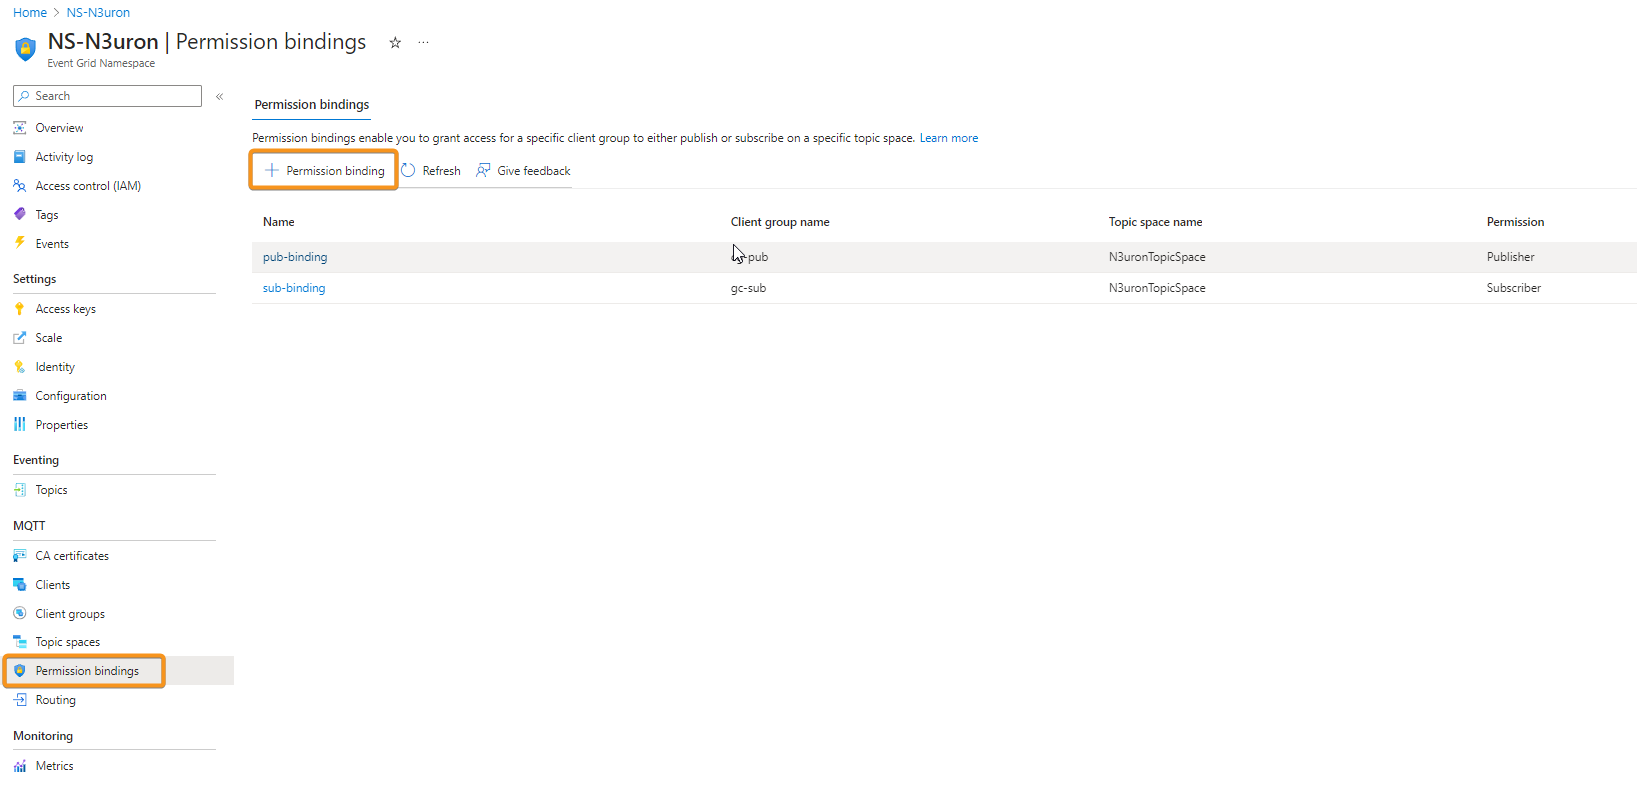
- Step 3: Configure the permission binding as follows:
- Provide a name for the permission binding. In this case, pub-binding.
- For the client group name, select cg-pub .
- For the Topic space name, select the topic space you created in the previous step. In this example, N3uronTopicSpace.
- Grant the Publisher permission to the client group on the topic space.

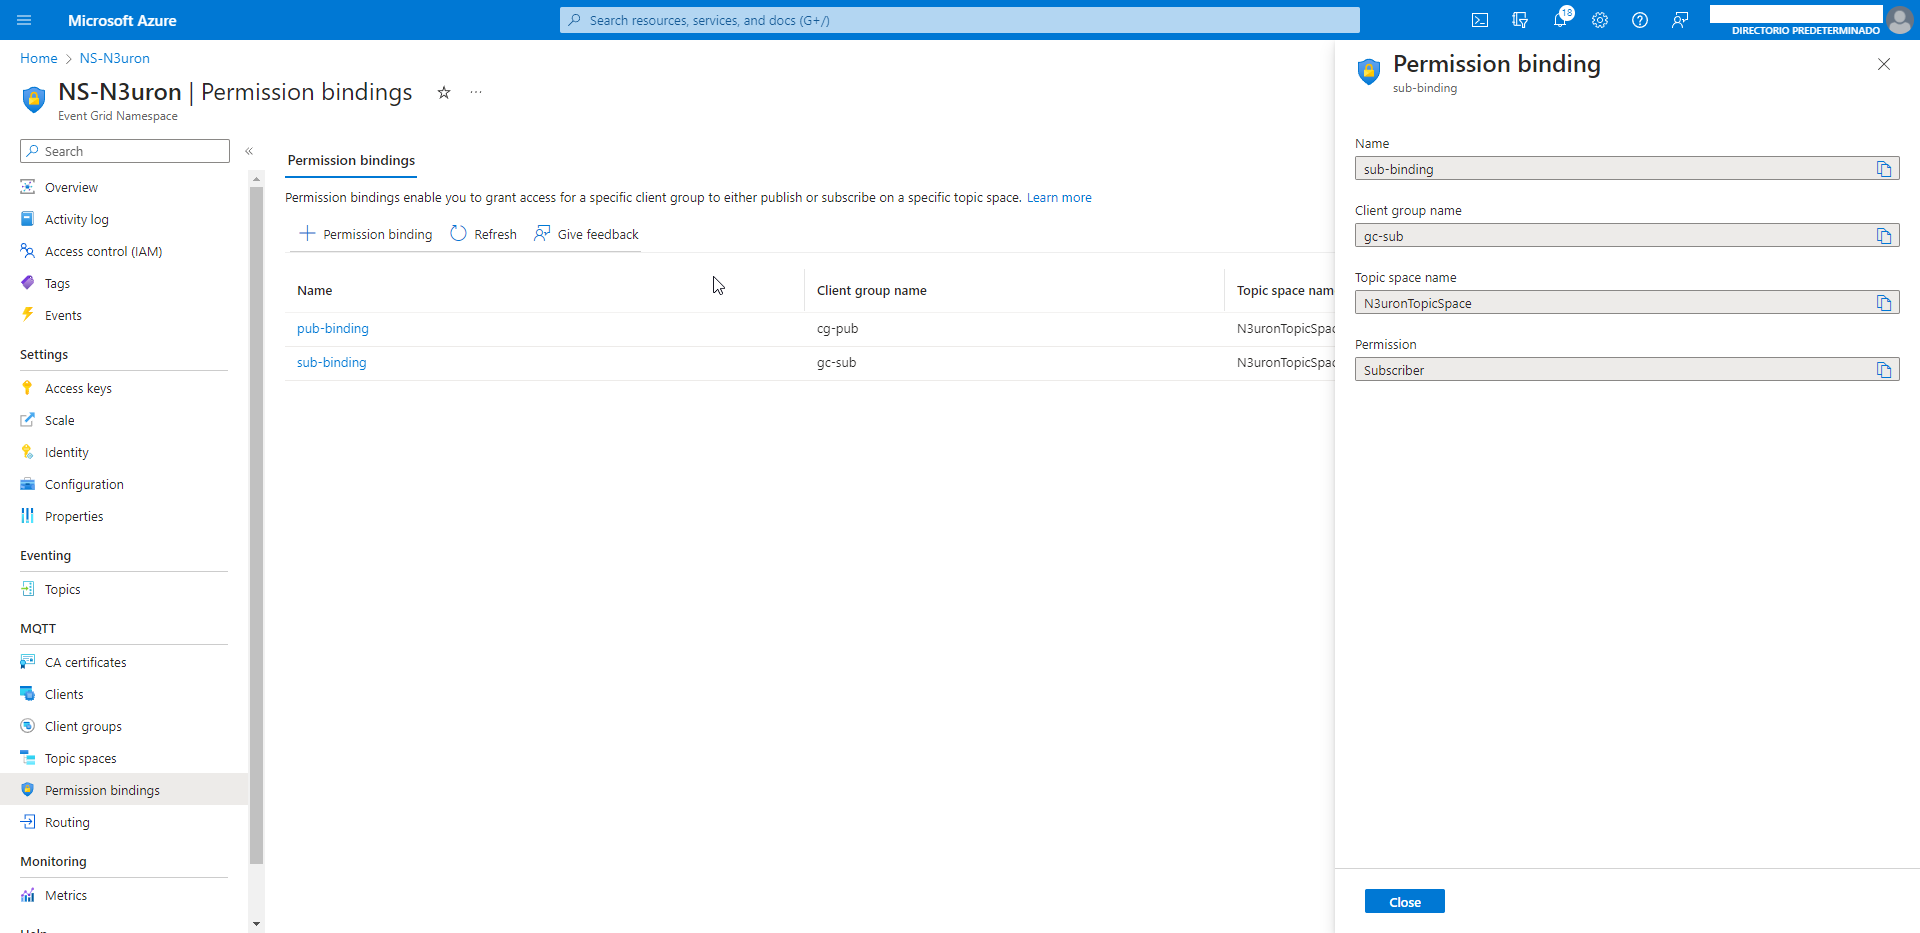
- Step 4: Repeat Step 3 for the subscribers. Configure the permission binding as follows:
- Provide a name for the permission binding. In this case, sub-binding.
- For the client group name, select cg-sub.
- For the Topic space name, select the topic space you created in the previous step. In this case, N3uronTopicSpace.
- Grant the Subscribe permission to the client group on the topic space.
Configure the N3uron IIoT Platform
In this example, we will configure two N3uron nodes. In one of them, we will create an MQTT Publisher client, and in the other, an MQTT Subscriber client.
Create a Module Instance Within N3uron's WebUI Interface for a Publisher
- Step 1: In the Navigation panel, select Config.
- Step 2: In the Explorer panel, select Modules.
- Step 3: Click on the Model menu and select New Module.
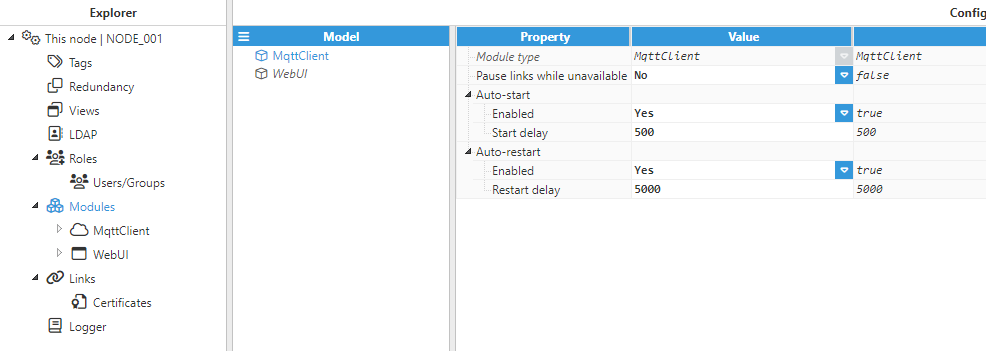
- Step 4: The instance can be given any name but for this example, we will use MqttClient .
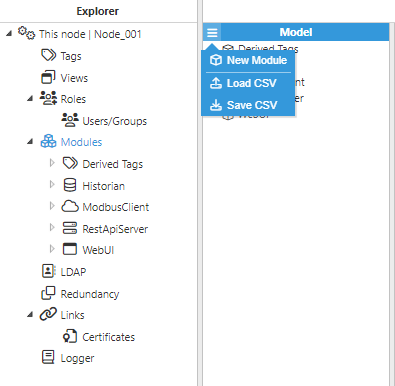
- Step 5: Provide a name for the module, in this case, MqttClient, and set the module type as MqttClient. Leave the rest of the properties as their default values and click Save.
Configuring N3uron's MQTT Module within the WebUI's Explorer Panel for a Publisher
- Step 1: In the Explorer panel, select the MQTT instance you have just created.
- Step 2: Click on the Model menu bottom bar and select New Connection.
- Step 3: Provide a name for the new connection. In this example, AZURE_EG.
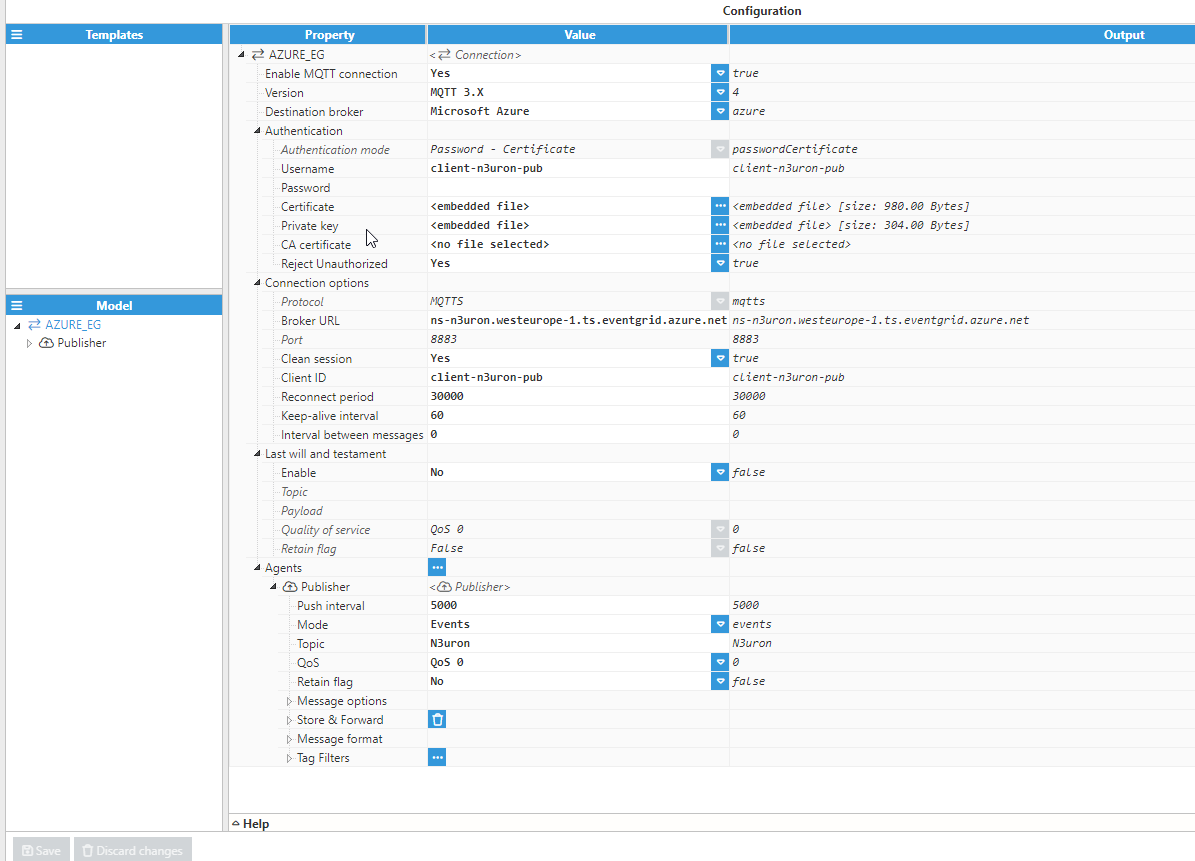
- Step 4: Configure the connection properties as follows:
- Version: Microsoft Azure Event Grid (Preview) allows choosing between MQTT v3.1.1 and MQTT v5 on TCP port 8883. Choose MQTT 3.x.
- Destination Broker: Select Microsoft Azure.
- Username: Enter the Client Authentication Name configured for your publisher client. In this case, client-n3uron-pub.
- Password: Leave this field empty.
- Certificate: Select your X.509 certificate file. In this case, client-n3uron-pub.pem.
- Private key: Select your X.509 private key file. In this case, client-n3uron-pub.key.
- Protocol: Select MQTTS.
- Broker URL: Enter the Hostname of your Azure Event Grid MQTT broker. In this case, ns-n3uron.westeurope-1.ts.eventgrid.azure.net.
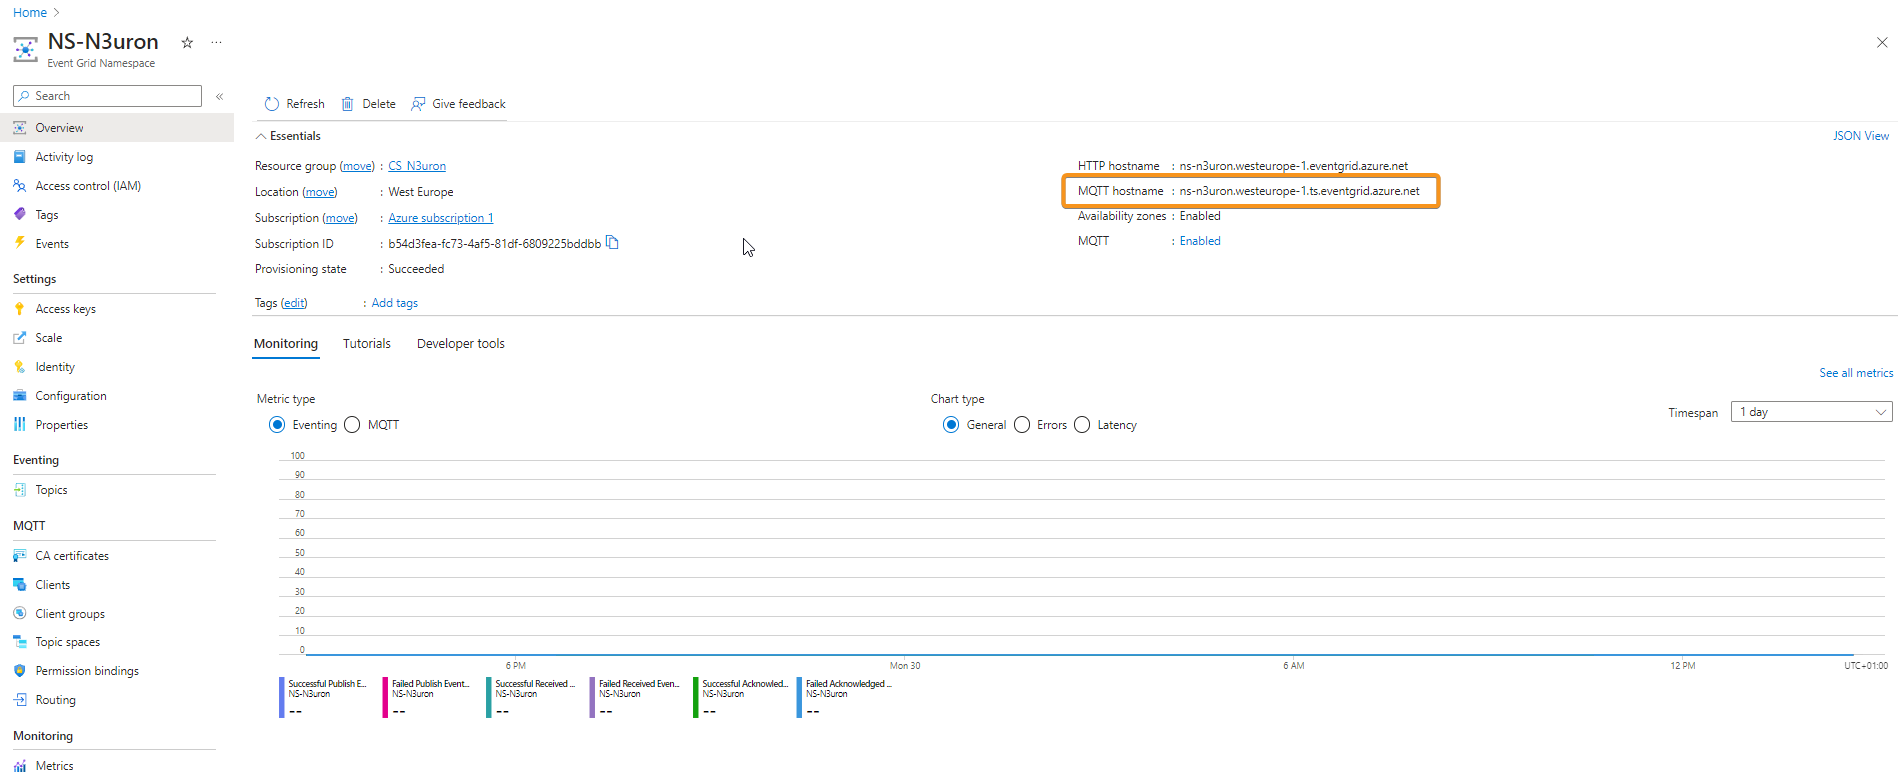
- Port: 8883.
- Client-ID: In this case, client-n3uron-pub.Note:
If you choose to allow more than one client session per authentication name in your MQTT settings, you can utilize the same username and certificates with other clients as long as you don't exceed the client session quota per authentication name. Remember to adjust the Client-ID for the other clients, such as 'client-n3uron-pub-1,' and so forth.
- Leave the rest of the properties as their default values and click on Save.
Publishing Data via N3uron to Azure Event Grid
- Step 1: Within the Model panel, right-click on the AZURE_EG Connection you have just configured, select New Publisher, and give it a name. In this example, we will simply use Publisher.
- Step 2: Click on it and add a name in the Topic field. To publish an MQTT message to Azure Event Grid MQTT broker, you must use the same topic you have configured in your Event Grid Namespace's Topic Space. In this case, the topic is called N3uron.
- Step 3: In the message format settings, choose the following;
- Serialization: JSON.
- Data Structure: Compact. Doing this will help reduce the message size and, consequently, lower bandwidth usage. To learn more about this, please follow this link.
- Date format: In this case UNIX Epoch.
- Compression: None.
- Encoding: UTF-8.
- Step 4: Click on the Tag Filter button, select New Tag Filter, and change the default name. In this example, we have used TagFilter. Leave Mode, Path, and Regex pattern as their default values.
With this configuration, every tag configured in N3uron will be published to our Azure Event Grid MQTT broker .
.png)
- Step 5: In the Explorer panel, select Tags.
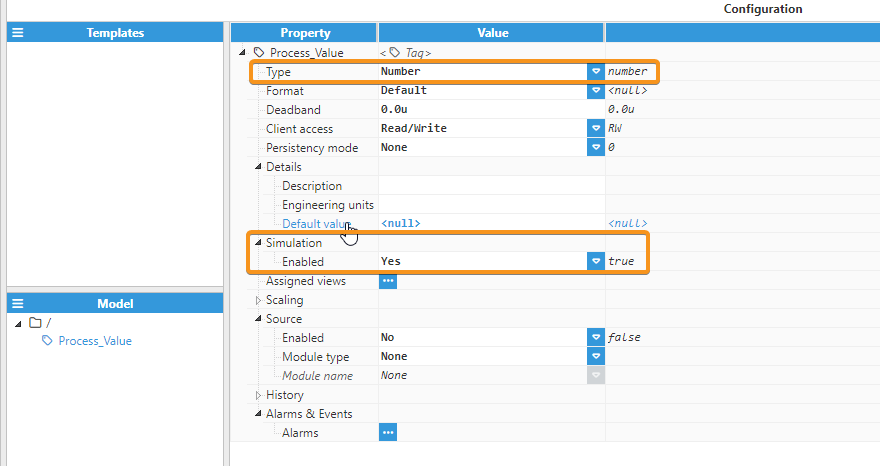
- Step 6: In the Model menu, right-click on the folder icon, select New Tag, and give it a name. In this example, we will use Process_Value.
- Step 7: Within the Configuration panel, set the following properties using the values shown below, leaving the rest of them as their default values:
- Type: Number.
- Simulation/Enabled: Yes
Create a Module Instance Within N3uron's WebUI Interface for a Subscriber
- Step 1: In the Navigation panel, select Config.
- Step 2: In the Explorer panel, select Modules.
- Step 3: Click on the Model menu and select New Module.
- Step 4: The instance can be given any name but for this example, we will use MqttClient .
- Step 5: Provide a name for the module, in this case MqttClient, set the module type, in this case MqttClient. Leave the rest of the properties as their default values and click Save.
Configuring N3uron's MQTT Module within the WebUI's Explorer Panel for a Subscriber
- Step 1: In the Explorer panel, select the MQTT instance you have just created.
- Step 2: Click on the Model menu bottom bar and select New Connection.
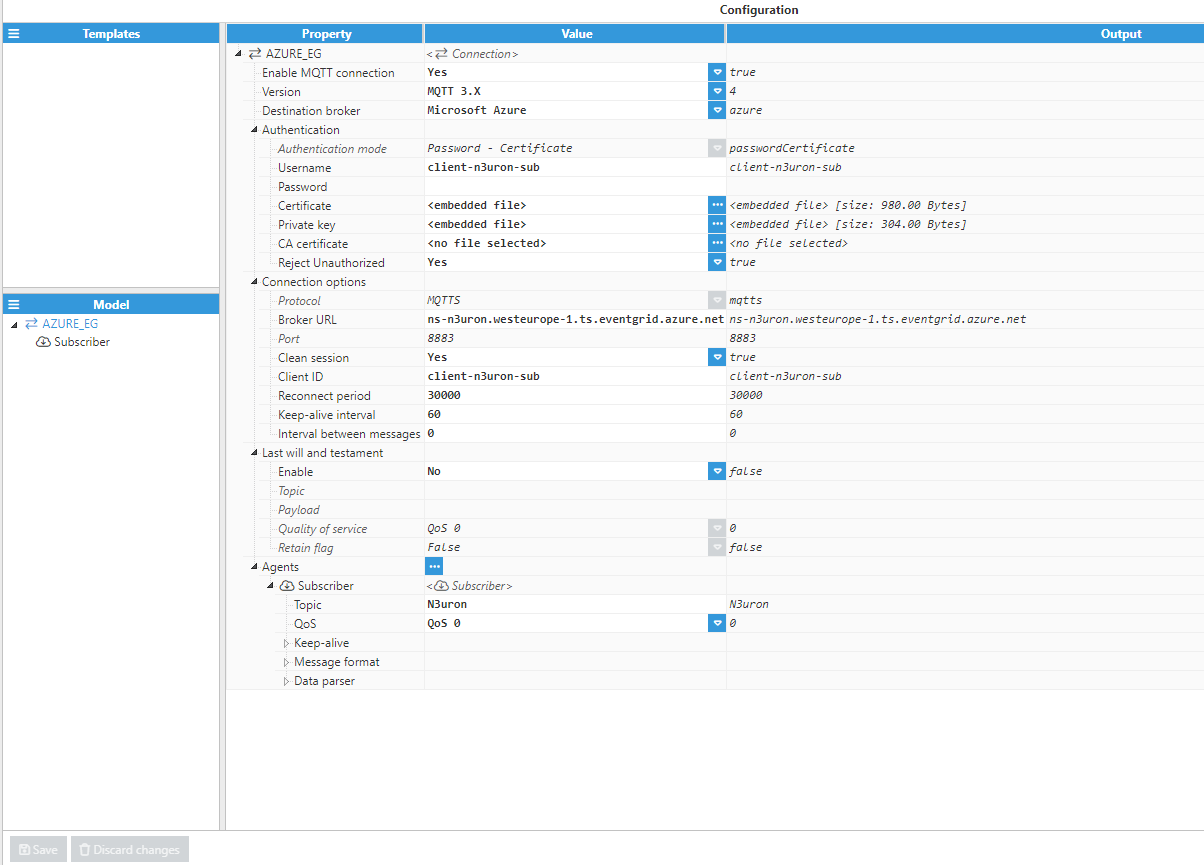
- Step 3: Give the new connection a name. In this example, it has been named AZURE_EG.
- Step 4: Configure the connection properties:
- Version: Microsoft Azure Event Grid (Preview) allows to use between MQTT v3.1.1 and MQTT v5 on TCP port 8883. In this case, MQTT 3.x.
- Destination Broker: Microsoft Azure Event Grid (Preview) allows to use between Microsoft Azure or Custom. In this case, Microsoft Azure.
- Username: Here write Client Authentication Name you configured as your subscriber client. In this case, client-n3uron-sub.
- Password: Leave the password empty.
- Certificate: Select your X.509 certificate file. In this case, client-n3uron-sub.pem.
- Private key: Select your X.509 private key file. In this case, client-n3uron-sub.key.
- Protocol: Select MQTTS.
- Broker URL: Enter the Hostname of your Azure Event Grid MQTT broker. In this case, ns-n3uron.westeurope-1.ts.eventgrid.azure.net.
.png)
- Port: 8883.
- Client-ID: In this case, client-n3uron-sub.Note:
If you choose to allow more than one client session per authentication name in your MQTT settings, you can utilize the same username and certificates with other clients as long as you don't exceed the client session quota per authentication name. Remember to adjust the Client-ID for the other clients, such as 'client-n3uron-sub-1,' and so forth.
- Leave the rest of the properties as their default values and click on Save.
Subscribing to Data from Azure Event Grid via N3uron
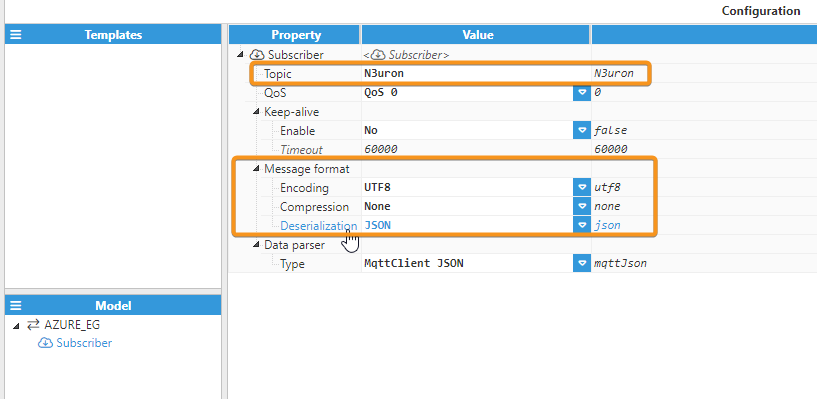
- Step 1: Within the Model panel, right-click on the AZURE_EG Connection you have just configured, select New Subscriber, and give it a name. In this example, we will simply use Subscriber.
- Step 2: Click on the newly created subscriber and specify a name in the Topic field. To publish an MQTT message to Azure Event Grid MQTT broker, you must use the same topic you have configured in your Event Grid Namespace's Topic Space. In this case, the topic is called N3uron.
- Step 3: In the message format settings, choose the following;
- Encoding: UTF-8.
- Compression: None.
- Deserialization: JSON.
- Step 4: Leave the remaining of the settings as default.
- Step 5: In the Explorer panel, select Tags.
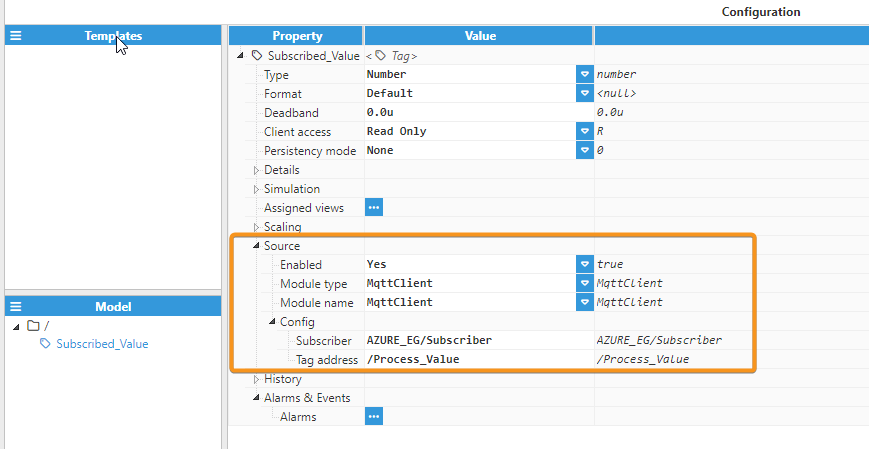
- Step 6: In the Model menu, right-click on the folder icon, select New Tag, and give it a name. In this example, we will use Subscribed_Value.
- Step 7: Within the Configuration panel, set the following properties using the values shown below, leaving the rest of them as their default values:
- Type: Number.
- Source:
- Enable: Yes.
- Module type: MqttClient.
- Module name: MqttClient.
- Config:
- Subscriber: AZURE_EG/Subscriber.
- Tag Address: /Process_Value.
Subscribing to Data from Azure Event Grid via your MQTT Client App
- Step 7: Open your favourite MQTT client app (in this case we will use MQTT Explorer) and configure your subscription as follow:
- Name: In this case Azure-EG-App.
- Validate certificate: Enable it.
- Encryption(tls): Enable it.
- Protocol: mqtt://.
- Host: Enter the Hostname of your Azure Event Grid MQTT broker. In this case, ns-n3uron.westeurope-1.ts.eventgrid.azure.net.
- Port: 8883.
- Username: Here write the Client Authentication Name you configured as your subscriber client. In this case, client-app.
- Click on the ADVANCED button.
- Topic: +Add N3uron as the topic.
- QoS: 0.
- MQTT Client ID: In this case client-app. If you are using multiple clients with the same Client Authentication Name, please make sure to change the Client ID accordingly. For example, you can use 'client-app-1,' 'client-app-2,' and so on.
- Click on the CERTIFICATES button.
- Client Certificate: Choose your .pem file. In this case client-app.pem.
- Client Key: Choose your .key file. In this case client-app.key.
- Save your configuration.
- Step 8: Connect your favorite MQTT app, such as MQTT Explorer to Azure Event Grid Broker. You should now receive messages from the topic you have subscribed to.