Microsoft Azure
Creating a new IoT Hub
- Step 1: Log into Microsoft Azure and go to Microsoft Azure Portal,
Once logged in, you’ll need to create the Azure resources that your device, in our case a N3uron node, will require in order to connect to the Azure IoT Hub and start exchanging messages.
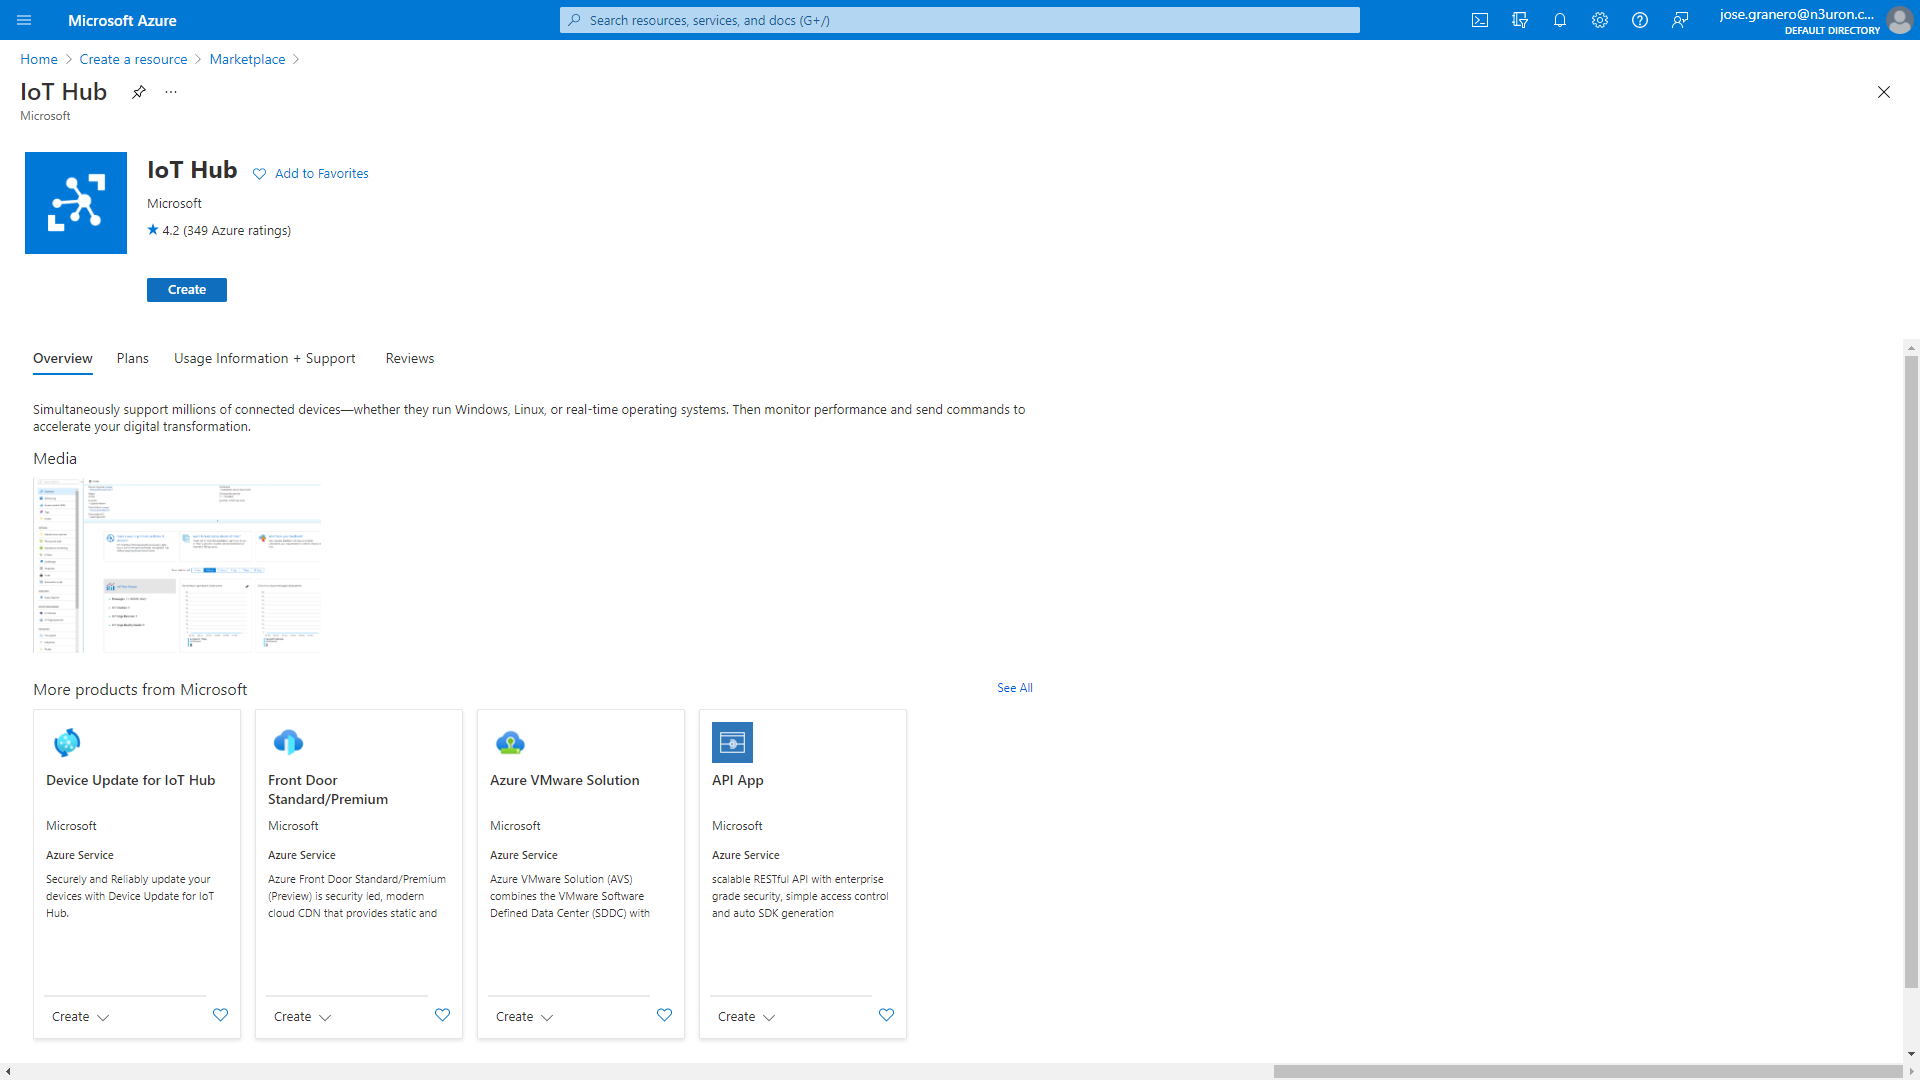
- Step 2: From the Azure homepage, select the + Create a resource option and then enter IoT Hub in the Search the Marketplace field.
- Step 3: Select IoT Hub from the search results and then select Create.
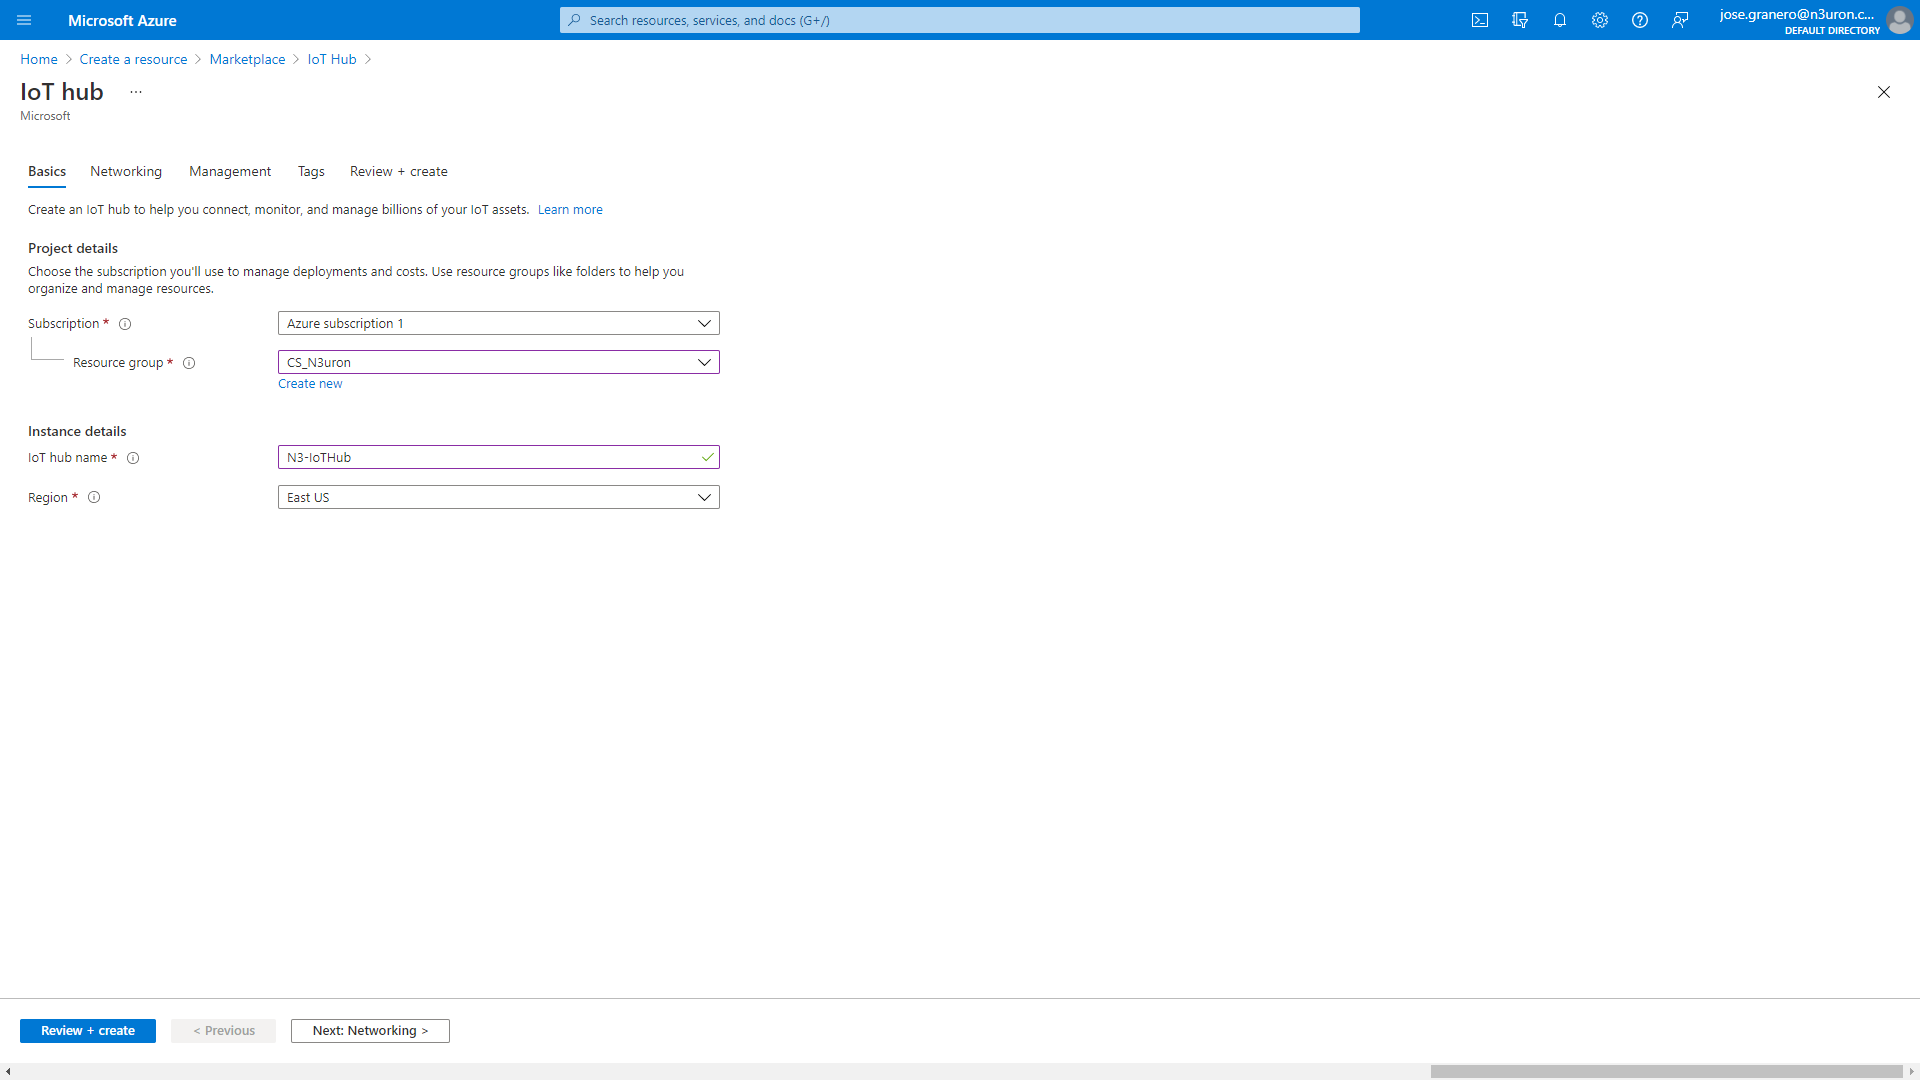
- Step 4: In the Basics tab, complete the fields as follows,
- Subscription: Select the subscription to use for your hub.
- Resource Group: Select a resource group or create a new one. To create a new one, select Create new and fill in the name you want to use. To use an existing resource group, select the specific resource group. For more information, see Resource manager.
- Region: Select the region you want your hub to be located in. Select the location closest to you.
- IoT Hub Name: Enter a name for your hub.
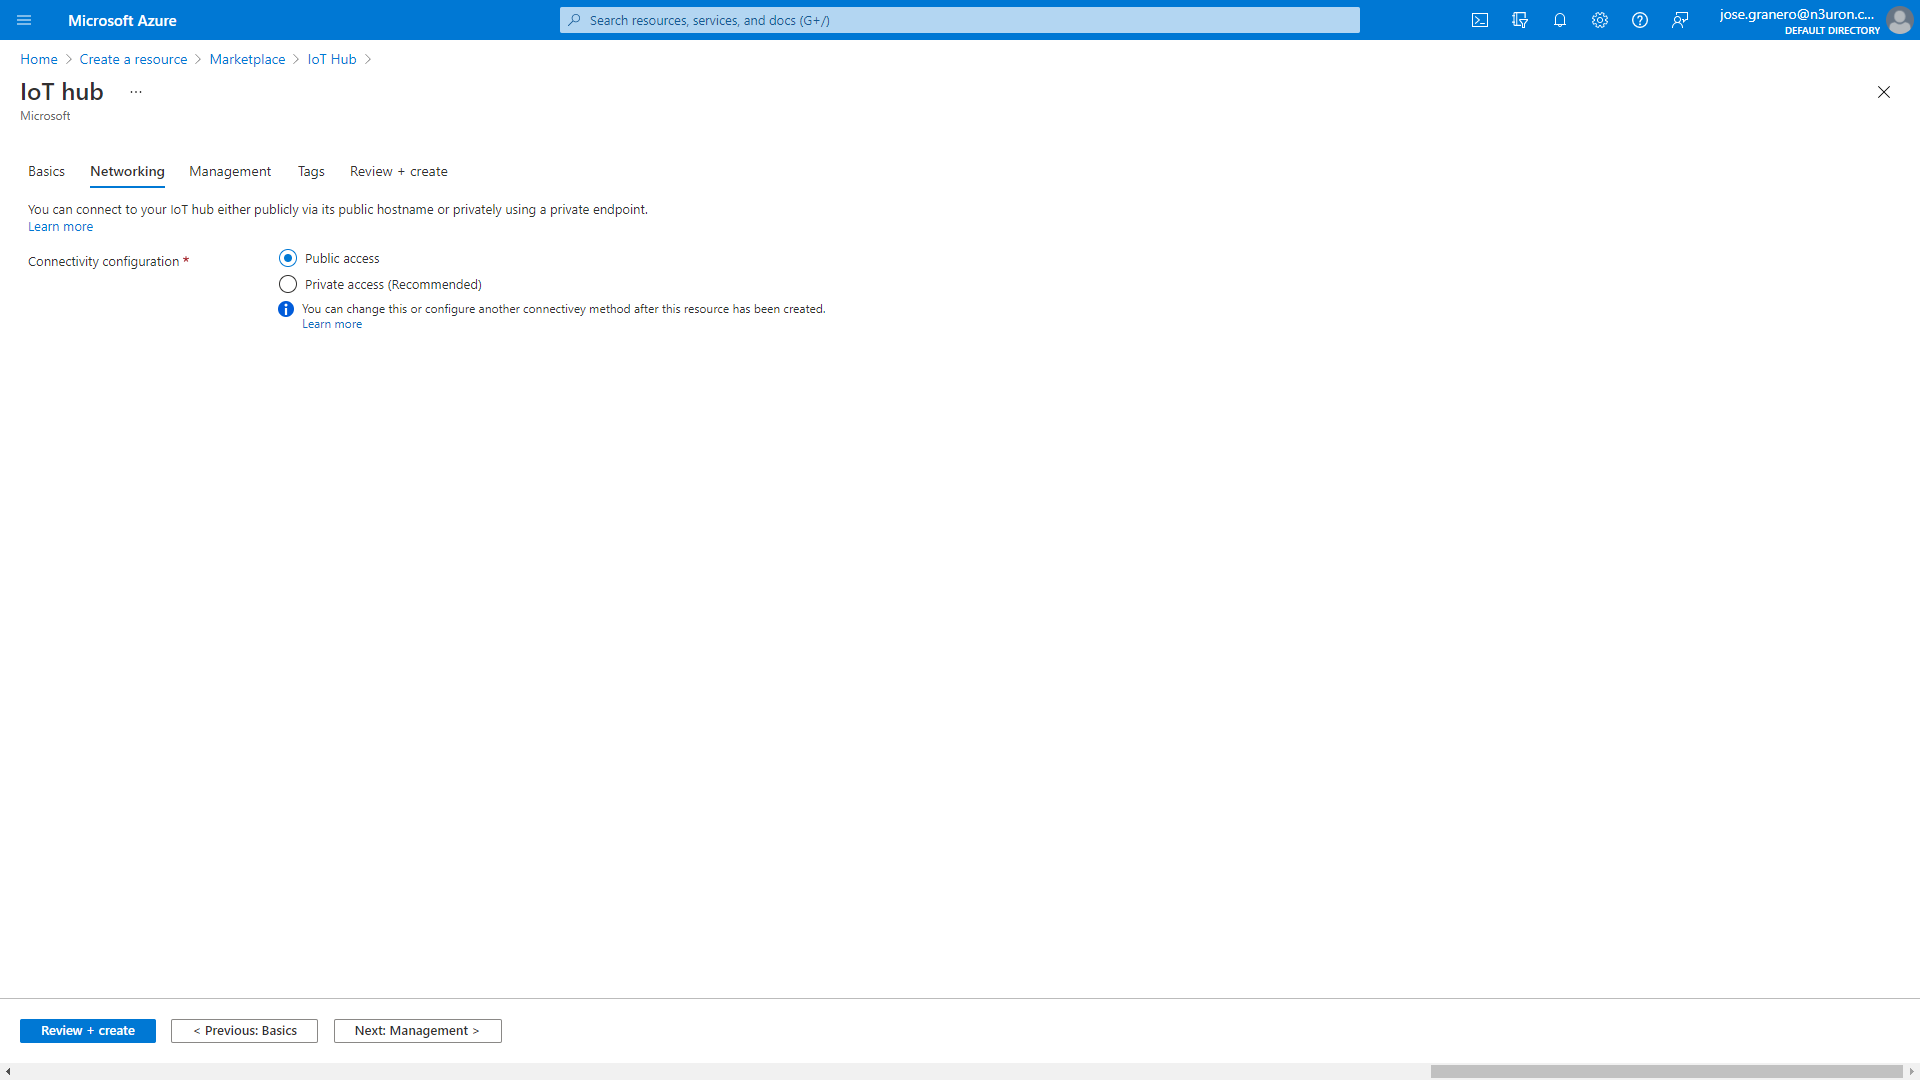
- Step 5: Select Next: Networking to continue creating your hub. Choose the endpoints that the devices can use to connect to your IoT Hub and select the Public access default setting.
- Step 6: Select Next: Management to continue creating your hub. Accept the default settings here.
- Step 7: Select Next: Tags to continue to the next screen. Accept the default settings here.
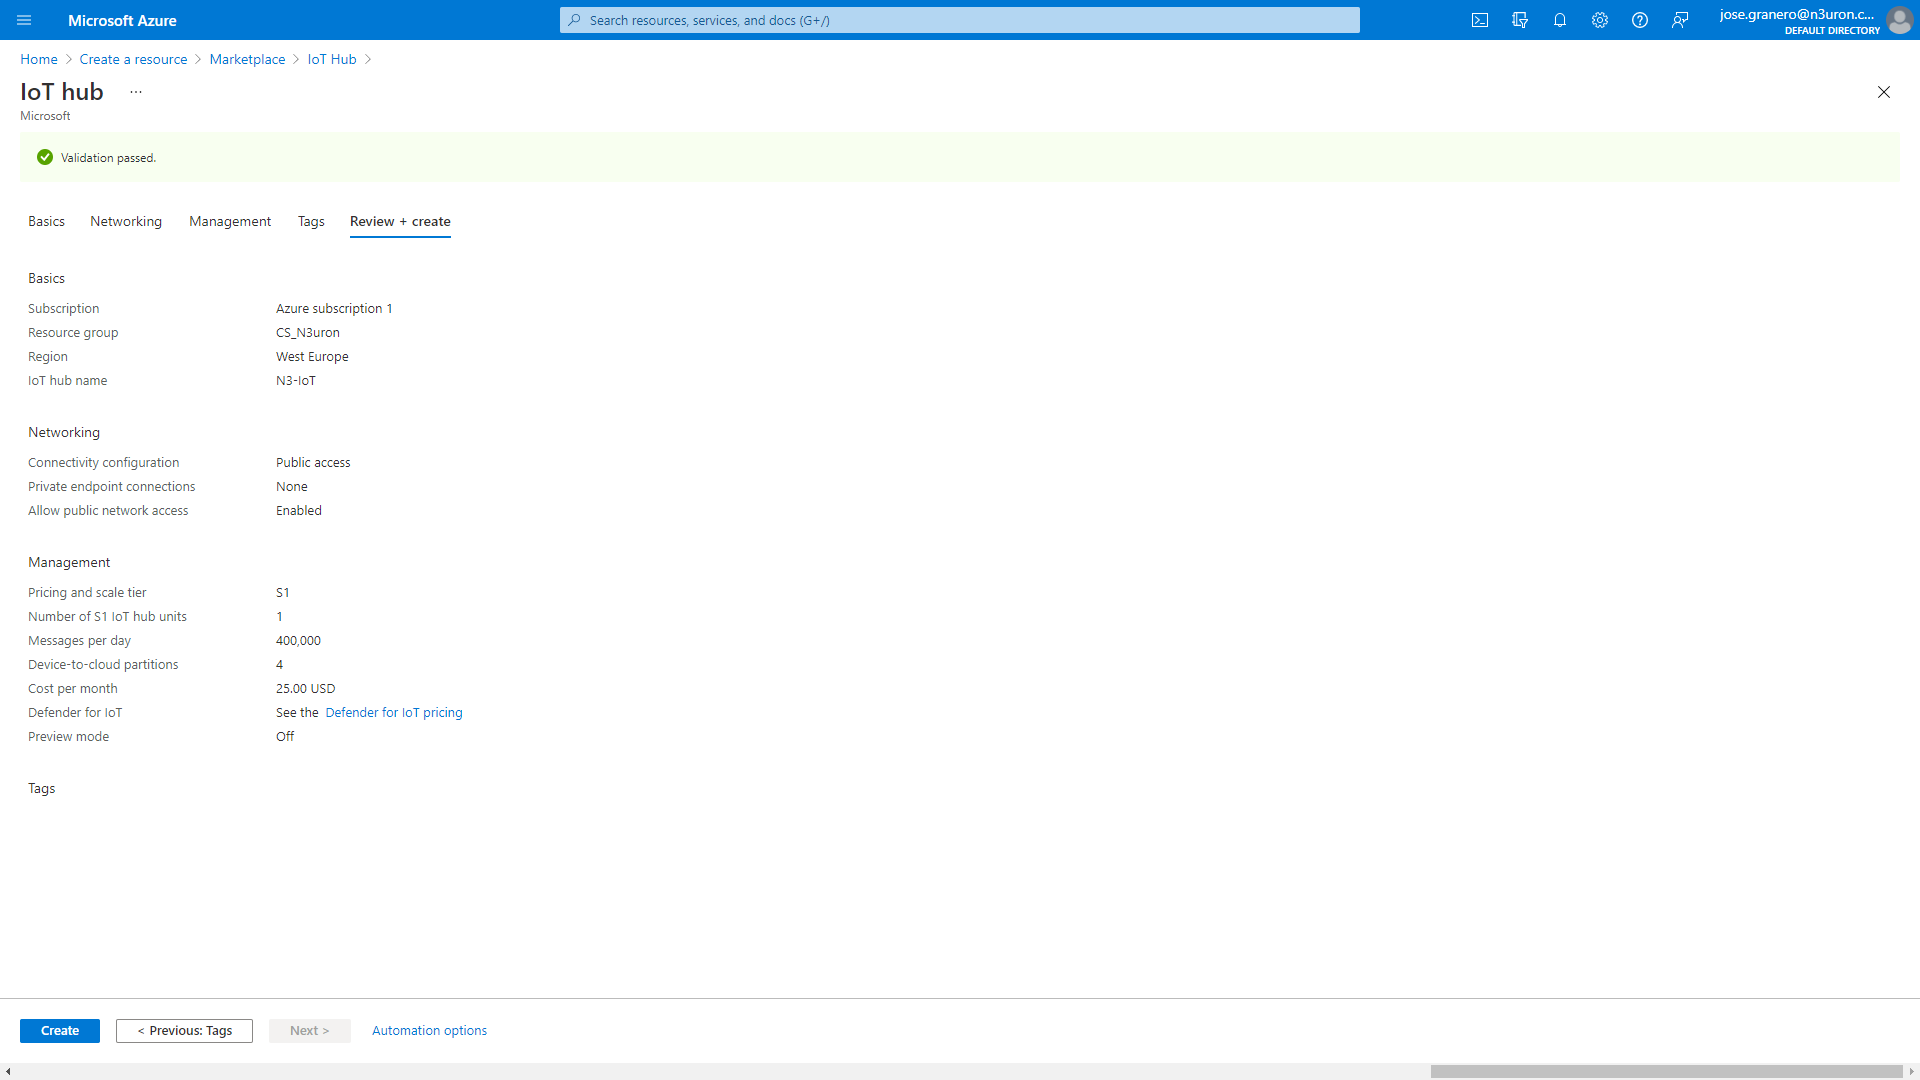
- Step 8: Select Next: Review + create to review your choices. You should see something similar to this screen but with the values you selected when creating the hub.
- Step 9: Select Create to start the deployment of your new hub. Your deployment will remain in progress for a few minutes while the hub is being created. Once the deployment is complete, select Go to resource to open the new hub.
Configuring Your Shared Access Policy
You can choose between two different mechanisms provided by Azure IoT Hub to authenticate devices and services: Security Tokens and X.509 Certificates.
Connection via security token (SAS)
- Step 1: Download the Device Explorer from the following URL: Device Explorer.
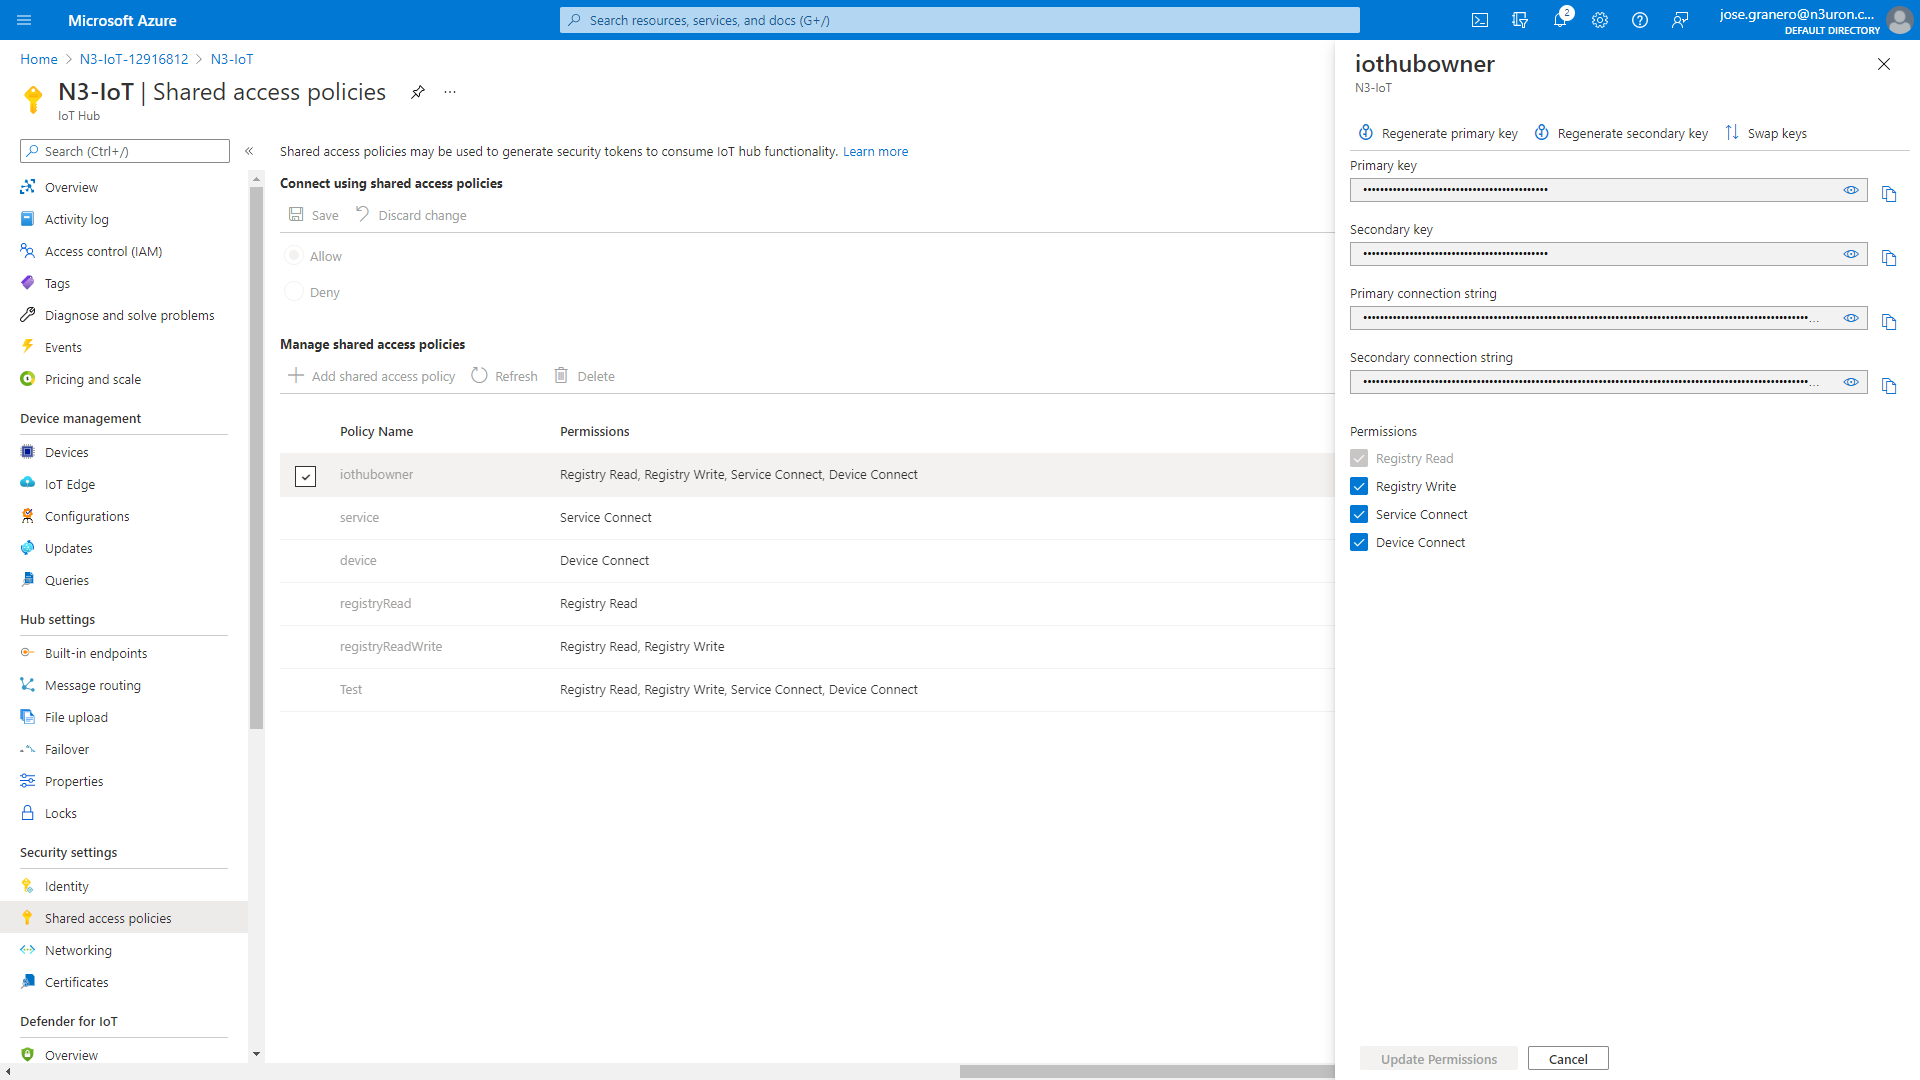
- Step 2: In the resource panel of the IoT Hub you have just created, select Shared access policies.
- Step 3: Click on iothubowner and copy the Primary connection string from the right-hand panel.
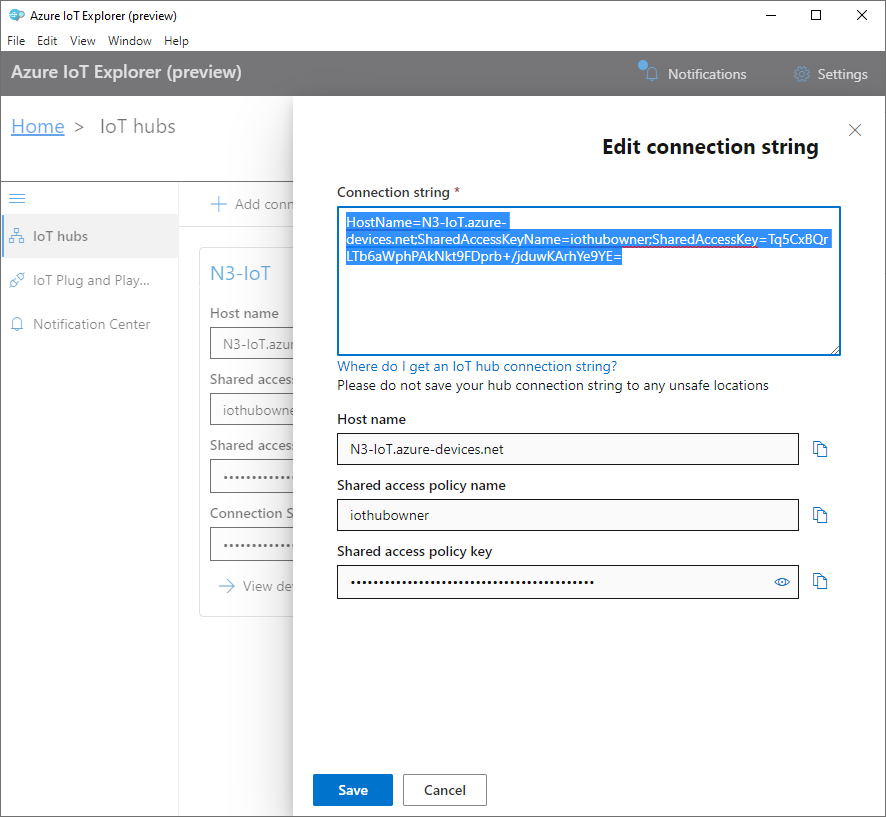
- Step 4: Start the Azure IoT Explorer, click on the + Add connection button, and paste the Primary connection string in the Connection String text box. Next click Save.
- Step 5: In the Devices section, click on the +New button and enter a name for your device. In Authentication type, select Symmetric key, check the Auto-generate keys field, and click on Create.

- Step 6: After creating the new identity, expand the Connection string with SAS token section. In the Symmetric key drop-down menu, select Primary Key, enter a sufficiently high figure in Expiration (minutes), click on the Generate Button, and copy the part of the SAS token connection string form SharedAccessSignature= onwards.
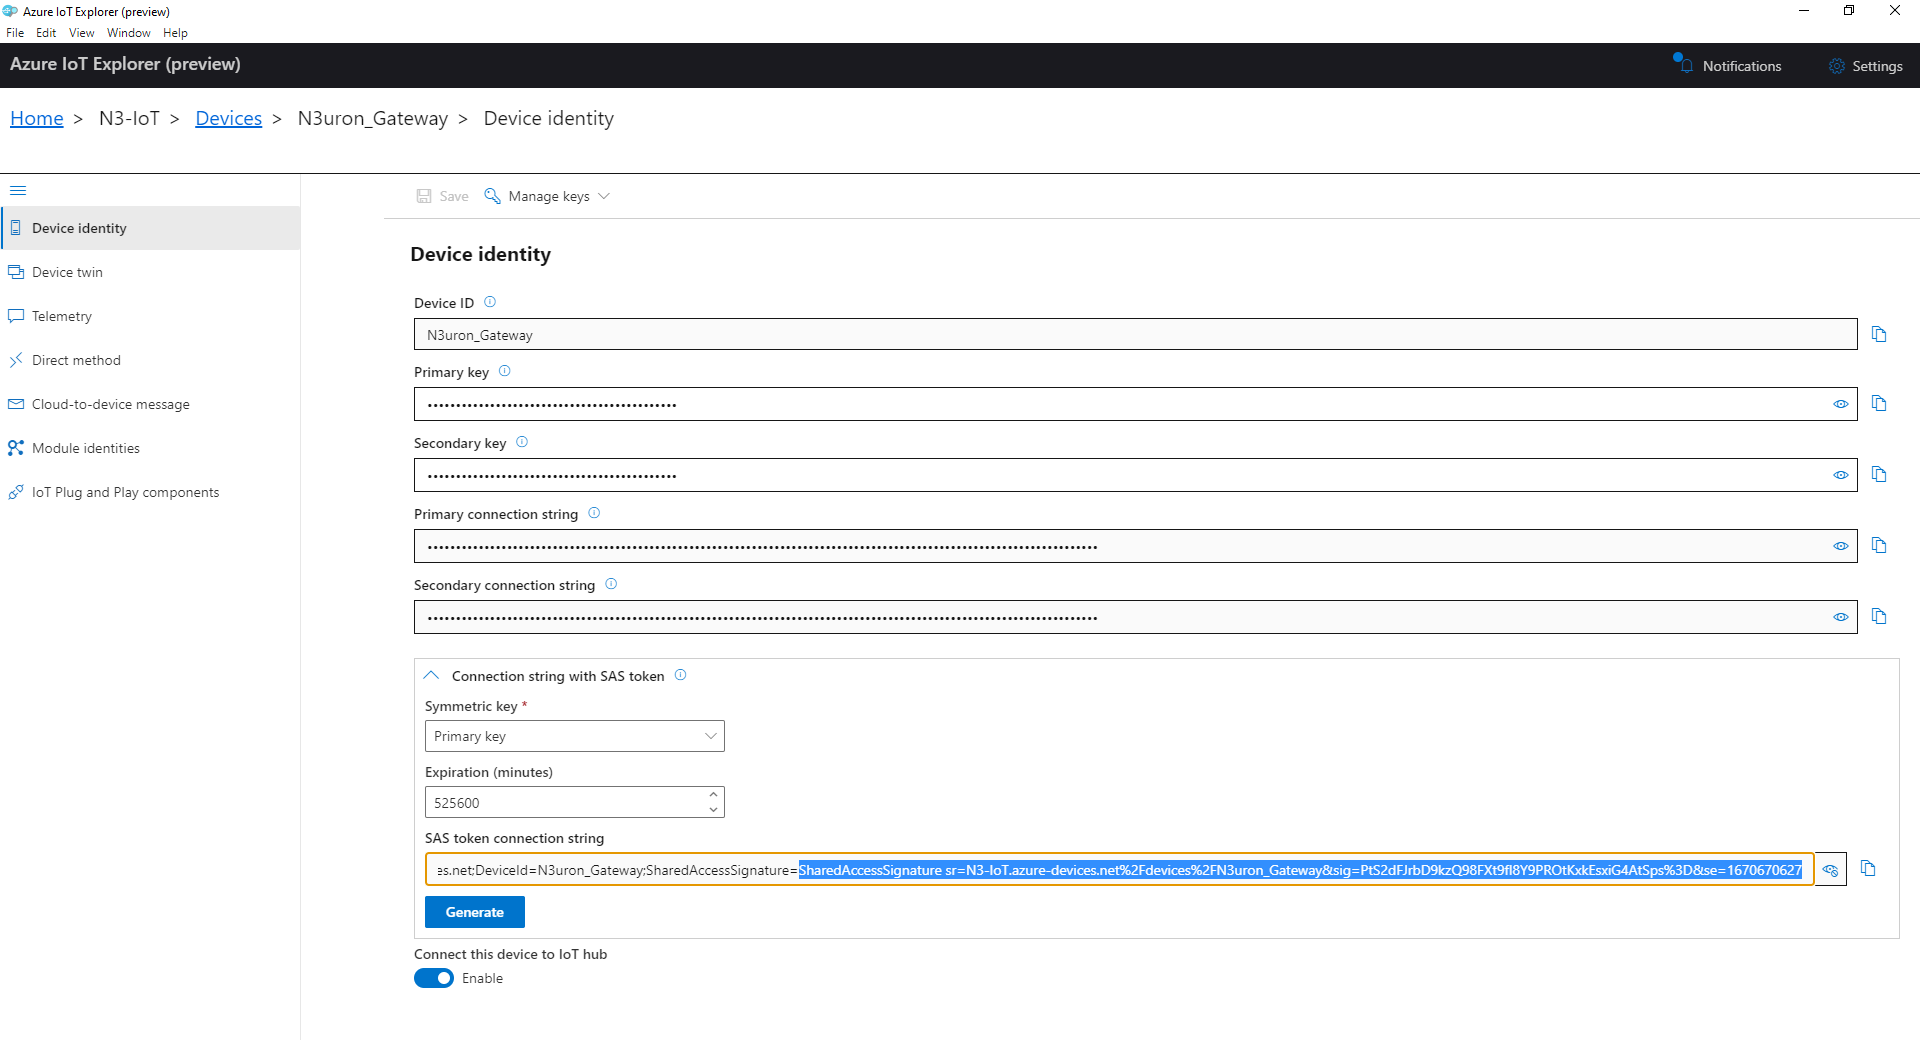
- Step 7: Finally, configure the MQTT Client with the following settings:
- URL: HostName
- ClientId: deviceId
- Username: HostName/deviceId
- Password: SAS Token (see the previous screenshot)
Connection via X.509 Certificates
- Step 1: Download the Device Explorer from: Device Explorer.
- Step 2: In the resource panel of the IoT Hub you have just created, select Shared access policies.
- Step 3: Click on iothubowner and copy the Primary connection string from the right-hand panel.
- Step 4: Download OpenSSL from OpenSSL.
Users can authenticate a device to their IoT Hub using two self-signed device certificates. This is sometimes called thumbprint authentication because the certificates contain thumbprints (hash values) that they submit to the IoT hub. The following tutorial explains how to create self-signed certificates, Using OpenSSL to create self-signed certificates.
- Step 5: Start the Azure IoT Explorer, click on the + Add connection button, and paste the Primary connection string in the Connection String text box. Next click Save.
- Step 6: In the Devices section, click on the +New button and enter a name for your device. In Authentication type, select X.509 self-signed, enter the Primary and Secondary thumbprints corresponding to the self-signed certificate you should have created previously, and click on Create.

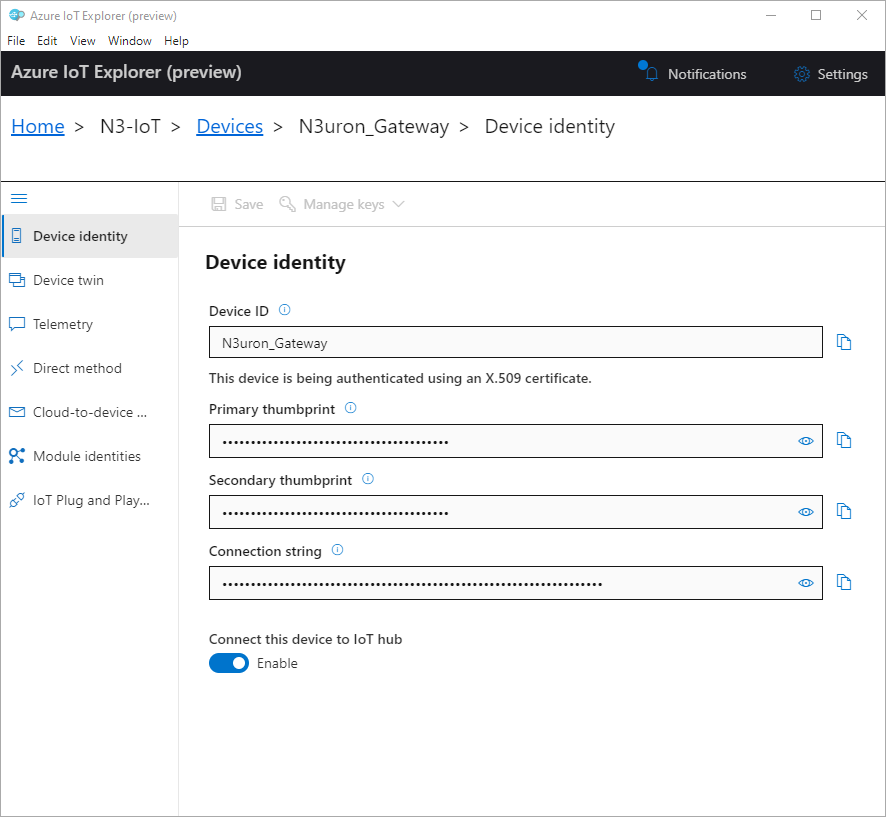
- Step 7: Finally, configure your MQTT client with the following settings:
- URL: HostName
- ClientId: deviceId
- Username: HostName/deviceId
- Password: Example password: “HostName=test-hub.azure-devices.net;DeviceID=TestDevice;x509=true”
- Certificate: Load your certificate
- Private key: Load your primary key
AWS IoT
- Step 1: Log into Amazon and Open AWS IoT Console.
Once logged in, you’ll create the AWS IoT resources that a device will require to connect to AWS IoT and exchange messages.
Creating a Policy
This policy will authorize your device to interact with AWS IoT services. Certificates are used to authenticate your device with AWS IoT Core. AWS IoT policies are attached to the certificate authenticating the device to determine the AWS IoT operations, such as subscribing or publishing to MQTT topics that this device is permitted to perform. The device will present its certificate whenever it connects and sends messages to the AWS IoT Core. You must create the AWS IoT policy first, which will then allow you to attach it to the device certificate that you will be creating later.
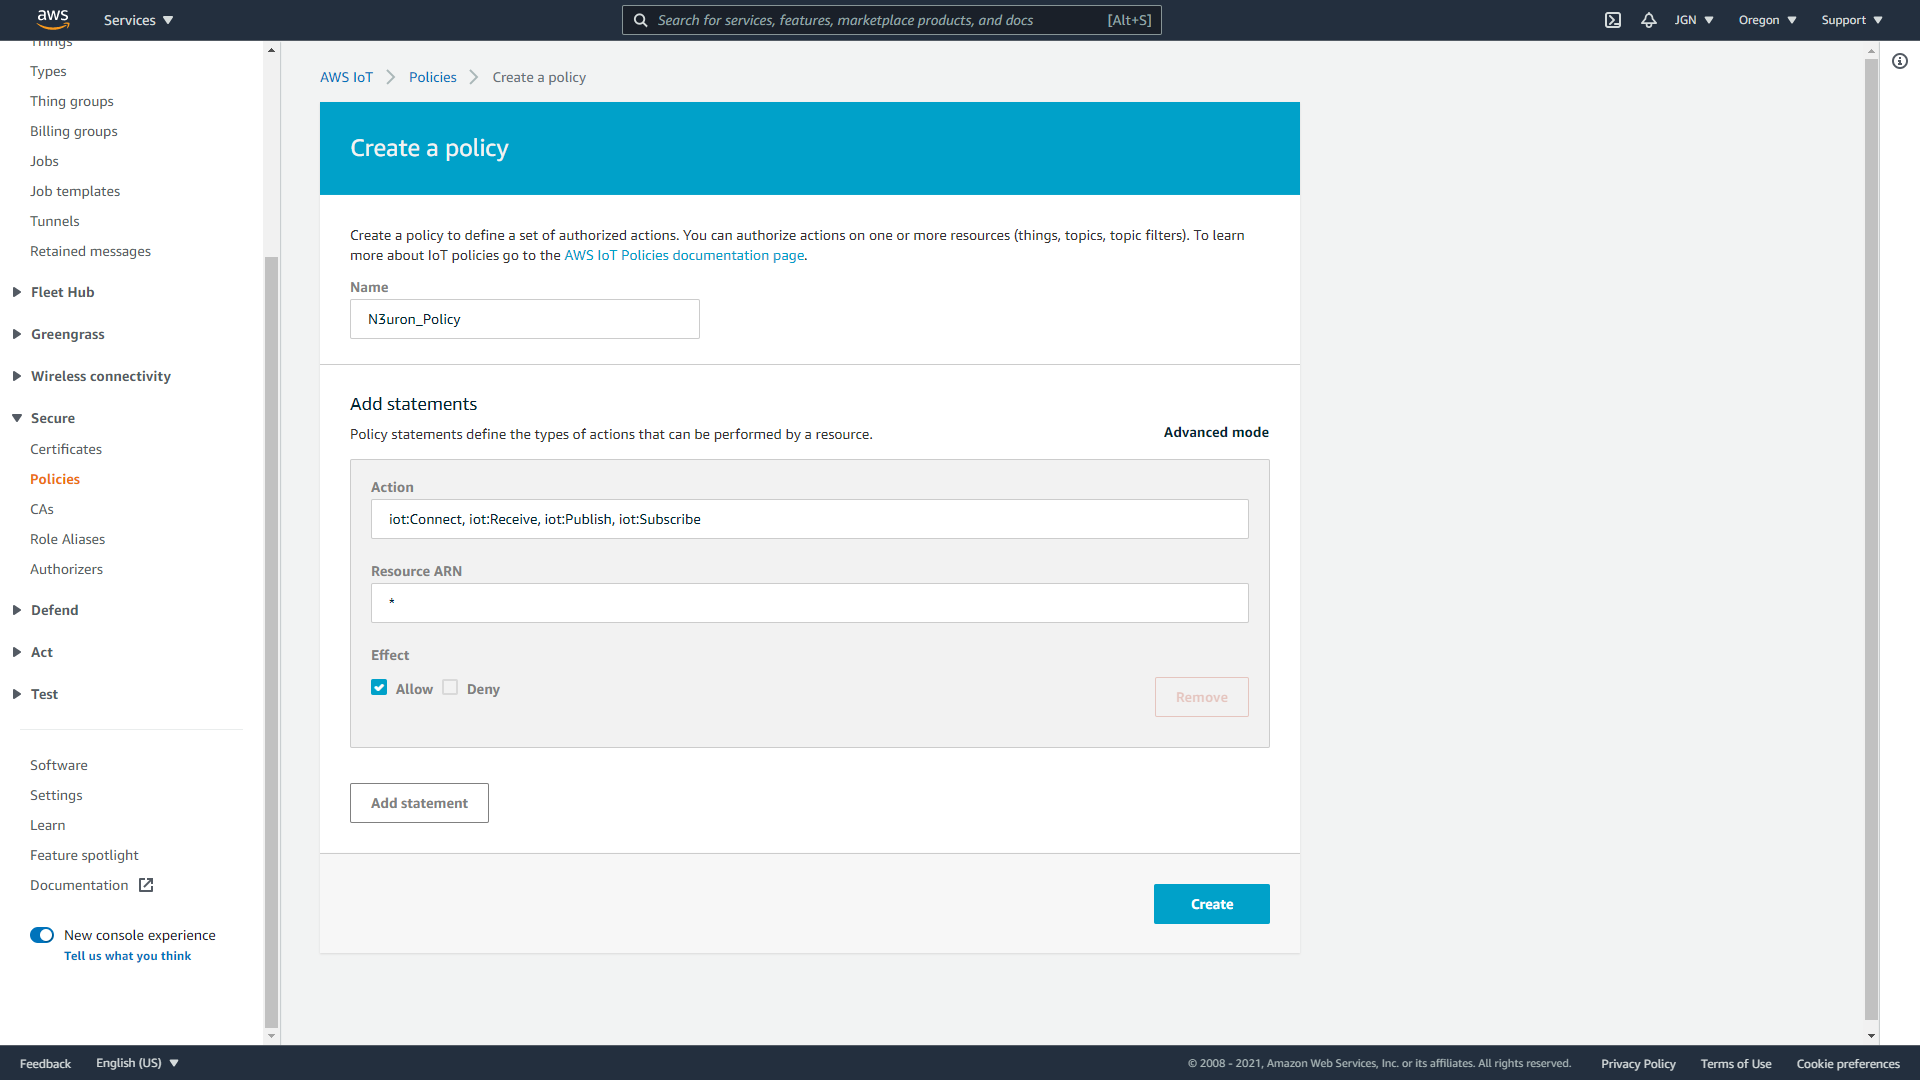
- Step 1: Within the AWS IoT Console, In the left-hand menu, first select Secure, and then Policies. On the You don't have a policy yet page, choose Create a policy. If your account has existing policies, choose Create.
- Step 2: On the Create a Policy page,
- In the Name field, enter a name for the policy.
- In the Action field, enter iot:Connect, iot:Receive, iot:Publish, iot:Subscribe. These are the actions that the device will need permission to perform.
- In the Resource ARN field, enter *. This selects any client (device). For increased security, it’s highly recommended that access is restricted by specifying a client ARN (Amazon resource name) once your Thing has been created.
- Select the Allow check box. These values allow all clients that have this policy attached to their certificate to perform the actions listed in the Action field.
- Step 3: After you have entered the information for your policy, choose Create.
For more information, see IAM policies.
Creating a thing
Devices connected to AWS IoT are represented by Thing objects in the AWS IoT registry. A Thing object represents a specific device or logical entity.
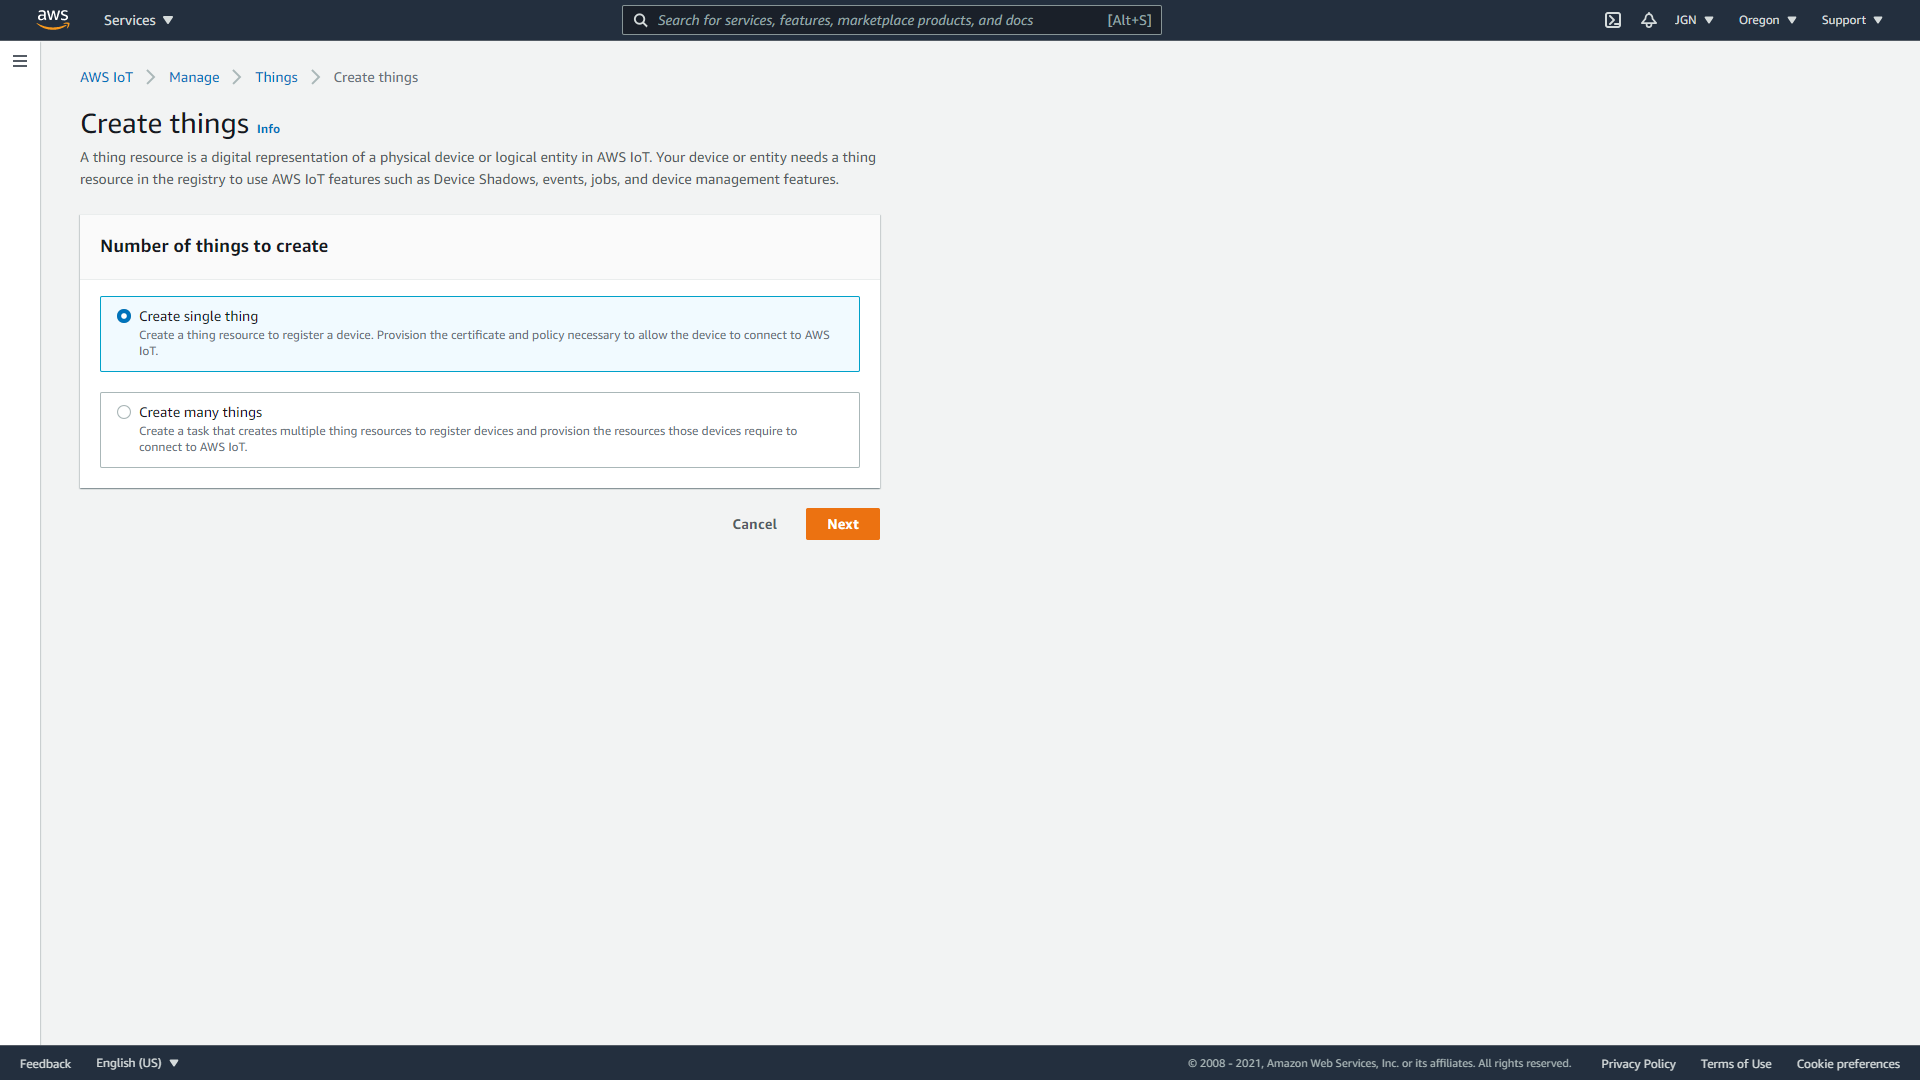
- Step 1: Within the AWS IoT Console, in the left-hand menu, select Manage, then choose Things.
- Step 2: On the Things page, select Create Things.
- Step 3: On the Create Things page, select Create a single thing, then select Next.
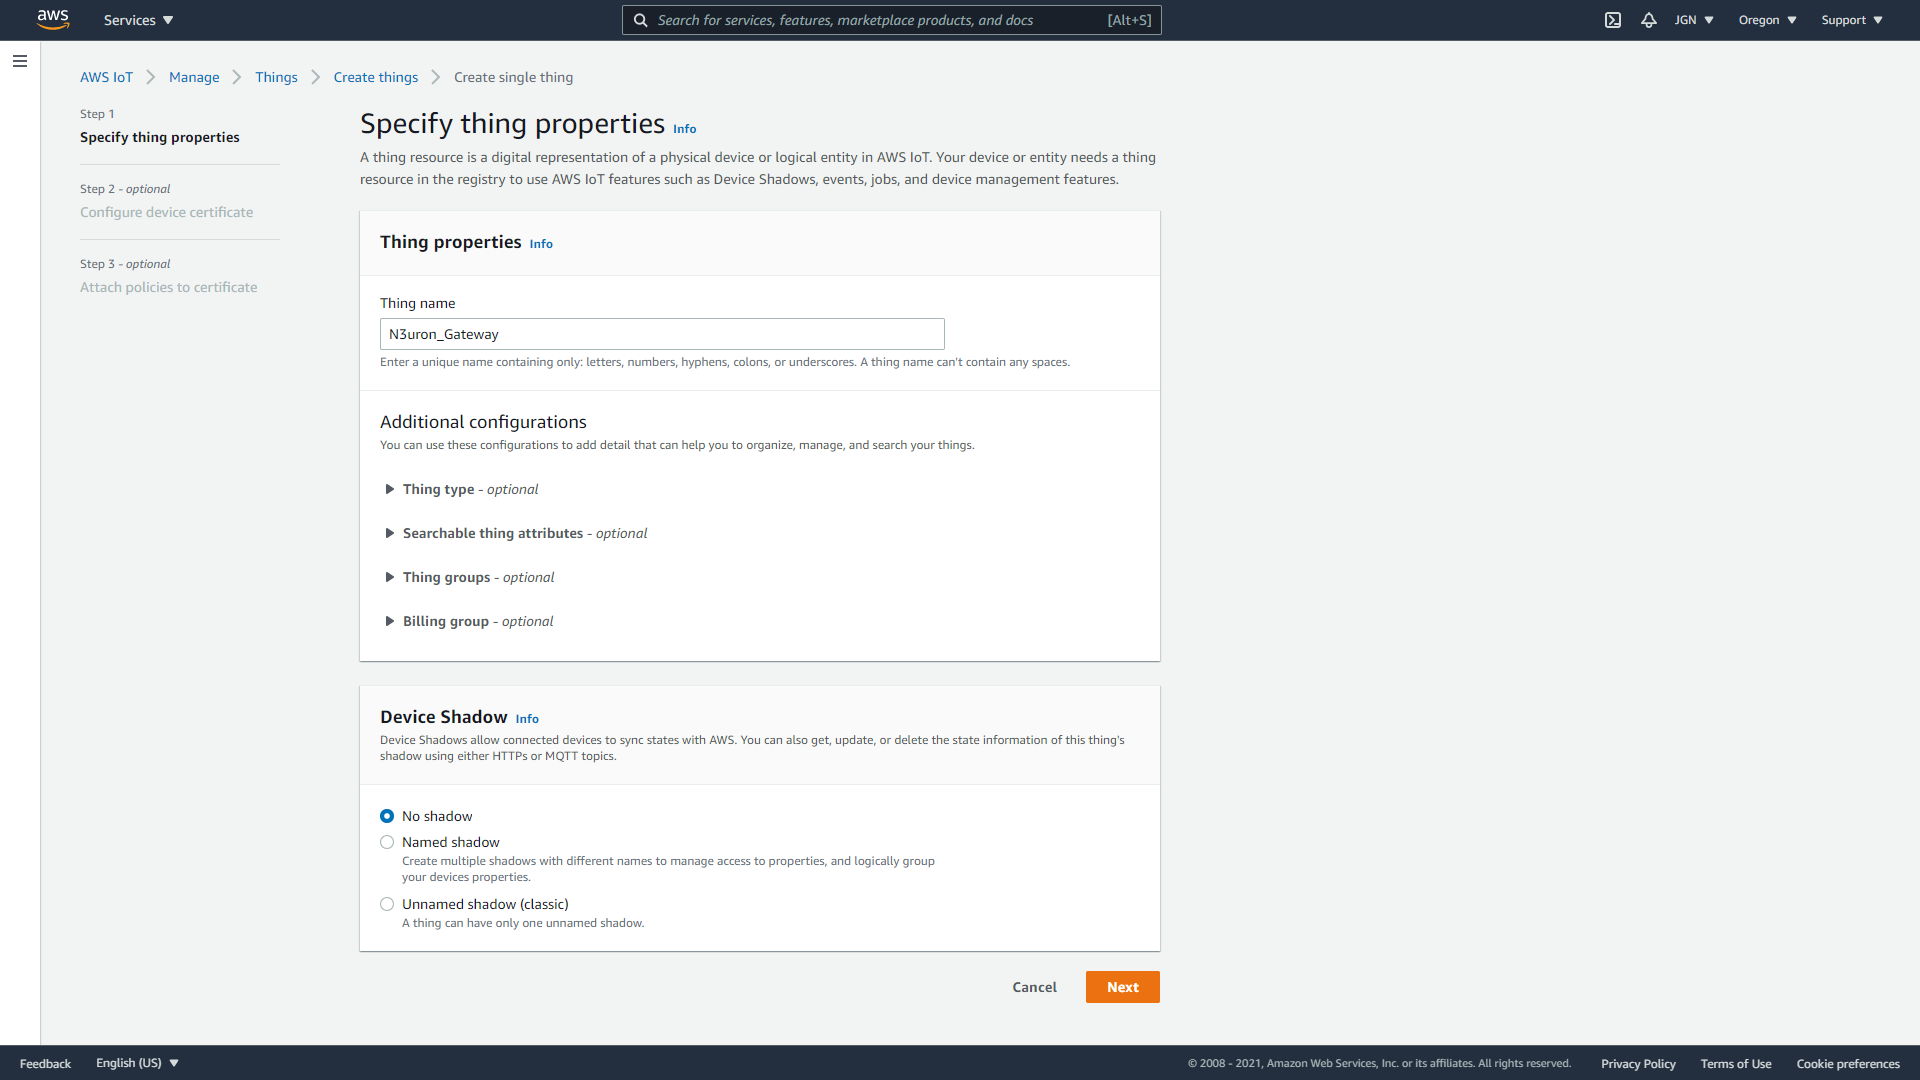
- Step 4: On the Specify thing properties page, for Thing name, enter a name for your Thing.
- Step 5: Leave the rest of the fields on this page empty. Select Next.
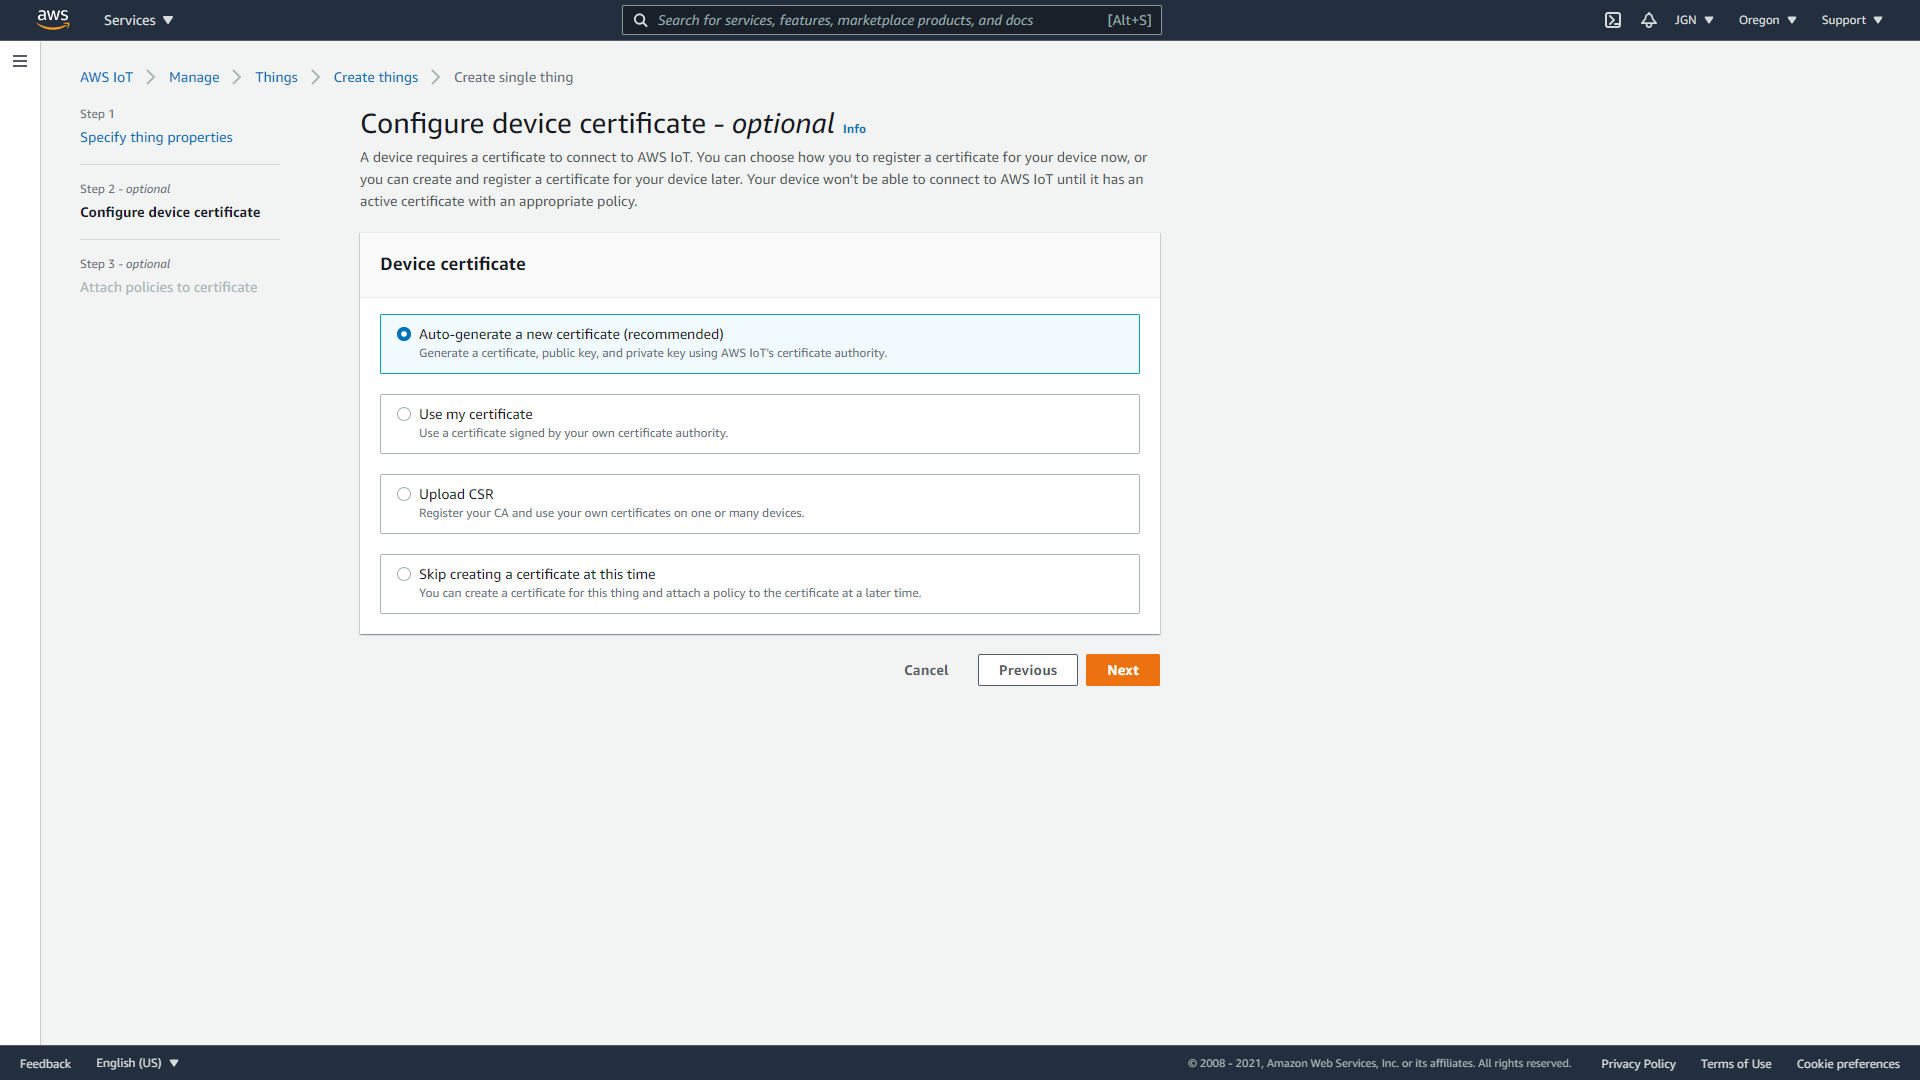
- Step 6: On the Configure device certificate – optional page, select Auto-generate a new certificate (recommended). Select Next.
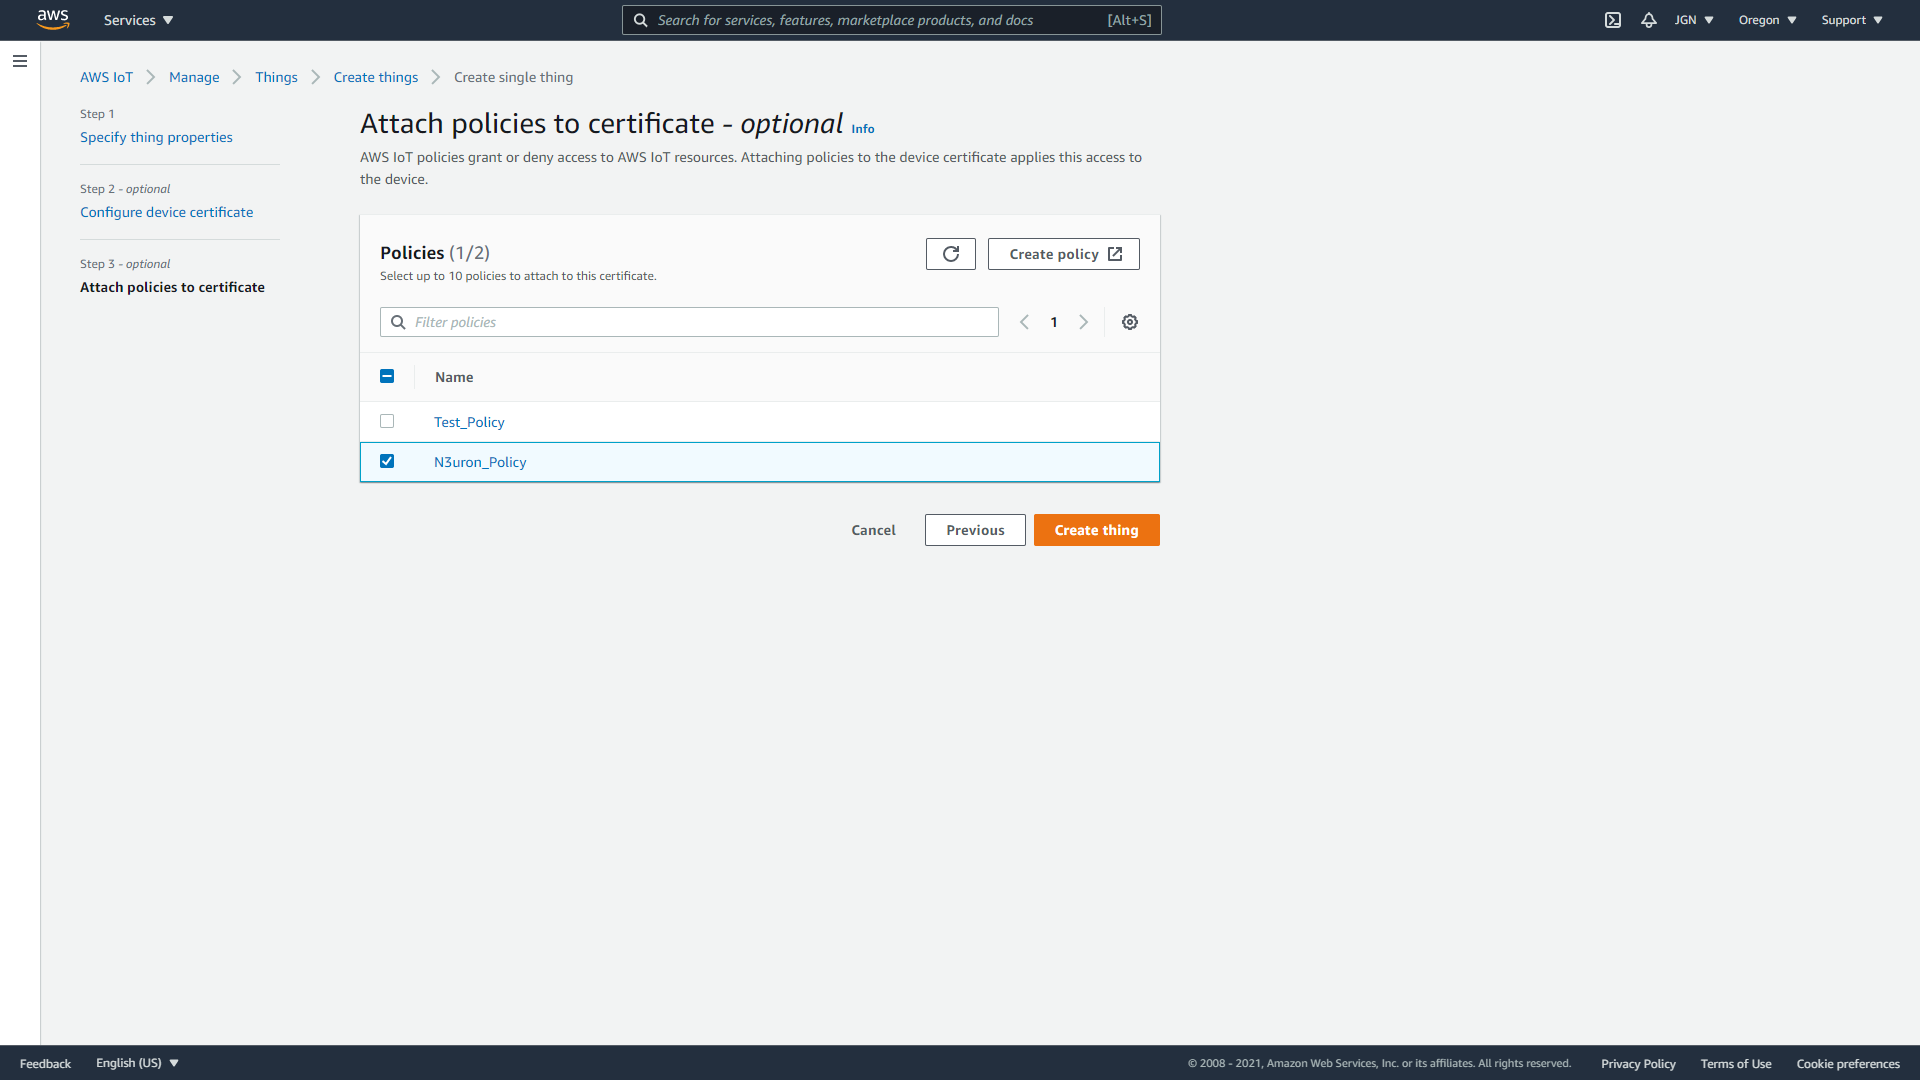
- Step 7: On the Attach policies to certificate – optional page, select the policy you created in the previous section. Choose Create thing.
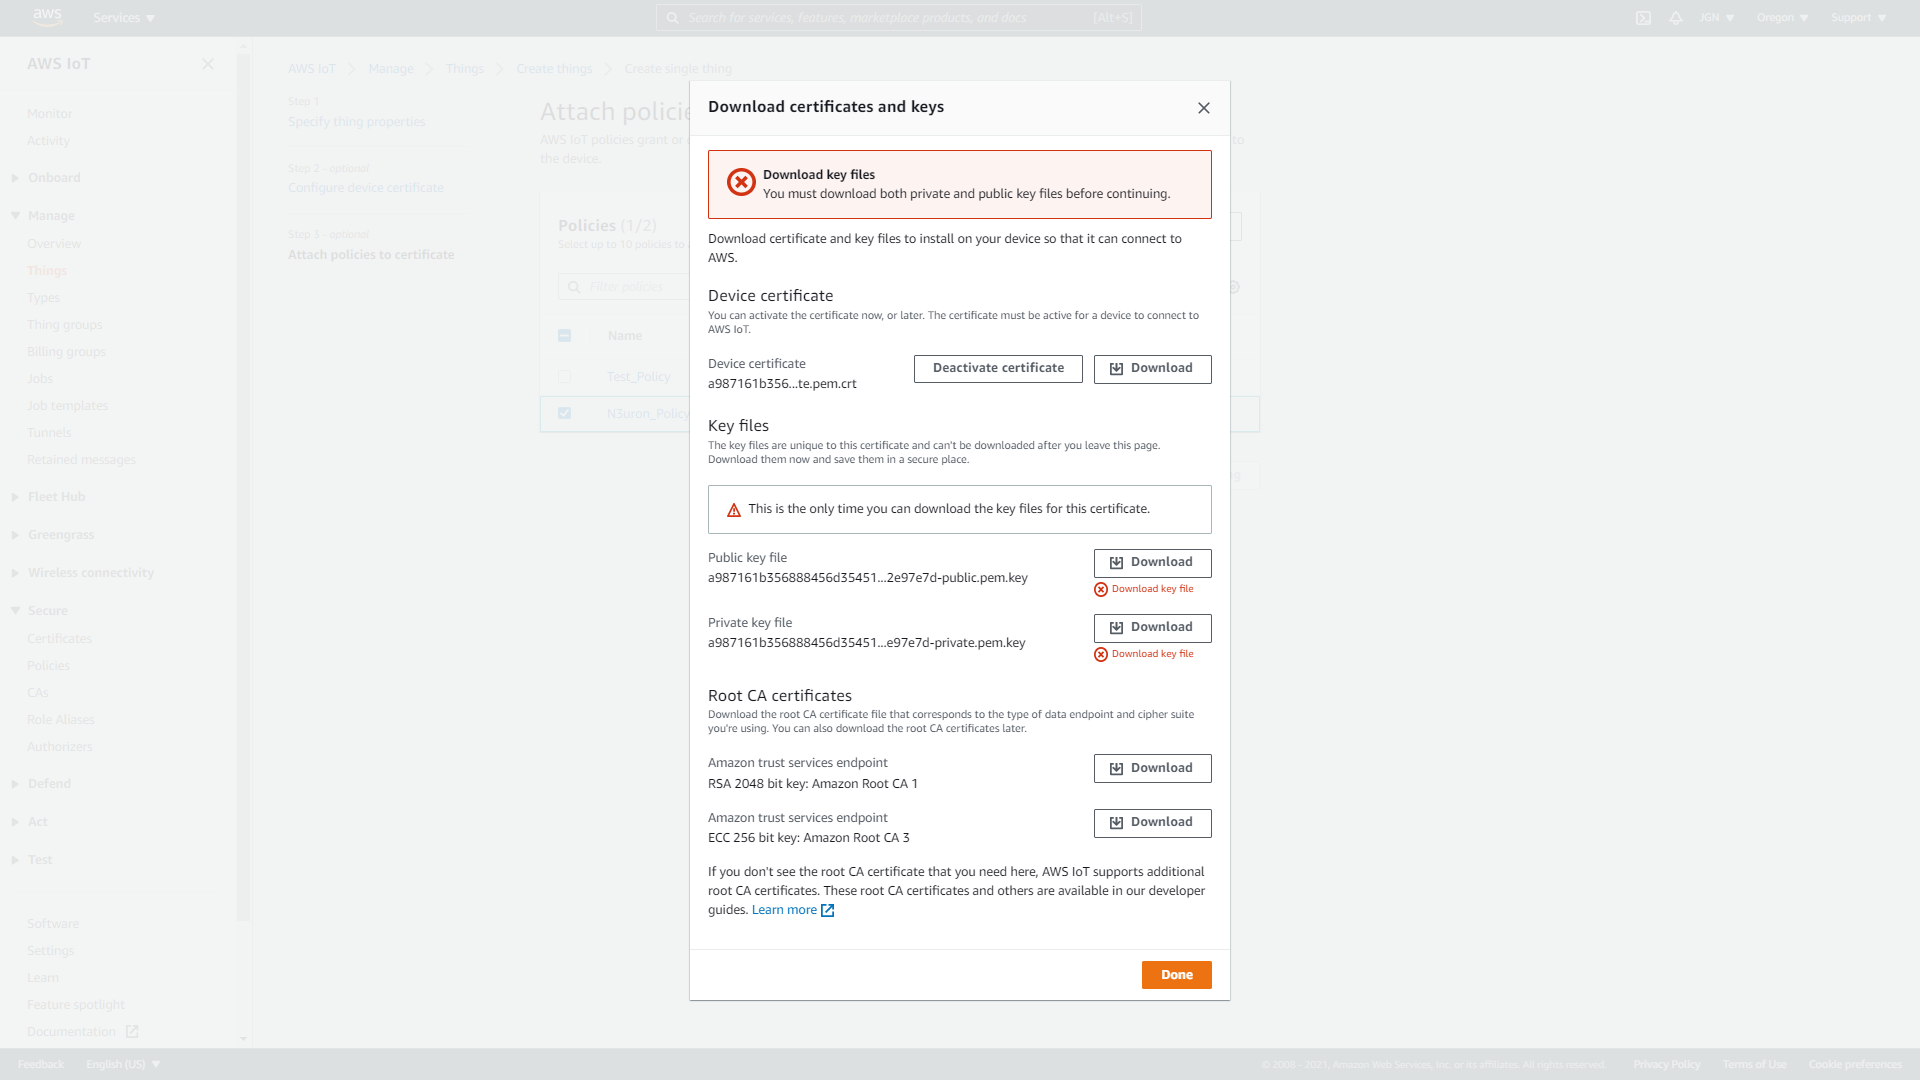
- Step 8: On the Download certificates and keys page:
- Download each of the certificates and key files and save them for later. You'll need to install these files on your device. See below for the required files:
- Private key
- Public key
- Device certificate
- Root CA certificate
- Download the Amazon root CA 1.
- Choose Done.
- Download each of the certificates and key files and save them for later. You'll need to install these files on your device. See below for the required files:
After this procedure is complete, you should be able to see the new thing object in your list of Things. Click on the Thing you’ve just created, select the Certificates tab, and make sure the certificate is active.
- Step 9: Once that has been done, the certificate can be activated which will allow users to connect to AWS using MqttClient. It can be attached to more than one Thing if necessary by selecting “Attach thing”.
- Step 10: In order to connect to AWS, a broker URL associated with our IoT Service is required. This URL is common to all Things. To obtain the URL, click settings to show the custom endpoint at the top of the page.
- Step 11: Finally, when setting up connections to AWS, use the following MqttClient settings:
- Protocol: MQTTS
- Broker URL: AWS Endpoint
- Port: 8883
- Certificate: thing.pem.crt
- Private Key: thing.prive.prm.key
- CA Certificate: rootCA.pem
These are the essential configuration settings required for establishing a connection. The rest can be customized as desired.
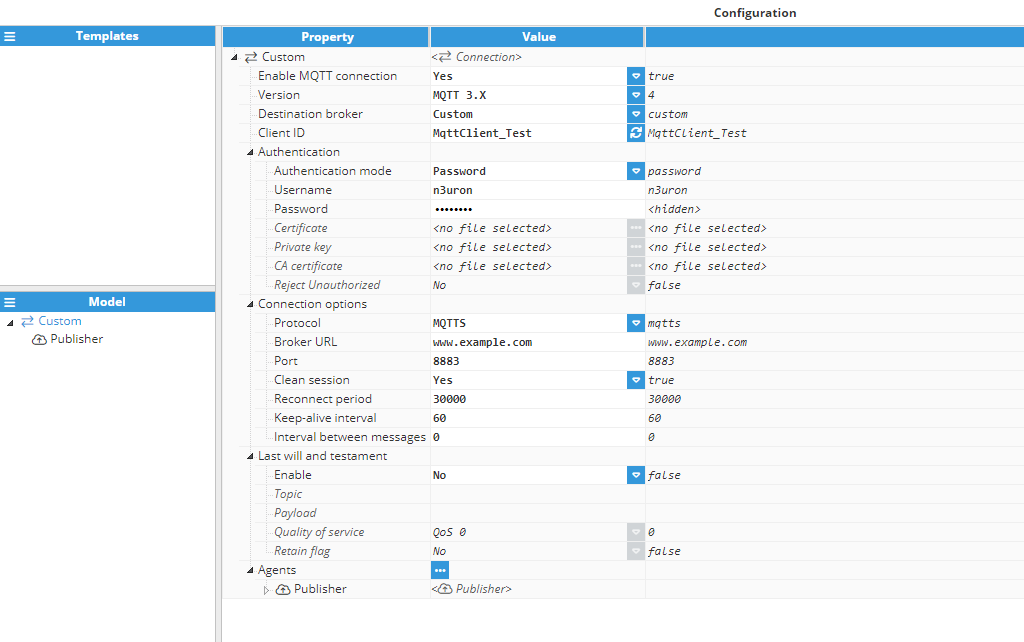
Generic Broker
To connect to a generic broker (for example Mosquitto), the following settings are used (this assumes that the broker is using an unsecured MQTT and does not require a username or password):
- Protocol: MQTT
- Host: www.example.com
- Port: 1883
These are the minimum settings required for a successful connection. However, if the broker requires authentication, whether that be with a username and password, certificate, or both, these options can be applied accordingly. The following screenshot shows the basic settings used to connect to a Mosquitto server without authentication: