Note:
Before starting the configuration, a new module instance must be created. Click here for more information about creating Module instances.
Module Configuration
Users can configure notifications by selecting Notifier from the Explorer tree menu.

As shown in the image below, a New Message can be created in the Model Panel by clicking on the burger menu icon. Each message can have several notifiers assigned to it.
Message
The Message configuration section is used to configure the message content, as well as any triggers and Notifiers. Notifiers can be Mail, SMPP, or Webhook connectors that enable integration with popular communication platforms such as WhatsApp, Slack, Discord, Telegram, Twilio, and any other third-party system that supports Webhook endpoints.
General Settings
Setting | Description |
|---|---|
Enabled | Enables or disables message processing. |
Timestamp | Configures timestamp formatting and timezone settings for the message. This affects how timestamps are displayed in alarm and tag tables within the notification message.
|
Triggers
Triggers define the conditions under which a message will be sent. There are four types of triggers available: Alarm, Periodic, TagCondition, and TagChange triggers. Multiple triggers can be configured for a single message, and the message will be sent when any of the configured triggers activate.
Note:
Starting with N3uron version 1.22.0, the TagChange trigger is available, allowing messages to be triggered based on value, quality, or timestamp
Alarm Trigger
The Alarm trigger sends a message when alarms matching specific criteria are activated. The following table describes the Alarm trigger configuration settings.
Setting | Description |
|---|---|
Path | Base tag path to monitor for alarms. Use / to monitor all alarms in the tag namespace, or specify a specific path such as /Plant01/Area01 to limit monitoring to alarms within that branch. |
Regex pattern | Regular expression filter for alarm paths. Only alarms whose full paths match this regex pattern will trigger the message. Use .* to match all alarms, or specific patterns like .*TEMP.* to match only alarms containing "TEMP" in their path. |
Minimum priority | Minimum alarm priority level that will trigger the message.
|
Active & Acked | Triggers when an alarm is active and has been acknowledged by an operator. |
Active & Unacked | Triggers when an alarm becomes active and has not been acknowledged. |
Cleared & Unacked | Triggers when an alarm condition is resolved but not yet acknowledged. |
Cleared & Acked | Triggers when an alarm is fully resolved and acknowledged. |
Notification delay | Time delay in milliseconds before sending the message after the alarm trigger condition is met. This prevents message flooding from rapidly changing alarm states. |
Periodic Trigger
The Periodic trigger sends messages at scheduled intervals or specific times. This is useful for periodic reports or status updates. The following table describes the Periodic trigger configuration settings.
Setting | Description |
|---|---|
Type |
|
Scan rate | Specifies the scan rate of the periodic trigger, in milliseconds. The minimum value is 1000 milliseconds. |
Cron expression | When Type is set to Cron, this parameter accepts cron expression syntax to schedule specific execution times. Format: * * * * * representing minute, hour, day of month, month, and weekday. Example: 0 8 * * * executes daily at 8:00 AM. |
Reschedule timer | When enabled, the timer is rescheduled after the trigger is executed. Example: If a message with several triggers (including a 60-second periodic trigger, which executed at 11:30:10) is executed at 11:30:25.
|
Run on start | When enabled, the message is sent immediately when the module starts. |
TagCondition Trigger
The TagCondition trigger sends a message when a tag value meets a specified condition, such as exceeding a threshold or matching a specific value. The following table describes the TagCondition trigger configuration settings.
Setting | Description |
|---|---|
Tag | Full path to the tag whose value will be monitored for the condition. Example: /Plant01/Area01/Temperature. |
Property | Specifies the tag property used as a trigger, value, quality, or timestamp. |
Initial change | Specifies if the initial subscription must also be considered as a valid trigger. For instance, after a reboot, the value of the tag acting as a trigger can change from <null> to true. If the initial change was enabled, then this change would activate the trigger. |
Condition | Comparison operator to apply to the tag value. Available conditions:
|
Value | The value used in the condition to compare to. It can be a number, a string or a boolean (true / false). |
Delay | Specifies the delay, in milliseconds, the trigger condition must remain active before sending the notification. |
Condition type | Specifies how the condition is evaluated:
|
Trigger on update | When enabled, the action triggers every time a new tag update is received that still satisfies the condition. This option is only used when the condition type is either If true or If false. When disabled, it only triggers once when the condition becomes true. |
Reset trigger | If enabled, the trigger is reset to the value provided in Reset value after the trigger has been activated. |
Reset value | Specifies the value that will be written automatically to the tag after the notification has been completed. |
TagChange Trigger
The TagChange trigger, sends a message whenever the value of a specified tag changes. This is useful for monitoring critical process variables or state changes. The following table describes the TagChange trigger configuration settings.
Setting | Description |
|---|---|
Tag | Full path to the tag that will be monitored for value changes. Any change in the tag value will trigger the message. Example: /Plant01/Area01/Status. |
Property | The property of the tag evaluated in the condition can be its value, quality, or timestamp. |
Initial change | Specifies whether the script should trigger on the initial subscription or not. |
Message Contents
The Message contents section defines the data included in notification messages. N3uron supports two types of message content tables: the Alarms table for alarm-related data and the Tags table for tag value information. Each message can include one or both table types, and each table type has its own filtering and column configuration options.
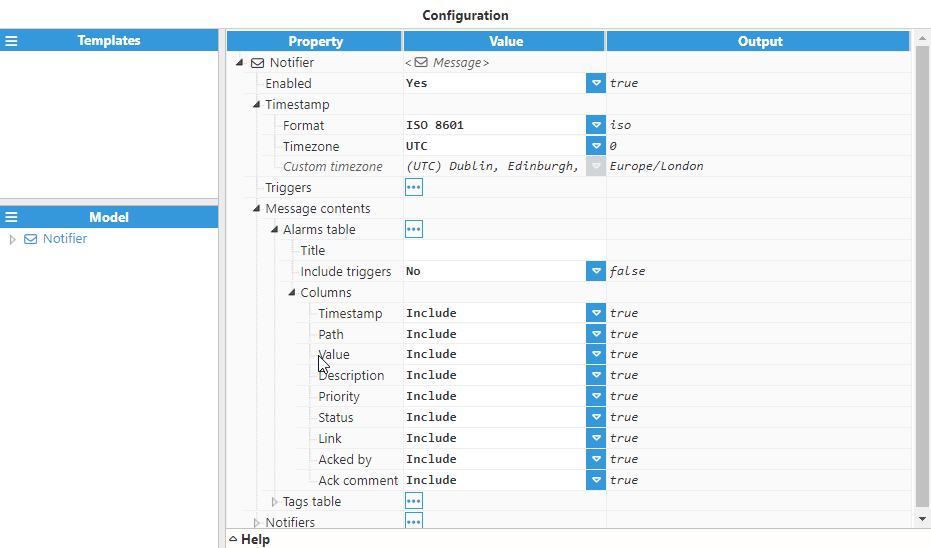
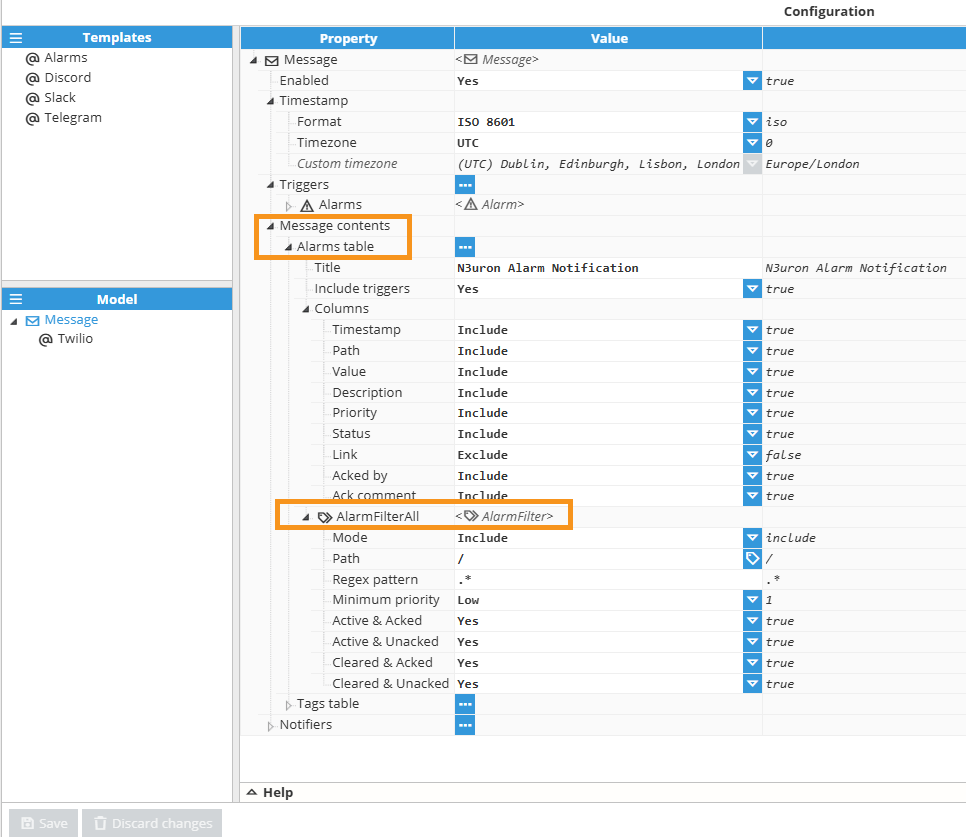
Alarms table
The Alarms table includes alarm information in the notification message. This table can be configured to filter specific alarms and display selected alarm properties. The following table describes the Alarms table configuration settings.
Setting | Description |
|---|---|
Title | Allows the inclusion of a title above the alarms table. This parameter is optional. |
Include triggers | When enabled, the alarms triggering the notification are also included in the alarms table along with other alarms included by alarm filters. |
Columns |
|
Alarm Filter
Alarm filters control which alarms are included in or excluded from the notification message. Multiple filters can be configured to create complex filtering logic. The following table describes the Alarm Filter configuration settings.
Setting | Description |
|---|---|
Mode | Selects whether the filter must include or exclude tags from the result. Include filters are applied first, and then the exclude filters are applied to the result of the include filters. • Include: Alarms matching the filter are included in the result. • Exclude: Alarms matching the filter are excluded from the result. Multiple filters can be combined to create sophisticated filtering logic. |
Path | Selects a specific tag or a tag group to apply the filter. |
Regex pattern | Specifies a regular expression used to filter the tags. The default regular expression is .*, which means all the tags must be included in the result. More information about regular expressions can be found at RegExr. |
Minimum priority | Specifies the minimum priority of the alarms included in the filter. Alarms with lower priority are excluded from the result of the f.ilter |
Active & Acked | Includes alarms that are currently active and have been acknowledged by an operator. |
Active & Unacked | Includes alarms that are currently active but have not been acknowledged. |
Cleared & Acked | Includes alarms that have been cleared and acknowledged. |
Cleared & Unacked | Includes alarms that have been cleared but not yet acknowledged. |
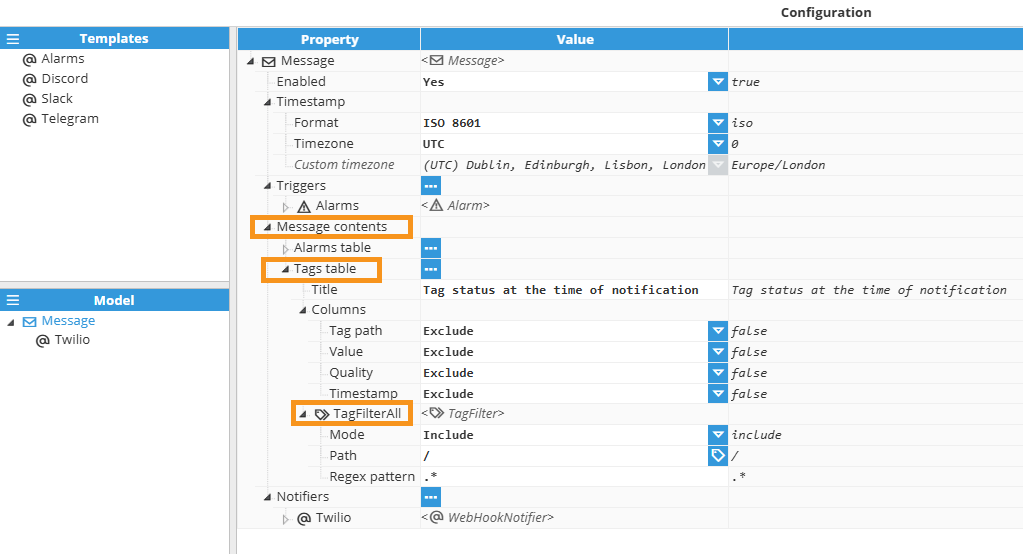
Tags table
The Tags table includes tag value information in the notification message. This table can display current values, quality, and timestamps for selected tags. The following table describes the Tags table configuration settings.
Setting | Description |
|---|---|
Title | Permits to include a title above the tags table. This parameter is optional. |
Columns |
|
Tags filter
Tag filters control which tags are included in or excluded from the notification message. Multiple filters can be configured to create complex filtering logic. The following table describes the Tag Filter configuration settings.
Setting | Description |
|---|---|
Mode | Defines whether the current filter condition is used to Include or Exclude tags based on the associated regular expression pattern. Each filter consists of one or more Include and Exclude rules, each with its own regex pattern:
The filtering process first applies all Include conditions, and then applies any Exclude conditions to the resulting set. |
Path | Selects a specific tag group to apply the filter |
Regex pattern | Specifies a regular expression used to filter the tags. The default regular expression is .*, which means all the tags must be included in the result. More information about regular expressions can be found at RegExr. |
Note:
At least one Include condition must be defined for the filter to have any effect.
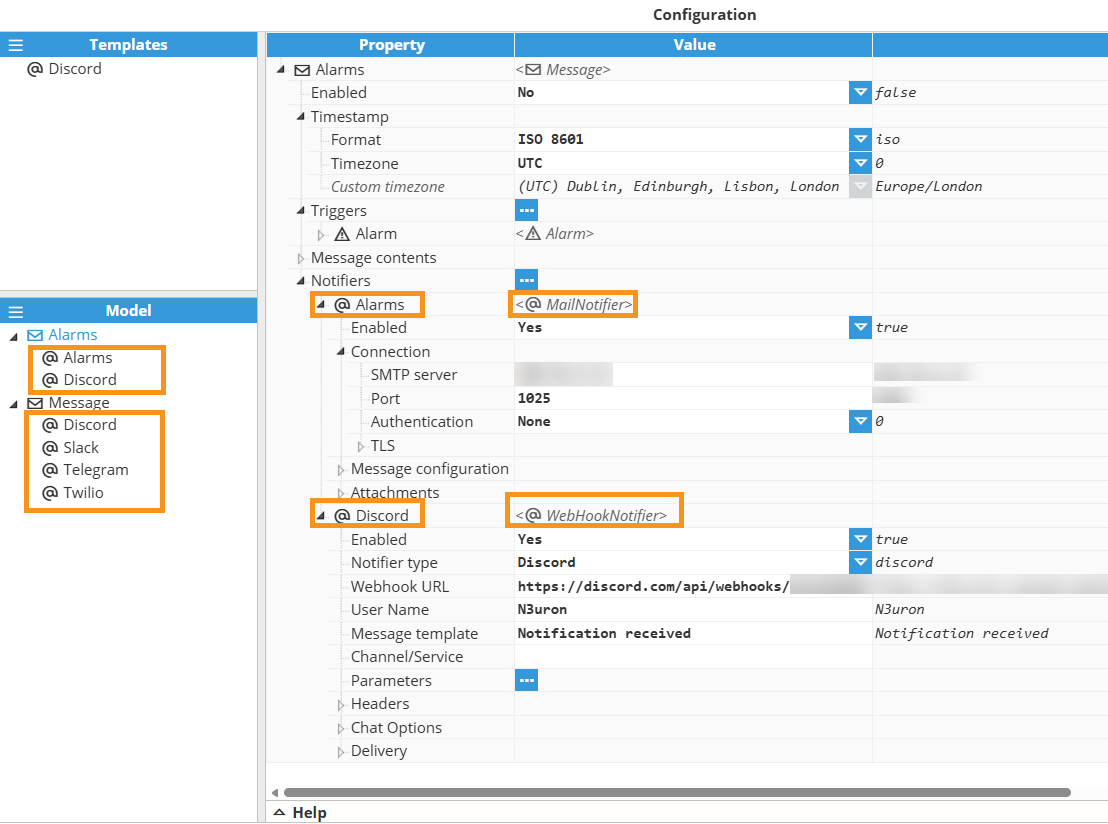
Notifiers
Notifiers define the delivery mechanism for messages. N3uron supports multiple notifier types, allowing messages to be sent through different channels.
The following notifier types are available:
Mail Notifier: Sends notifications via email through SMTP servers.
SMPP Notifier: Delivers SMS messages through the Short Message Peer-to-Peer protocol.
Webhook Notifier: Sends notifications to popular communication platforms such as WhatsApp, Slack, Discord, Telegram, Twilio, as well as other third-party systems that support Webhook endpoints.
Note:
Starting with N3uron version 1.22.0, the Webhook notifier is available.
Parameters
Notifiers with parameters can be used by accessing the $.parameter object. Each parameter corresponds to one or more tag events, and each tag event includes the following properties:
tag: The path of the tag.
value: The current value of the tag (number, string, boolean, or null).
quality: The parameter quality is a number in the range of 0-255, which represents a level of confidence in the tag value.
ts (timestamp): The parameter timestamp is a number that represents the number of milliseconds lapsed since January 1970 (Unix Epoch).
Setting | Description |
|---|---|
Single tag | This parameter will contain a single tag specified with a tag path. |
Tag group | This parameter will contain a group of tags that are included in the specified path |
Multiple tags (Filter) | This parameter will contain any of the tags that match the given filters. |

To access parameters declared in the Notifier, reference the $.parameter object followed by the parameter name.
Single tag
For a Single tag parameter, $.parameter.<name> is a single tag event object, so you can access its fields directly:
$.parameter.PT_101.tag;
$.parameter.PT_101.value;
$.parameter.PT_101.quality:
$.parameter.PT_101.ts;
Tag group / Multiple tags (Filter)
For a Tag group or Multiple tags (Filter) parameter, $.parameter.<name> returns an array of tag event objects. Iterate over the array to access each tag’s fields (tag, value, quality, ts):
for (const ev of $.parameter.A0_L1) {
  // ev.tag, ev.value, ev.quality, ev.ts
}
Since $.parameter is a JavaScript object, it can be iterated to programmatically obtain all parameters using the for…of syntax. An iteration example can be seen in the following snippet:
for (const [param, value] of Object.entries($.parameter)){
   $.logger.info("Parameter %s is %j", param, value);
}
Extract Tag Objects as a Flat Array from Parameters:
This sample function demonstrates how to extract and flatten all values from Parameters into a single array. It supports both cases where a parameter value is an array of tag objects (each element will be added individually) or a single tag object (added directly). The result is a flat array of parameter values, which can then be used for further processing.
function getValuesFromParameters() {
  const parameterValues = [];
  for (const paramValue of Object.values($.parameter)) {
    if (Array.isArray(paramValue)) {
      // Parameter is an array: append each element individually
      for (const element of paramValue) {
        parameterValues.push(element);
      }
    } else {
      // Parameter is a single tag object: append it directly
      parameterValues.push(paramValue);
    }
  }
  return parameterValues;
}
Mail Notifier
The Mail Notifier sends messages via email using an SMTP server. The following table describes the Mail Notifier configuration settings.
Setting | Description |
|---|---|
Enabled | Enables message notifications through this notifier |
Connection |
|
Message configuration |
|
Attachments |
|
Example using a Template
.png)
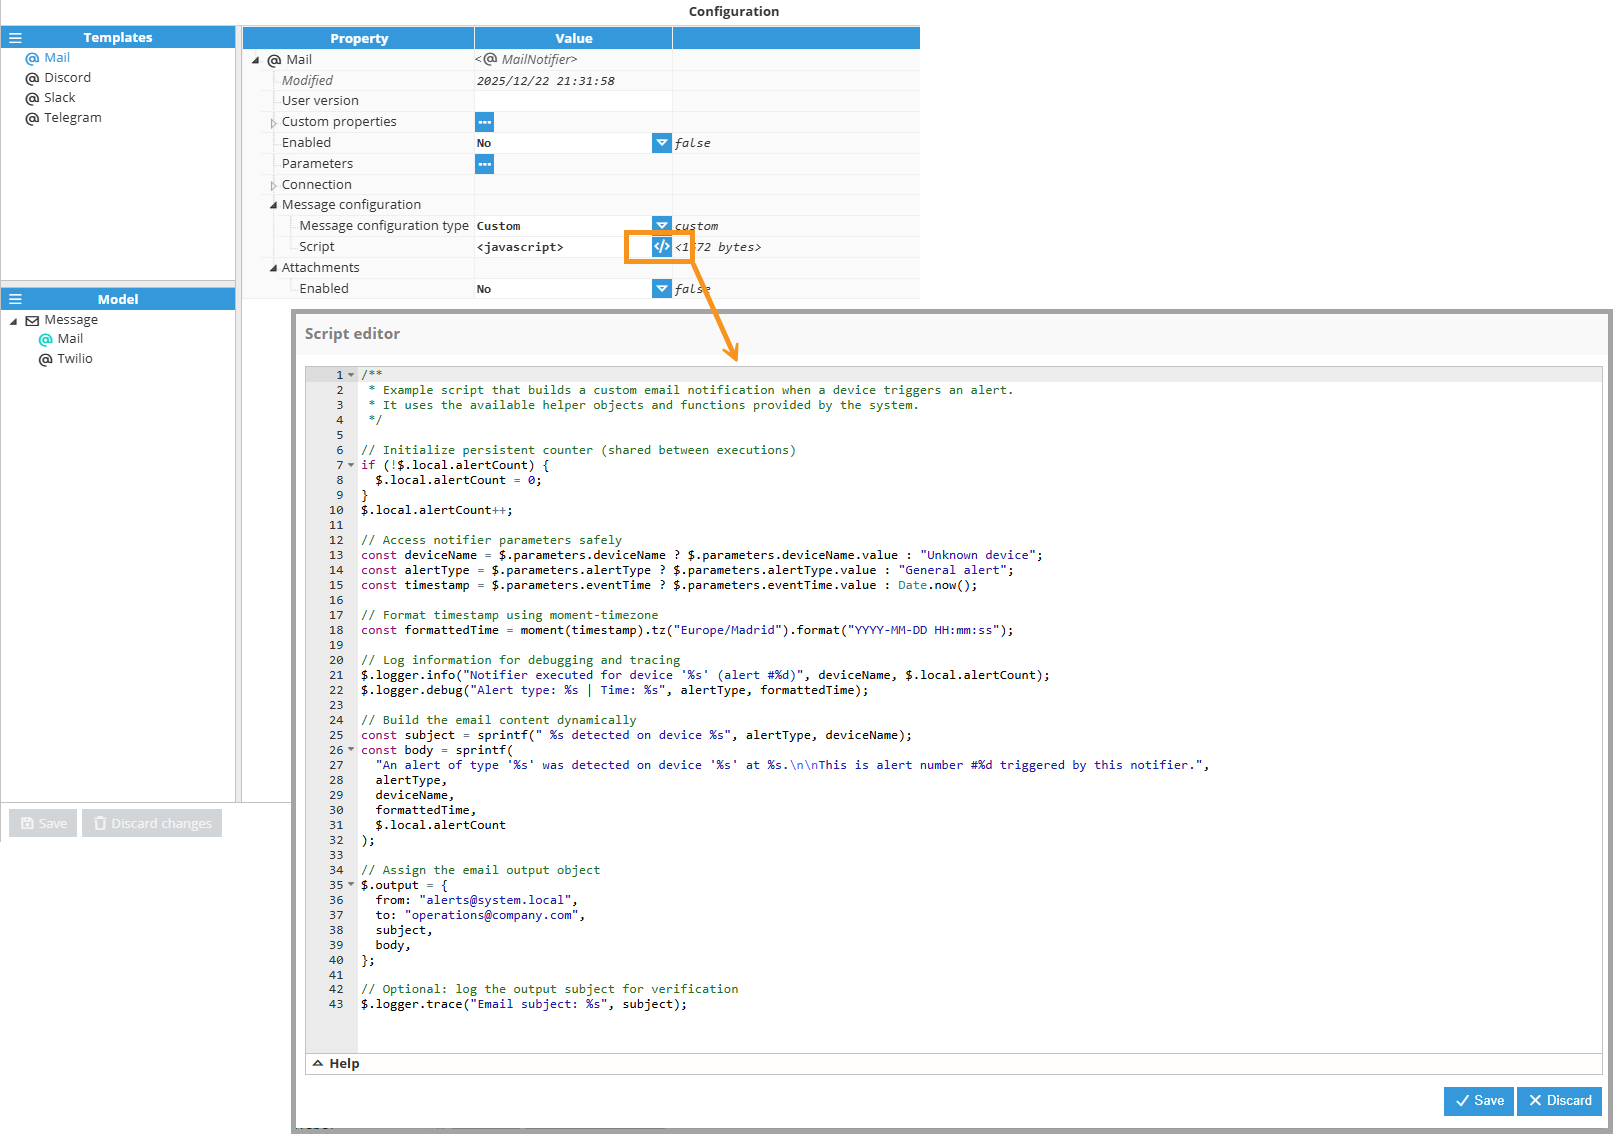
Custom message configuration
Applies when the Message configuration type is set to Custom. Provide a JavaScript script to dynamically set the email fields for each notification.
The script has access to the following functions and objects:
Buffer: Class used to manipulate a byte buffer directly. More information can be found at: NodeJS API Reference.
moment: Class used to parse, format, and manipulate dates. This has access to both normal moment and moment-timezone. More information can be found at: moment and moment-timezone.
sprintf: Function used to simplify formatting a string using placeholders and a list of arguments, using the same format as the C sprintf function. More information can be found at C++ reference - sprintf.
$.logger: Object containing logging functions that can be used to log custom messages during script execution. Valid log levels are error, warn, info, debug, and trace. Each of these functions can be used as $.logger.info(message, args...). The logger accepts a format string in the sprintf format.
$.local: This object can be used to keep user-defined data between multiple executions of the same notifier. By default, it's an empty object. For example, a property named scanCount can be defined by using if(!$.local.scanCount) $.local.scanCount = 0. These properties can be accessed from any scripts executed by a notifier.
$.parameters: Object containing all declared parameters for this notifier. Each parameter can be accessed by using its instance name. For example, if a parameter is named startTime, it can be accessed using $.parameter.startTime. Each parameter has a value, quality, and timestamp (in UNIX epoch format, with milliseconds). Using the previous example, to access the value $.parameter.startTime.value is used; the quality requires using $.parameter.startTime.quality, and the timestamp uses $.parameter.startTime.ts.
$.output: The script must set in $.output an object with the desired email content. The object can have the following properties: from, to, cc, bcc, subject, and body.
Example — custom subject and body:$.output = { from: "from@email.com", to: "to@email.com", subject: "Custom subject", body: "This is the custom body" };You can also access parameters to build the email content dynamically.
Example — build content from $.parametersconst device = $.parameters.deviceName ? $.parameters.deviceName.value : "Unknown device"; $.output = { from: "from@email.com", to: "to@email.com", subject: sprintf("Alert from device %s", device), body: sprintf("The device %s has triggered an alert.", device) };
Whenever you open the JavaScript editor, a default template is provided, well-commented and structured to help you get started.
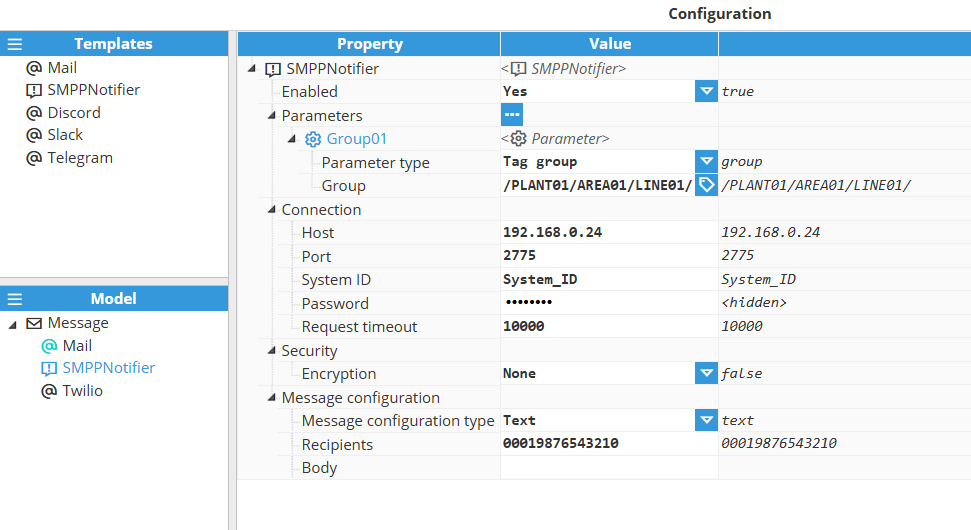
SMPP Notifier
The SMPP (Short Message Peer-to-Peer) Notifier sends SMS text messages through an SMPP server. The following table describes the SMPP Notifier configuration settings.
Setting | Description |
|---|---|
Enabled | This parameter specifies the hostname, IP or URL of the SMPP server. |
Connection |
|
Security | Encryption:
|
Message configuration |
|
Custom message configuration
The same approach applies as described in the Mail Notifier custom message configuration (see section above). The key difference is the output structure: for the SMPP notifier, the script must produce an SMS payload instead of email fields.
$.output
The script must set $.output to an object containing the desired SMS configuration. The object must include the following properties: recipients and body.
Example — static recipients and body
$.output = {
  recipients: "+19876543210,+12345678901",
  body: "This is a test message"
};
The script can access parameters to configure the SMS payload dynamically.
Example — build recipients and body from parameters
$.output = {
  recipients: $.parameters.recipients.value,
  body: sprintf(
    "Alert triggered at %s",
    moment().format("YYYY-MM-DD HH:mm:ss")
  )
};
Note:
Starting with N3uron version 1.22.0, you can create custom messages using JavaScript expressions and use parameters.
Webhook Notifiers
Webhook notifiers enable N3uron to send alarm and tag notifications to external services and messaging platforms via HTTP/HTTPS requests. The Notifier module supports multiple Webhook types including Discord, Slack, Twilio, WhatsApp, Telegram, and customizable Webhooks. Built-in webhooks offer platform-specific configurations while sharing common settings for headers, delivery options, and message formatting.
The following Webhook notifier types are available:
Type | Description |
|---|---|
Discord | Sends notifications to Discord channels using Discord Webhook URL. Provided user name, message templates, and channel/service configuration. |
Slack | Sends notifications to Slack channels using Slack Webhook URL. Provides options for user name, message templates, and channel/service configuration. |
Twilio | Sends messages via the Twilio API. Requires Twilio account credentials (Account SID and Auth Token) and phone number configuration. |
Sends notifications to WhatsApp using the WhatsApp Business Platform (Cloud API). Requires an Authorization Token and Phone Number ID configuration. | |
Telegram | Sends notifications to Telegram chats using the Telegram Bot API. Requires a Bot Token and Chat ID for message delivery. |
Custom | Provides complete control over Webhook configuration including custom URL, headers, body format, serialization, and JavaScript-based request body generation. Use this type for integration with APIs not explicitly supported by other notifier types. |
Discord Configuration
Setting | Description |
|---|---|
Enabled | Enables message notifications through this notifier. |
Notifier type | Discord |
Webhook URL | Specifies the endpoint URL where notifications will be sent. |
User Name | User name to identify the webhook message. |
Message template | Specifies the text included in the message. If the message includes alarm and/or tag tables, the body is located above them. |
Channel/Service | Channel or service identifier (if applicable). |
.png)
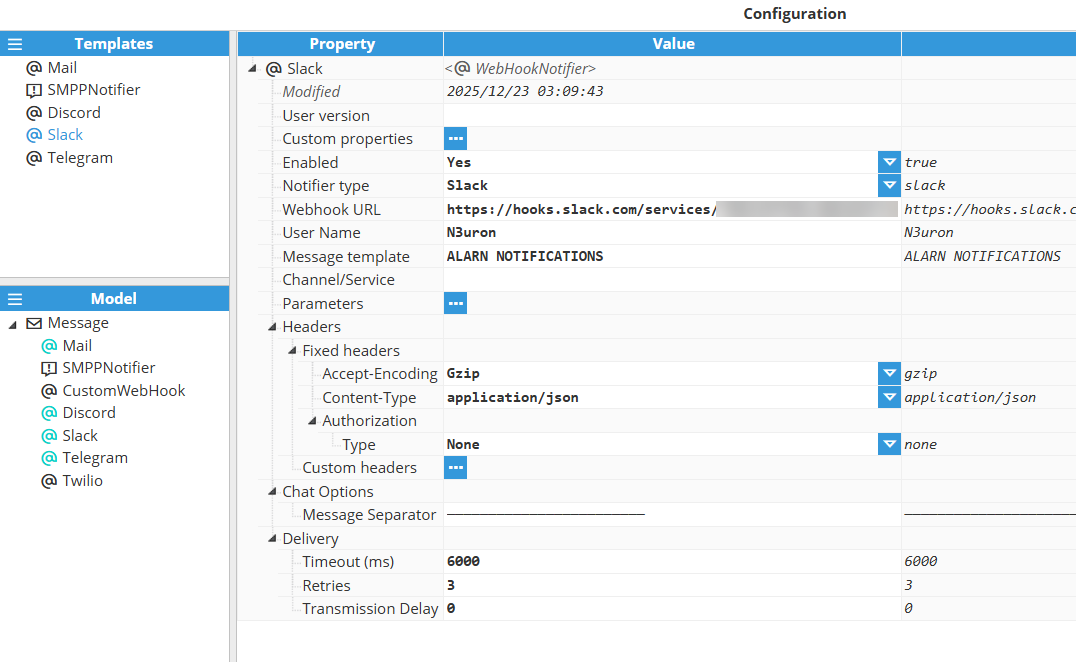
Slack Configuration
Setting | Description |
|---|---|
Enabled | Enables message notifications through this notifier. |
Notifier type | Slack |
User Name | User name to identify the webhook message. |
Message template | Specifies the text included in the message. If the message includes alarm and/or tag tables, the body is located above them. |
Channel/Service | Channel or service identifier (if applicable). |
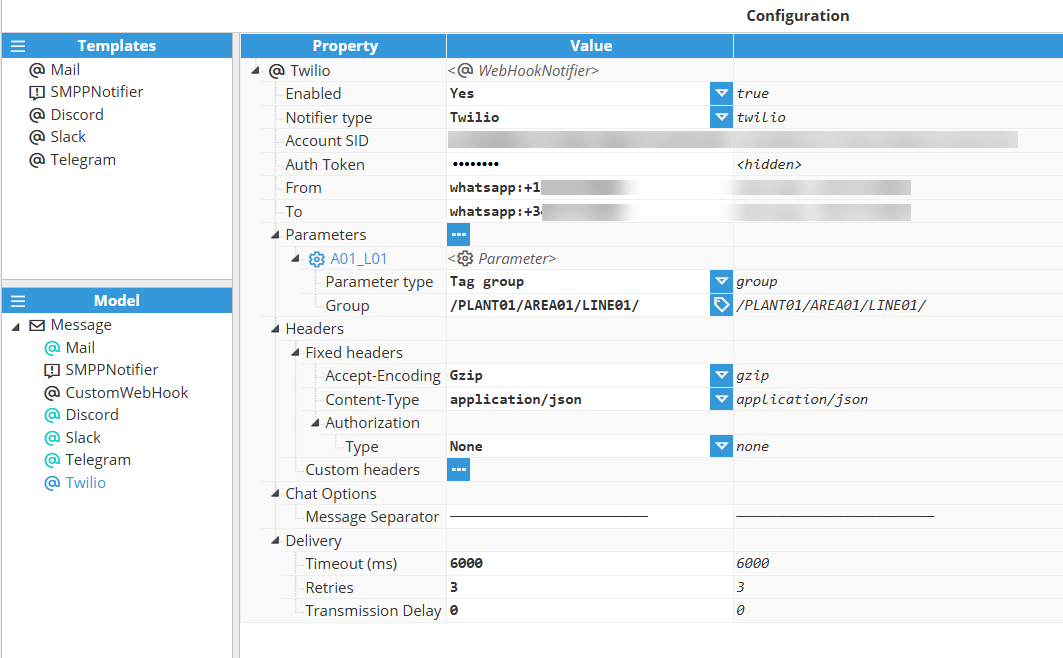
Twilio Configuration
Setting | Description |
|---|---|
Enabled | Enables message notifications through this notifier. |
Notifier type | Twilio |
Account SID | Twilio Account SID. |
Auth Token | Specifies the token used for authentication. |
From | Sender identifier (if applicable). |
To | Recipient identifier (if applicable). |
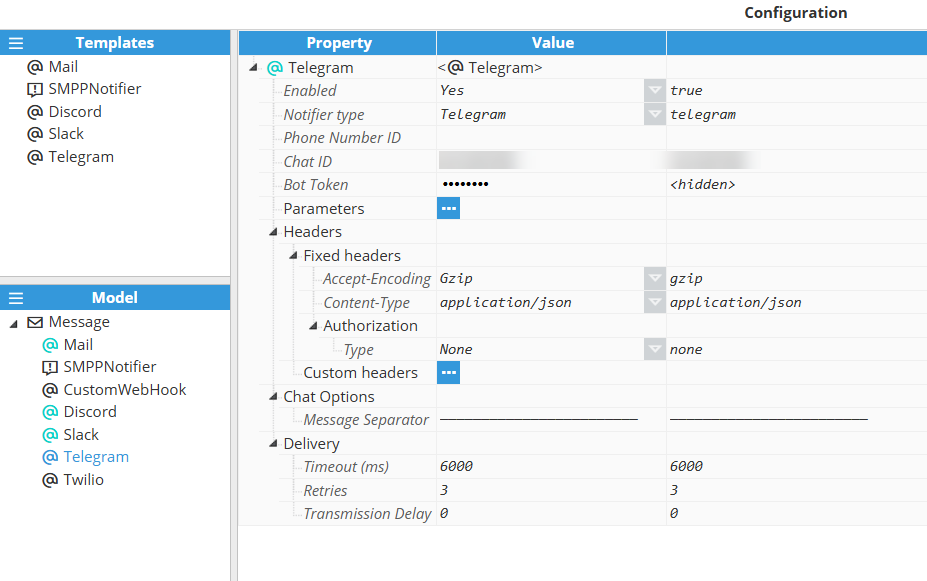
Telegram Configuration
Setting | Description |
|---|---|
Enabled | Enables message notifications through this notifier. |
Notifier type | Telegram |
Phone Number ID | Telegram phone number identifier associated with the bot. |
Chat ID | Telegram Chat ID. |
Bot Token | Telegram Bot Token. |
WhatsApp Configuration
Setting | Description |
|---|---|
Enabled | Enables message notifications through this notifier. |
Notifier type | |
Auth Token | Specifies the token used for authentication. |
Phone Number ID | WhatsApp Phone Number ID. |
To | Recipient identifier (if applicable). |
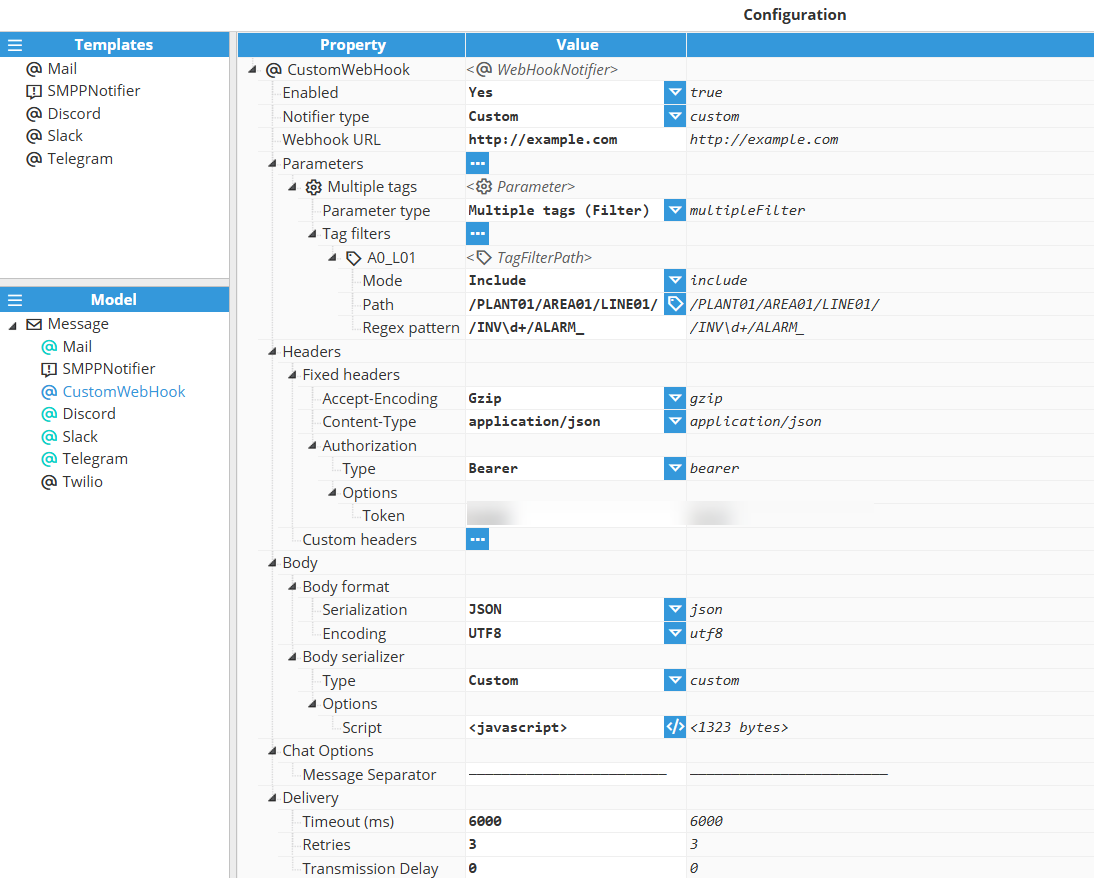
Custom Webhook Configuration
Setting | Description |
|---|---|
Enabled | Enables message notifications through this notifier. |
Notifier type | Custom |
Webhook URL | Specifies the endpoint URL where notifications will be sent. |
Body Format | Serialization: Selects the serialization of the body of the request data
Encoding: Selects which format is used to encode the body.
|
Body serializer | Type
Options
|
Custom Webhook Body Serializer
Script that will be used to generate the body of the request. The result of this script will then be serialized using the specified serializer. The parsing script has access to the following functions and objects:
Buffer: Class used to manipulate a byte buffer directly. More information can be found at: NodeJS API Reference.
moment: Class used to parse, format, and manipulate dates. This has access to both normal moment and moment-timezone. More information can be found at: moment and moment-timezone.
sprintf: Function used to simplify formatting a string using placeholders and a list of arguments, using the same format as the C sprintf function. More information can be found at C++ reference - sprintf.
$.logger: Object containing logging functions that can be used to log custom messages during script execution. Valid log levels are error, warn, info, debug, and trace. Each of these functions can be used as $.logger.info(message, args...). The logger accepts a format string in the sprintf format.
$.local: This object can be used to keep user-defined data between multiple executions of the same notifier. By default, it's an empty object. For example, a property named scanCount can be defined by using if(!$.local.scanCount) $.local.scanCount = 0. These properties can be accessed from any scripts executed by a notifier.
$.parameters: Object containing all declared parameters for this notifier. Each parameter can be accessed by using its instance name. For example, if a parameter is named startTime, it can be accessed using $.parameters.startTime. Each parameter has a value, quality, and timestamp (in UNIX epoch format, with milliseconds). Using the previous example, to access the value $.parameters.startTime.value is used; the quality requires using $.parameters.startTime.quality, and the timestamp uses $.parameters.startTime.ts.
$.output: The script must set this value to the desired output. The type of the output depends on the selected serializer; if the serializer is JSON, the output must be an object, and if it's text, it must be a string.
Example:
// Log initial execution info
$.logger.info("Notifier script started at %s", moment().format("YYYY-MM-DD HH:mm:ss"));

// Initialize or increment a local counter that persists between executions
if (!$.local.sendCount) $.local.sendCount = 0;
$.local.sendCount++;

// Access parameters safely and log their values
if ($.parameters.startTime) {
  $.logger.debug("Start time parameter: %s", moment($.parameters.startTime.value).toISOString());
}
if ($.parameters.deviceName) {
  $.logger.debug("Device name: %s", $.parameters.deviceName.value);
}

// Example of conditional logic based on parameter values
const device = $.parameters.deviceName ? $.parameters.deviceName.value : "Unknown device";
const start = $.parameters.startTime ? moment($.parameters.startTime.value).format("HH:mm:ss") : "N/A";

// Example of building a message body dynamically
const message = sprintf(
  "Device '%s' triggered a notification at %s. This is execution #%d.",
  device,
  start,
  $.local.sendCount
);

// Log the final message
$.logger.info("Final message: %s", message);

// Example of using $.input to include embed data, if present
const embeds = Array.isArray($.input) ? $.input : [];

// Set the script output
$.output = {
  username: "N3uron Script Engine",
  content: message,
  embeds,
};
Common Headers Settings
Setting | Description |
|---|---|
Fixed headers |
|
Authorization | Type: Selects the type of authentication used with this webhook.
|
Custom headers | Type: Selects how the value for this header is created.
|
Common Chat Options
Setting | Description |
|---|---|
Message Separator | Defines the text or symbol used to visually separate each message block (e.g., alarms or tag entries) within the output. Common examples include '---', '***' or '####'. |
Common Delivery Settings
Setting | Description |
|---|---|
Timeout (ms) | Maximum request time before aborting. |
Retries | Number of retry attempts on transient errors. |
Transmission Delay | Specify the delay between sequential messages, in milliseconds. Higher delay means more time to execute all requests, but it can help avoid rate-limiting issues. |