Notifications can be delivered via Email, SMS, or Webhooks. Email and SMS are supported through the Mail and SMPP notifiers, respectively. The examples below explain how to configure each option in detail.
Note:
Starting with N3uron version 1.22.0, you can also send notifications via Webhooks to WhatsApp, Telegram, Discord, Slack, Twilio, and custom webhook endpoints.
Periodic Trigger
The Notifier module allows users to schedule periodic notifications. To define a periodic trigger, simply follow these steps:
Step 1: Create a periodic trigger.
.png)
Step 2: Configure the basic parameters of the trigger.
Scan rate: In this example, 10000 is used.
Type: In this example, "Fixed time" is selected.
Reschedule timer: In this example, "No" is selected.
Run on start: In this example, "Yes" is selected, so the message will be sent when the module starts.
.png)
Once the trigger has been configured, the next step is to define the information that should be included in the message.
Step 3: Establish the content of the message.
Alarms table: In this example, we have defined a filter to include all alarms and all available columns for the alarms table.
.png)
Tags table: In this example, we have defined a filter that includes all tags and all available columns for the tags table.
.png)
TagCondition Trigger
A TagCondition trigger sends the notification whenever a tag's property meets a specified condition. This trigger continuously monitors tag values, quality, or timestamps and activates when defined thresholds or states are reached. To configure a TagCondition trigger, follow these steps:
Step 1: Create a TagCondition trigger.
Step 2: Configure the basic parameters of the trigger:
Tag: In this example, /Enterprise/Site/Area_WestZone/WTG01/WROT/RotorSpeed has been selected.
Property: In this example, Value has been selected, which means the trigger will monitor the current value of the tag.
Condition: In this example, Greater than has been used.
Value: In this example, this field has been set to 30, establishing the threshold for comparison.
Delay: In this example, this field has been set to 5000 milliseconds (5 seconds), which means the condition must remain true continuously for 5 seconds before the trigger activates.
Condition type: In this example, If true has been selected, meaning the trigger will fire when the condition transitions from false to true.
The remaining parameters are kept at their default settings.
In the above example, the configured notification will be sent whenever the rotor speed exceeds 30 RPM and remains above this threshold for at least 5 seconds. The 5-second delay prevents false alarms from brief transient spikes.
.png)
TagChange Trigger
A TagChange trigger sends a notification whenever the selected tag changes, regardless of the condition. You can monitor changes on the tag Value, Quality, or Timestamp, and decide whether the message should trigger on the initial subscription.
Step 1: Create a TagChange trigger.
Step 2: Configure the parameters of the trigger:
Tag: Select the tag path to monitor (for example, /Plant/Site/Area/Mixer/Temperature).
Property: Select Value, Quality, or Timestamp.
Initial change: Set to No to prevent sending a message when the subscription starts, meaning when the module restarts.
.png)
Alarm Trigger
An Alarm trigger sends the notification whenever a specific alarm or group of alarms changes its state. To configure an Alarm trigger, follow these steps:
Step 1: Create an Alarm trigger.
Step 2: Configure the basic parameters of the trigger:
Path: In this example, /Alarms has been used.
Regex Pattern: In this example, .* has been used, which means that every alarm present in the group will be evaluated.
Minimum priority: In this example, this field has been set to High.
The remaining parameters are kept at their default settings.
.png)
In this example, the message will be triggered whenever any alarm in the tag group switches to either Active Acked or Active Unacked. As with the earlier examples, you’ll also need to define the content of the message.
Once the triggers have been successfully configured, the notifier or notifiers that will be executed when these triggers occur also need to be defined.
Mail Notifier
The MailNotifier allows users to send notifications via an email account. These messages may also include attached files, if needed. To create a notifier of this type, simply follow these steps:
Step 1: Click on Notifiers and select New MailNotifier from the drop-down menu.
Step 2: Configure the notifier:
SMTP server: Introduce a valid hostname for your SMTP server. In this example, we are using smtp.gmail.com.
Port: Introduce a valid port for the server. In this case, 587 will be used.
Username and Password: Introduce a valid Gmail address and associated password.
Message configuration:
From: Specify the sender's email.
To: Specify the recipient's email.
.png)
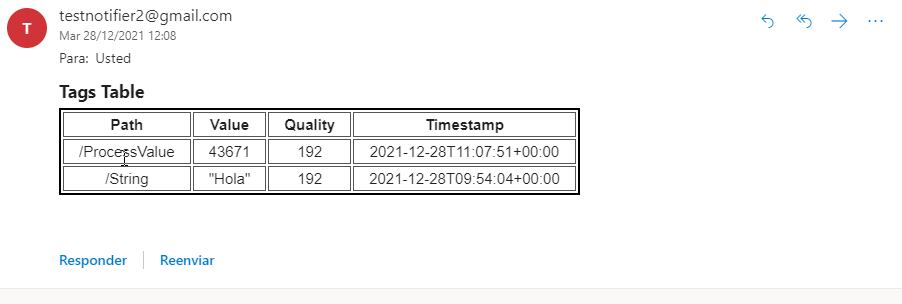
If everything has been properly configured, the recipient should receive messages similar to the examples displayed below:

SMPP Notifier
The SMPPNotifier allows users to send notifications via SMS. To create a notifier of this type, simply proceed as follows:
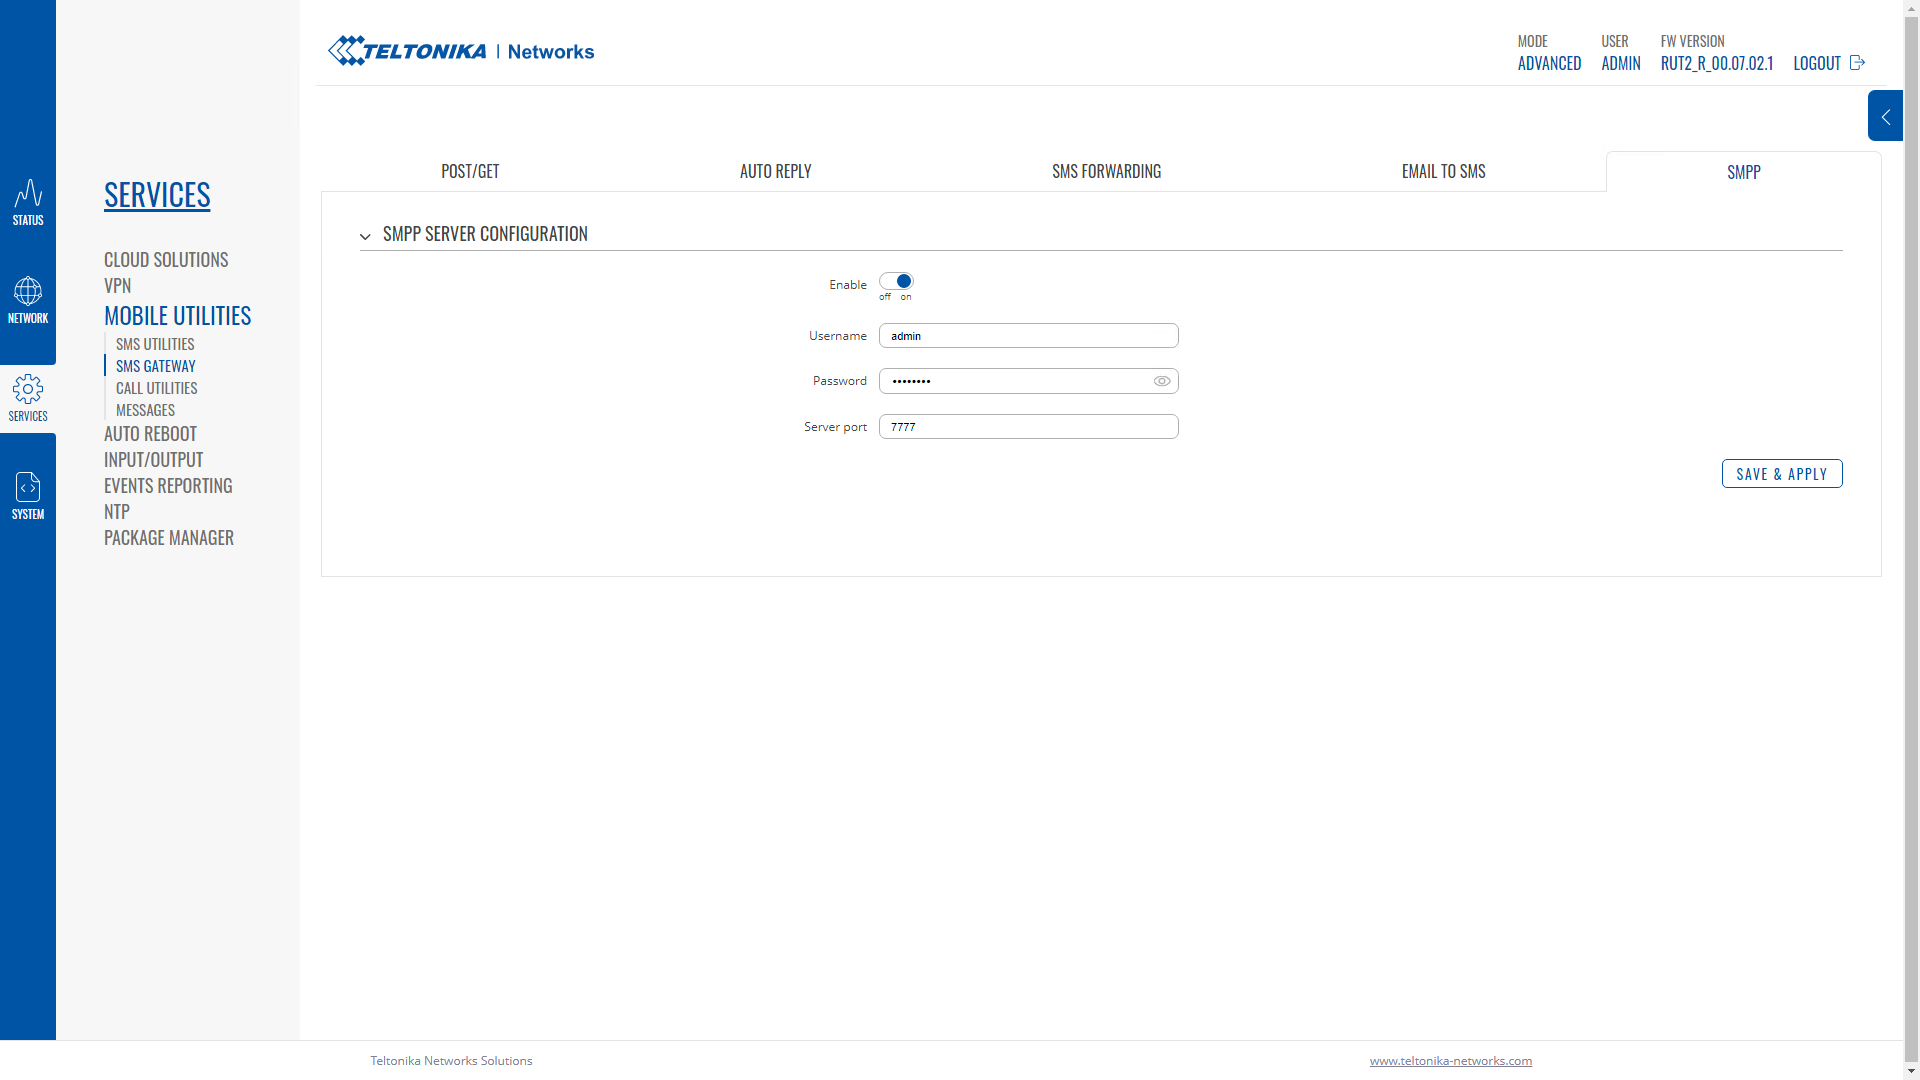
Step 1: In this example, a Teltonika Router model RUT240 will be used. Click here for more information about the Router Configuration. The first step is to install the SMPP packet and then configure the Router, as follows:
User name and Password: These credentials will be entered in N3uron when configuring the connection.
Server Port: In this example, 7777 is used.
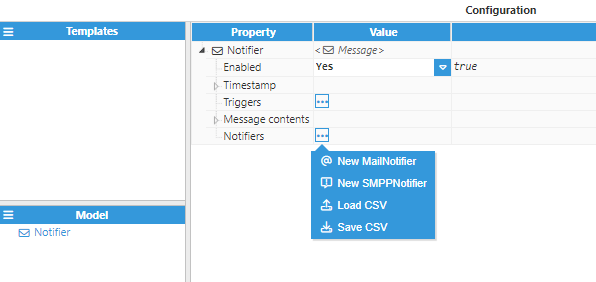
Step 2: Click on Notifiers and select New SMPPNotifier from the drop-down menu.

Step 3: Configure the notifier:
Host: Enter the IP address of the router. In this example, 10.101.0.131 is used.
Port: Enter the port. In this example, it is 7777.
SystemID and Password: Enter the credentials for accessing the router.
Destinatary: Introduce the cell number of where you would like to receive the notifications. The prefix (+) followed by the country code must be used.
.png)
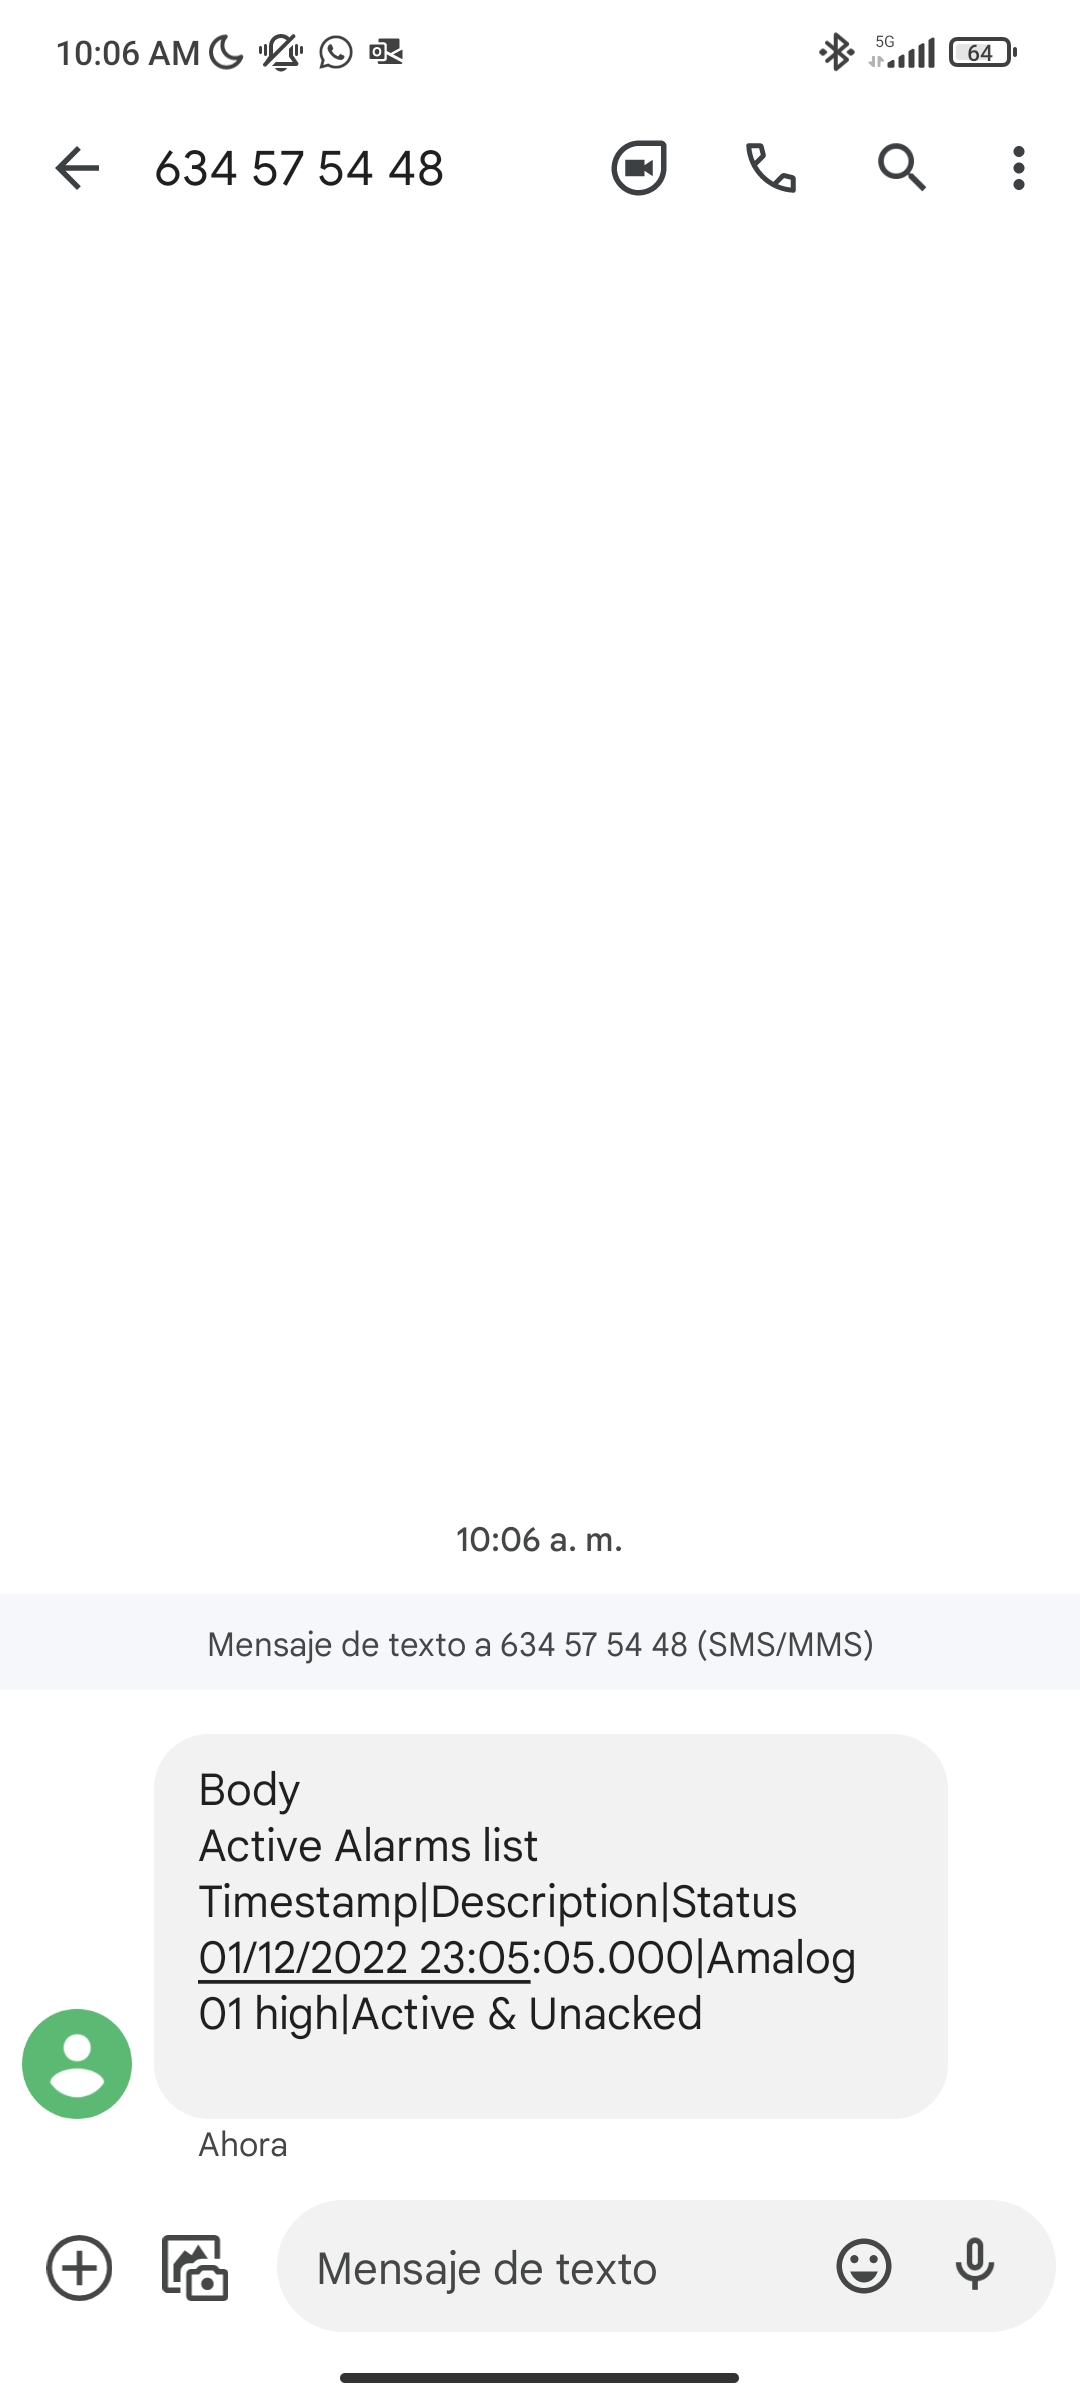
Step 4: Check the results.
If everything has been properly configured, the recipient should receive messages similar to the ones displayed below on their cell phone.
PagerDuty Alert via Custom Webhook
Use a WebhookNotifier configured as Custom to send alert events to PagerDuty via Events API v2.
.png)
Prerequisite:
In PagerDuty, add the Events API v2 integration to your service and copy the Integration Key. This value is used as routing key.
WebhookNotifier configuration
.png)
Notifier type: Custom
Webhook URL: https://events.<region>.pagerduty.com/v2/enqueue
Headers:
Fixed headers:
Content-Type: application/json
Accept-Encoding: gzip (optional)
Authorization: None
Body:
Body format:
Serialization: JSON
Encoding: UTF8
Body:
Body serializer:
Type: Custom
Options:
Script: Paste the script below
Note:
The PagerDuty host is region-dependent. Use the Integration URL shown by PagerDuty for your Events API v2 integration.
Body serializer script (trigger incident on alarm):
// 1. SETUP: Enter your PagerDuty Integration Key here
const ROUTING_KEY = "PASTE_YOUR_PAGERDUTY_INTEGRATION_KEY_HERE";
// 2. PROCESS INPUT (The Alarms)
// $.input is a single string with newlines. We convert it to an object so PagerDuty displays it cleanly.
const rawInput = $.input || "";
const lines = rawInput.split('\n');
const alarmDetails = {};

// Loop through each line to parse "Key: Value" pairs
lines.forEach(function(line) {
    // Skip separator lines or empty lines
    if (line.includes('───────────────────────') || line.trim() === "") return;

    if (line.includes(':')) {
        const parts = line.split(':');
        const key = parts.shift().trim();       // Extract the label (e.g., "Path")
        const value = parts.join(':').trim();   // Extract the data (e.g., the path string)

        // Add to our details object if the key exists
        if (key) {
            alarmDetails[key] = value;
        }
    }
});

// Create a dynamic summary for the notification title
// If we found a Description and Path, use them. Otherwise, use a default.
let summaryMessage = "Critical Alarm from N3uron";
if (alarmDetails["Description"] && alarmDetails["Path"]) {
    summaryMessage = sprintf("%s: %s", alarmDetails["Description"], alarmDetails["Path"]);
}

// 3. GENERATE OUTPUT FOR PAGERDUTY
$.output = {
  "routing_key": ROUTING_KEY,
  "event_action": "trigger",
  "payload": {
    "summary": summaryMessage,
    "source": "N3uron-Monitor",
    "severity": "critical",
    "timestamp": moment().toISOString(),
    // "custom_details" is the correct place to put your parsed alarm data
    "custom_details": alarmDetails
  }
};.png)
Add this WebhookNotifier to a Message that uses an Alarm trigger, so a PagerDuty incident is triggered whenever an alarm changes state.