Note:
Before starting configuration, a new module instance must be created. Click here for more information about creating Module instances.
Client Setup
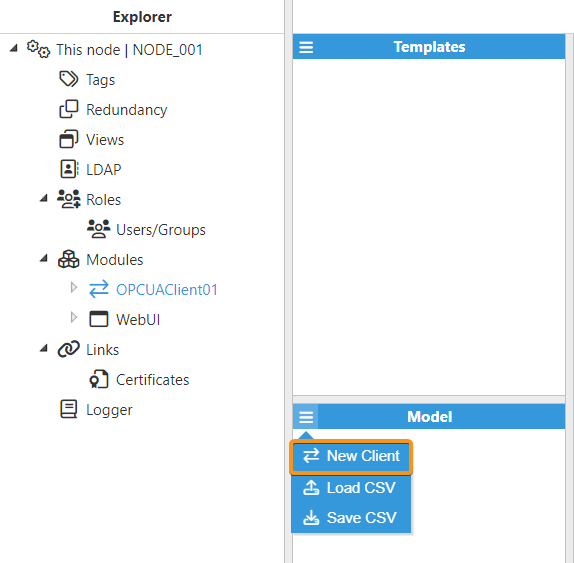
The OPC UA Client module allows for unlimited connections to any number of OPC UA compliant servers. As shown in the above screenshot, new connections can be created by clicking on the burger menu icon. Each connection to a specific OPC UA server is named Client. See below for the steps required when connecting N3uron to an OPC UA server.
.png)
Each client requires the following parameters to be set:
Setting | Description |
|---|---|
Enable data collection | Enables or disables data collection for this OPC UA Client instance. |
Subscription batch size | Indicates the batch size rate for adding subscriptions to the OPC UA server. The default value is 5000. |
Subscription batch delay | Sets the delay between two subscription batches. The default value is 0. |
Max. items per subscription | The maximum number of monitored items per subscription to the server. If there are more monitored items than this value, multiple subscriptions will be used.
|
Data change filter | Selects when events should be reported by the server. This affects all monitored items created by this client. The default value is Status/Value. The available options are:
|
Override timestamps | When enabled, timestamps received from the server will be overwritten using the local time. |
.png)
Connection
Setting | Description |
|---|---|
Discovery URL | Enter the URL for the OPC UA server's discovery endpoint, which is used to locate available connection endpoints and their configurations. The format should be as follows: opc.tcp://IPAddress:port or opc.tcp://myServer:port.
|
Endpoint URL | Enter an OPC UA endpoint URL for the specific OPC UA Server that N3uron should connect to. The format should be as follows: opc.tcp://IPAddress:port or opc.tcp://myServer:port. Example: opc.tcp://192.168.0.1:3005. The option to browse and discover an endpoint is available by clicking on the button of the OPC UA Server discovery utility.
|
Endpoint must exist | If Enabled, the OPC UA Client will verify that the hostname specified in the "Server Certificate" is the same as the hostname provided in the "Endpoint URL" to permit the connection. The default value is Disabled. |
Security mode | Specifies the type of encryption used when exchanging messages between the OPC UA Client and Server. By default, it is set to Sign & Encrypt. The available options are:
|
Security policy | Specifies which security mechanism should be used. By default, this is set to Basic 128 & Rsa 15. Supported algorithms are as follows:
|
Requested session timeout | Sets the amount of time a session must be idle before it times out. In general, we recommend you use a high enough value so that the session never times out. The value entered should be at least double the sum of multiplying the publishing interval with the subscription keep-alive count value. The default value is 3,600,000ms. |
Reconnect delay | Specifies the wait time before attempting to reconnect after a failed connection attempt, displayed in milliseconds. The minimum value is 1,000ms and the default value is 5,000ms. |
.png)

Authentication
Setting | Description |
|---|---|
Enabled | When Enabled, users will need to introduce valid credentials to access the server. |
User | Specifies the user name to authenticate with the server. |
Password | Specifies the password used to authenticate with the server.
|
Subscription
Setting | Description |
|---|---|
Publishing interval | Defines how frequently the OPC UA server will send notification packages and specifies the necessary elapsed time between notifications, displayed in milliseconds. The default value is 1,000ms. |
Lifetime count | Number of publishing intervals until the subscription is deleted by the server if no publish request has been received. The default value is 60. |
Max. keepalive count | When the server publishing timer surpasses the number of attempts specified here without any data to be sent, the subscription will send a keep-alive message to the client. The default value is 10. |
Max. notifications per publish | Establishes the maximum number of notification events per publish request. This can be used to help reduce peaks in communication load when transmitting buffered data. The default value is 10,000. A value of 0 means that the client specifies no limit and the server will use the maximum number of notifications per publish. |
Certificates
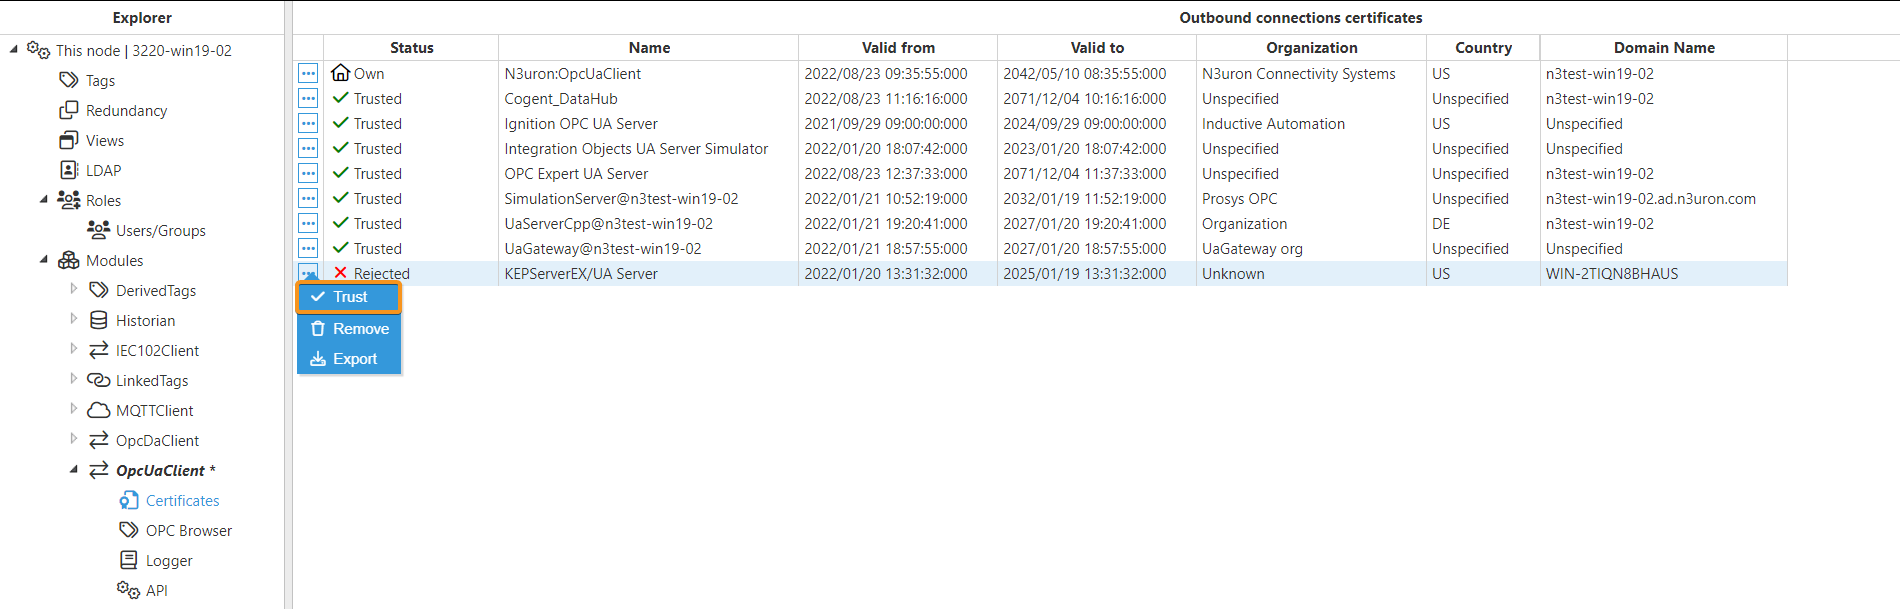
Once the configuration has been saved, the client and the server will exchange their corresponding certificates. These certificates must be trusted on both sides. By default, any certificate issued by a server is displayed as Rejected in N3uron and therefore, it must be manually trusted prior to establishing the connection. After trusting the certificate in N3uron, you will need to head to the server and trust the certificate issued by the OPC UA Client module instance.
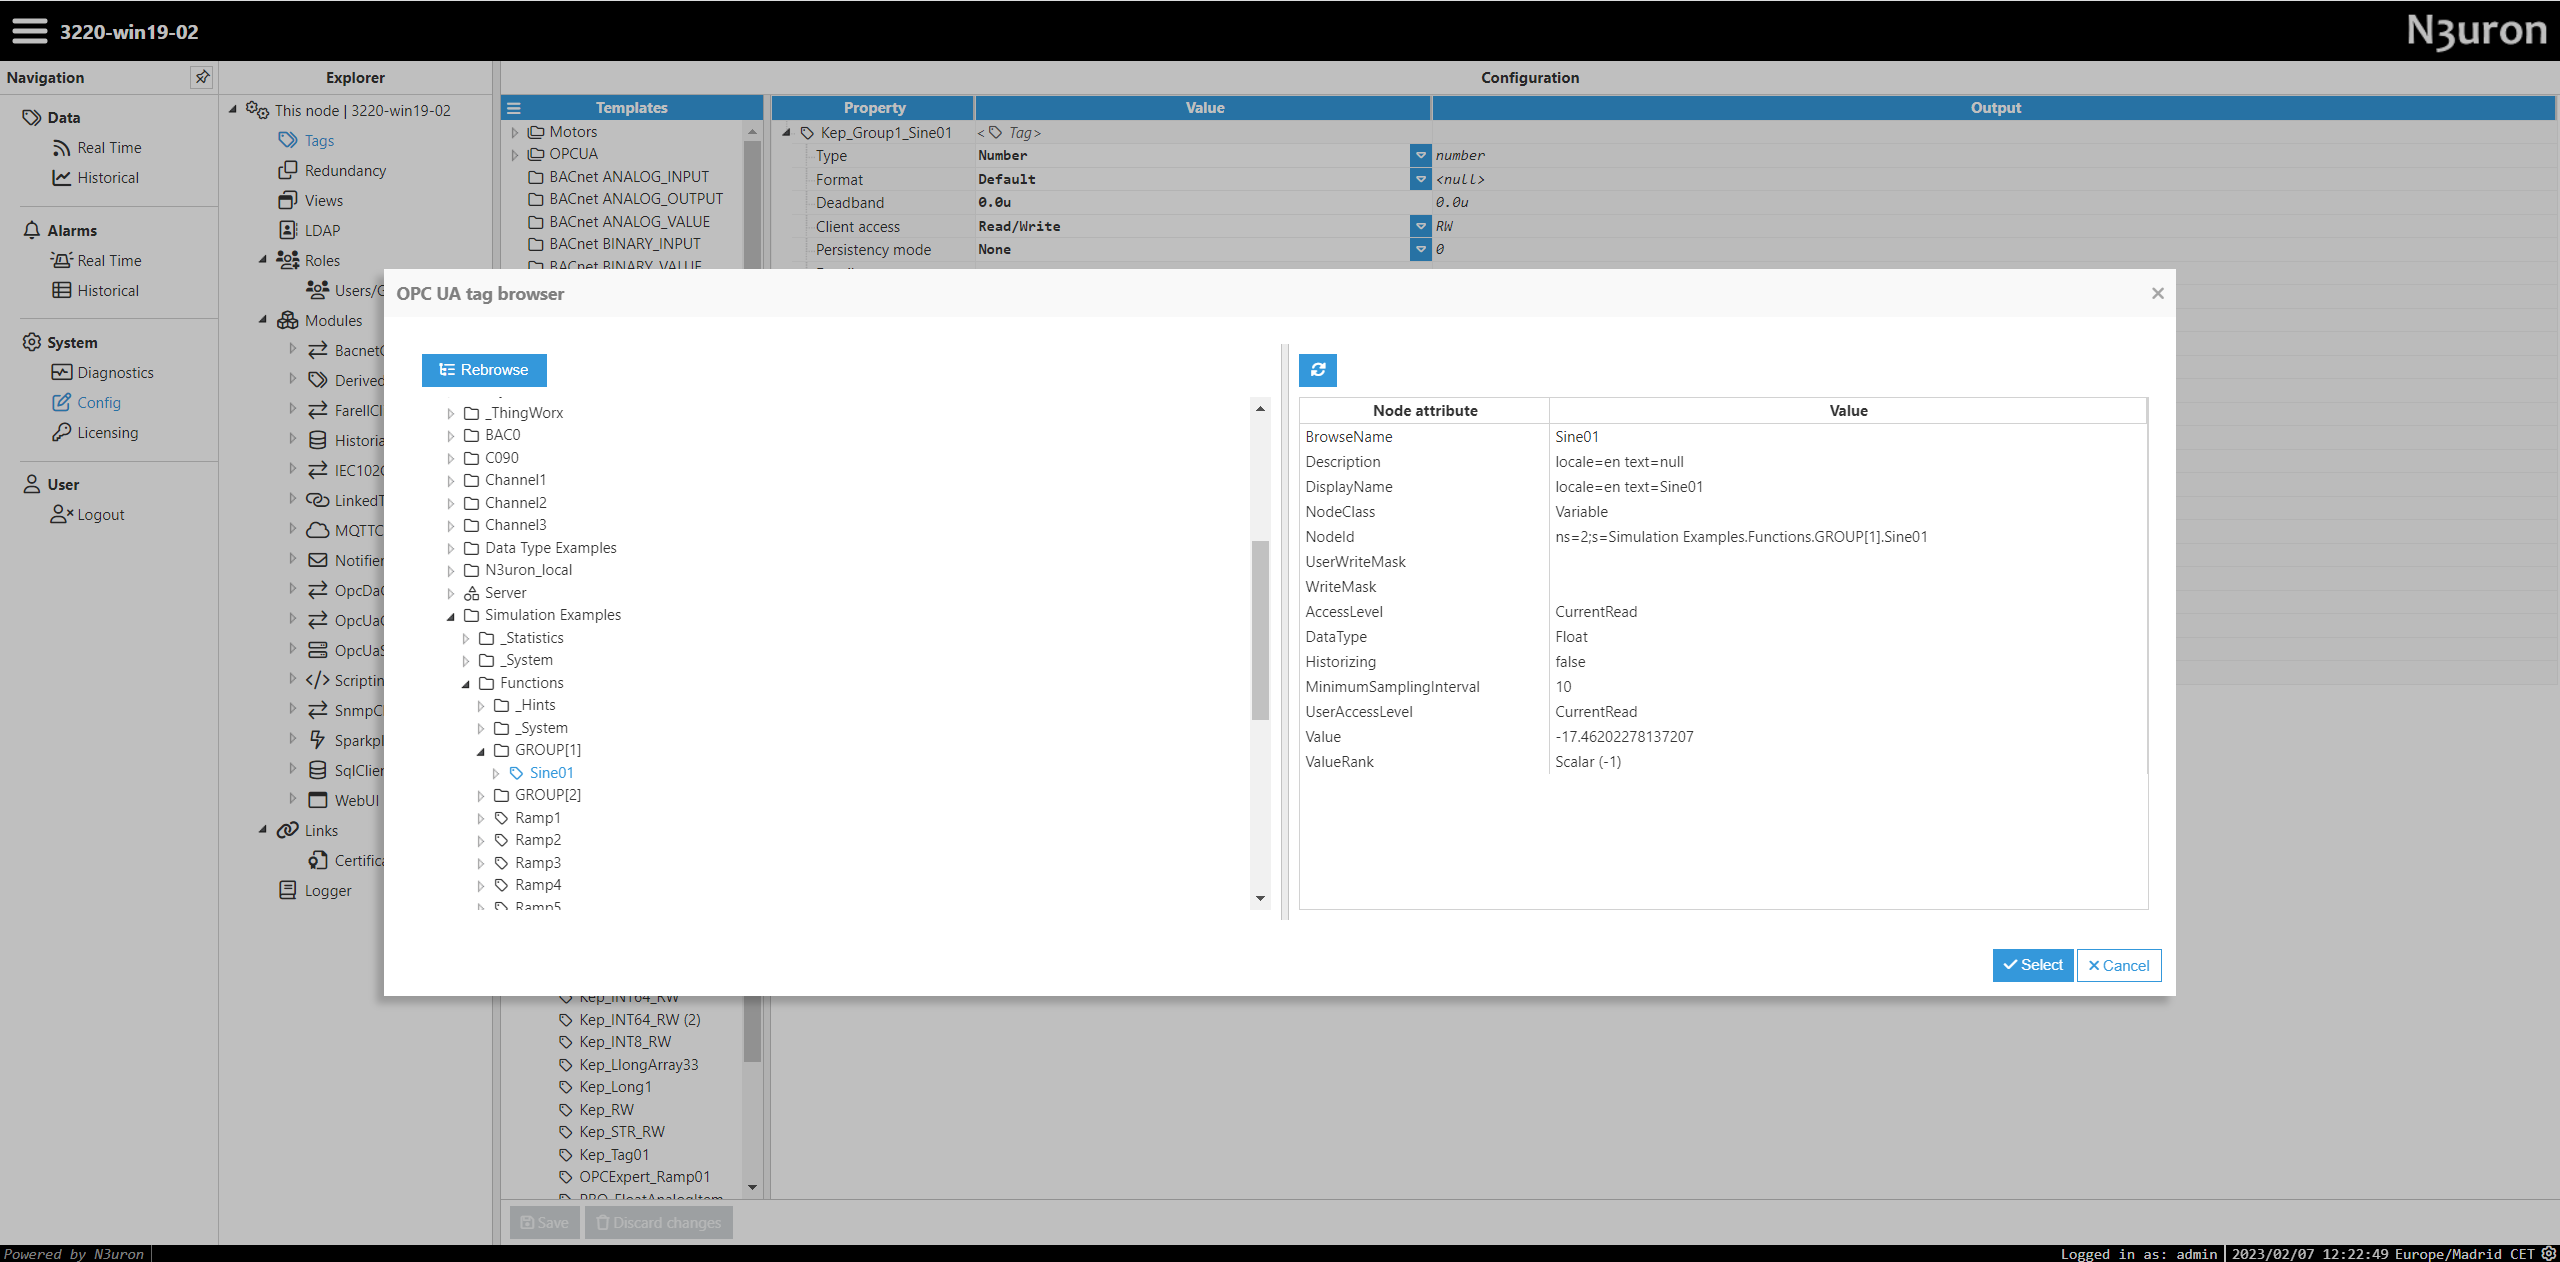
OPC Browser
Note:
This feature is available from N3uron version 1.21.5.
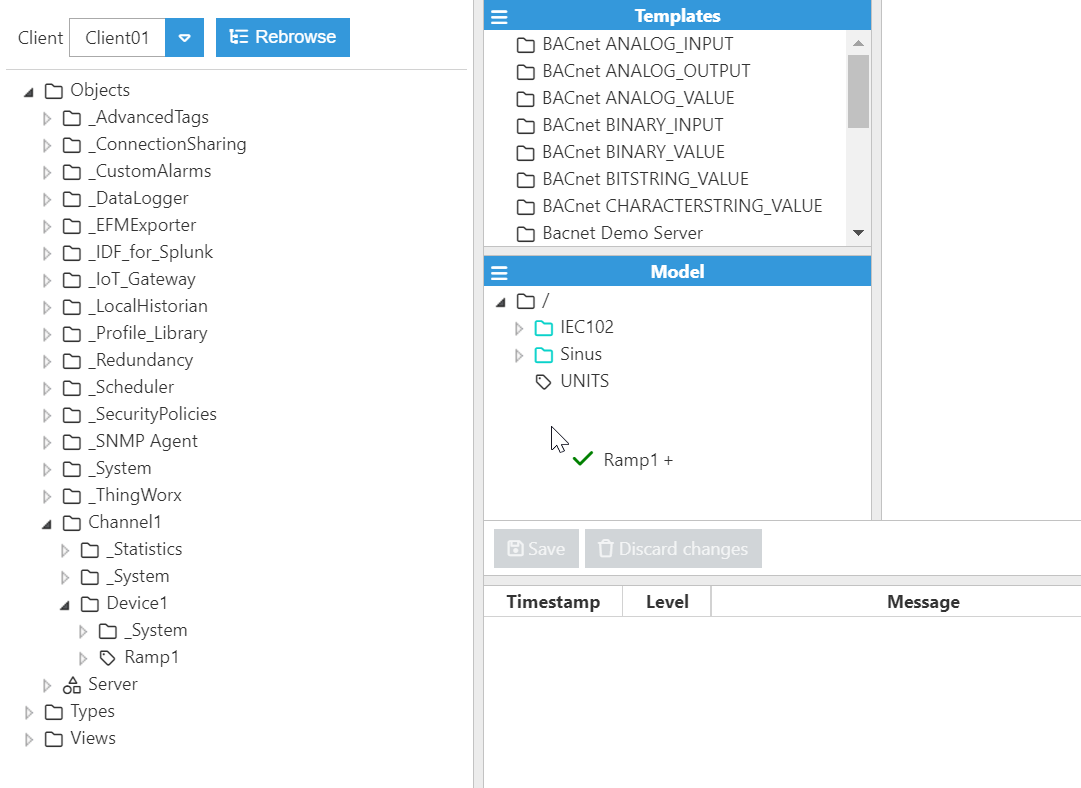
The drag-and-drop feature for the OPC UA Browser allows you to easily add and organize tags by simply dragging them from the browser to the data model.
.gif)
To use the drag-and-drop feature for tags, follow these steps:
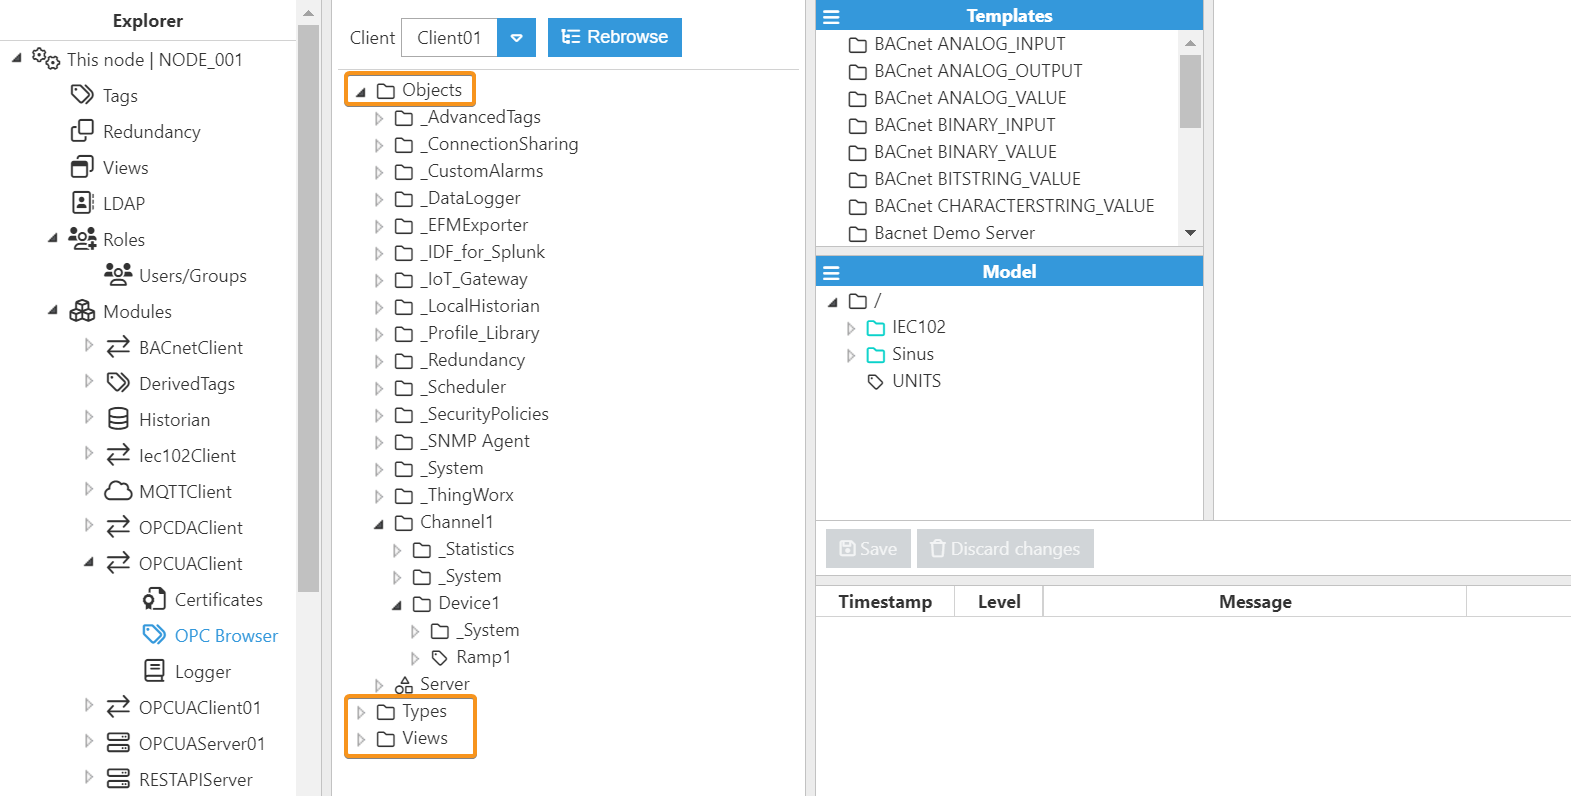
Select the OPC UA Client instance, expand the menu and click on OPC Browser.
From the drop-down menu, select the Client previously created. In this case, Client01.

Now, the server's address space will be displayed, including: Objects, Types and Views.
From the OPC UA Browser, select the tags or folders and drag them to the data model.
Save the changes.
Tag Configuration
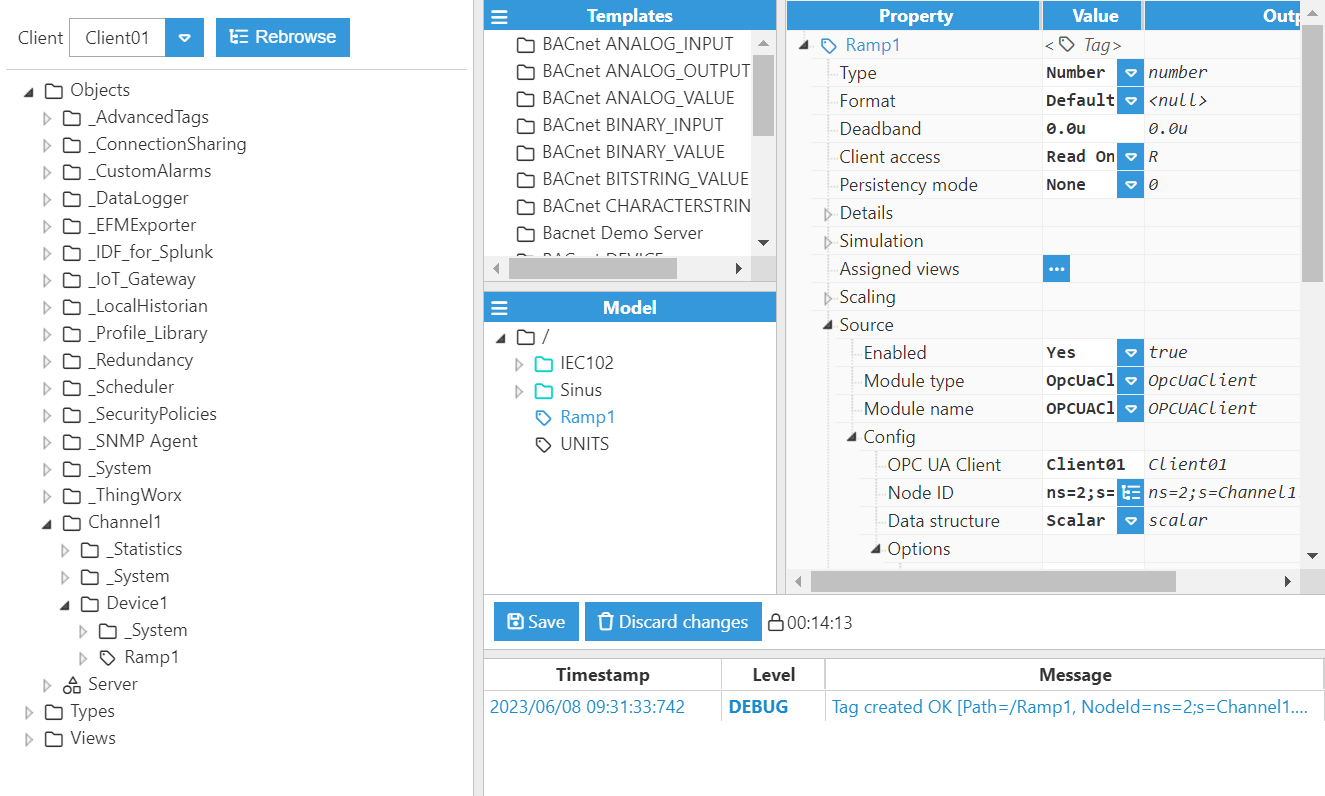
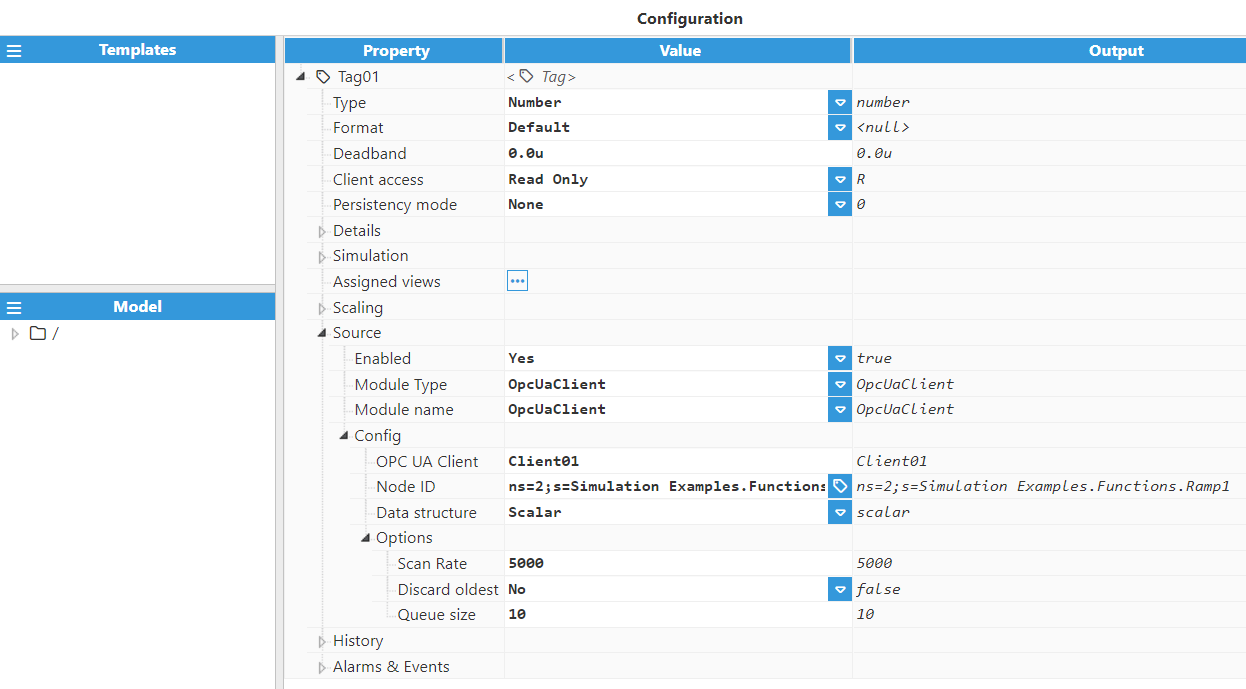
Once the client has been configured and the certificates are trusted, you can start creating tags that are linked to the OPC UA server. Below, you can see a tag configuration example, as well as a brief explanation of each available parameter in the Source section for the OPC UA Client module.
Source
Setting | Description |
|---|---|
Enabled | When Disabled, tags won't be updated with the values received from the server, but instead, will essentially act as memory tags. When set to Enabled, the tag value will be continuously updated with the values received from the OPC UA Server. The default value is set to Disabled. |
Module type | Defines the driver type used to retrieve values. In this example, OpcUaClient must be selected from the drop-down menu. If OpcUaClient does not appear in the drop-down menu, it means that this functionality has not yet been installed on this machine and therefore, must be installed. |
Module name | Users should enter here the name of the OPC UA Client module instance that was previously created. |
Config
Setting | Description |
|---|---|
OPC UA Client | This section represents the link between the tag and its data source. Therefore, it must be filled in with the name of the Client that was previously created. In the above example, we used Client01. |
Node ID | Specifies the OPC item path. According to the OPC UA specification, the Node ID is made up of the Namespace index (ns), an Identifier Type and the Identifier. The following table shows some examples: |
Identifier | Type | Example |
|---|---|---|
s | String | ns=2; s=MyTemperature |
i | Integer | ns=2; i=133 |
g | GUID | ns=2; g=123E4567-E89B-12D3-A456-426614174000 |
b | ByteString | ns=2; b=01020304050607 |
By clicking on the button on the right, the OPC UA Tag Browser can be used to select the Node ID.
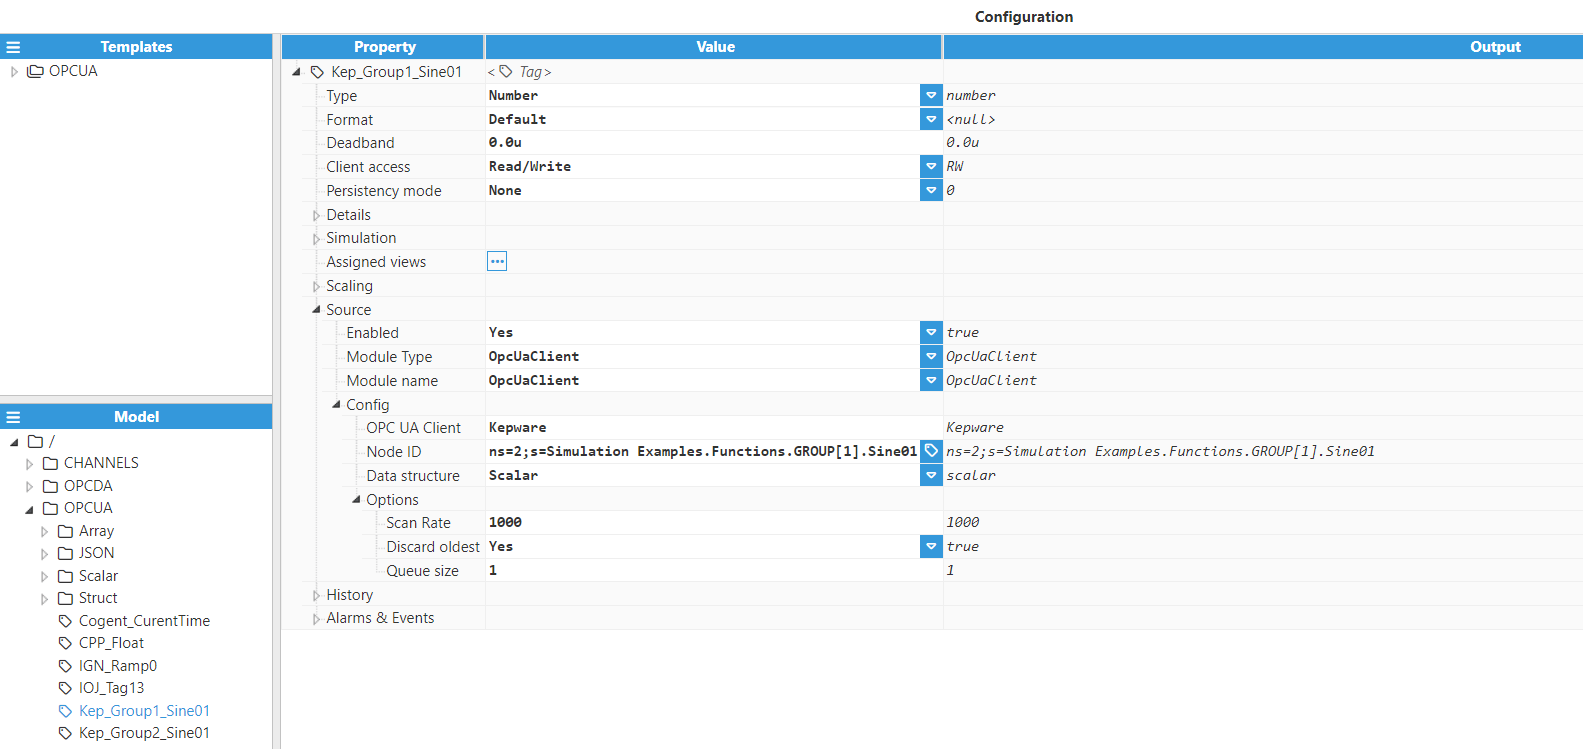
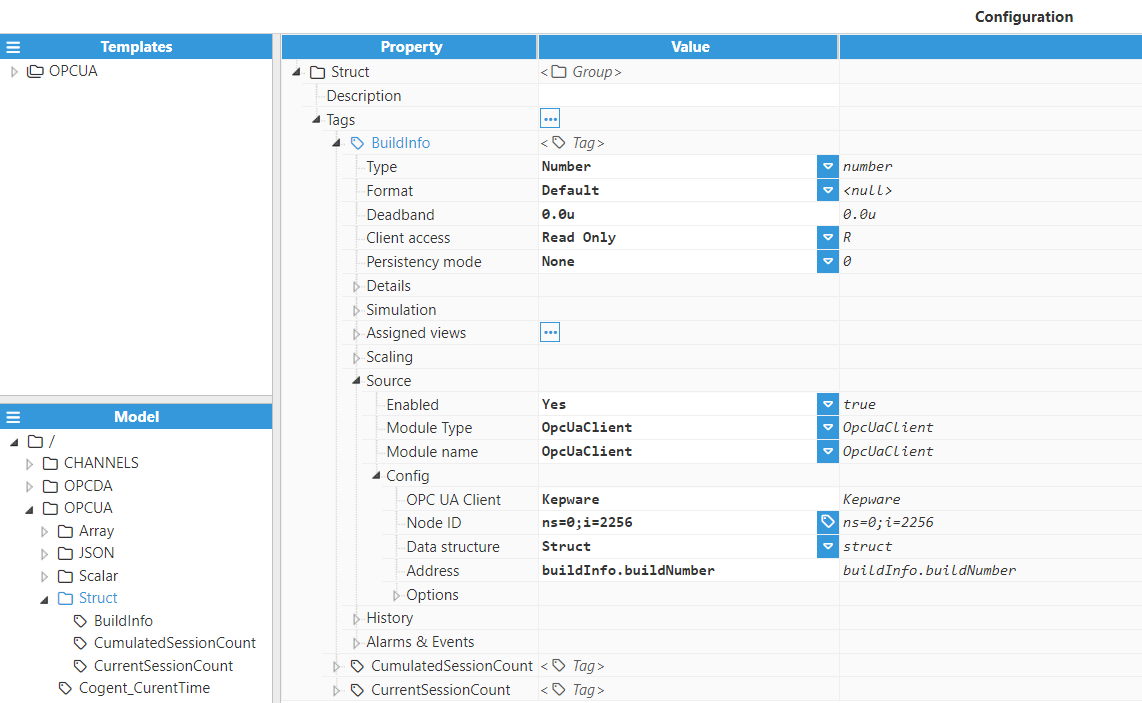
Data structure
Setting | Description |
|---|---|
Scalar | Specifies whether the type of data is a scalar value. |
Array | Specifies whether the type of data is an array value. The array can have any number of dimensions. |
Struct | Specifies whether the type of data is a struct or an array of structs. It is an object whose properties must be accessed in a nested way (prop1.prop2 or prop1[index].prop2). |
Convert to JSON string | The expected value can have any structure and this structure will be converted to JSON. For this to be valid, the tag type must be string. |


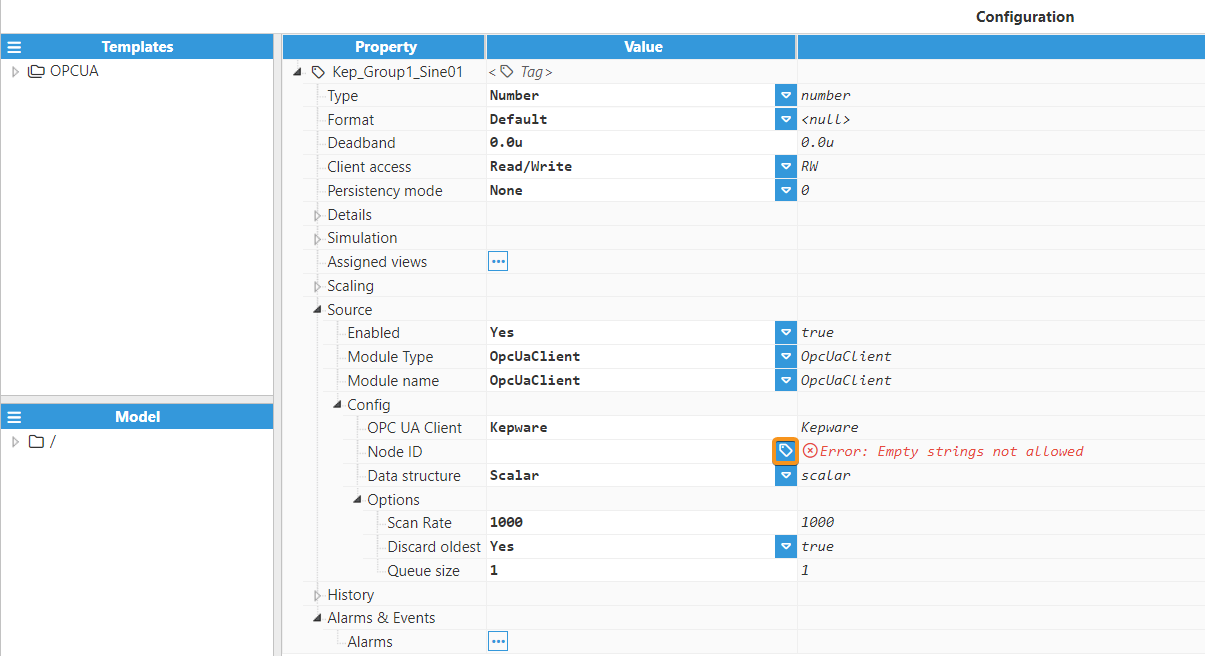
Options
Setting | Description |
|---|---|
Scan rate | Sampling interval request for the tag, displayed in milliseconds. The minimum value is 100ms and the default value is 5,000ms. |
Discard oldest | When Enabled, the oldest events will be deleted to allocate space for the latest events in the buffer. |
Queue size | Specifies the size of the buffer for storing received events. The default value is 10. |