Alarm configuration in N3uron is flexible and fully customizable to your needs. A tag can have one or multiple alarms configured within it. Alarms can also be configured in Templates so that each instance will already have alarms configured when the instance is created.
Alarm settings can be used to create alarms based on comparisons, ranges, bit states, multiple conditions, or custom expressions.
This includes the ability to:
Map alarm conditions to values from other tags using the Multiple conditions mode.
Write custom JavaScript expressions to evaluate complex logic.
Access tag values, quality, and timestamps directly within alarm evaluation scripts.
Combine multiple tag values and conditions in a single alarm definition.
For highly complex scenarios involving data transformation or aggregation, the Derived Tags module remains available as an alternative approach.
Note:
Starting from N3uron version 1.22.0, alarm conditions can directly reference other tag values and execute custom JavaScript code.
Creating an Alarm
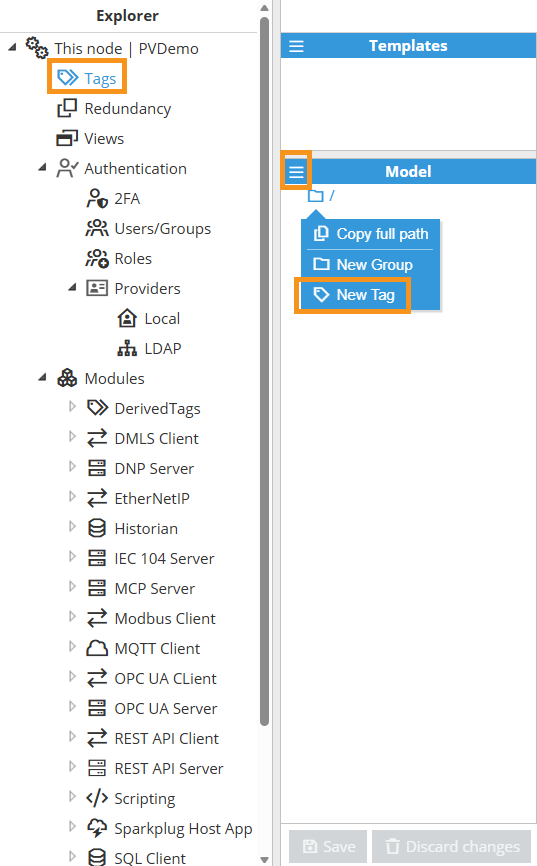
Step 1: In the Navigation panel, go to System→Config→Tags. Here, a new tag can be created in one of two ways: click on the menu button located on the left-hand side of the Model header and select New Tag, or alternatively, right-click on the root folder in the Model panel and select New Tag.
Step 2: Give a name to the new tag.
Step 3: Go to the Alarms section within the tag configuration area and click on the ellipsis button on the right-hand side of the Alarms label. In the drop-down menu, select the New Tag Alarm-number, New Tag Alarm-boolean, New Tag Alarm-string, or New Tag Alarm-quality option depending on the tag type and alarm condition needed.
.png)
Step 4: Give a name to the new alarm.
Step 5: Expand the alarm entry you just created and configure its parameters.
General Settings
Setting | Description |
|---|---|
Enabled | Enables or disables evaluation of the alarm condition. When enabled, the alarm actively monitors the tag value against the configured conditions. The default value is Yes. |
Description | Alarm description shown in alarm controls and notifications. This field is required and should clearly describe the purpose or nature of the alarm to help users, external systems, or AI Agents quickly understand the context when the alarm is triggered. |
Priority Settings
The Alarm Priority parameter determines the severity and urgency of an alarm. It affects how the alarm is displayed, filtered, notified, and potentially handled by the system. Consistent and accurate prioritization helps ensure a timely response to critical events while avoiding unnecessary alarm fatigue from non-critical events.
Setting | Description |
|---|---|
Diagnostics (0) | Refers to alarms that provide diagnostic information or system status without indicating a specific issue. |
Low (1) | Indicates a non-critical situation that may require attention but doesn't pose immediate danger or downtime. |
Medium (2) | Represents a potential issue that warrants investigation and possible action to prevent escalation. |
High (3) | Signals a significant problem that requires prompt attention and might affect system performance or functionality. |
Critical (4) | Denotes a severe issue that demands immediate action, as it could lead to system failure, data loss, or safety hazards. |
Note:
The Diagnostics priority level is available from N3uron version 1.22.0.
Timestamp and Acknowledgement Settings
Setting | Description |
|---|---|
Timestamp source | The Timestamp source defines the origin of the timestamp assigned to each alarm event. This timestamp records the precise moment the alarm condition was met, allowing for accurate historical analysis and event correlation. Available Options:
|
Acknowledge mode | The Acknowledge mode parameter determines how alarms are acknowledged by the operator. Available modes:
|
Mode Configuration
The Mode parameter specifies the condition used to evaluate the tag's value against the configured threshold(s) to determine if an alarm should be triggered.
Comparators
Mode | Description |
|---|---|
Equal to | Triggers the alarm when the tag value is exactly equal to the target. |
Not equal to | Triggers the alarm when the tag value is different from the target. |
Greater than | Triggers the alarm when the tag value is strictly greater than the target. |
Greater than or equal to | Triggers the alarm when the tag value is greater than or equal to the target. |
Less than | Triggers the alarm when the tag value is strictly less than the target. |
Less than or equal to | Triggers the alarm when the tag value is less than or equal to the target. |
.png)
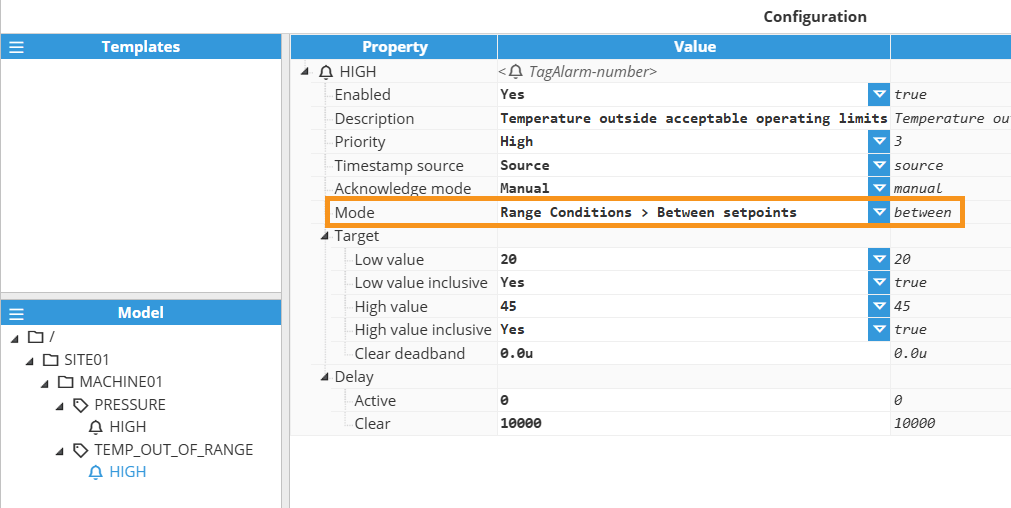
Range Conditions
Mode | Description |
|---|---|
Between setpoints | Triggers the alarm when the tag value is within the defined range, based on a low and high threshold. |
Outside setpoints | Triggers the alarm when the tag value is outside the defined range, based on a low and high threshold. |
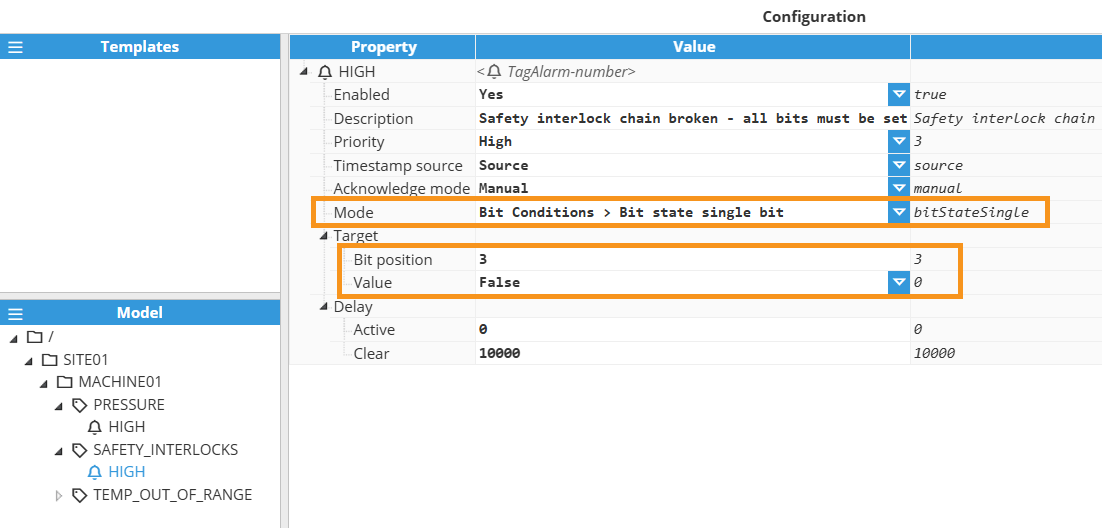
Bit Conditions
Mode | Description |
|---|---|
Bit state single bit | Triggers the alarm based on the state (0 or 1) of a specific bit in the tag value. |
Bit state multiple bits | Triggers the alarm when one or more specified bits in the tag value match the defined bitmask condition. |
Multiple Conditions
Triggers the alarm based on a set of conditions defined in the target conditions. This mode allows you to create complex alarm logic by combining multiple comparisons and referencing values from other tags in the system. The alarm activation depends on the configured matching strategy(e.g., all or any).
.png)
This alarm is configured on the tag DEVICE_STATUS_CODE and uses Multiple conditions mode, so it can evaluate several comparisons against the same tag. The match logic is set to Any condition true, meaning the alarm will activate if at least one of the configured conditions becomes true (OR logic). In this setup, each condition checks whether DEVICE_STATUS_CODE equals a specific fault code (3, 7, or 11). Therefore, the alarm triggers whenever the tag value is 3, 7, or 11, and it clears when the tag value is something else.
Alarm name: DEVICE_BAD_STATE
Source tag: DEVICE_STATUS_CODE
Mode: Multiple conditions
Condition match mode: Any condition true (OR)
Conditions:
Enabled: Yes | Comparator: Equal to | Value: 3
Enabled: Yes | Comparator: Equal to | Value: 7
Enabled: Yes | Comparator: Equal to | Value: 11
Effective logic:
DEVICE_BAD_STATE = (DEVICE_STATUS_CODE == 3) OR (DEVICE_STATUS_CODE == 7) OR (DEVICE_STATUS_CODE == 11)
Note:
Multiple conditions mode is available from N3uron version 1.22.0.
Custom expressions
Custom expression mode triggers an alarm using a user-defined JavaScript expression. Use this mode when built-in alarm modes (comparators, multiple conditions, bit conditions, etc.) cannot represent the logic you need.
Setup:
Create an alarm under the target tag.
Set Mode to Custom expression.
Open the Custom condition and write a JavaScript expression.
The script must produce the alarm result as either:
A boolean: return true (alarm active), return false (alarm inactive).
An object: { active: <boolean>, description: <string> }
If a description is provided, it overrides the alarm’s configured Description while the alarm is evaluated/active (implementation-dependent).
What you can access in the script
Current tag values:
$.currentValue.value
$.currentValue.quality
$.currentValue.ts
Read other tags values (by path):
$.read("tagPath").value
$.read("tagPath").quality
$.read("tagPath").ts
Tag path formats:
/ Absolute path (e.g., /Plant/Feeder/Inverter/activePower).
./ Relative to current location (e.g., ./SetPoint).
../ Relative path from parent location (e.g., ../Inverter/CurrentVoltage).
$.variables
This object can be used freely by the user to create variables that are not shared with other tags and that persist between executions (but not between module restarts).
if ($.variables.counter === undefined){
  $.variables.counter = 0;
}
const count = $.variables.counter++;
$.toString()
This method returns the whole '$' object formatted in a string, ready to be displayed.
Logging (for diagnostics and troubleshooting):
$.logger.error.info
$.logger.error.warn
$.logger.error.debug
$.logger.error.trace
Useful libraries:
Examples:
// Example 1: Alarm active if TemperatureSensor01 > 100
const temp = $.read("/Plant/Area1/TemperatureSensor01").value;
$.output = { active: temp > 100, description: "Temperature above threshold" };

// Example 2: Alarm active if available system memory < 500 MB
$.output = { active: os.freemem() / 1024 / 1024 < 500, description: "Low system memory" };

// Example 3: Alarm active every day at 8:00 AM (moment.js)
const now = moment();
$.output = { active: now.hour() === 8 && now.minute() === 0, description: "Scheduled daily check" };

// Example 4: Log a message and return a simple boolean for alarm state
const value = $.read("./TankLevel").value;
const alarmActive = value < 20;
$.logger.debug("Tank level: %.2f - Alarm active: %s", value, alarmActive);
$.output = alarmActive;

// Example 5: Directly return a boolean (CPU load > 90%)
return os.loadavg()[0] > 0.9;

// Example 6: Directly return an object with active and description
const diskFree = os.freemem() / 1024 / 1024;
return { active: diskFree < 300, description: "Free RAM is critically low" };
Note:
Custom expression mode is available from N3uron version 1.22.0.
Target Configuration
Setting | Description |
|---|---|
Value | Value to compare, whether numerical, boolean, string, or quality. The exact meaning depends on the selected tag type, alarm type, and mode. |
Clear deadband | Apply the deadband when clearing an alarm.
|
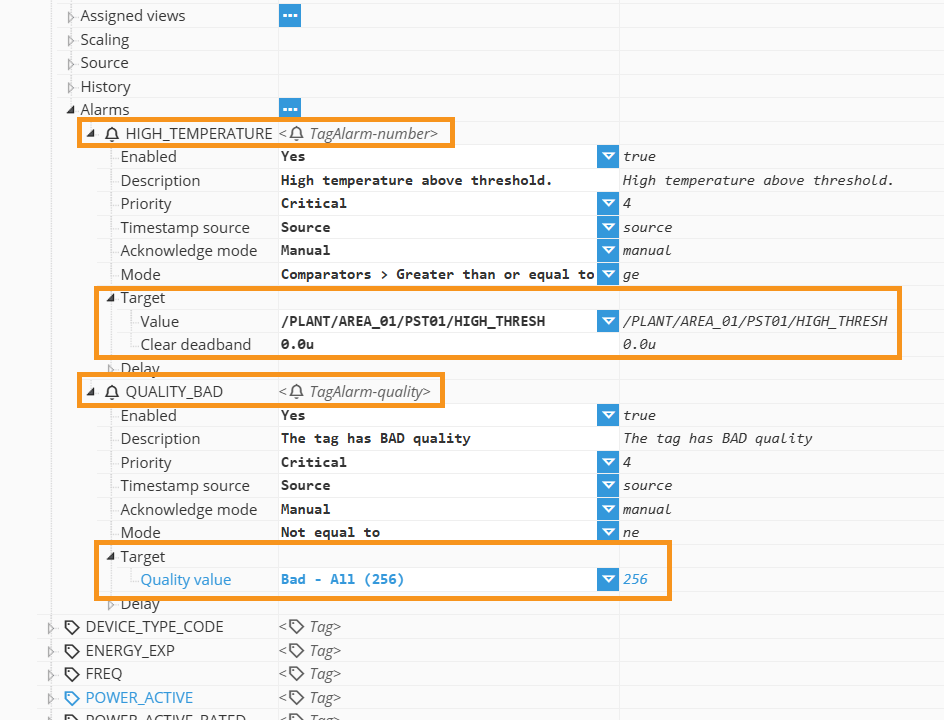
For any alarm mode, the alarm is evaluated on the current value of the tag where the alarm is defined. The configuration then applies the selected logic (Comparator, Range, Bit Conditions, Multiple Conditions, etc.) using one or more Target fields.
What you can enter in Target fields
Custom value: A fixed constant, such as a number, string, or boolean value (True/False).
Select tag: use the current value of another tag as the target input.
Supports absolute paths /PLANT/Feeder/Inverter/ActivePower and relative path from current location ./SetPoint, relative path from parent location ../Inverter/CurrentVoltage.
Expression (= <expression...>): calculate the target input from an expression or when using a template reference, a Custom property {SetPoint}.
Note:
Using relative paths makes alarm configurations more reusable because the target reference is resolved from the alarm’s tag location, not from a fixed plant-wide path. This is beneficial both in templates and in repeated/replicated tag structures.
Delay Configuration
Parameter | Description |
|---|---|
Active | Defines the time, in milliseconds, before the alarm will be considered active after the alarm's condition becomes true. The default value is 0. |
Clear | Defines the time, in milliseconds, before an active alarm will be considered clear after the alarm's condition becomes false. The default value is 0. |
Note:
When an Active delay is configured, the alarm does not become active until the condition has remained true for the full delay period. However, the alarm event timestamp is set to the moment the condition was first met (the start of the delay), not the moment the delay expires. This preserves the true onset time of the abnormal condition for accurate event sequence and analysis.
Note:
As is the case for Tags, it is also possible to import and export alarm configurations to/from a CSV file.