Introduction to Links
Each N3uron node can connect to other nodes and exchange data using N3uron Links. These connections between N3uron nodes provide the following advantages:
Real-time: Data flows continuously between nodes, displaying the current value of tags in both the source and destination node. Data is time-stamped at the origin, maintaining time consistency across the entire fleet.
Secure: All data sent is encrypted using the TLS 1.3 cryptographic protocol to prevent data tampering. N3uron nodes exchange Digital Certificates for instant authentication. These certifications require manual approval by a user in both nodes.
Reliable: All connections between N3uron nodes include an automatic Store&Forward mechanism, meaning that any data which is not delivered due to a communication outage between nodes is saved locally and automatically sent once the connection is restored.
Firewall friendly: No open ports are required at remote facilities.
Bi-directional: Once the connection is established, it is fully bi-directional, meaning that each node can both send and receive data. This makes links very convenient for sending commands to remote nodes.
Easy configuration: Tags are only configured in the source node. Destination nodes display the same information as source nodes, without requiring any extra configuration.
Low bandwidth requirement: All data sent is highly compressed so that links will work correctly on slow and high latency TCP connections, such as 2G and Satellite.
Note:
When sizing storage for the Store & Forward mechanism, users should consider that approximately 100 million events require 1 GB of disk space.
Link Configuration
Each link requires two different nodes, the node initiating the connection and the node receiving the connection. Once the connection is established, it is fully bi-directional and data is exchanged between both nodes, regardless of which node initiated the connection.
Connections initiated by a node are configured as Outbound connections. A node can initiate connections to multiple other nodes.
Connections received by a node are configured as Inbound connections. A node can receive connections from many other nodes.
To create a new connection, go to the Explorer panel and select Links. Depending on whether you are going to establish outbound connections, inbound connections, or both, you will have to configure all or only some of the parameters listed below. Outbound and inbound connections can coexist in the same node.
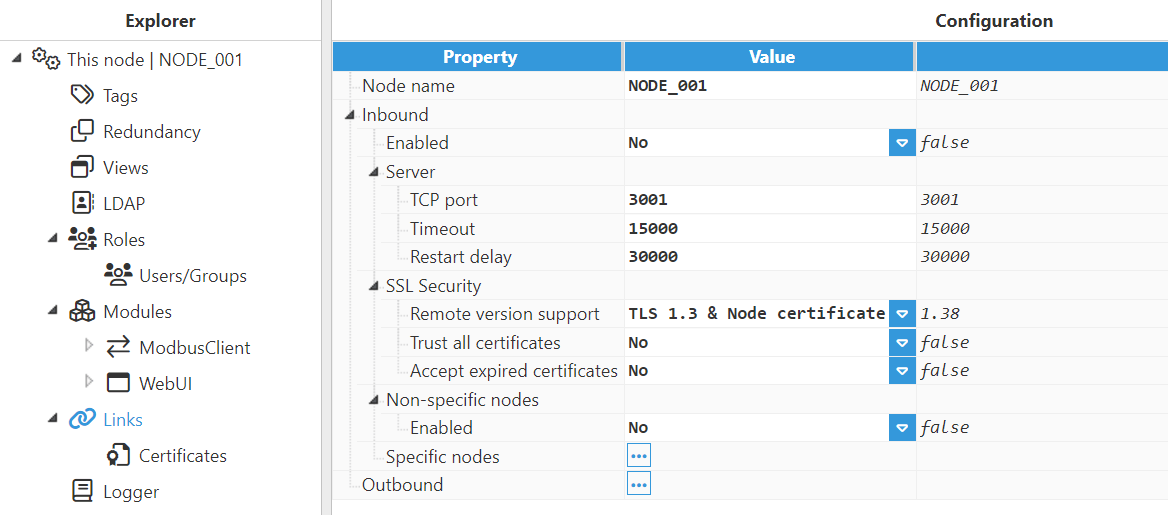
Node name: This name identifies the node and must be unique. It is necessary when configuring connections in the other nodes.
Inbound:
Enabled: Enables inbound connections from remote nodes.
Specific nodes: This section permits connections to the nodes herein listed to be restricted. The remote node name and the name assigned to the inbound link must match.
Non-specific nodes: Configuration enables the connection of remote nodes without providing their specific name. This option is reserved for backward compatibility and its use is not recommended for obvious security reasons.
Server:
TCP port: TCP port for listening to incoming connections. The valid range is 1 to 65535. The default value is 3001.
Important
Please make sure the port is not used by any other application in the same machine.
Timeout: Time to receive a valid response for incoming connections, in milliseconds. The default value is 15,000ms and the minimum is 1,000ms.
Restart delay: Time to wait before restarting the TCP sever after a failure, in milliseconds. The default value is 30,000ms and the minimum is 1,000ms.
SSL Security:
Remote version support: The TLS version and the type of certificates used in connections.
TLS 1.3 & Node certificate: This is the most recommended option. It uses TLS version 1.3 and the digital certificates of each node.
TLS 1.2 & Node certificate: Uses TLS version 1.2 and the digital certificates of each node. This option is not recommended and it is only supported for backward compatibility.
TLS 1.2 & Common certificate: Uses TLS version 1.2 and a common digital certificate shared by all nodes. This option is not recommended and it is only supported for backward compatibility.
Important
Both nodes must use the same configuration settings.
Trust all certificates: When enabled, all SSL certificates received from peers will automatically be trusted. The 'No' option is strongly recommended.
Accept expired certificates: When enabled, the node will accept expired certificates. The 'No' option is strongly recommended.
Non-specific nodes:
Enabled: Enables inbound link connections from any remote node without providing their specific name. The nonspecific nodes option is reserved for backward compatibility and its use is not recommended.
Specific nodes:
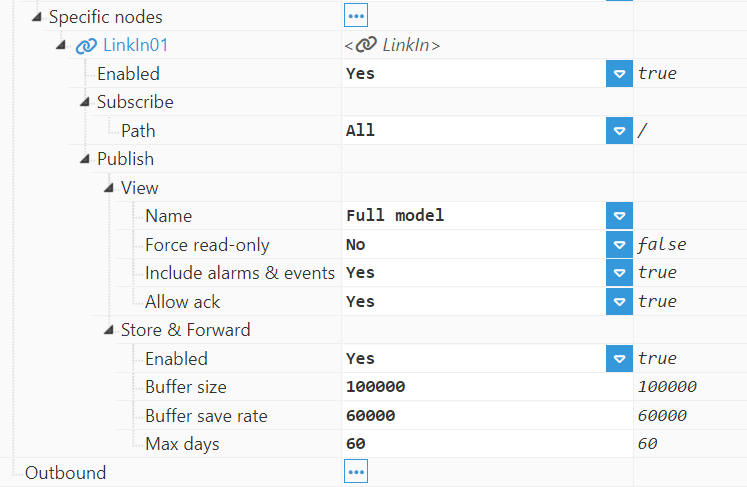
LinkIn: Permits a different inbound link to be added for each remote node. The remote node's name and the name assigned to the inbound link must match.
Enabled: Enables the inbound connection from the remote node.
Subscribe:
Path: Remote path to subscribe to.
Examples:
/: Root path, subscribes to all tags.
/Group01: Subscribes to tags contained in Group01.
None: No subscription.
Publish:
View: This setting allows one or more Views to be entered in order to restrict the data shared through the link.
Name: The name of the view to publish on this link. Only those tags associated with the selected View will be published to the other end. The View must be created previously in the Views configuration section and tags must be added to the View in the tag configuration area. Set to None to publish nothing to the other end. Set to Full model to publish the entire data model to the other end.
Force read-only: Specifies if the selected view is published in read-only mode, preventing write operations received from remote nodes regardless of the tag's configured access mode.
Include alarms & events: Specifies if data published to the other end includes alarms and events information.
Allow ack: Specifies if alarm acknowledgements from remote nodes are permitted.
Store & Forward: Enables the storage of events when the remote node goes offline. Once the remote node is back online, stored data is automatically sent in the same order as it was generated. Store & Forward uses local disk caching for safe storage, although it does not require Historian. The buffer size is limited by the space available in the disk, although it's possible to specify the maximum storage time to avoid reaching the buffer capacity.
Buffer size: The maximum number of events per file when S&F saves data to disk. The default value is 100,000 events per packet and the minimum is 100 events per file. For example, If the Buffer size is set to 100,000 events, the buffer of events accumulated is saved to disk when the Buffer save rate interval is reached or after 100,000 events, whatever happens first.
Buffer save rate: Maximum interval to save the buffer to disk, displayed in milliseconds. The default value is 60,000ms and the minimum is 1,000ms. For example, if the Buffer save rate is equal to 60,000ms, the buffer of events accumulated is saved to disk when the Buffer size is reached or after 600,000ms, whatever happens first.
Max days: The number of days to maintain the S&F event buffer on disk for. Older data is automatically purged after this time. Set to 0 to disable the automatic purge (not recommended). The default value is 60 days.
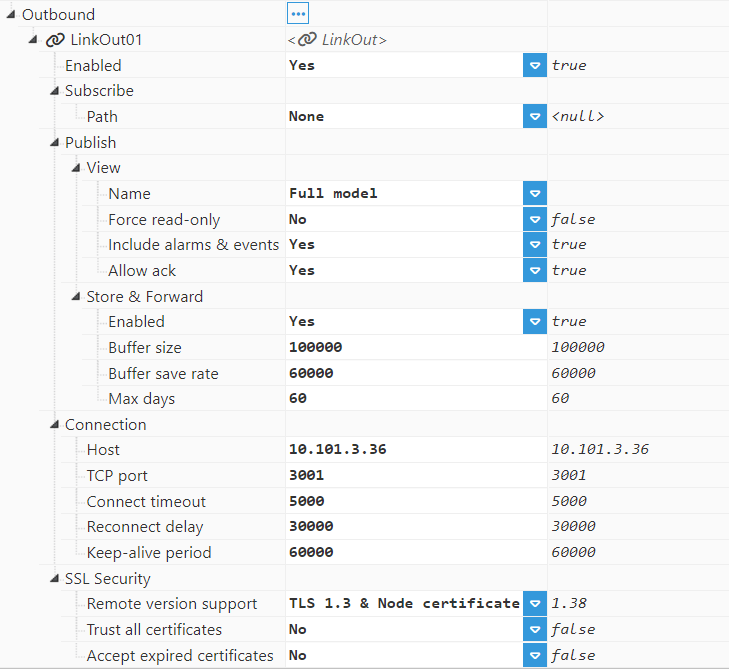
Outbound:
LinkOut: The same parameters explained above for an inbound connection also apply here (Enable, Subscribe, and Publish).
Connection:
Host: Host or IP address to connect to the remote node.
TCP port: TCP port to connect to the remote node.
Connect timeout: Time to get a valid response from the remote node, in milliseconds. The default value is 5,000ms and the minimum is 1,000ms.
Reconnect delay: The time for reconnection after a disconnection or a failed connection, in milliseconds. The default value is 30,000ms and the minimum is 5,000ms.
Keep-alive period: The time between keep-alive checks, in milliseconds. The default value is 60,000ms and the minimum is 5,000ms.
SSL Security: The same as in Inbound.
Configuring a Link between two nodes requires three steps:
Step 1: Provide a unique name between all N3uron nodes and each of the nodes connected.
Step 2: Configure the Inbound connection for the node receiving the connections. Once the Inbound connection is enabled, it will listen to the configured port for incoming connections from other N3uron nodes. The default port for incoming connections is 3001.
Step 3: Configure the Outbound connection for the node initiating the connection. The name of the Outbound connection must be the same as the name of the node receiving the connection.
See the following example of Link configuration for more information on configuring links for node connections.
Compatibility
N3uron Links are designed to be backward compatible with previous versions of N3uron.
For example, a central node running N3uron v1.22 can receive Links from nodes running N3uron v1.21.
However, forward compatibility is not supported. This means that a node running N3uron v1.22 cannot connect to a central node running N3uron v1.21. The central node must be upgraded to N3uron v1.22 before nodes running that version can connect to it.
Custom Certificates
By default, N3uron generates and uses an X.509 certificate for each node to serve as its identity. This is the recommended configuration. However, if you prefer to generate and use custom certificates, ensure that the following requirements are met.
Common Name (CN)
The Common Name in the certificate is strictly tied to the node name and the link type.
For Outbound Links:
NODE_NAME:N3uron:LinkOutExample:
NODE_001:N3uron:LinkOutFor Inbound Links:
NODE_NAME:N3uron:LinkManagerExample:
NODE_001:N3uron:LinkManager
Note
Replace NODE_NAME (e.g., NODE_001) with your actual node name. If the node name changes later, the certificate will become invalid.
Subject Alternative Name (SAN)
N3uron requires a specific Uniform Resource Identifier (URI) within the subjectAltName extension inside the certificate.
For Outbound Links:
URI = urn:NODE_001:N3uron:LinkOutFor Inbound Links:
URI = urn:NODE_001:N3uron:LinkManager
Key and Certificate Format
Format: The certificate must be in PEM format.
Key passphrase: The private key should be generated without a password.
File Installation and Renaming
Once generated, the files must be placed in specific directories and renamed using a double-underscore convention.
The certificates for Outbound Links must be placed here:
<N3uron installation directory>/data/bootstrap/links/.pki/outbound/ownFor Inbound Links:
<N3uron installation directory>/N3uron/data/bootstrap/links/.pki/inbound/ownYou must rename your generated certificate and key files to match the following pattern (note the double underscores __ around "N3uron"):
Certificate: NODE_NAME__N3uron__LinkOut.crt
Private Key: NODE_NAME__N3uron__LinkOut.key
Example: NODE_001__N3uron__LinkOut.crt
After placing and renaming the files, you must restart the N3uron service for the changes to take effect.
Note
In order to avoid overwriting the certificates, the name of the node must not be changed. Also, note that if the name of the node is changed, the digital certificate will be invalid.
Example of Link Configuration
The following example involves 4 nodes: 2 nodes to initiate the connection (Remote Nodes) to the other 2 nodes, which are receiving the connection (Central Nodes). In this way, both Central nodes will subscribe to the data collected by Remote nodes.
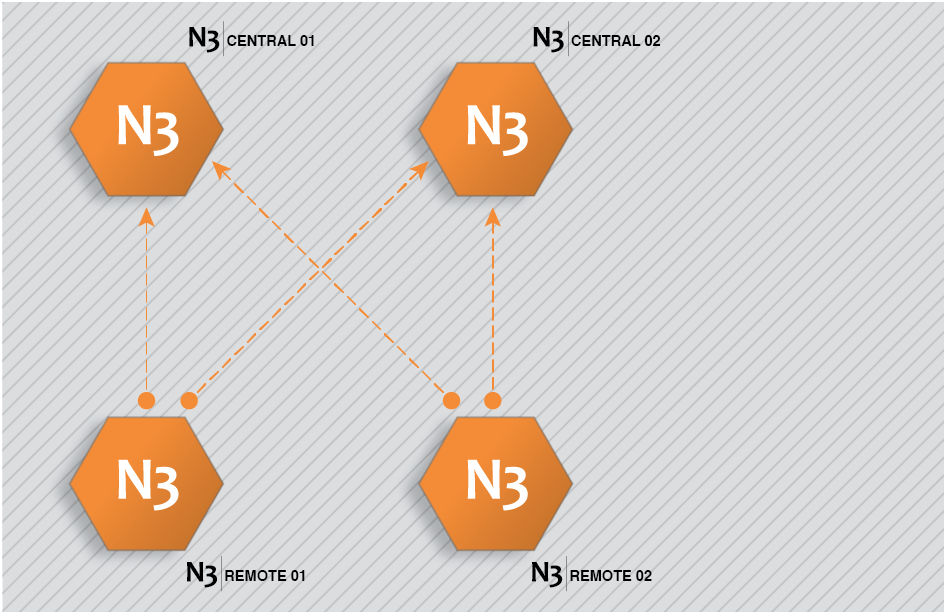
This architecture is created by completing the following steps:
Step 1: Configure N3Central01 and N3Central02 to receive incoming connections (Config => Links).
Provide the name (N3Central01 and N3Central02). This name must be unique among all connected nodes.
Enable incoming connections and configure the listening port (3001 by default).
Create a specific connection for remote nodes N3Remote01 and N3Remote02 by setting the tag subscription as “All” and publish view as none. This means that these nodes are now subscribed to all available tags in the remote nodes but won't publish any data to these remote nodes.
.png)
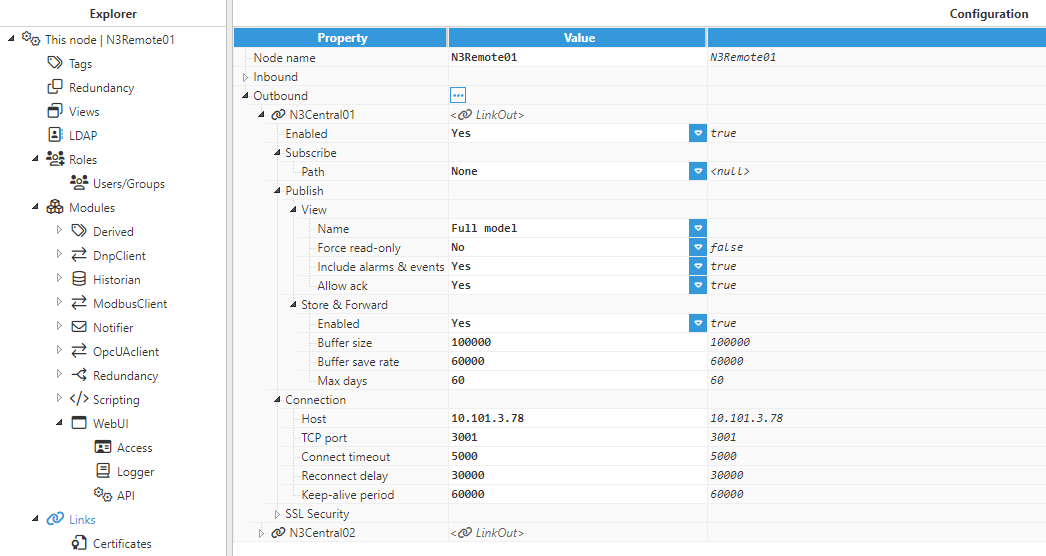
Step 2: Configure N3Remote01 and N3Remote02 to provide data to the central servers (Config => Links).
Provide the name (N3Remote01 and N3Remote02). This name must be unique among all connected nodes.
Add outbound connections to the central servers. The name of each outbound connection must match exactly with the name of the destination central server.
Configure tag subscription as “None” since the remote nodes won’t be subscribed to the tags in the central nodes.
Configure the Publish view as “Full model” in order to push all local events to the remote nodes.
Configure the connection details, IP, and port, for the central servers.
Once the configuration of all nodes is complete, the central server will send a digital certificate to the remote nodes. All certificates must be set as “trusted” in the remote nodes.

Once the digital certificates for the central server have been “trusted” by the remote nodes, the digital certificate from the remote nodes must also be “trusted” by the central server.

Once all digital certificates have been trusted, the connection has been successfully established and the link status will be displayed in Diagnostics => Links to show that these remote tags are now available in the central nodes.

