Channel
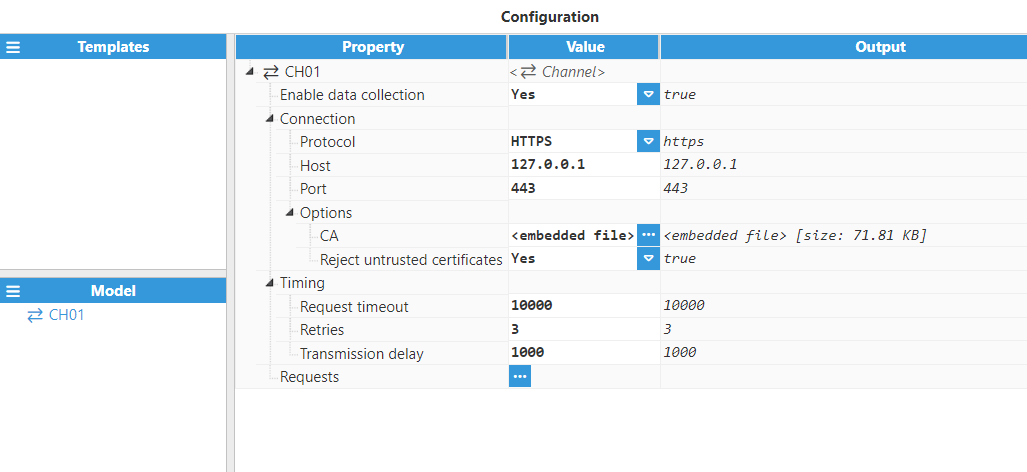
The first step when configuring the REST API Client is to create a connection to a REST endpoint. This is represented by a channel. Channels define the protocol, host, port, and security settings for communicating with the target REST server.
Setting | Description |
|---|
Enable data collection | Enables data collection for this channel. If set to false, no requests on this channel will be executed. The default value is true. |
Connection | This section contains options related to the HTTP/HTTPS connection to the target REST server. Protocol: Select between the HTTP protocol and the secure HTTPS protocol. When HTTPS is selected, additional security options become available. Host: Hostname or IP address of the target REST server without http:// or https:// prefixes. Example: api.example.com or 192.168.1.100. Port: TCP port where the target REST server will be listening. By default, HTTP uses port 80, and HTTPS uses port 443. Valid range is 1 to 65536. Options: This section contains additional options that are used when the protocol is HTTPS. CA: Allows using a custom certificate as a trusted Certificate Authority to validate the certificates returned by the server. This can be useful when the server is using certificates signed with a non-trusted CA or when using self-signed certificates. Reject untrusted certificates: When set to true, connections to the target HTTPS server will be silently dropped if the server supplies a certificate that is not signed by a trusted certificate authority. This can occur when using self-signed certificates. In such cases, this option must be set to false. The default value is true.
|
Timing | This section contains options related to timeouts and retries that affect all the requests in the channel. Request Timeout: Specifies the maximum time that can pass after a request is sent to the server before it times out and is retried (in milliseconds). The default value is 10000 milliseconds. Retries: Selects how many times a request will be retried before being aborted. The default value is 3 retries, which means that the request will be sent 4 times to the server (initial request plus 3 retries). Transmission delay: Specifies the delay between one request and the next one on this channel (in milliseconds). The minimum value is 0, which means that the next request will be sent out as soon as possible after the current one finishes.
|
Request
A Request represents the REST request that is sent to the server. Each Request belongs to a Channel and defines the HTTP method, URL path, parameters, headers, request body, and how to parse the response.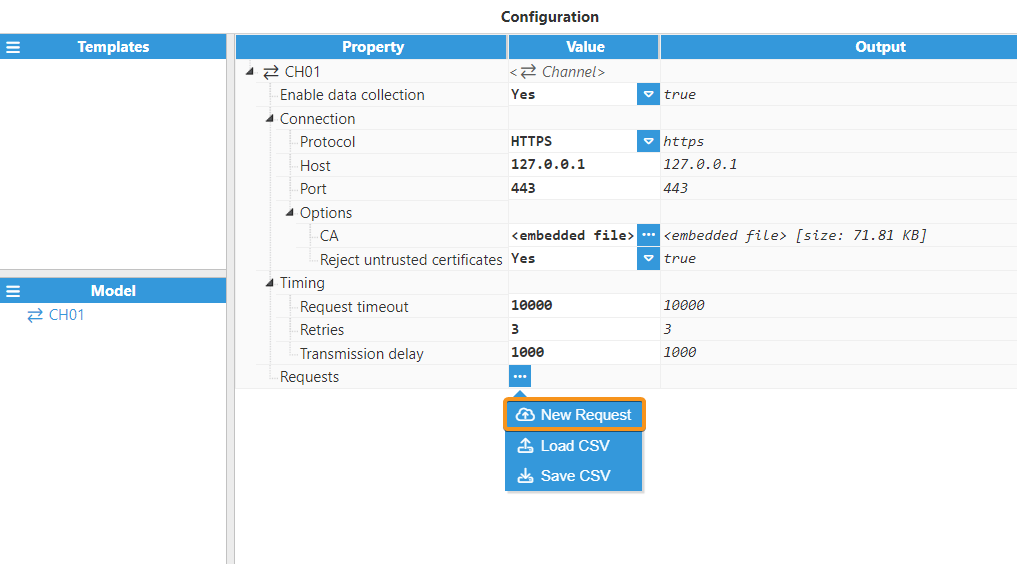
Setting | Description |
|---|
Enable data collection | Enables or disables this request. If disabled, the request will never be sent to the server, and any tags with this request as their source will remain with a BAD-UNINITIALIZED quality. The default value is true. |
Method | Selects between the different HTTP REST methods. When a method that does not support a request body (such as GET) is selected, the body configuration field is hidden. Conversely, selecting methods like POST or PUT will display the body field. The supported methods are: GET: Executes a REST GET request. DELETE: Executes a REST DELETE request. POST: Executes a REST POST request. PUT: Executes a REST PUT request. PATCH: Executes a REST PATCH request.
|
.png)
Triggers
The Triggers section defines the specific conditions that initiate an API request. You can configure multiple triggers for a single request, and execution occurs whenever any of them becomes active. The available trigger types allow for time-based execution via Periodic trigger (using fixed intervals or Cron expressions) or event-driven execution based on real-time data via TagCondition and TagChange triggers.
Setting | Description |
|---|
Triggers | Each request can have one or more triggers that dictate when it will be executed. Each trigger is checked continuously, and whenever one becomes active, the request will be executed. Available triggers are: Periodic: This type of trigger becomes active after a specified period has passed. Configuration options: Type: Selects how the period is calculated. The options are: Fixed time: The period starts counting when the module starts, and it will be increased by the specified amount whenever the trigger is active. For example, if the period is 30000 ms and the module starts at 12:32:12, the transaction will execute on start, and every 30 seconds afterwards, for example, at 12:32:42. Fixed interval: The trigger becomes active at fixed points in time, depending on the given period. For example, if the period is 5 minutes, the trigger will activate at xx:00, xx:05, xx:10, etc., regardless of when the module started. Cron: The actions start periodically based on a cron expression. If the script doesn't finish before the next scheduled time, that execution will be skipped. This field will require you to provide or select a cron expression to define the desired schedule.
Scan rate: Specifies the period between each time the trigger is activated, displayed in milliseconds. The default and minimum value is 1000 milliseconds. Reschedule timer: If enabled, the transaction activation time will be rescheduled whenever another trigger is activated.
Example: If a transaction with several triggers (including a 60-second periodic trigger, which executed at 11:30:10) is executed at 11:30:25: Reschedule enabled: The periodic trigger will be executed at 11:31:25, rescheduling the timer to execute 60 seconds after the current execution. Reschedule disabled: The periodic trigger will be executed at 11:31:10, which is 60 seconds after the previous periodic execution.
Run on start: Determines whether the trigger should execute immediately when the module starts. Default is Yes
TagCondition: This type of trigger activates whenever a tag-based condition is met. Configuration options: Tag: Path to the tag used in this tag condition trigger. The tag path must exist in the N3uron tag namespace. Property: The property of the tag used to trigger the transaction. Options include Value, Quality, and Timestamp. Initial change: Specifies if the script should trigger on the initial subscription or not. Condition: Specifies the comparison applied to evaluate the condition. If the tag is a string, it is compared alphabetically (for example, aa > ba returns true, while aa > ab returns false). Value: Specifies the value used in the condition. It can be a Number, a String, or a Boolean. Condition type: Determines how the condition will be evaluated: If true: The action triggers when the condition becomes true. It can only trigger once (or once per tag update), depending on the value of Trigger on update. If false: The action triggers when the condition becomes false. Just like the case above, it can trigger only once or once per tag update. While true: The action triggers once when the condition becomes true, and then repeats periodically, according to the period specified. While false: Same as above, except it triggers while the condition is false.
Trigger on update: If true, the action will trigger whenever there's a new tag update that still satisfies the condition. Otherwise, it will only trigger the first time the condition becomes true. This option is only used when the condition type is set to If true or If false. Reset trigger: If enabled, the trigger will be reset to the given value after each completed transaction. Reset value: Selects the reset value of the trigger when it resets after a transaction.
TagChange: This type of trigger activates when there is any change to the specified tag. Configuration options: Tag: Path to the tag to monitor for changes. Property: The property of the tag to monitor (Value, Quality, or Timestamp). Initial change: Specifies if the script should trigger on the initial subscription or not.
|
.png)
Parameters
The Parameters section allows you to link tags to the API request, enabling dynamic configuration based on real-time data. You can define parameters as a Single tag, a Tag group, or a set of Multiple tags (using regex filters) and then reference them in your custom scripts via the $.parameter object to access their current value, quality, and timestamp.
Setting | Description |
|---|
Parameters | Tag values that can be referenced throughout the request configuration. They allow dynamic request construction based on the last value of the specified tags. Parameters can be accessed in scripts using $.parameter['paramName'] or $.parameter.paramName, where paramName is the instance name of the parameter. Each parameter object contains the properties tag, value, quality, and ts (timestamp). |
.png)
Path
The Path section specifies the exact resource location on the server (e.g., /Data.json). You can define this path using static Plain text or generate it dynamically for each request using a Custom script, which can utilize request parameters via the $.parameter object, to build the path string.
Setting | Description |
|---|
Path | Specifies the path of this request. For example, if the complete URL of the request is https://www.example.com:443/Data.json, the protocol selected should be HTTPS, the host and port should be set to www.example.com and 443, respectively, and the path must be /Data.json. |
.png)
Headers
The Headers section manages the metadata sent alongside your request. The client automatically handles Fixed Headers (such as Accept-Encoding for compression and Authorization for authentication). Additionally, you can define Custom Headers to meet API-specific requirements, generating values either as static text or dynamically via custom scripts that access request parameters via $.parameter.
Setting | Description |
|---|
Headers | HTTP headers provide additional metadata about the request. The REST API Client manages fixed headers automatically and allows custom headers for API-specific requirements. |
.png)
Body
The Body section configures the payload sent to the server for methods like POST, PUT, or PATCH. Here, you can define the Body serializer to generate data using custom scripts—which can dynamically access request parameters via $.parameter—and set the Body format to handle the serialization and encoding required by the endpoint.
Setting | Description |
|---|
Body | Defines the request body sent to the server for HTTP methods that support it (POST, PUT, PATCH). The body is constructed using serialization and encoding settings, then generated by a custom script. |
.png)
Response
The Response section defines how data returned by the server is processed and ingested into N3uron. This allows you to configure the Response format to correctly decode and deserialize the raw message (e.g., as JSON, XML, or Text) and set up the Response parser to map specific data points to tags using custom scripts.
Setting | Description |
|---|
Response format | Defines how the response body from the server is decoded and deserialized before being passed to the Response parser. Encoding: Selects which format is used to decode the message. Available formats: UTF8: Decodes the message as a UTF8 string. Binary: Decodes the message as a binary buffer. Base64: Decodes the message as a Base64 encoded string. Hex: Decodes the message as a hexadecimal string.
Serialization: Selects the serialization of the incoming data. This data will be deserialized using the selected serializer: Binary: The data will not be deserialized, instead it will be forwarded to the parser as a binary Buffer. Text: The data will be converted to a string, and then this string will be forwarded to the parser. JSON: The message will be deserialized from a JSON string into a JavaScript object, which is then forwarded to the data parser. XML: The message will be deserialized from XML into a JavaScript object, and then forwarded to the data parser.
|
Response parser | Defines how the deserialized response data is parsed and mapped to tags. Type: Selects the method used to parse the data obtained after deserializing the message: Script: Script that will be used to convert the incoming message into a specific format that is used to provide data to tags. The parsing script has access to the following functions and objects: Buffer: Class used to manipulate a byte buffer directly. More information can be found at NodeJS API Reference. moment: Class used to parse, format, and manipulate dates. This has access to both normal moment and moment-timezone. More information can be found at moment and moment-timezone. sprintf: Function used to simplify formatting a string using placeholders and a list of arguments, using the same format as the C sprintf function. More information can be found at C++ reference - sprintf. $.logger: Object containing logging functions that can be used to log custom messages during script execution. Valid log levels are error, warn, info, debug, and trace. Each of these functions can be used as $.logger.info(message, args...). The logger accepts a format string in the sprintf format. $.local: This object can be used to keep user-defined data between multiple executions of the same request. By default, it's an empty object. For example, a property named scanCount can be defined by using if(!$.local.scanCount) $.local.scanCount = 0. These properties can be accessed from any scripts executed by a request. $.parameter: Object containing all declared parameters for this request. Each parameter can be accessed by using its instance name. For example, if a parameter is named startTime, it can be accessed using $.parameter.startTime. Each parameter has a value, quality, and timestamp (in UNIX epoch format, with milliseconds). Using the previous example, in order to access the value $.parameter.startTime.value is used; the quality requires using $.parameter.startTime.quality, and the timestamp uses $.parameter.startTime.ts. $.input: This contains the headers, the body, and the status code of the response. $.input.statusCode: This contains the status code of the request, as an integer. More information can be found at HTTP response status codes. $.input.headers: This is an object containing the headers of the response. The name of the headers is in lower-case. $.input.body: This contains the body of the response. The type and format of the body depends on the deserializer that is used; it can either be a Buffer (if binary deserialization is used), a string (when using text deserialization), or a JavaScript object (if the deserialization is either JSON or XML).
$.output: This is the output of the parsing function. By default, it's an empty array where objects containing the tag updates have to be placed. The format of each element of the array must be {tag: TAG_ADDRESS, value: TAG_VALUE, quality: TAG_QUALITY, ts: EPOCH_TIMESTAMP}. TAG_ADDRESS: This value is used to choose which tag will be updated. It can either be the tag address of the tag (defined in the tag configuration), or the path of the tag if the tag address is empty. TAG_VALUE: This is the value used to update the tag. It can be any value. TAG_QUALITY: This is the quality of the tag for this event. It has to be a number from 0 (Bad) to 192 (Good). If the quality is not present, it will be automatically set to 192. EPOCH_TIMESTAMP: This value is the timestamp of the event. It has to be a number in epoch format with milliseconds. If the timestamp is not present, it will be automatically set to the current time.
|
.png)
Tag Configuration
REST API Client can be used as a source module and, as such, can generate tag events from REST requests. In order for these tag events to be valid, tags with the REST API Client as their source must be created (Refer to this link for more detailed information on creating tags). See the screenshot below for an example configuration:
.png)
Tag source configuration settings
Setting | Description |
|---|
Enabled | When disabled, tags won’t be updated with the values received from the device. Instead, they will essentially act as memory tags. When set to enabled, the tag value will be continuously updated with the values received from the field device, or in this case, the REST server. The default value is set to disabled. |
Module type | Defines the driver type used to retrieve values from the field. In this example, RestApiClient must be selected from the drop-down menu. If RestApiClient does not appear in the drop-down menu, this means that this driver has not been installed on this machine yet and must be installed. |
Module name | Selects which instance of the REST API Client module will provide the data for this tag. |
Config | Enabled: Enables data collection for this tag. If disabled, no events can occur in this tag. Request: Selects which request will provide data to this tag. The request must already exist in the selected REST API Client instance. The format for this property is Channel/Request. Alias: The alias can be used to associate this N3uron tag with the data retrieved from the REST server. This property can be left blank, which means that the full tag path must be used to assign the values received from the REST server. If a tag alias is used, tags can be referred to in the request parser using this alias, instead of the full tag path.
|