Connecting to a Siemens PLC
- Step 1: Create the module: Config => Modules => Model => New module
.png)
- Step 2: Provide a name for the module, such as SiemensClient, assign the module type to SiemensClient, and save the new configuration settings.
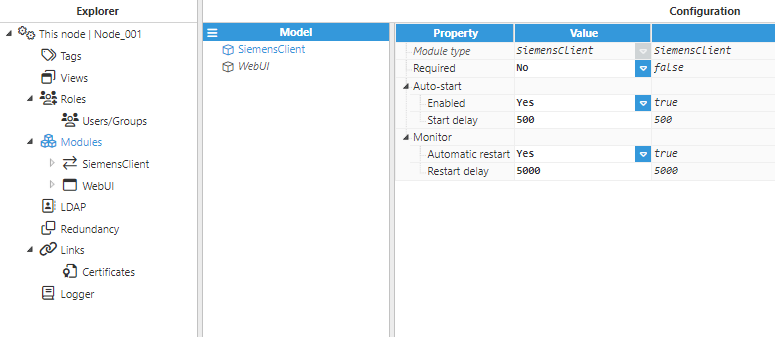
- Step 3: Configure the Logger and API sections (the default values are usually sufficient). Save the configuration settings.
- Step 4: Create a new device: Config => Modules => SiemensClient => Model => New device.
.png)
- Step 5: Provide a name for the device, in this case the name is PLC01 and configure as appropriate.
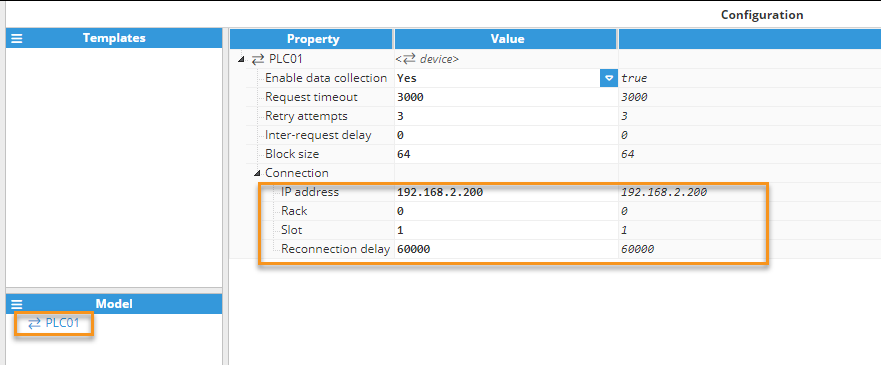
- Rack number
- Slot number
- IP address
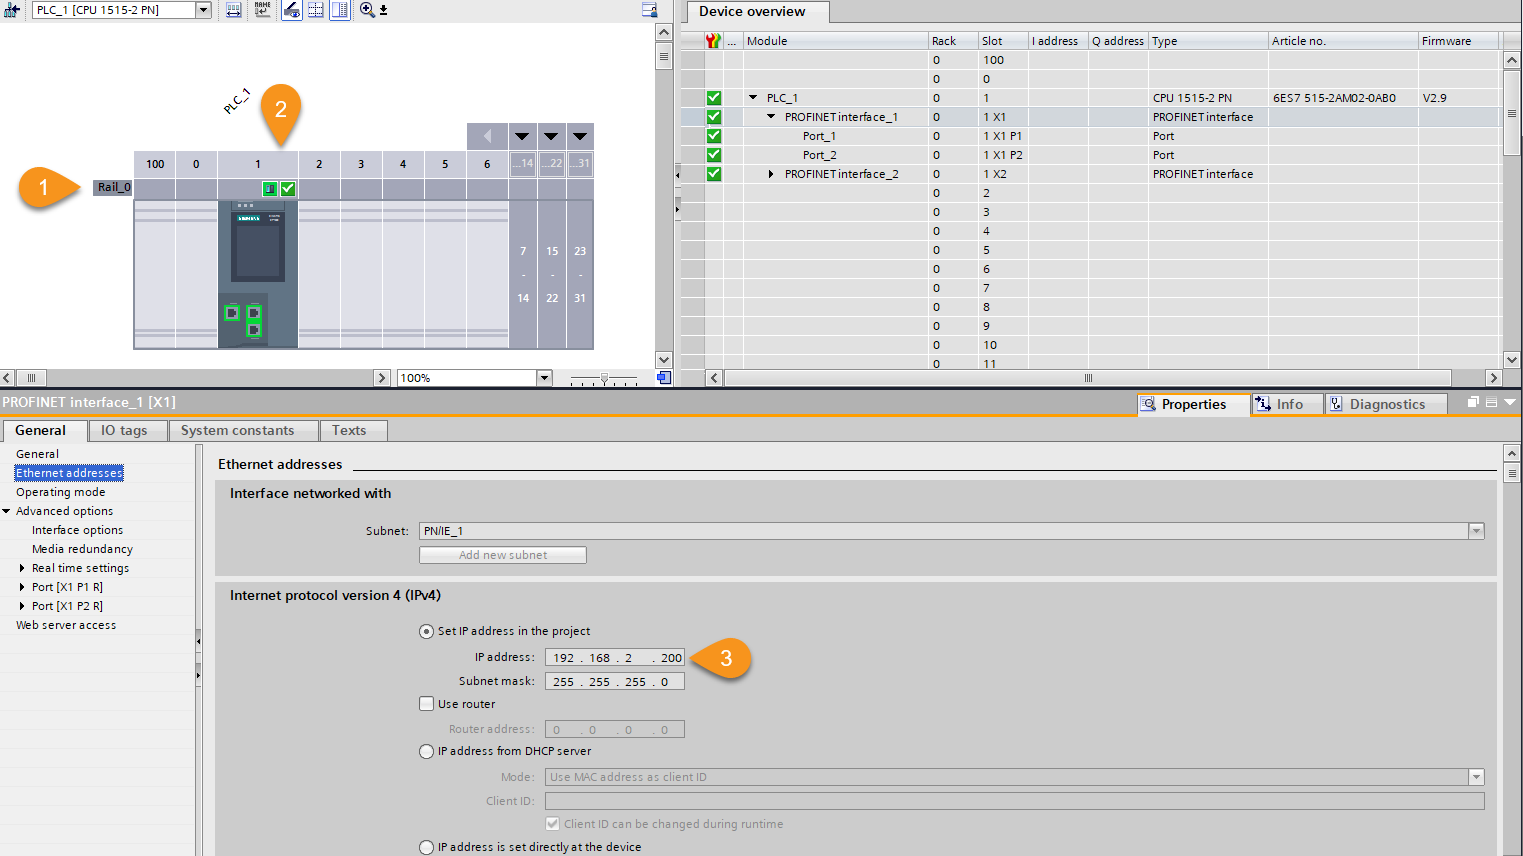
For this example, the following settings have been used:
- Enable data collection: True.
- Connection
- IP address: 192.168.2.200.
- Rack: 0.
- Slot: 1.
- Reconnection delay: 60000.
The rest of the parameters have been left as their default values.
- Step 6: Create a new tag: Config => Tags => Model => New tag.
.png)
- Step 7: Assign a name to the tag; in this scenario, we'll create three tags. One will be a memory tag, and the other two will originate from DBs (Data Blocks).
Accessing PLC Tags or Flags
.png) .All details regarding communication should be configured in the Source entry. This tag will correspond to %MW2 of Integer datatype in the PLC.
.All details regarding communication should be configured in the Source entry. This tag will correspond to %MW2 of Integer datatype in the PLC.- Source
- Enabled: Yes
- Module type: SiemensClient
- Module name: SiemensClient
- Config
- Device: PLC01
- S7 address: m:02
- Scan rate: 5,000
- Source
Accessing Boolean/Bit tags within DataBlocks
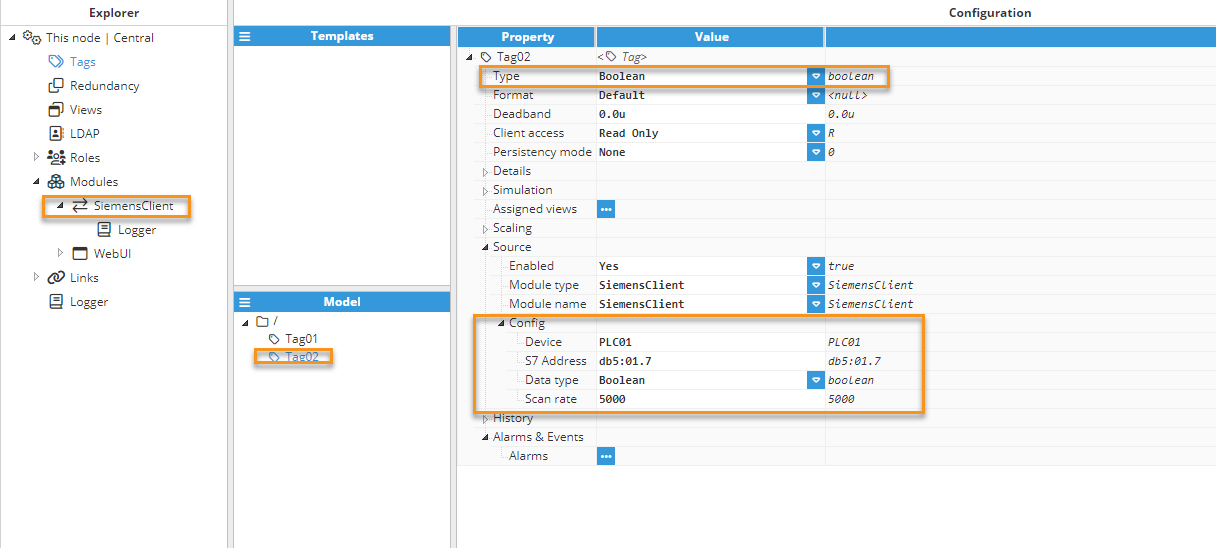
To access Boolean values or individual bits within a byte, simply use the prefix "db" (which stands for DataBlock), followed by the number of the data block, a colon, the byte offset number, and then a dot followed by the bit number, ranging from 0 to 7. This tag will correspond to DB5.DBX1.7 of Boolean datatype in the PLC.
- Source
- Enabled: Yes
- Module type: SiemensClient
- Module name: SiemensClient
- Config
- Device: PLC01
- S7 address: db5:01.7
- Data type: Boolean
- Scan rate: 5,000
Accessing primitive datatype tags within DataBlocks (other than Boolean)
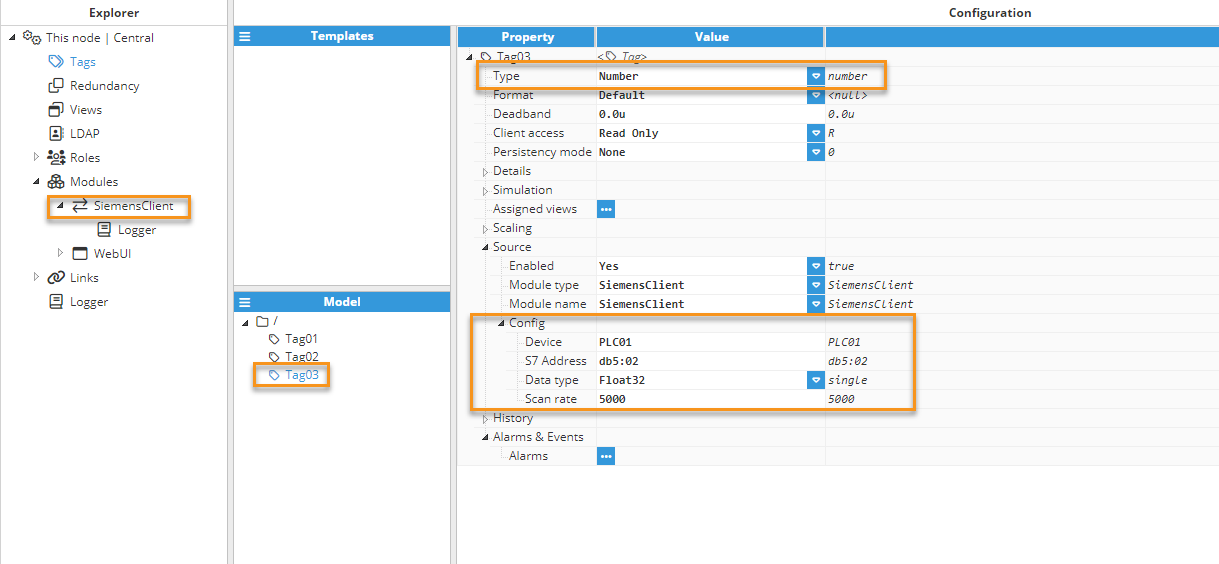
.To access byte-based data types within a data block, you follow a similar pattern. You start with the prefix "db" for DataBlock, followed by the number of the data block, then a colon, and finally the byte offset number. This tag will correspond to DB5.DBD2 of Real datatype in the PLC.
- Source
- Enabled: Yes
- Module type: SiemensClient
- Module name: SiemensClient
- Config
- Device: PLC01
- S7 address: db5:02
- Data type: Float32
- Scan rate: 5,000
Accessing Array elements within DataBlocks
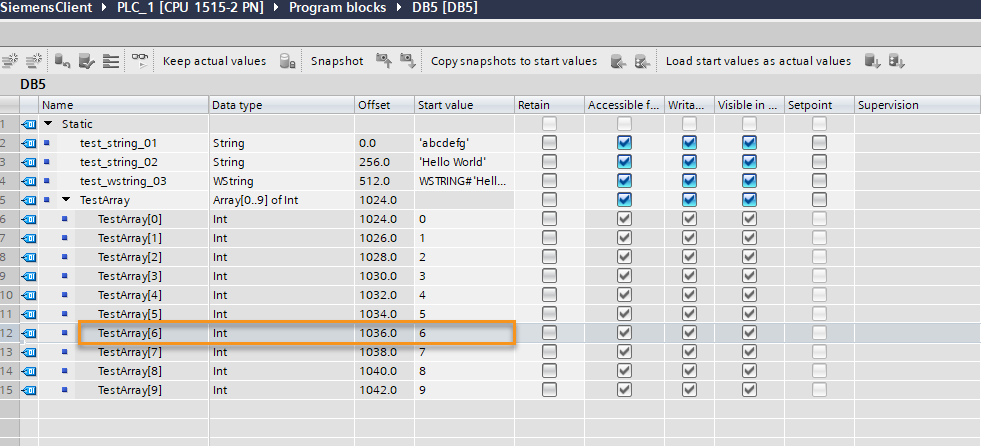
To access an element within an array, you calculate the address by adding the ArrayOffset to the product of the element's position and its size in bytes. For example, to access the element TestArray[6], the calculation would be: 1024 + (6 * 2) = 1036. Here, the element size is 2 bytes since the Int datatype in Siemens occupies 2 bytes..png)
This tag will correspond to DB5.DW1036 of Real datatype in the PLC.
- Source
- Enabled: Yes
- Module type: SiemensClient
- Module name: SiemensClient
- Config
- Device: PLC01
- S7 address: db5:1036
- Data type: Int16
- Scan rate: 5,000
Accessing Struct elements within DataBlocks
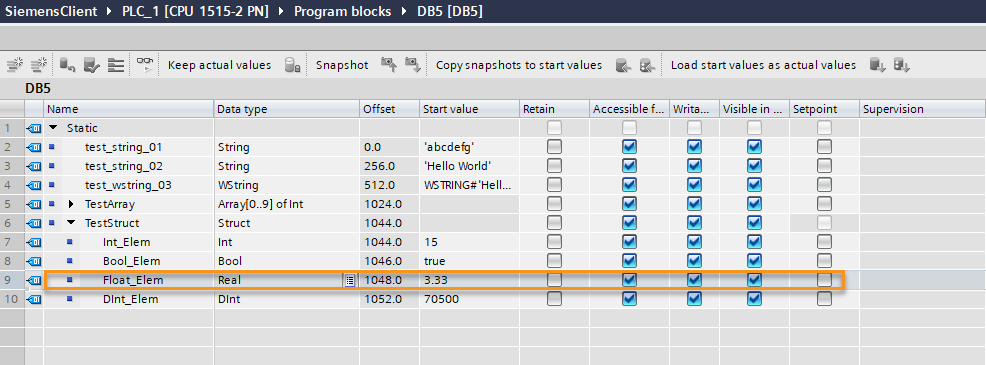
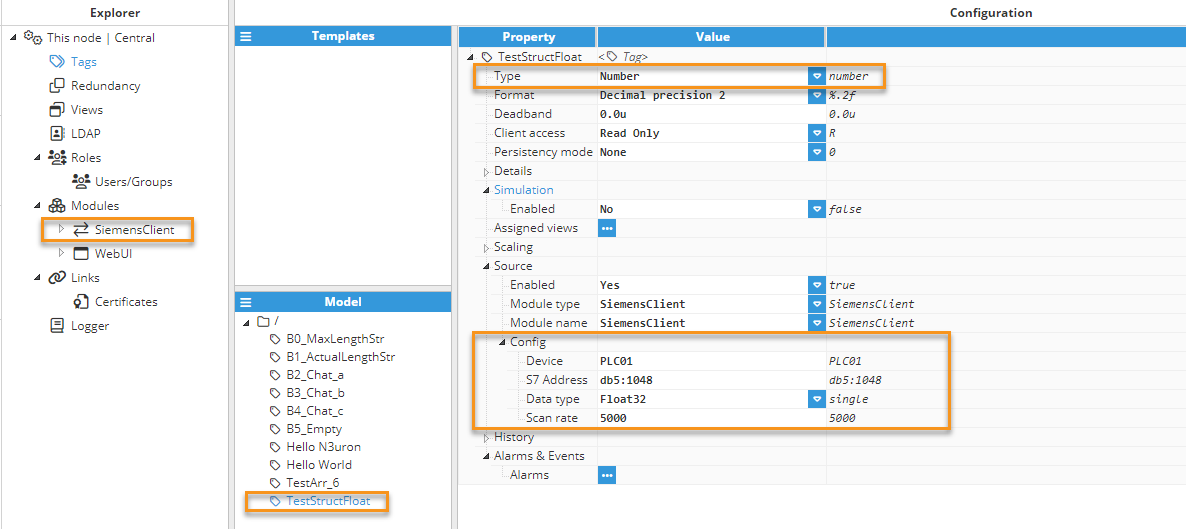
Accessing elements within a structure is similar to accessing arrays. The main distinction lies in the fact that arrays consist of elements with uniform data types, whereas structures can accommodate elements with diverse data types. You should take that into consideration when calculating the offset of the elements within the structure.
Accessing Strings and characters within a DataBlock
Each string created in a Siemens PLC occupies 256 bytes of memory. This allocation consists of 2 initial bytes reserved for indicating the maximum length and actual length of the string, while the remaining 254 bytes are used for storing ASCII characters. The following table shows the string structure:
| Byte | Description |
| Byte 1 | Maximum string length (254) |
| Byte 2 | Actual string length in bytes |
| Byte 3 | First ASCII character |
| Byte 4 | Second ASCII character |
| ... | And So on |
The following example demonstrates how to read the string 'test_string_01' containing "abc", as visible in the image below..png)
For this task, we will read the data from this string byte by byte. In N3uron, the configuration of the tags will specify their data type as UInt8. We'll use an image example to illustrate the Maximum Length of the string, which corresponds to Byte 0.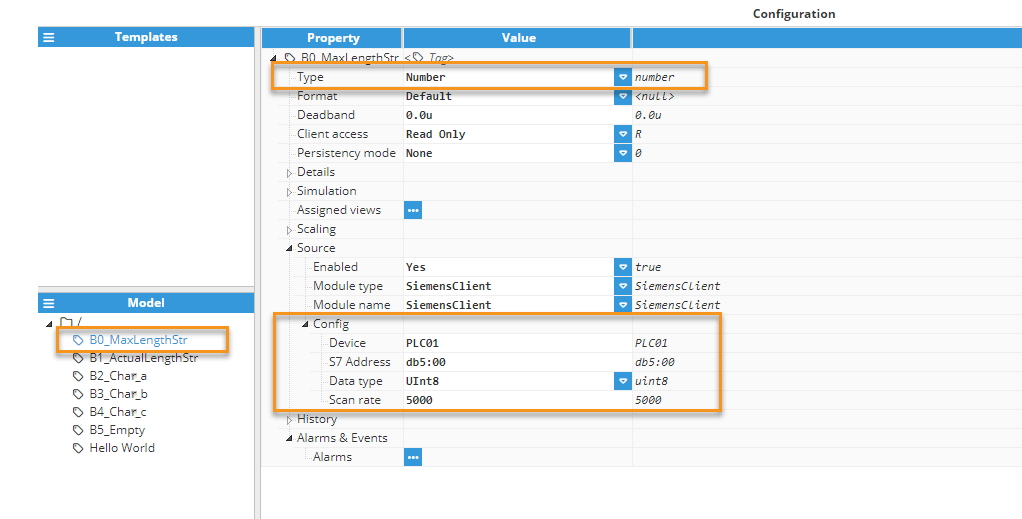
- B0_MaxLengthStr:
- Type: Number
- Source:
- Enable: Yes
- Module type: SiemensClient
- Module name: SiemensClient
- Config:
- Device: PLC01
- S7 address: db5:00
- Data type: UInt8
- Scan rate: 5000
- B1_ActualLengthStr:
- Type: Number
- Source:
- Enable: Yes
- Module type: SiemensClient
- Module name: SiemensClient
- Config:
- Device: PLC01
- S7 address: db5:01
- Data type: UInt8
- Scan rate: 5000
- B2_Char_a:
- Type: Number
- Source:
- Enable: Yes
- Module type: SiemensClient
- Module name: SiemensClient
- Config:
- Device: PLC01
- S7 address: db5:02
- Data type: UInt8
- Scan rate: 5000
- B3_Char_b:
- Type: Number
- Source:
- Enable: Yes
- Module type: SiemensClient
- Module name: SiemensClient
- Config:
- Device: PLC01
- S7 address: db5:03
- Data type: UInt8
- Scan rate: 5000
- B4_Char_c:
- Type: Number
- Source:
- Enable: Yes
- Module type: SiemensClient
- Module name: SiemensClient
- Config:
- Device: PLC01
- S7 address: db5:04
- Data type: UInt8
- Scan rate: 5000
- B5_Empty:
- Type: Number
- Source:
- Enable: Yes
- Module type: SiemensClient
- Module name: SiemensClient
- Config:
- Device: PLC01
- S7 address: db5:05
- Data type: UInt8
- Scan rate: 5000

The following table shows the result of reading this string byte by byte.
| Byte position | Value | Content of the byte |
| Byte_0 | 254 | Max length |
| Byte_1 | 3 | Actual length |
| Byte_2 | 97 (decimal value of ASCII) | a |
| Byte_3 | 98 (decimal value of ASCII) | b |
| Byte_4 | 99 (decimal value of ASCII) | c |
| Byte_5 | 0 (decimal value of ASCII) | empty |
The following example demonstrates how to read directly the string 'test_string_02' containing "Hello World", as visible in the image below.

- Step 8: The tag should now be available and displaying as good quality in the Real-Time display.
