Note:
Before starting the configuration, a new module instance must be created. Click here for more information about creating Module instances.
Module Configuration
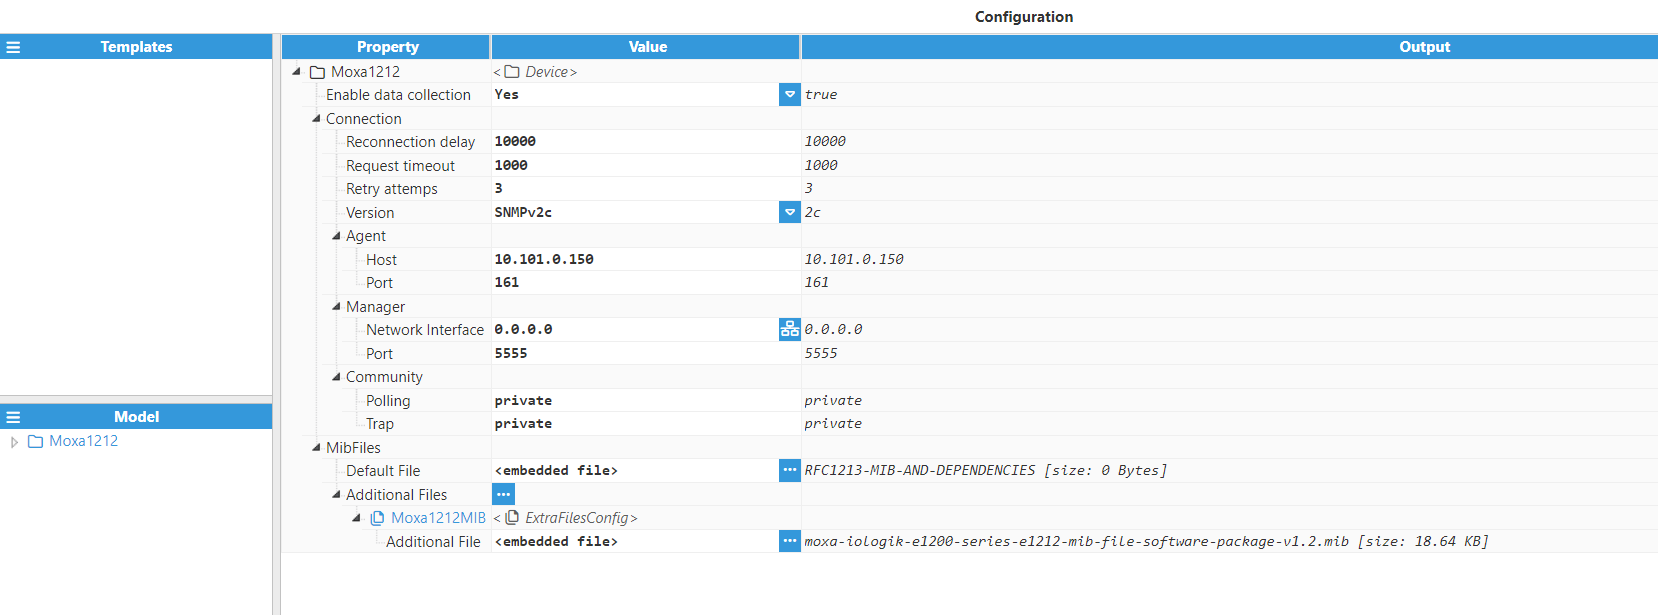
As shown in the previous screenshot, multiple devices can be created in the Model panel by clicking on the burger menu icon. Each connection is named Device. See below for an explanation of the different configuration options.
Device Configuration
Each channel has the following parameters:
- Enable data collection: When Disabled, the connection will remain inactive and all associated tags will remain as Bad-Uninitialized. The default value is set to Enabled.
- Connection:
- Reconnection delay: Time between attempts to re-open the serial port after a failed attempt, displayed in milliseconds. The minimum value is 1,000ms.
- Request timeout: Maximum amount of time to wait for a valid response, displayed in milliseconds. The valid range is 100ms to 600,000ms. The default value is set to 3,000ms.
- Retry attempts: Number of communication retries before considering the target device as unreachable. The valid range is 0 to 100. The default value is 3.
- Version: Protocol version. SNPMv1, SNMPv2c and SNMPv3 versions are available. Note:SNMPv3 is available from N3uron version 1.21.5.
- Agent:
- Host: Hostname/IP address of the target device.
- Port: Agent port number to connect to. The valid range is from 1 to 65535. The default port is the 161.
- Manager:
- Network Interface: Specifies the interface through which the module will be accessible. All interfaces are configured by default (0.0.0.0). The option to browse and discover a network interface is also available by clicking on the button to the right.
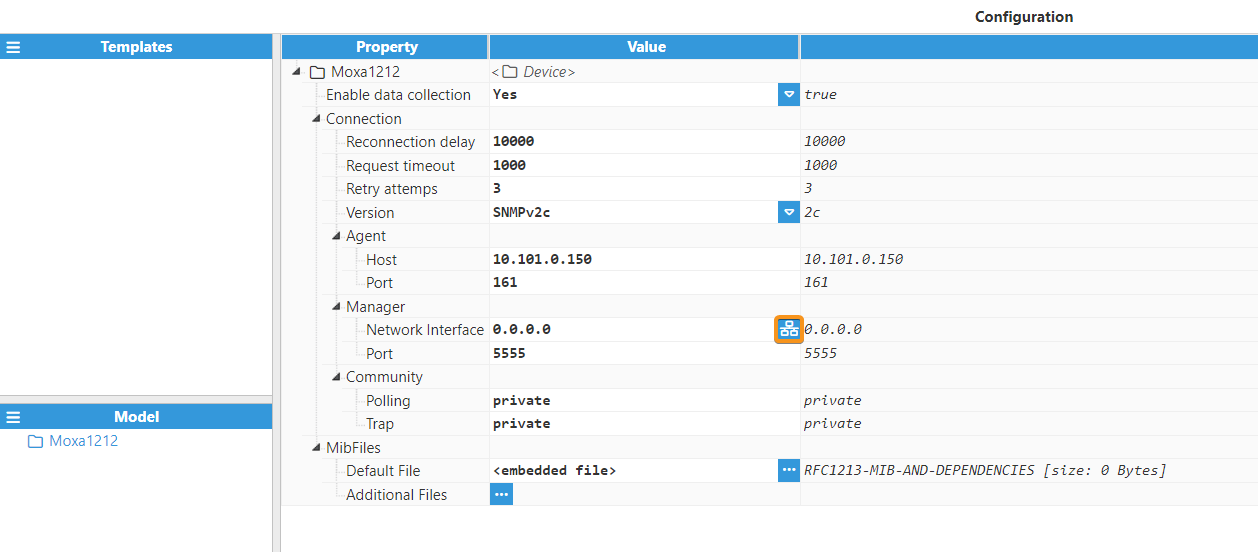
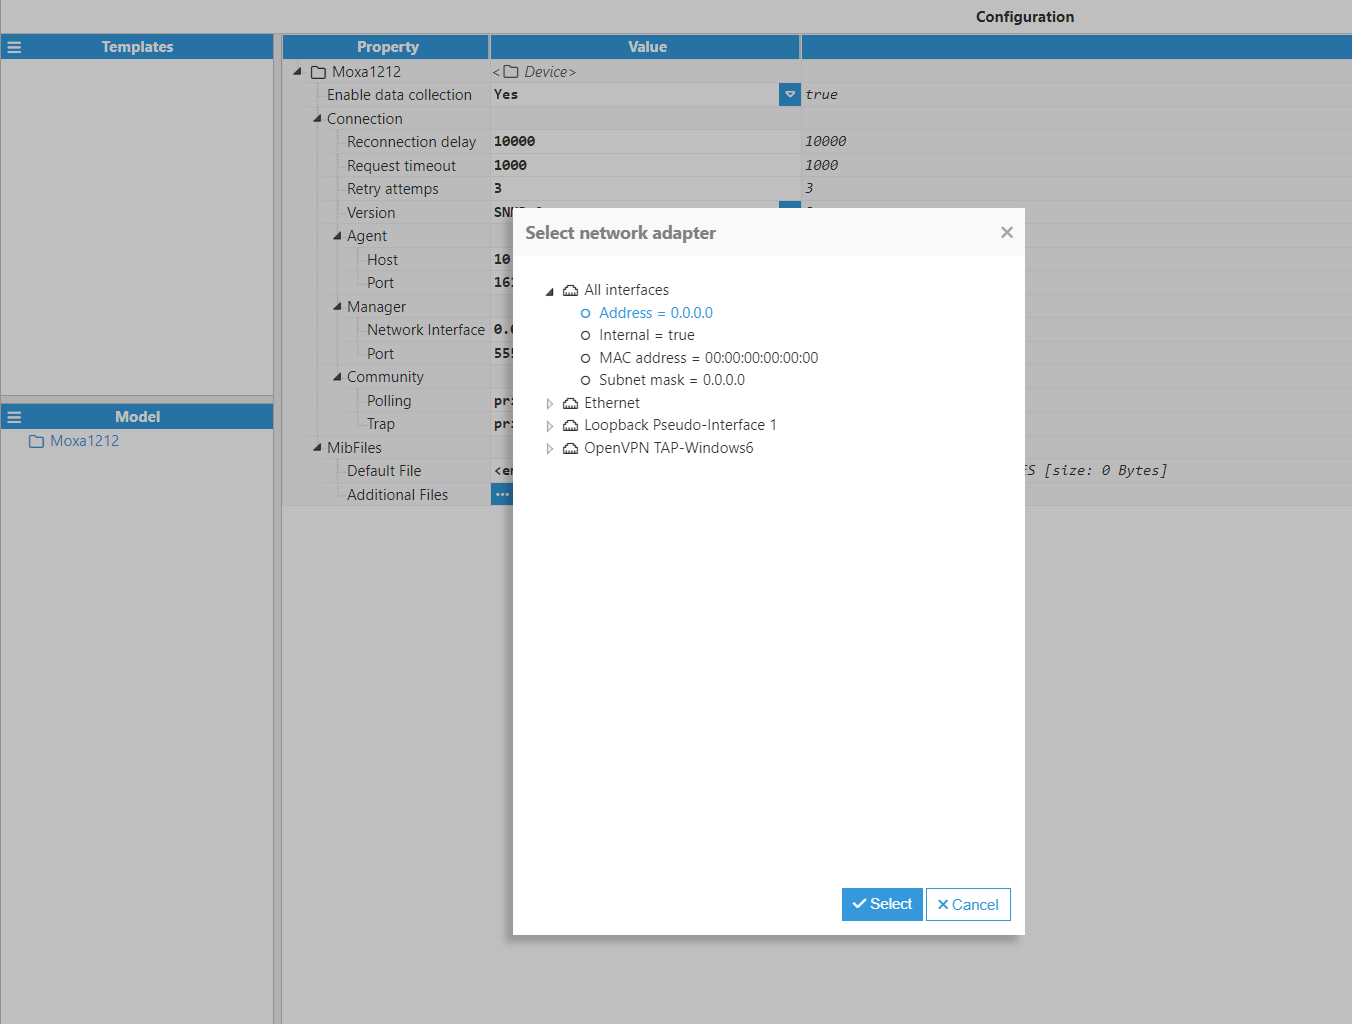
- Port: Port for incoming notifications. The valid range is from 1 to 65535. The default port is 5555.Note:The network interface and the Manager port are specified as this is where we are going to receive the data from the agent.
- Network Interface: Specifies the interface through which the module will be accessible. All interfaces are configured by default (0.0.0.0). The option to browse and discover a network interface is also available by clicking on the button to the right.
- Community: Note:The Community field is only available for SNMPv1 and SNMPv2c.
- Polling: Name of the community configured in the target device to use for polling.
- Trap: Name of the community configured in the target device to use for sending traps.Note:The community name can be defined by the user and depends entirely on the configuration of the remote device. Common options include "public" and "private". The "public" community is usually used for reading data, whereas the "private" community is used for writing data to an Agent.For information on determining the correct community name, refer to the device manufacturer's documentation.
- Authentication:Note:The Authentication field is only available for SNMPv3.
- Username: Enter the username for authentication with the target device. The default Username is username.
- Secure Transfer: Select the security level for transmitting SNMP messages with the target device. This setting determines how SNMP messages are authenticated and encrypted during transmission.
- None: Provides no authentication or encryption.
- Authentication: Provides authentication without encryption.
- Authentication and Privacy: Provides authentication and encryption. Choose the level of security that best suits your network's security needs.
- Authentication password: Enter the authentication key for the target device.
- Authentication method: Select the authentication protocol for secure communication with the target device. This setting determines the algorithm used to authenticate SNMP messages during transmission. The available options are:
- None
- MD5
- SHA: This is the default option.
- SHA224
- SHA256
- SHA384
- SHA512
- Private password: Enter the private key for the target device. This key is used for encrypting and decrypting SNMP messages during transmission.
- Private security method: Select the privacy protocol for encrypted communication with the target device. This setting determines the algorithm used to encrypt SNMP messages during transmission. The available options are:
- None
- DES
- AES: This is the default option.
- AES256b
- AES256r
- Advanced config:
- Engine ID: Enter the SNMP Engine ID for the target device. The Engine ID is a unique identifier used to distinguish between different devices that are using SNMPv3. This setting is used in the authentication and encryption of SNMP messages. If you are unsure what to enter, leave this field blank to use the default settings. However, if you need to configure a specific Engine ID, enter it in the field. Note:Please note that changing the Engine ID may require reconfiguration of the SNMPv3 device. It is recommended to consult the device documentation or a network administrator before changing the Engine ID.
- Context: Enter the SNMP context for the target device. The SNMP context is a specific identifier used to distinguish between different sets of managed objects in SNMPv3. By specifying the context, you can ensure that SNMP messages refer to the correct set of objects. If you are ensure what to enter, leave this field blank to use the default settings. However, if you need to configure a specific context, enter it in the field. Note:Please note that not all SNMPv3 devices require a context to be specified. The use of contexts is optional and depends on the specific device and application. If you are unsure whether a context is required, consult the device documentation or a network administrator.
- Engine ID: Enter the SNMP Engine ID for the target device. The Engine ID is a unique identifier used to distinguish between different devices that are using SNMPv3. This setting is used in the authentication and encryption of SNMP messages. If you are unsure what to enter, leave this field blank to use the default settings. However, if you need to configure a specific Engine ID, enter it in the field.
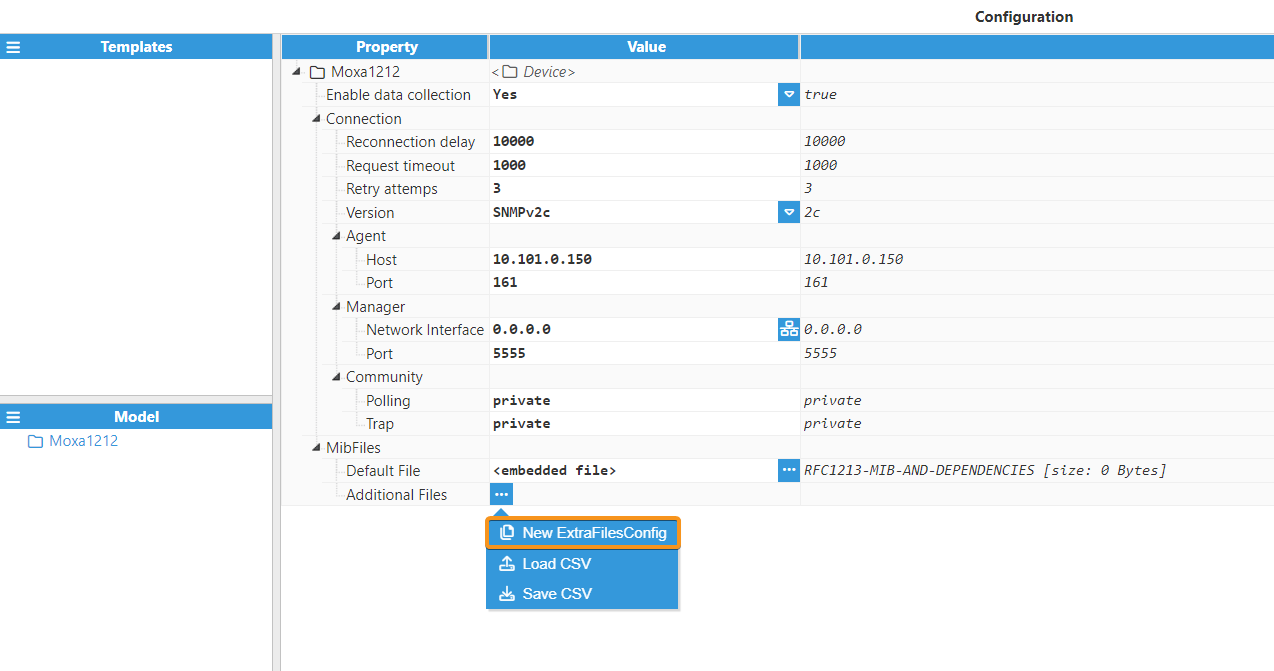
- MibFiles:
- Default File: File that contains the default MIBs used for SNMP data collection. Can be overridden by importing an external file. Default MIB file is RFC1213-MIB, including its dependencies: RFC1155-SMI, RFC-1212, RFC1158-MIB, SNMPv2-SMI and SNMPv2-TC.
- Additional Files: Specifies additional MIB files to be loaded, which will be added to the default MIB file.Note:Adding or importing a MIB module does not guarantee that new tags will be created. Some MIB modules (including those supplied by manufacturers) do not define any accessible objects.
Tag Configuration
The device configuration parameters define the settings used for establishing connections. After configuring these elements, users will be able to create and configure all tags associated with the data received from SNMP devices, as seen in the below example: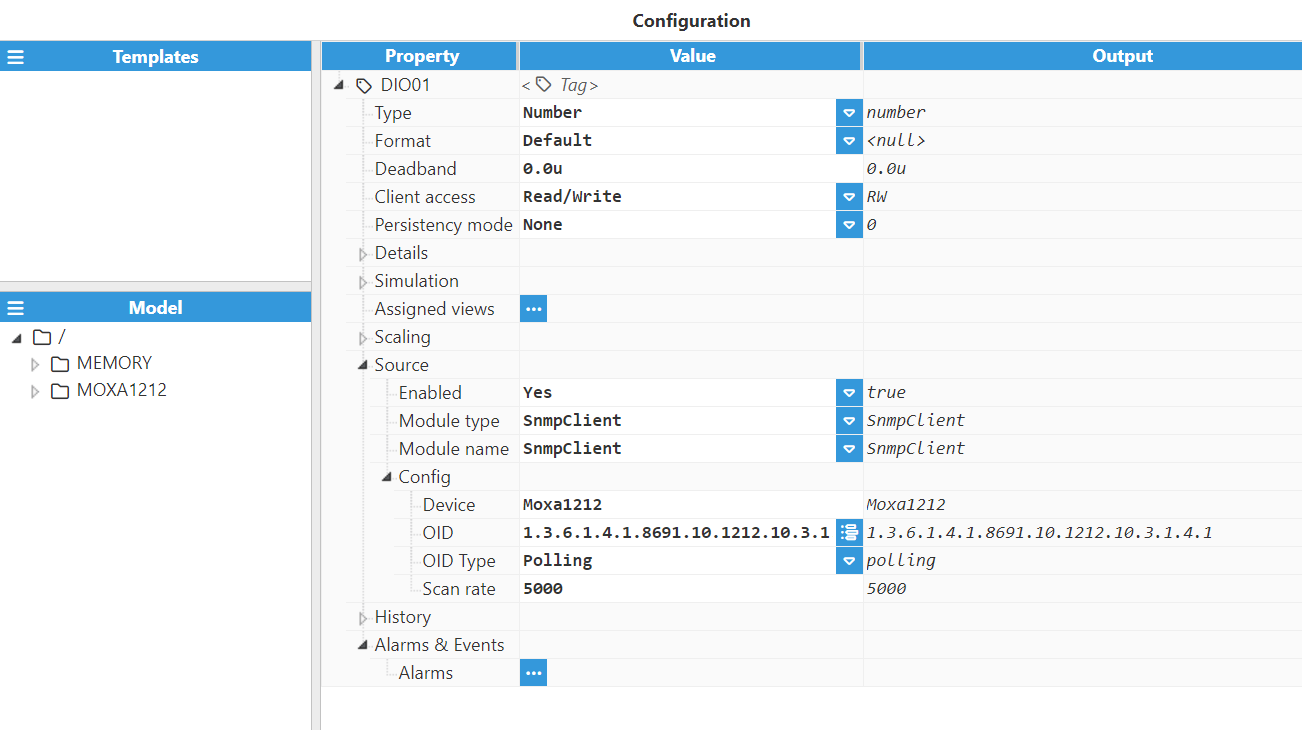
The only mandatory settings that need configuring are those contained within the source section. These parameters are listed below.
- Source:
- Enabled: When Disabled, tags will not be updated with the values received from the device, but instead, will essentially act as memory tags. When set to Enabled, the tag value will be continuously updated with the values received from the field device. The default value is set to Disabled.
- Module type: Defines the driver type used to retrieve values from the field. In this example, SnmpClient must be selected from the drop-down menu. If SnmpClient does not appear in the drop-down menu, it means that this driver has not yet been installed on this machine and therefore, must be installed.
- Module name: Introduce the name of the SNMP Client module instance that we previously created.
- Config:
- Device: Device acting as the data source, specified as <device_name>. The device needs to exist in an SNMP Client module.
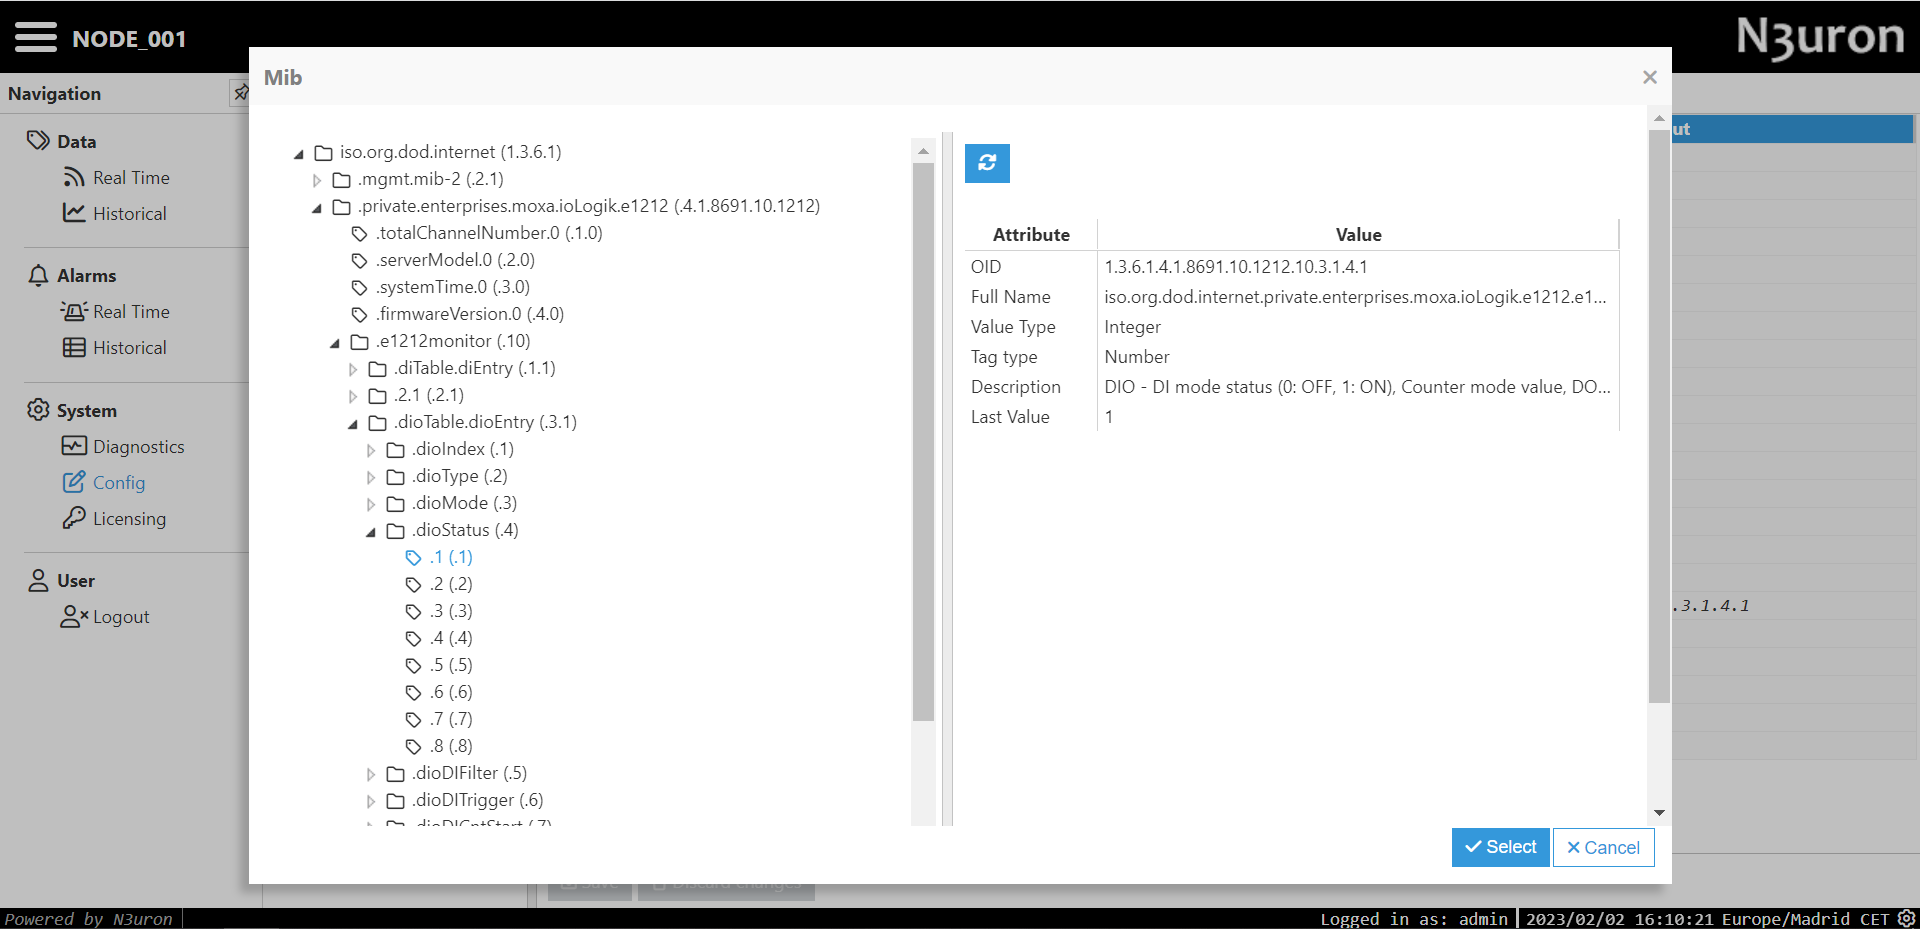
- OID: OID (Object Identifier) value for requesting information. Users can browse for the corresponding OID by clicking on the button on the right-hand side of the OID field. Once the browser is open, the different OIDs with their attributes and values can the be explored.

- OID Type: OID Type. Polling and Trap options are available.Note:SNMP managed devices can be configured to send unsolicited messages known as traps.
- Scan rate: Poll interval for the tag, displayed in milliseconds. The minimum value is 100ms.