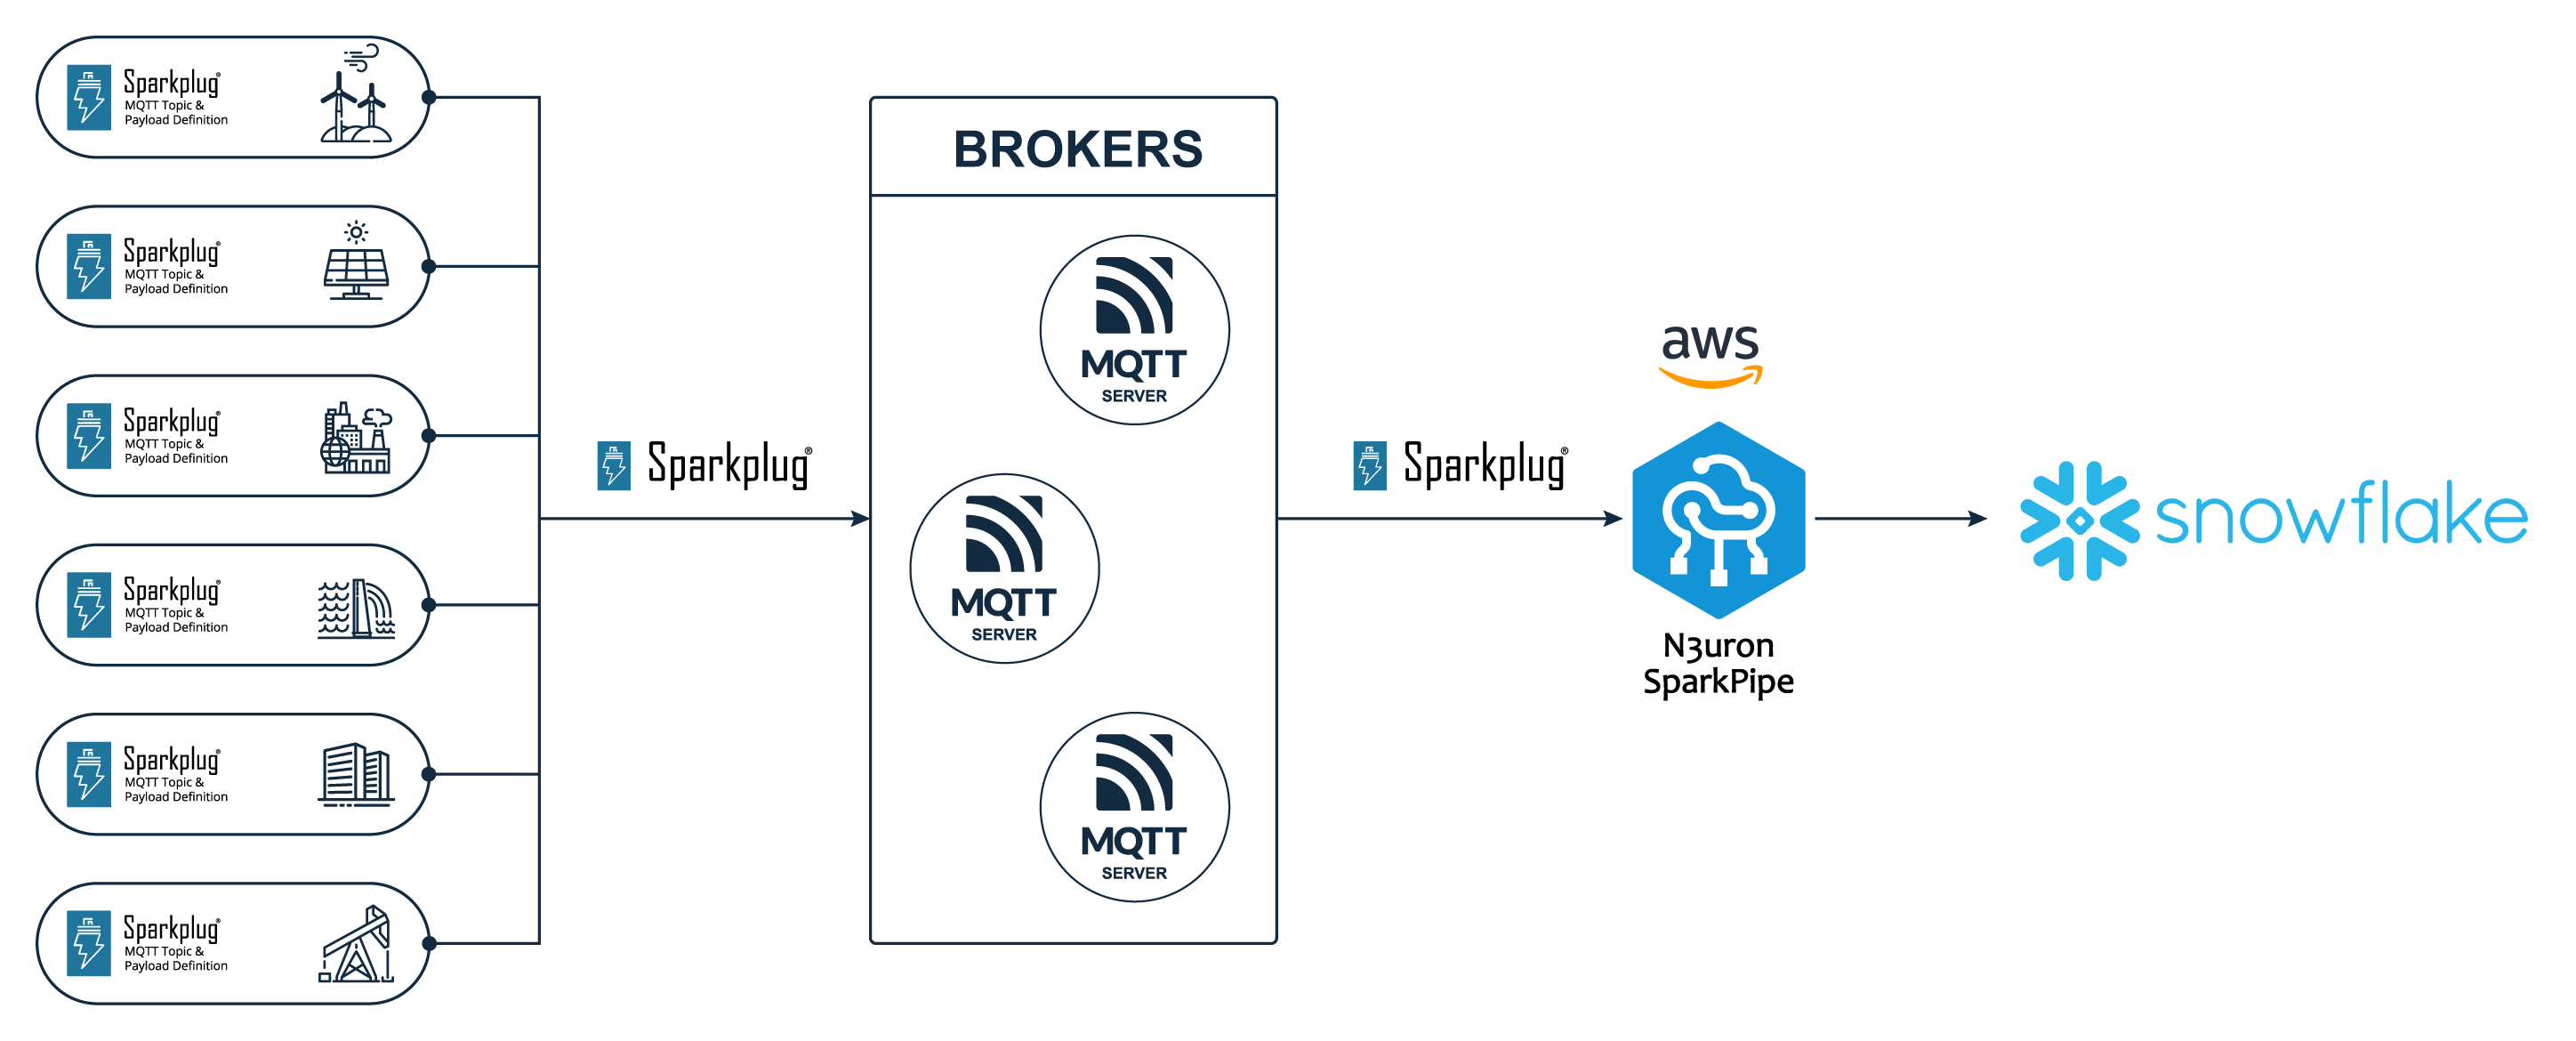
Overview
The SparkPipe connector for Snowflake provides a no-code, zero-ETL and low-latency integration of Sparkplug OT data with the Snowflake cloud platform.
Features
Real-time data ingestion: Leverages the Snowpipe Streaming high-performance API to ingest Sparkplug data with low latency at scale.
Ready-to-use data: Sparkplug data is available to all consumers in a simple SQL table without complex data pipelines or ETL processes.
Full Sparkplug v3 compatibility: Built-in support for all the Sparkplug data types, including arrays and data sets.
Configuration
This is the default configuration for the Snowflake connector:
...
# Connectors configuration
[connectors]
  name = "snowflake"

...
# Snowflake
[connectors.snowflake]
  # The URL to accesss your Snowflake instance, make sure to replace <account-id> with your
  # Snowflake account identifier.
  # See https://docs.snowflake.com/en/user-guide/admin-account-identifier
  url = "https://<account-id>.snowflakecomputing.com"

  # API token to authenticate requests. SparkPipe uses this token to access the SnowPipe Streaming
  # high-performance API for data ingestion.
  api_token = ""

  # Name of the target database in Snowflake.
  database_name = "N3_SPARKPIPE"

  # Name of the target schema in Snowflake.
  schema_name = "PUBLIC"
Set up the database and tables
In this guide, we’ll use a database named N3_SPARKPIPE with the PUBLIC schema. You can customize these if needed.
USE DATABASE N3_SPARKPIPE;
USE SCHEMA PUBLIC;
Use the following SQL command to create the RAW_DATA table. This table stores all the Sparkplug events.
CREATE OR REPLACE TABLE RAW_DATA (
    tag_path        STRING            COMMENT 'The path of this tag in the EdgeNode',
    group_id        STRING            COMMENT 'The name of the Sparkplug Group',
    edge_node_id    STRING            COMMENT 'The name of the Sparkplug Edge Node',
    device_id       STRING            COMMENT 'The name of the Sparkplug Device (optional)',
    datatype        STRING            COMMENT 'The data type of the tag',
    string_value    STRING,
    boolean_value   BOOLEAN,
    integer_value   INTEGER,
    double_value    DOUBLE,
    datetime_value  TIMESTAMP,
    string_array    ARRAY(STRING),
    boolean_array   ARRAY(BOOLEAN),
    integer_array   ARRAY(INTEGER),
    double_array    ARRAY(DOUBLE),
    dataset_value   VARIANT,
    quality         INT              COMMENT 'The data quality if specified',
    properties      VARIANT          COMMENT 'Contains the additional properties as a JSON',
    ts              TIMESTAMP        COMMENT 'The timestamp of the event'
)
CLUSTER BY (ts);
Use the following SQL command to create a PIPE for ingesting data into RAW_DATA. This PIPE parses and inserts each event received from SparkPipe into the RAW_DATA table created earlier.
CREATE OR REPLACE PIPE RAW_DATA_PIPE
AS
COPY INTO RAW_DATA (
  tag_path,
  group_id,
  edge_node_id,
  device_id,
  datatype,
  string_value,
  boolean_value,
  integer_value,
  double_value,
  datetime_value,
  string_array,
  boolean_array,
  integer_array,
  double_array,
  dataset_value,
  quality,
  properties,
  ts
)
FROM (
  SELECT
    $1:tag_path::STRING        AS tag_path,
    $1:group_id::STRING        AS group_id,
    $1:edge_node_id::STRING    AS edge_node_id,
    $1:device_id::STRING       AS device_id,
    $1:datatype::STRING        AS datatype,
    $1:string_value::STRING    AS string_value,
    $1:boolean_value::BOOLEAN  AS boolean_value,
    $1:integer_value::NUMBER   AS integer_value,
    $1:double_value::DOUBLE    AS double_value,
    DATEADD(
      millisecond,
      $1:datetime_value::NUMBER,
      TO_TIMESTAMP_NTZ(0)
    ) AS datetime_value,
    $1:string_array::ARRAY(STRING) AS string_array,
    $1:boolean_array::ARRAY(BOOLEAN) AS boolean_array,
    $1:integer_array::ARRAY(INTEGER) AS integer_array,
    $1:double_array::ARRAY(DOUBLE) AS double_array,
    $1:dataset_value::VARIANT      AS dataset_value,
    $1:properties:"Quality"::INT AS quality,
    $1:properties AS properties,
    DATEADD(
      millisecond,
      $1:ts::NUMBER,
      TO_TIMESTAMP_NTZ(0)
    ) AS ts
  FROM TABLE(
    DATA_SOURCE(TYPE => 'STREAMING')
  )
);
Create an API token in Snowflake
Step 1: Log in to your Snowflake account and go to Settings.
.png)
.png)
Step 2: In Settings, open the Authentication section and click Generate New Token.
.png)
Step 3: Enter a name for the token and, optionally, a description. Then set the expiration time (a long duration is recommended) and click Generate.
.png)
Step 4: Copy or download the token, then use it to set the api_token value in the config.toml file.
.png)