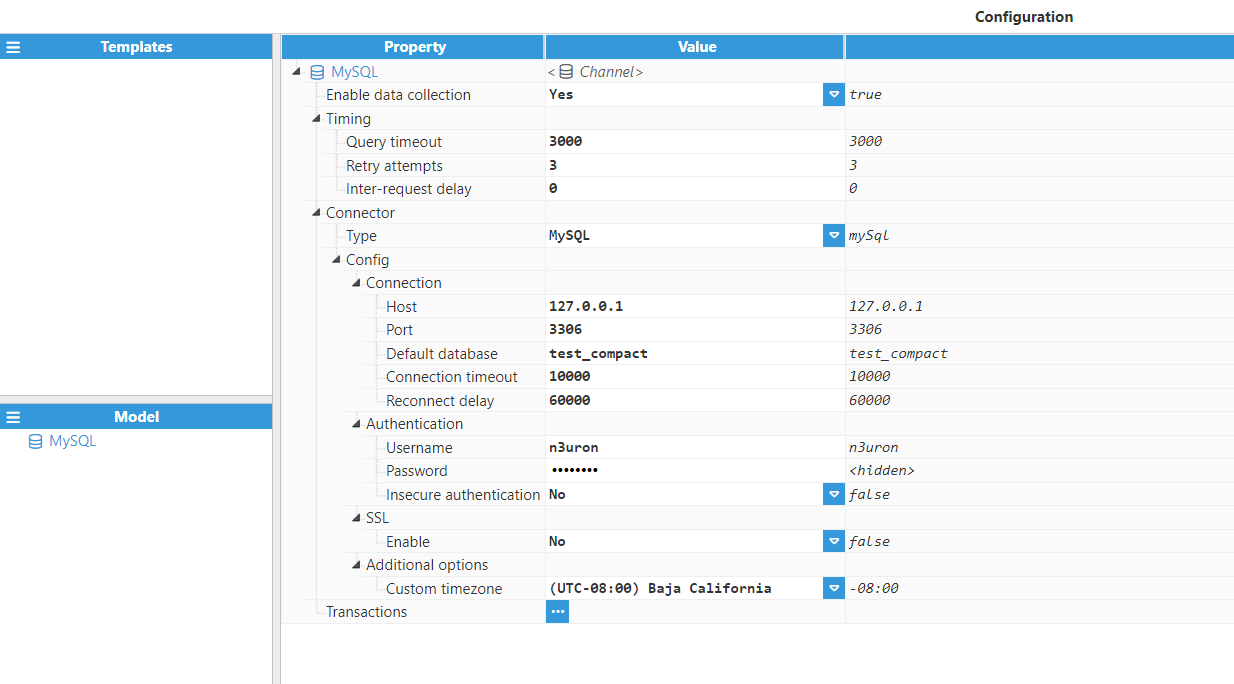
Reading tag and timestamp values from a MySQL database
In this example, SQL Client is used to connect to a MySQL database located in the same machine to extract the following data:
.png)
- Step 1: Configuration of the connection.
- Step 2: Configuration of the transaction.
![]()
The Query script for requesting the required columns from the database:
$.output = "SELECT id, temperature, humidity, status, errorCode, ts FROM test_compact";The Parser script iterates through the Dataset returned from the query, starting by iterating all rows (one row per sensor) and then iterating through the columns for each individual row (one column per signal):
for(const row of $.input.rows()){
  //Iterate through the columns of the Dataset for each row
  for(const col of $.input.columns()){
    //Get the name of the current column
    const column = col.getName();
    $.logger.debug("Column is %s", column);
    //Ignore id and ts columns
    if(column === "id" || column === "ts") continue;
    const tagData = {};
    //Set the destination tag using the format rowid_columnName
    tagData.tag = "sensor"+row.getValue("id")+"_"+column;
    //Get the value of the current column at this row
    tagData.value = row.getValue(column);
    //Set quality to 192
    tagData.quality = 192;
    //Set the ts to the value of the ts column
    tagData.ts = row.getValue("ts");
    $.logger.debug("Tag data is %j", tagData);
    //Push the tag data object to the output array
    $.output.push(tagData);
  }
}
- Step 3: Tag configuration settings for linking the data received from the database to tags.
.png)
Inserting historical data into a database
This example explains how to use a HistoricalTransaction to insert N3uron tag events into a database.
The database in this example is MySQL and as such, a syntax that is compatible with MySQL is used.
- Step 1: The target table should have the following schema:
.png)
- Step 2: The following screenshot shows the HistoryTransaction configuration:
![]()
- Step 3: The following data serialization script is used:
const ds = new Dataset();
//Add all columns that are used to the Dataset
ds.addColumn("tag", "NVARCHAR");
ds.addColumn("number_value", "DOUBLE");
ds.addColumn("string_value", "NVARCHAR");
ds.addColumn("bool_value", "TINY_INT");
ds.addColumn("quality", "TINY_INT");
ds.addColumn("ts", "DATETIME");
for (const event of $.input) {
  const row = {
    //Tag is escaped with the string separator for MySQL
    tag: "'"+event.tag+"'",
    string_value: null,
    number_value: null,
    bool_value: null,
    quality: event.quality,
    ts: event.ts
  }
  //Depending on the type of the event, set the relevant field
  switch (typeof event.value) {
    case "number":
      row.number_value = event.value;
      break;
    case "string":
      //Add string quotes since string values need to be quoted in the query
      row.string_value = sprintf("'%s'", event.value);
      break;
    case "boolean":
      row.bool_value = event.value;
      break;
  }
  //Add the row to the Dataset
  ds.addRow(row);
}

//If the output row count is 0, return empty Dataset
if (ds.getRowCount() === 0) $.output = new Dataset();
else $.output = ds;
- Step 4: The next query builder is used:
//If the input Datasets has no rows, return an empty string to abort the query
if($.input.getRowCount() === 0){
  $.output = ""
} else {
  $.output += _insertData();
}

function _insertData(){
  const values = [];
  //Iterate through all the rows in the input Dataset
  for(const row of $.input){
    //String variable that holds the values to insert for each row
    let rowValues = "(";
    rowValues += row.getValue("tag")+",";
    rowValues += row.getValue("string_value")+",";
    rowValues += row.getValue("number_value")+",";
    rowValues += row.getValue("bool_value")+",";
    rowValues += row.getValue("quality")+",";
    //Timestamp is created using the MySQL function FROM_UNIXTIME(epoch).
    rowValues += sprintf("FROM_UNIXTIME(%d)", row.getValue("ts").getTime()/1000);
    rowValues += ")";
    //Push the row values into the values array
    values.push(rowValues);
  }
  //Return the query
  const query = sprintf("INSERT INTO n3_history (tag, string_value, number_value, bool_value, quality, ts) VALUES "+ values.join(",\r\n"));
  return query;
}
This query will execute in event mode (it only sends new tag events) and the trigger will be a buffer size trigger, which means that the transaction triggers whenever there are 500 events or more in the buffer.
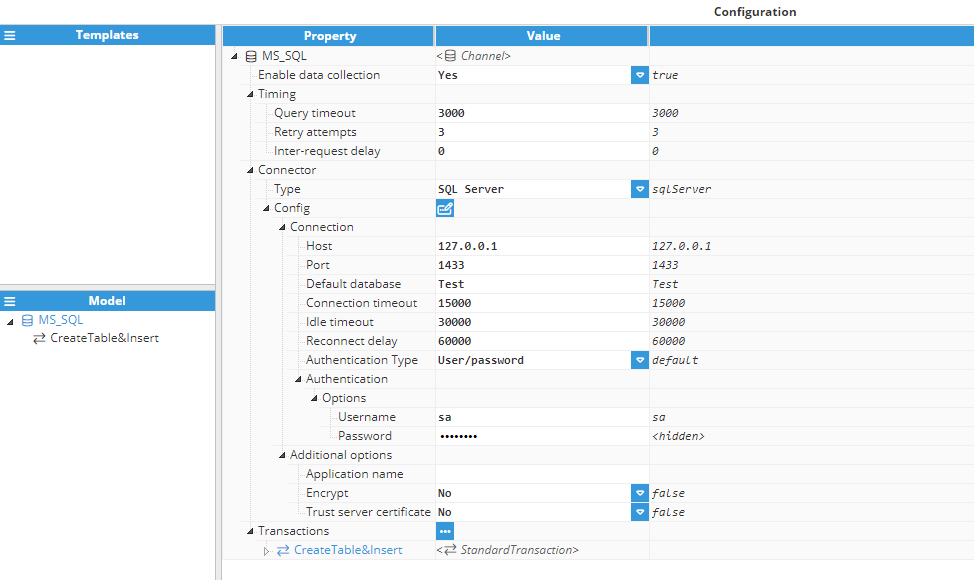
Microsoft SQL Server Table Creation and Insert queries from parameters
This example is designed to automate the process of creating a table in a Microsoft SQL Server database and inserting data into it using a query script. The script first checks if the specified table exists in the database, and if it does not, it creates the table with predefined columns. These columns include an auto-incrementing primary key (id), a timestamp (DateAndTime), and three fields for storing voltage values (VoltageBR, VoltageRY, and VoltageYB). The script generates an SQL query to insert a new row into the table. The row includes the current date and time and voltage data fetched from external parameters. This script is especially useful in scenarios where data needs to be dynamically stored in a database at regular intervals. Additionally, the trigger can be customized to respond to specific events, allowing for flexible data storage based on various conditions.
- Step 1: Configuration of the connection.
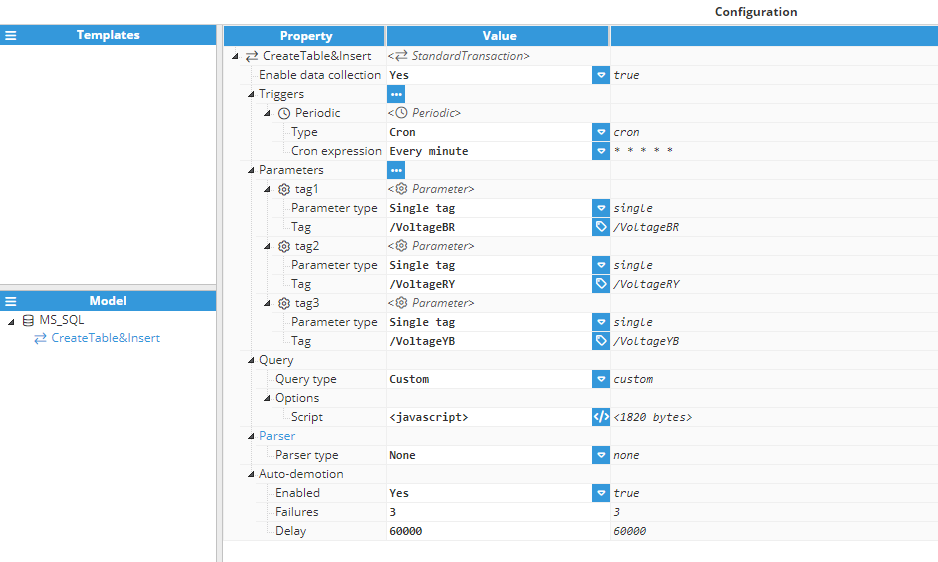
- Step 1: Configuration of the standard transaction includes setting the parameters and defining the trigger. In this case, the trigger is a Cron expression configured to execute the transaction every minute.
- Step 3: Script used to create the query.
// Constant representing the name of the target database table.
// If the table belongs to a specific schema, use the format "schema.table_name".
const TABLE_NAME = "_1MIN";

/**
 * Generates a SQL query to create a table in SQL Server if it doesn't already exist.
 * The table will store data with the following structure:
 * - id: An integer primary key with auto-increment starting from 0.
 * - DateAndTime: A non-nullable datetime field to record the timestamp.
 * - VoltageBR, VoltageRY, VoltageYB: Float fields to store voltage values.
 *
 * @returns {string} The SQL query to create the table.
 */
function _createTableSqlServer() {
  const query = sprintf(
    "IF OBJECT_ID(N'%1$s', N'U') IS NULL BEGIN\
    CREATE TABLE %1$s (\
        \"id\" INT PRIMARY KEY IDENTITY(0, 1),\
        DateAndTime DATETIME2 NOT NULL,\
        VoltageBR FLOAT,\
        VoltageRY FLOAT,\
        VoltageYB FLOAT,\
    )\
    END;\r\n",
    TABLE_NAME
  );
  return query;
}

/**
 * Generates a SQL query to insert data into the SQL Server table.
 * The data includes:
 * - Current date and time.
 * - Voltage values fetched from external parameters (tag1, tag2, tag3).
 *
 * @returns {string} The SQL query to insert the data.
 */
function _insertDataSqlServer() {
  const currentDateTime = new Date().toISOString().slice(0, 19).replace('T', ' ');
  const query = sprintf(
    "INSERT INTO %s (DateAndTime, VoltageBR, VoltageRY, VoltageYB) VALUES ('%s', %f, %f, %f)",
    TABLE_NAME,
    currentDateTime,
    $.parameter.tag1.value,
    $.parameter.tag2.value,
    $.parameter.tag3.value
  );
  return query;
}

// Execute the functions to create the table (if it doesn't exist) and insert data into it.
$.output = _createTableSqlServer();
$.output += _insertDataSqlServer();
Creating Insert queries from parameters
This example deals with a common scenario where several tag values need to be periodically inserted into the database. Although a History Transaction is usually a more efficient way for this task, we will be using a Standard Transaction to illustrate how to work with Parameters. The database connection is assumed to be already created and working.
The syntax used in this example is compatible with MySQL. If the destination database is different, the syntax might require small changes within the query.
- Step 1: Configuration of the transaction.
![]()
- Step 2: Script used to create the query.
const TABLE_NAME = "n3_data";

$.output = insert();

function insert(){
  const query = sprintf("INSERT INTO %s (%s) VALUES (%s)", TABLE_NAME, getColumns().join(","), getValues().join(","));
  return query;
}

function getColumns(){
  const columns = [];
  //Iterate through all the parameters
  for(const p of Object.keys($.parameter)){
    //Use the parameter name as column name, and escape it using the escape character `
    columns.push(sprintf("`%s`", p));
  }
  return columns;
}

function getValues(){
  const values = [];
  //Iterate through all the parameters
  for(const value of Object.values($.parameter)){
    //Cast the value into the appropiate type and push it into the values array
    values.push(cast(value));
  }
  return values;
}
function cast(value){
  //If the value is null, the string NULL is returned
  if(value === null){
      return "NULL";
  }
  switch (typeof value){
    case "number":
      //If the value is a number, return it without changing
      return value;
    case "string":
      //If the value is a string, convert it to a MySQL string using '
      return "'"+value+"'";
    case "boolean":
      //If the value is a boolean, convert it to a 0 or 1 number
      return Number(value);
    default:
    //If the type is none of the above, throw an error since
    //only the above types are supported in this example
      throw new Error("Unknown type for value: "+typeof value);
  }
}
Synchronizing data (from N3uron to a database)
In this example, data from N3uron is going to be synchronized with the database, so that both N3uron and the database contain the same data. The tags that will be synchronized come from an external device (whether this be a PLC, a Modbus device, or an OPC UA Server) and are set up as parameters in the transaction.
This example uses a Standard Transaction since this is the ideal transaction for this scenario.
The destination database in this example is MySQL and as such, the syntax for MySQL is used.
- Step 1: The database destination table has the following schema:
.png)
- Step 2: Configuration settings for StandardTransaction:
![]()
- Step 3: Script used to create the query:
$.output = sprintf("UPDATE `n3_db_sync` SET `setpoint`=%f, `status`='%s', `is_running`=%d",
  $.parameter.setpoint.value,
  $.parameter.status.value,
  $.parameter.is_running.value);
This query will be executed every 5 seconds and will update the "n3_db_sync" table with the current values in N3uron. This table has a single row, which contains the values that were synchronized between N3uron and the database.
Synchronizing data (from the database to N3uron)
This example is analogous to the previous one, except that the data flows in the opposite direction, from a database to N3uron tags.
The destination tags in this example are not SQL Client source tags, instead, they are tags whose sources are other modules, such as Modbus, Siemens S7, etc. Like in the previous example we will use a Standard Transaction. It is important to note that these tags must have Read/Write permissions, otherwise, the write command will not succeed.
The destination database is MySQL, so the MySQL syntax is being used.
- Step 1: The destination table has the following schema:
.png)
- Step 2: The following StandardTransaction configuration is used:
![]()
- Step 3: The query script is as follows:
$.output = "SELECT `product1_demand`, `product2_demand`, `product1_label`, `product2_label`, `line1_active`, `line2_active`, `line3_active`, `line4_active` FROM db_n3_sync";- Step 4: The parser script is as follows:
$.output.push({tag:"/PLC/product1_demand",value:$.input.getValue(0, "product1_demand")});
$.output.push({tag:"/PLC/product2_demand",value:$.input.getValue(0, "product2_demand")});
$.output.push({tag:"/PLC/product1_label",value:$.input.getValue(0, "product1_label")});
$.output.push({tag:"/PLC/product2_label",value:$.input.getValue(0, "product2_label")});
$.output.push({tag:"/PLC/line1_active", value: $.input.getValue(0, "line1_active")});
$.output.push({tag:"/PLC/line2_active", value: $.input.getValue(0, "line2_active")});
$.output.push({tag:"/PLC/line3_active", value: $.input.getValue(0, "line3_active")});
$.output.push({tag:"/PLC/line4_active", value: $.input.getValue(0, "line4_active")});
This transaction will be executed every 5 seconds and will write all data obtained in the first row of the query to the specified tags.
Data Transformation: Converting Stringified JSON into Tag Data
In this example, a SQL client connects to a local MySQL database to extract specific data. The script iterates through rows and focuses on particular 'System' values. Once this data is selected, it is organized into individual JSON objects. These objects are then converted into strings before being passed to tags of string type. These tags can be further used, for example, by publishing their values through an MQTT client.
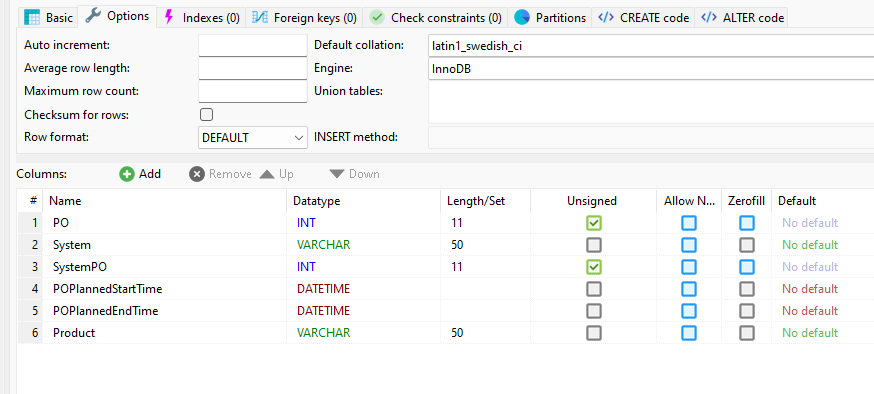
- Step 1: The source table has the following schema:
- Step 2: The source table has the following data:
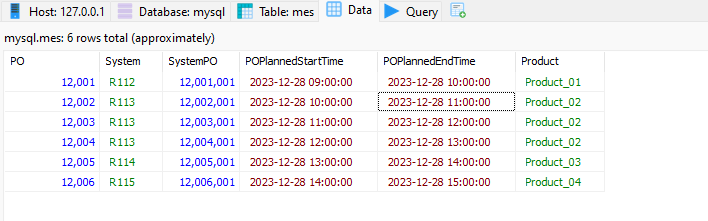
- Step 3: The query script is as follows:
// TABLE_NAME => name of the target table of the database. For tables within a schema the name would be "schema.table_name"
const TABLE_NAME = "mes";

// WHERE => clause used in the SELECT query. It may be left blank when no WHERE clause is required.
const WHERE = "";

//COLUMNS => Array of the column names to retrieve from the table. Using "*" wildcard retrieves all columns from the table.
const COLUMNS = [
  "PO",
  "System",
  "SystemPO",
  "DATE_FORMAT(POPlannedStartTime, '%Y-%m-%d %H:%i:%s') AS POPlannedStartTime",
  "DATE_FORMAT(POPlannedEndTime, '%Y-%m-%d %H:%i:%s') AS POPlannedEndTime",
  "Product"
  ];

// The output can be generated using the select() function to retrieve data from the database.
$.output = select();

// This function returns a SELECT query used to retrieve data from the database
function select(){
  let query = sprintf("SELECT %s FROM %s", COLUMNS.join(","), TABLE_NAME);
  // WHERE is added to the query if not blank.
  if(WHERE !== ""){
      query += " WHERE " + WHERE;
  }
  return query;
}
- Step 4: The parser script is as follows:
// INDEX_COLUMN => Column containing the tagpath (or alias) of the target tag. // - If present, the tagpath (or alias) will be INDEX_COLUMN_VALUE.CURRENT_COLUMN_NAME. // - If empty (""), the tagpath (or alias) will be the current column name directly. const INDEX_COLUMN = "System"; // QUALITY_COLUMN = Column containing the quality of the tag. If empty (""), Good quality (192) will be used. const QUALITY_COLUMN = ""; // DATE_COLUMN => Column containing the timestamp in DATETIME or equivalent type such as TIMESTAMP for PostgreSQL. // If empty (""), NOW() will be used. const DATE_COLUMN = ""; const systemValues = ['R112', 'R113', 'R114', 'R115']; const filteredData = {}; for (const row of $.input.rows()) { const systemValue = row.getValue('System'); if (systemValues.includes(systemValue)) { if (!filteredData[systemValue]) { filteredData[systemValue] = []; } const rowObject = {}; for (const column of $.input.columns()) { const columnName = column.getName(); const columnValue = row.getValue(columnName); $.logger.debug("%s: %s", columnName, columnValue); if (columnValue !== null && columnName !== 'System') { rowObject[columnName] = columnValue; } } filteredData[systemValue].push(rowObject); } } // Store the accumulated JSON for 'R112' and 'R113' in separate tags for (const system in filteredData) { if (Object.hasOwnProperty.call(filteredData, system)) { const jsonString = JSON.stringify(filteredData[system]); $.output.push({ tag: `${system}`, value: jsonString, quality: 192 }); } } - Step 5: Tag configuration settings for linking the data received from the database to tags.

- Step 5: Real-time Tag data visualization.

- Step 6: The internal structure of the tags.
[
  {
    PO: 12002,
    SystemPO: 12002001,
    POPlannedStartTime: "2023-12-28 10:00:00",
    POPlannedEndTime: "2023-12-28 11:00:00",
    Product: "Product_02",
  },
  {
    PO: 12003,
    SystemPO: 12003001,
    POPlannedStartTime: "2023-12-28 11:00:00",
    POPlannedEndTime: "2023-12-28 12:00:00",
    Product: "Product_02",
  },
  {
    PO: 12004,
    SystemPO: 12004001,
    POPlannedStartTime: "2023-12-28 12:00:00",
    POPlannedEndTime: "2023-12-28 13:00:00",
    Product: "Product_02",
  },
];
Resilient Data Handling: Resuming from the Last Timestamp After Database Disconnections
Intermittent database disconnections can interrupt data retrieval and processing, risking data loss and duplication. This example presents a strategy that leverages the last timestamp captured during query execution as a recovery point. By storing this timestamp, the system seamlessly resumes data processing from where it left off upon reconnection—ensuring no duplicates and maintaining data integrity. Once processed, the data can be forwarded to other systems via delivery modules such as MQTT Client or OPC-UA Server.
This is the PostgreSQL table named turbine_data, which stores analog sensor readings for turbine gearbox temperature, shaft-bearing temperature, and wind speed.
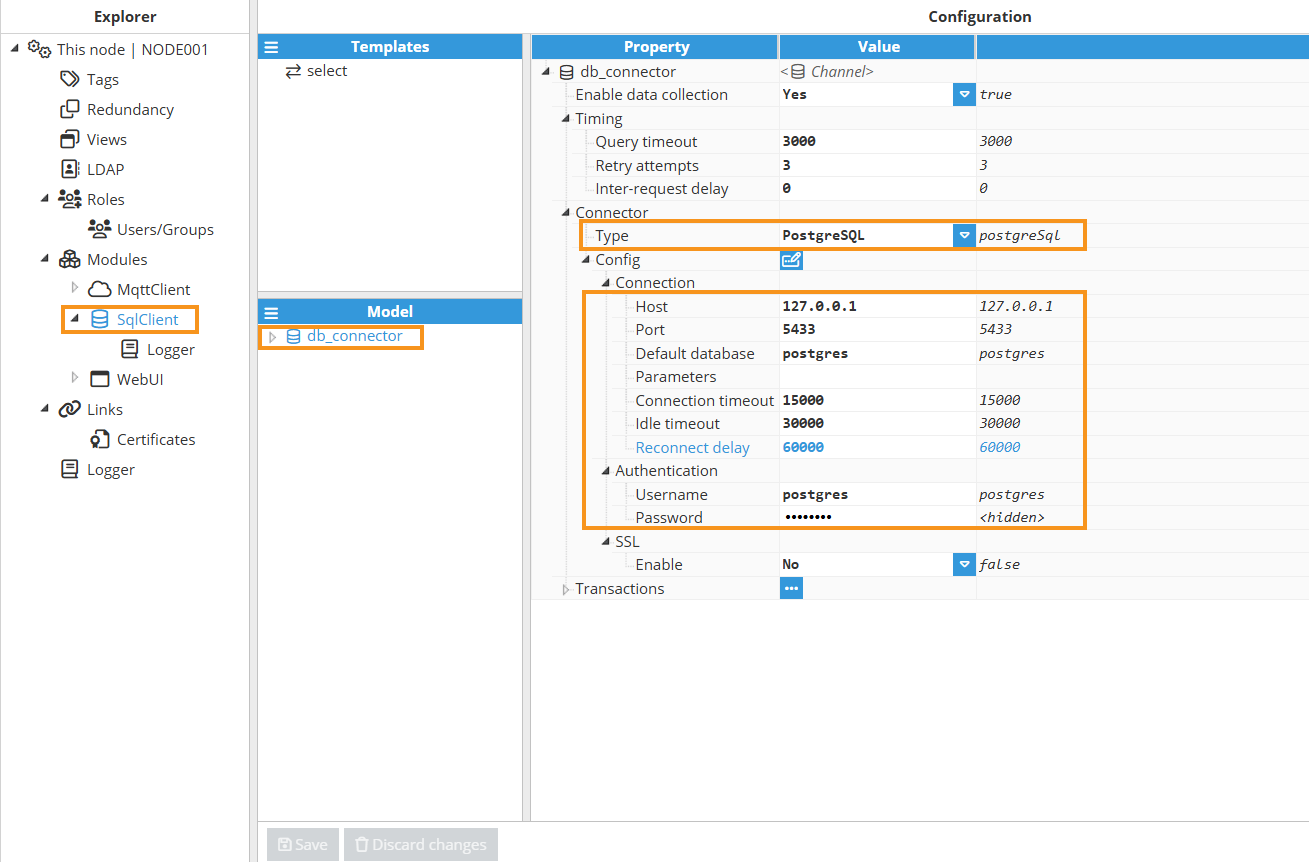
- Step 1: Create a channel, for example, named db_connector.
- Step 2: Choose a connector type from options like MariaDB, MySQL, SQL Server, PostgreSQL, OracleDB, or TimescaleDB. In this example, we select PostgreSQL.
- Step 3:
- Connection settings: Host, Port, Default Database.
- Authentication: Username and Password.
- You can leave other settings at their defaults or adjust them as needed.
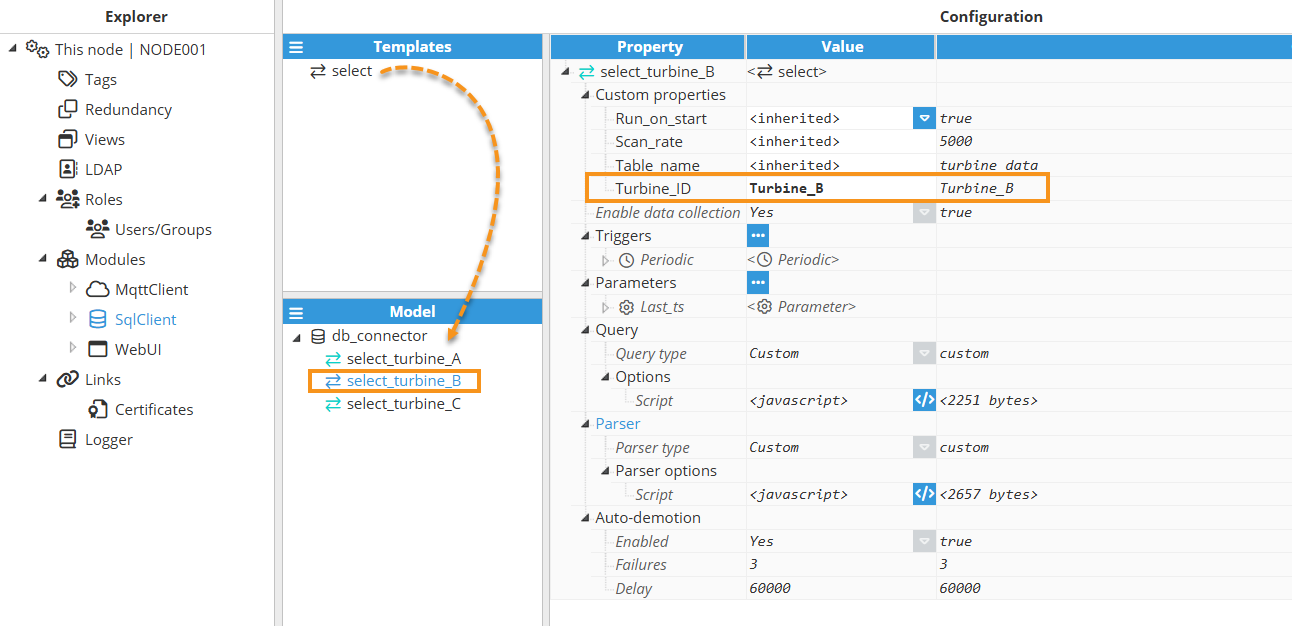
- Step 4: Create a new Standard Transaction in the Template section and name it select for instance, since the SELECT statement is used to query the database.

- Step 5: Create the following Custom properties:
- Run_on_start: Determines whether the trigger should execute automatically upon restart.
- Scan_rate: Specifying the scan rate for the periodic trigger, expressed in milliseconds.
- Table_name: Specifies the name of the database table. This custom property is used to construct the query.
- Turbine_ID: Specifies the turbine identifier used in the WHERE clause to filter rows by the turbine_id column in the database.
- Step 6: Create a Single tag parameter named Last_ts.
- Purpose:
- Provides the path to the tag that holds the last timestamp read from the database at the time of transaction execution.
- Usage in Query Script:
- Reads the current tag value of Last_ts to retrieve the last recorded timestamp.
- Uses this timestamp in the WHERE clause to filter rows with a timestamp greater than the stored value.
- Usage in Parser Script:
- Provides the path to the tag for updating the last timestamp after the transaction completes.Note:Always use parameters to read tag values within both Query and Parser scripts.
- Provides the path to the tag for updating the last timestamp after the transaction completes.
- Purpose:
.png)
- Step 7: Create the query script using the default SQL Client query template.
- 1) Extract the Last Timestamp: Retrieves the Last_ts parameter (expected in the "2025-02-10T14:42:56.000Z" format) to serve as the starting point for the query.
- 2) Sets the TABLE_NAME variable to specify the target table, using the value from the Table_name Custom Property enclosed in curly braces.Note:In Templates, access Custom Property values by enclosing the property name in curly braces.
- 3) Extract the turbine ID from the Turbine_ID Custom Property and remove any double quotes to ensure proper formatting for SQL queries.
- 4) Construct the WHERE Clause:
- Begins with a mandatory filter using the turbine ID.
- Dynamically appends a time filter time_stamp > last_ts if last_ts is not null or undefined.
- 5) Defines the COLUMNS array, listing the specific fields to be selected; time_stamp, temp_shaftbearing, temp_gearbox, and wind_speed.
- 6) Generate the SQL Query:
- Calls the select() function to build the SQL SELECT query using the specified columns, table name, and WHERE clause.
- The query is appended with an ORDER BY time_stamp ASC clause for consistent result ordering by timestamp.
- The generated query is logged for debugging and then assigned to $.output for further processing by the Parser script.
.png)
- Complete Javascript code for the Query script:
// ----------------------------------------------------------------------------- // Parameter Extraction and Logging // ----------------------------------------------------------------------------- // Retrieve the 'last_ts' parameter, which indicates the starting timestamp // for the SQL query. The expected format is "2025-02-10T14:42:56.000Z". const last_ts = $.parameter.Last_ts.value; $.logger.debug("Retrieved Last Timestamp: %s", last_ts); // ----------------------------------------------------------------------------- // Table and Turbine Identifier // ----------------------------------------------------------------------------- // Define the target table name. const TABLE_NAME = {Table_name}; // Extract the turbine identifier from parameters and sanitize it by removing any // double-quote characters. This ensures the turbine ID is properly formatted for SQL queries. const turbine_id = {Turbine_ID}.replace(/"/g, ""); // ----------------------------------------------------------------------------- // Dynamic WHERE Clause Construction // ----------------------------------------------------------------------------- // Initialize the WHERE clause with the condition to filter rows by the turbine identifier. let WHERE = `turbine_id = '${turbine_id}'`; // If a last timestamp is provided, add an additional condition to only include records // with a time_stamp greater than the provided value. The "::timestamptz" cast ensures // that the timestamp is interpreted with time zone awareness. if (last_ts) { WHERE += ` AND time_stamp > '${last_ts}'::timestamptz`; } // ----------------------------------------------------------------------------- // Column Selection Setup // ----------------------------------------------------------------------------- // Define the list of columns to retrieve from the database. These columns should // match the ones available in the target table. Comments next to each column clarify // their role or the type of data they represent. const COLUMNS = [ "time_stamp", // Timestamp when the data record was captured. "temp_shaftbearing", // Temperature reading for the shaft bearing. "temp_gearbox", // Temperature reading for the gearbox. "wind_speed" // Measured wind speed related to turbine performance. ]; // ----------------------------------------------------------------------------- // SQL Query Generation // ----------------------------------------------------------------------------- // Generate the SQL SELECT query using the helper function and assign it to the output // for further processing in the system. $.output = select(); /** * Constructs a SQL SELECT query based on defined parameters. * * This function dynamically builds a SQL query string by: * - Selecting specific columns from the designated table. * - Incorporating a dynamically built WHERE clause that filters results by the * turbine identifier and, optionally, a starting timestamp. * - Appending an ORDER BY clause to ensure results are returned in ascending order * by the 'time_stamp' column. * * The constructed query is logged for debugging purposes. * * @returns {string} The complete SQL query string ready for execution. */ function select() { // Build the basic SELECT statement by joining the specified columns and appending the table name. let query = sprintf("SELECT %s FROM %s", COLUMNS.join(","), TABLE_NAME); // If the WHERE clause is non-empty, attach it to the query to filter the results. if (WHERE !== "") { query += ` WHERE ${WHERE}`; } // Append an ORDER BY clause to sort the query results by 'time_stamp' in ascending order. query += " ORDER BY time_stamp ASC"; // Log the complete query for debugging to verify the dynamic construction. $.logger.debug("Generated SQL query: %s", query); // Return the fully constructed SQL query string. return query; } - Step 8: Create the parser script using the default SQL Client parser template.
- 1) DATE_COLUMN is set to time_stamp, which provides the timestamp for each row.
- 2) With SKIP_NULL set to true, any column with a null value is skipped during processing.
- 3) A variable lastTimestamp is initialized to store the most recent timestamp encountered during row processing.
- 4) Row and Column Processing: The script iterates over each row and, within each row, over each column.
- 5) Event Object Creation: Create an empty object to hold the event data for the current column.
- 6) Event Tag Assignment: In the parser, you can assign an "alias" to the event's tag attribute. When using SQL Client as the source, this alias is known as a Tag address, in the tag configuration. If no Tag address is provided, you must use the full tag path (e.g., /Turbine_A/wind_speed, /Turbine_B/wind_speed). In the parser script, if INDEX_COLUMN is empty, the tag is constructed from the column name (e.g., wind_speed, temp_shaftbearing, temp_gearbox).
.png) Note:Using Tag address simplifies tag referencing by avoiding long, complex tag paths. This enhances configuration clarity and maintainability, as the tag address alias provides a concise reference within the Parser script code.
Note:Using Tag address simplifies tag referencing by avoiding long, complex tag paths. This enhances configuration clarity and maintainability, as the tag address alias provides a concise reference within the Parser script code. - 7) Event Value Assignment: The event’s value is set to the current column’s value.
- 8) Event Timestamp Assignment :
- The timestamp from the DATE_COLUMN is converted to an epoch time and assigned to the event.
- The lastTimestamp variable is updated with the ISO string representation of the DATE_COLUMN value.
- 9) Append the constructed event to the output array.
- 10) After processing all rows, if a lastTimestamp is not null or undefined, a separate event is appended. This event uses the tag defined by $.parameter.Last_ts.tag and has the lastTimestamp as its value.
.png)
- Complete Javascript code for the Parser script:
// ----------------------------------------------------------------------------- // Configuration Parameters // ----------------------------------------------------------------------------- // INDEX_COLUMN: Specifies the column that contains a tag alias or path. // - When defined (non-empty), the final tag name is built by concatenating the // value from this column and the current column name (format: "INDEX_VALUE.COLUMN_NAME"). // - When empty, the column name itself is used as the tag name. const INDEX_COLUMN = ""; // QUALITY_COLUMN: Specifies the column that contains the tag quality indicator. // - When defined, the tag quality is extracted from this column. // - When empty, a default quality value of 192 (representing 'Good') is assumed. const QUALITY_COLUMN = ""; // DATE_COLUMN: Specifies the column that contains the timestamp (e.g., DATETIME or TIMESTAMP). // - When defined, the tag's timestamp is taken from this column. // - When empty, the current system time (NOW) will be used. const DATE_COLUMN = "time_stamp"; // SKIP_NULL: If set to true, any field with a null value is skipped during processing. const SKIP_NULL = true; // ----------------------------------------------------------------------------- // Debug Logging // ----------------------------------------------------------------------------- // Log the complete input object for debugging purposes. $.logger.debug("Input: %s", JSON.stringify($.input)); // ----------------------------------------------------------------------------- // Initialization // ----------------------------------------------------------------------------- // Variable to track the last timestamp encountered in the dataset. let lastTimestamp = null; // ----------------------------------------------------------------------------- // Main Processing Loop // ----------------------------------------------------------------------------- // Iterate over each row in the input data. for (const row of $.input.rows()) { // Iterate over each column in the current row. for (const column of $.input.columns()) { const columnName = column.getName(); // Retrieve the name of the current column // If SKIP_NULL is enabled and the current column's value is null, skip processing this field. if (row.getValue(columnName) === null && SKIP_NULL) continue; // Skip processing columns that are used as metadata (INDEX_COLUMN, QUALITY_COLUMN, DATE_COLUMN). if ( columnName === INDEX_COLUMN || columnName === QUALITY_COLUMN || columnName === DATE_COLUMN ) { continue; } // ------------------------------------------------------------------------- // Build the Tag Event // ------------------------------------------------------------------------- // Create an empty object to hold the event data for the current column. const event = {}; // Determine and set the tag name: // - If INDEX_COLUMN is provided, build the tag as "INDEX_VALUE.COLUMN_NAME". // - Otherwise, simply use the column name as the tag. if (INDEX_COLUMN !== "") { event.tag = sprintf("%s.%s", row.getValue(INDEX_COLUMN), columnName); } else { event.tag = columnName; } // Set the tag value from the current column. event.value = row.getValue(columnName); // Set the tag quality: // - If QUALITY_COLUMN is provided, extract the quality from that column. // - Otherwise, a default quality of 192 (Good) is assumed (per configuration). if (QUALITY_COLUMN !== "") { event.quality = row.getValue(QUALITY_COLUMN); } // Set the timestamp for the tag: // - If DATE_COLUMN is provided, extract the timestamp from that column, // convert it to epoch time (milliseconds), and update the lastTimestamp tracker. // - Otherwise, the current timestamp (NOW) would be used (implied by system defaults). if (DATE_COLUMN !== "") { const dateValue = row.getValue(DATE_COLUMN); event.ts = dateValue.getTime(); // Convert timestamp to epoch (milliseconds) lastTimestamp = dateValue.toISOString(); // Record the last timestamp in ISO format } // Append the constructed event to the output array. $.output.push(event); } } // ----------------------------------------------------------------------------- // Append Final Timestamp Event // ----------------------------------------------------------------------------- // After processing all rows, if a timestamp was encountered, create an additional // event to record the last timestamp. The tag for this event is specified by // $.parameter.Last_ts.tag. if (lastTimestamp !== null) { $.output.push({ tag: $.parameter.Last_ts.tag, value: lastTimestamp }); } - Step 9: Instantiate the standard transaction Template, named select, for each turbine.
- Step 10: Navigate to System > Config > Tags and create a new Template named Turbine.
- Step 11: Create the following Custom Properties:
- Module_name: Specifies the name of the SQL Client module instance.
- Transaction: Sets the transaction name, combining the channel (e.g., db_connector) with the transaction identifier (e.g., select_turbine_A).
.png)
- Step 12: Create the following tags within the Template:
- Last_TS: A memory tag (without a source) with read-write permissions and disk persistence, ensuring its value is retained even after a system restart. It stores the last timestamp recorded in the database when the SQL transaction is executed.
.png)
- temp_gearbox: A read-only tag sourced from the SQL Client module. Its value represents the gearbox temperature in degrees Celsius.
.png)
- temp_shaftbearing: A read-only tag sourced from the SQL Client module. Its value represents the shaft-bearing temperature in degrees Celsius.
.png)
- wind_speed: A read-only tag sourced from the SQL Client module. Its value represents the wind speed in meters per second.
.png)
- Last_TS: A memory tag (without a source) with read-write permissions and disk persistence, ensuring its value is retained even after a system restart. It stores the last timestamp recorded in the database when the SQL transaction is executed.
- Step 13: Instantiate the Turbine Template in the tag model, assigning appropriate names (e.g., Turbine_A, Turbine_B, and Turbine_C), and update the corresponding Custom Properties accordingly.
.png)
- Step 14: Verify in the Diagnostics window that the SQL Client configuration is correct and that data is being successfully retrieved from the database.
.png)
- Step 15: If no issues are found in Diagnostics, navigate to Data > Realtime to view the data retrieved from the database. Once everything is set up, you’ll notice that if the SQL Client disconnects from the database, the corresponding tags will show a BAD quality. When the connection is restored, the SQL Client resumes data retrieval from the last recorded timestamp up to the most recent entry, ensuring that no data is lost, and showing GOOD quality in the tags. Additionally, this data can be delivered using other protocols such as MQTT, OPC UA, Modbus, and more.
.png)