API Configuration
API parameters define the communication settings between the module and N3uron's bootstrap.
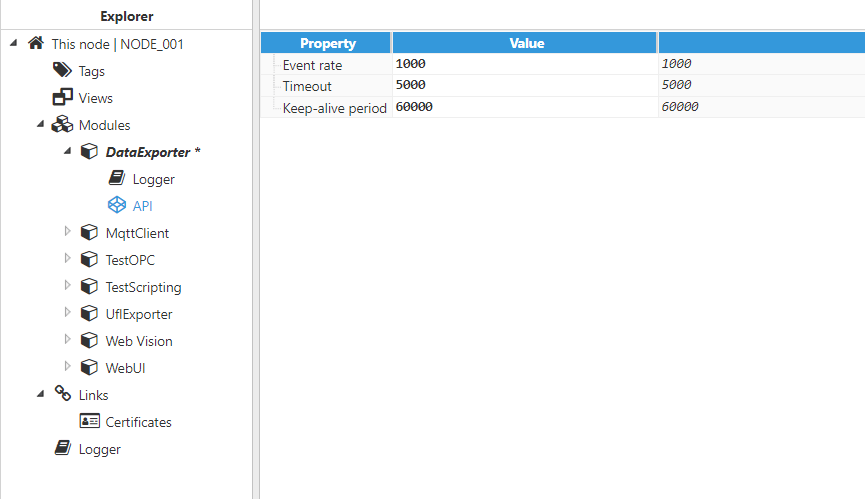 Figure 3: API parameters
The API configuration settings include the following parameters:
- Event rate: Determines the Event exchange rate between bootstrap and the module, displayed in milliseconds. The default value is 1,000ms with a minimum value of 100ms.
- Timeout: Maximum wait time for a response from bootstrap, displayed in milliseconds. The minimum value is 100ms and default value is 5,000ms. For nodes dealing with a large number of tags, this time can be increased to avoid timeouts when communicating with bootstrap.
- Keep-alive period: Time between keep-alive checks with bootstrap, displayed in milliseconds. Set to 0 to disable keep-alive checks for this module. The default value is 60,000ms. When the module fails to respond to keep-alive requests, bootstrap will automatically restart the module process.
Once the API parameters have been set, the configuration settings must be saved and the module needs to be restarted in order to apply the new values.
Logger Configuration
These parameters define how the module logs activity.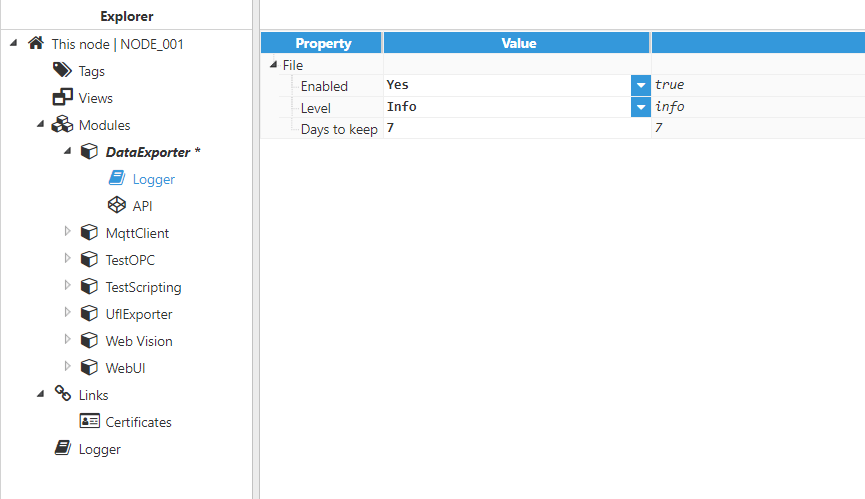 Figure 4: Logger configuration
Parameters:
- Enabled: When enabled, the module sends logs to a text file located at <installation_folder>/n3uron/log/<module_name>. The default value is set to enabled.
- Level: Level of detail provided in the information sent to the log file.
- Error: Only logs errors.
- Warning: Logs errors and warnings.
- Info (default): Logs errors, warnings, and general information messages.
- Debug: Logs most module activity for debugging and troubleshooting purposes.
- Trace: Logs full module activity. This mode may log large amounts of data and for this reason, it is not recommended for production environments.
- Days to keep: Log files are automatically deleted when they become older than the number of days specified in this section. The default value is 7 days.
Agent
The Agent configuration section offers configuration options for each Agent object, with one or several groups pertaining to each Agent.
These options are used to configure the settings for file uploads, as well as to define the parameters affecting the groups in a given Agent. The following screenshot shows the different available options for Agent configuration: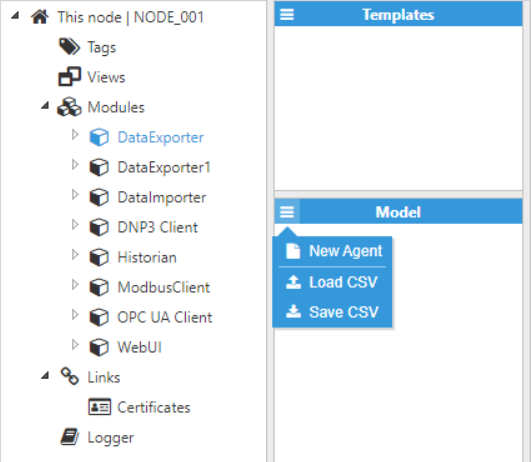 Figure 5: Creating new Agents
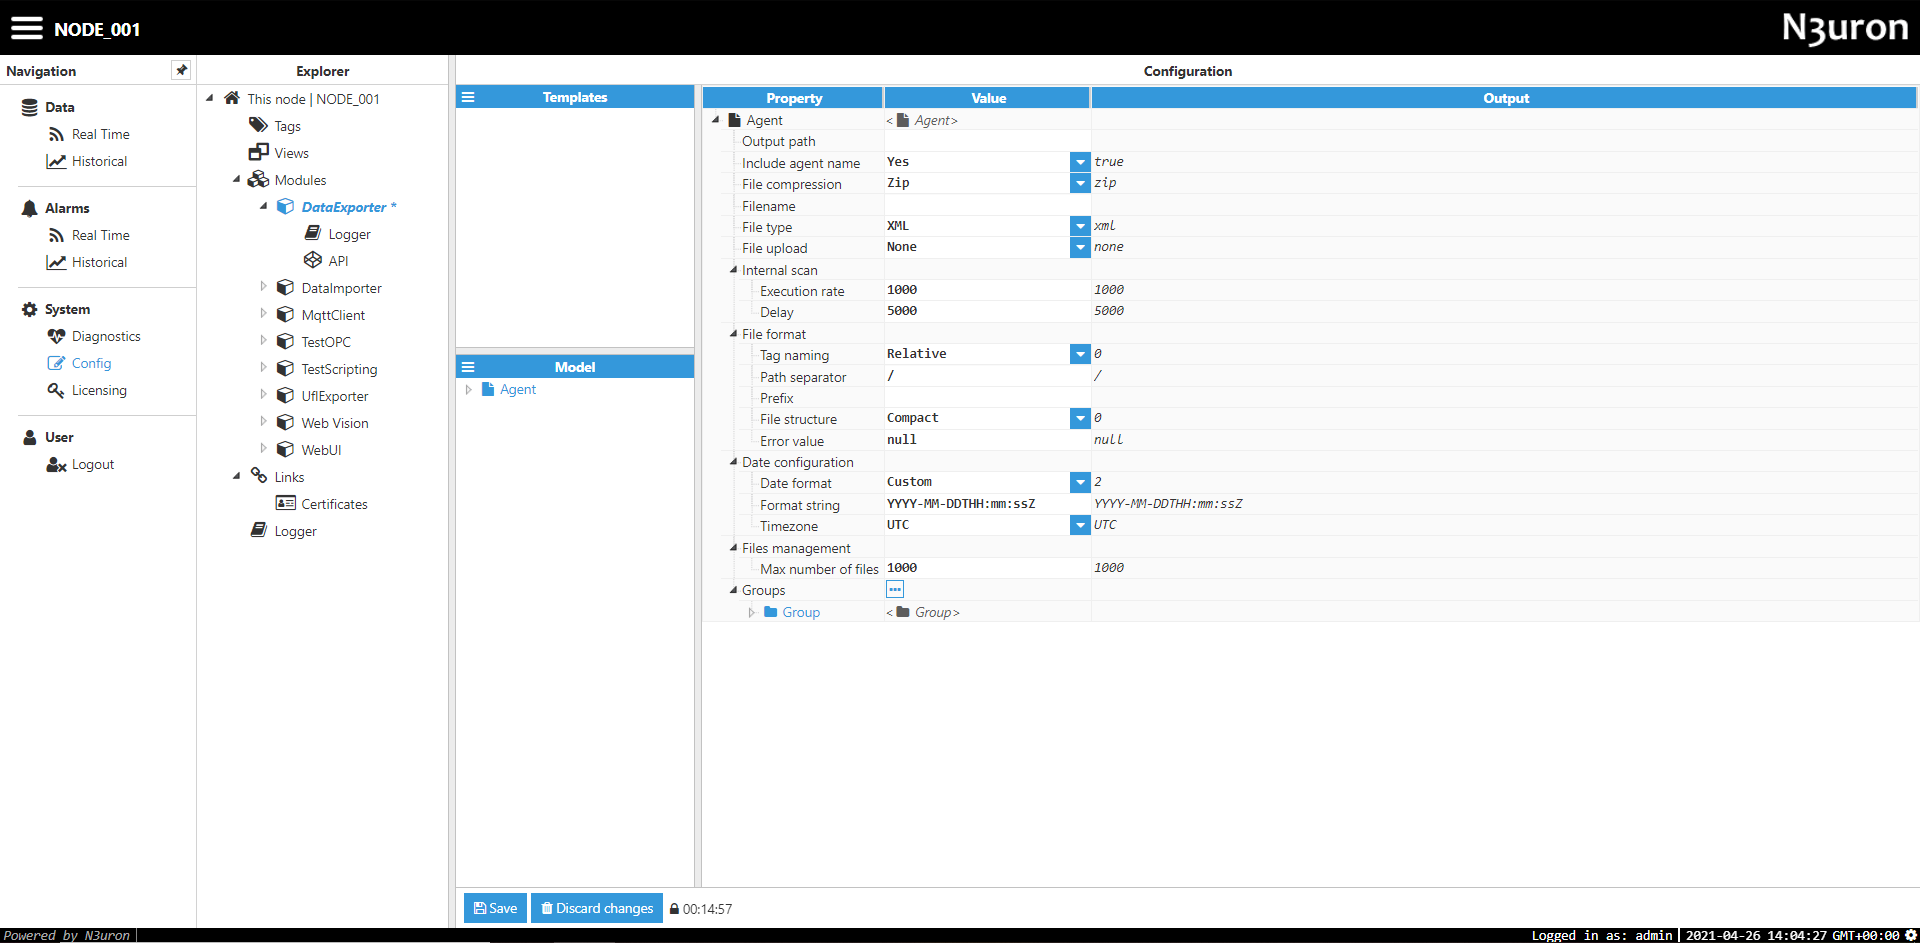 Figure 6: DataExporter Agent settings
Parameters:
- The Output Path is the path where the module will save exported files to. This path can either be absolute or relative to the base N3uron folder. If the module does not contain file uploads, the final path will be “outputPath/AgentName/” or alternatively, “/outputPath/AgentName/Pending or Sent or Failed/” will be used for modules containing file uploads. The default value is <null>, which corresponds to /n3uron/Data/DataExporterInstance/.
- The Include Agent Name parameter specifies whether the Agent Name will be appended to the output path or not. For example, if the Output path is Files (a relative path to /data/DataExporterInstance/) and this setting is set to “True”, the path will be: <program_root>/data/DataExporterInstance/
Files/AgentName. If this setting is set to “False”, the path will be: <program_root>/data/
DataExporterInstance/Files/. - The File Compression setting specifies how files should be exported. If this setting is set to “ZIP”, files are packed together in a .zip file. If set to “None”, files are exported as loose files without compression. All exported files are tagged with the .tmp extension until they have been fully loaded and acquire the desired extension (XML or CSV).
- The Filename string will be used as the filename, appended to the timestamp. For example, if the filename is 1minAggregation and calculations trigger at 13:17:00 on the 14th of June 2018, the resulting filename will be 20180614131700-1minAggregation.zip. If this field is left blank, the filename will simply be the timestamp. Therefore, in this example the filename would be 20180614131700-no-file-upload-zip.zip. This setting only applies when the File compression setting is set to “ZIP”.
- The File Type parameter specifies the file type to be exported. If this setting is set to “XML”, data will be exported in XML file format as XML elements with attributes. If this setting is set to “CSV”, data is exported in CSV files with comments to denote the group, start and end times, and configurable column separator.
The File Upload setting determines the protocol used to automatically upload files to a server. The available protocols are:
- None: Files will be stored locally.
- SFTP: Files will automatically be uploaded to an SFTP server, with the option of storing a local copy.
- FTP: Files will automatically be uploaded to an FTP server via plain FTP, with the option of storing a local copy.
Internal Scan
The Internal scan menu offers options for controlling how each Agent is executed. Valid default parameters will usually be as follows:
- The Execution rate parameter specifies the module’s check rate, a process used to verify whether groups are in need of calculating aggregations or not, displayed in milliseconds. A lower rate means that checks are done more often (which implies more CPU usage). A higher rate means that checks are carried out less often (which implies higher latency when creating the aggregation file, but less CPU usage). The execution rate does not affect the result of any calculations. The minimum value is 1000 milliseconds.
- The Delay parameter specifies the time period the module will wait for after each interval has finished, in case there are any events that have not yet reached this node due to network inconsistencies. For example, for a delay of 5000 milliseconds with 1 minute aggregation periods, aggregations will start at 00:01:05, 00:02:05, etc., although the aggregation interval will remain as 00:00:00 to 00:01:00. The minimum value is 0 milliseconds (which means there is no delay).
Files Format
The Files format option is used to configure the format of CSV or XML files. Two of these options are available for both file types, although the CSV file type has an additional option that allows users to specify the separator type.
- The Tag naming parameter specifies how the path of each tag will be displayed. If this setting is set to “Relative”, the input tag group will be omitted from the name of the tag, leaving only the relative path from this input tag group. If this setting is set to “Absolute”, the full tag path will be displayed for each tag
- The Path separator setting is used to specify which character should be used to separate the tag path, whether the full path (when using Extended structure) or relative to the input group (when using Compact). By default, the separator is set to “/”. As an example, if the Input Tag Group is “/Plant/BLK001”, the tag in the file would be as follows:
- Tag in tag model: /Plant/BLK001/Inv001/POWER
- Compact (Tag path separator is “/”): Inv001/POWER
- Compact (Tag path separator is “.”): Inv001.POWER
- Extended (Tag path separator is “/”): Plant/BLK001/Inv001/POWER
- Extended (Tag path separator is “.”): Plant.BLK001.Inv001.POWER
- The Prefix option specifies the prefix that will be prepended to the tag path.
- The File Structure (for XML files) setting specifies the file structure for XML files. If this setting is set to “Compact”, events are added as an array of “Event” nodes for each tag. If this setting is set to “Extended”, events are added as an array of “Event” nodes, each containing the tag as an attribute. Examples of both options for the following tags (DCVoltage, DCCurrent, Frequency) can be found in the Appendix.
- The CSV Separator (for CSV files) setting is used to choose either a comma or semicolon for use as column separators in CSV files.
- The Error Value setting specifies the value that is set to aggregations when they cannot be calculated.
Date Configuration
The Date Configuration menu is used to configure the date in all resulting files.
- The Date Format setting specifies the date format used in the output file. If this setting is set to “ISO8601”, the date will be formatted according to the ISO8601 format (Example: 2019-01-22T10:30 :01Z). If this setting is set to “Unix Epoch”, the date will be saved as the number of milliseconds lapsed since the Epoch (Jan 1 1970, 00:00:00 UTC). When set to “Custom”, the date format will be a custom format string.
- When Date Format is set to “Custom”, Format string specifies the date format that will be used in the resulting file.
- Timezone specifies the timezone used when formatting dates in the resulting file.
Files Management
Each protocol has its own specific options for connections to the server, in addition to common general options for determining how files will be uploaded to servers.
- If File Upload is set to “None”, the Max number of files will be shown in the Files Management menu. This setting specifies the maximum number of files to store in the hard drive. Older files will be deleted whenever this number is exceeded.
SFTP
Connection
When selecting SFTP file upload, the following options will be displayed:
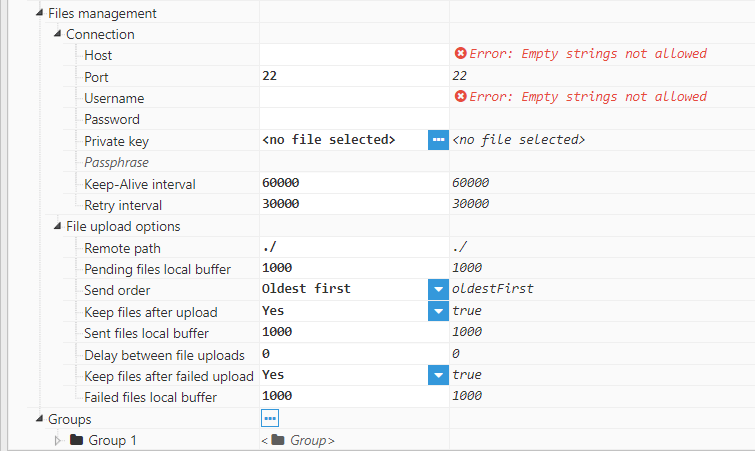 Figure 7: Files management menu for SFTP servers
Connection:
- Host specifies the host address of the SFTP server.
- Port specifies the port used to connect to the host. The default value for SFTP servers is 22. The valid range for this setting is 1-65536.
- Username specifies the username used for authentication with the server.
- Password specifies the password used for authentication with the server. For SFTP servers, this field is not required if authentication is carried out using a private key. However, it can still be used as an alternative authentication method if the private key is rejected.
- Private key specifies the private key used for authentication. The key must be in PEM format.
- Passphrase specifies the passphrase used to decrypt the private key (if using an encrypted password). It can be left blank if the private key is not password encrypted or if there is no private key.
- Keep-Alive Interval is used to determine when a keep-alive packet needs to be sent in order to ensure that the connection does not drop due to inactivity. It is also used to check whether the connection is still active or not. By setting this value to 0, the keep-alive mechanism is automatically disabled, however, this is not recommended.
- The Retry Interval specifies the wait time after a connection drops before attempting reconnection.
SFTP File Upload Options
The File Upload Options section is included within the Files Management menu. This section is used to configure connections to FTP or SFTP servers. Most of these options are available in both the SFTP and FTP server settings. They are used to configure various aspects relating to how files are sent, or whether or not sent files should be kept.
File Upload Options:
- Remote path is used to specify the path where files will be uploaded to. This path can either be relative to the home directory of the SFTP server, or absolute. Users must include write and rename permissions in this directory (which must be created prior to this step).
- Pending Files Local Buffer specifies the maximum number of files to keep if file uploads to the SFTP server have failed. Once the maximum number of pending files has been reached, older files will be deleted. The minimum value is 1.
- Send Order specifies the order for file uploads to the server. If this setting is set to “Oldest first”, the module will send the oldest files first. If this setting is set to “Newest first”, the module will send the newest files first.
- Keep Files After Upload specifies whether or not to store files locally once uploaded to the server.
- Sent Files Local Buffer specifies the maximum number of successfully sent files to be kept locally before older files are deleted. The minimum value is 1.
- The Delay Between File Uploads option specifies the time (displayed in milliseconds) to wait before starting the next file upload after a successful transfer has been completed. For example, this can be used if the server is only able to handle one file per second (in this case, the delay would be 1000 ms). The minimum value is 0, which means that the next file will be sent as soon as possible after the previous upload has been completed.
- The Keep Files After Failed Upload setting specifies whether or not to store files locally after failing to upload them to the server.
- The Failed Files Local Buffer option specifies the maximum number of failed files to keep locally before older files are deleted. The minimum value is 1.
FTP
Connection
When selecting FTP file upload, the following options will be displayed:
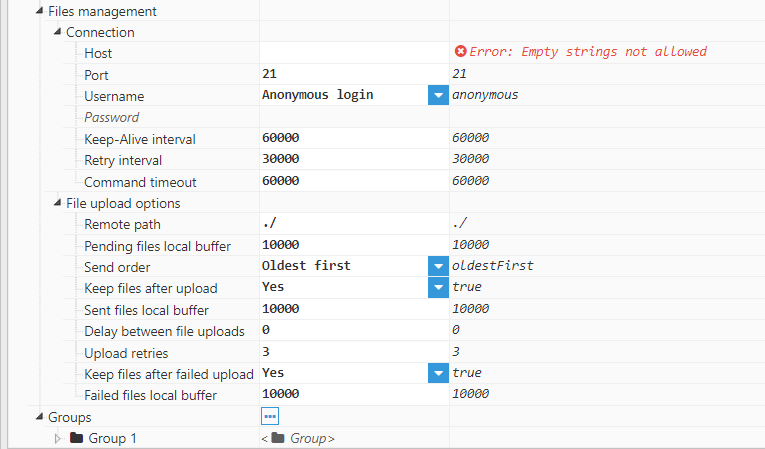 Figure 8: Files Management menu for FTP servers
Connection:
- Host specifies the host address of the FTP server
- Port specifies the port used to connect to the host. The default value for FTP servers is 21. The valid range for this setting is 1-65536.
- Username specifies the username used for authentication with the server.
- Password specifies the password used for authentication with the server.
- The Keep-Alive interval is used to determine when a keep-alive packet needs to be sent in order to ensure that the connection does not drop due to inactivity. It is also used to check whether the connection is still active or not. By setting this value to 0, the keep-alive mechanism will be disabled. However, this is not recommended.
- The Retry Interval setting specifies the wait time after a connection drops before attempting reconnection.
- Finally, the Command Timeout setting specifies how long the client will wait for a reply from the FTP server. If there is no response before the timeout passes, the client will close the connection and try again in a new connection.
FTP File Upload Options
The File Upload Options section can be accessed from the Files Management menu. This section is used to configure connections to FTP or SFTP servers. Most of these options are shared across both SFTP and FTP server settings. They are used to configure various aspects relating to how files will be sent or whether or not files should be stored locally.
File Upload Options:
- Remote path is used to specify where files will be sent to on the server. This path can either be relative to the server’s home directory or an absolute path.
- The Pending Files Local Buffer specifies the maximum number of files to keep if file uploads to the SFTP server fail. Once the maximum number of pending files has been reached, older files will be automatically deleted. The minimum value is 1.
- Send Order specifies the order for file uploads to the server. If this setting is set to “Oldest first”, the module will send the oldest files first. If set to “Newest first”, the module will send the newest files first.
- The Keep Files After Upload setting specifies whether or not to store files locally once uploaded to the server.
- The Sent Files Local Buffer specifies the maximum number of successfully sent files to keep locally before older files are deleted. The minimum value is 1.
- Delay Between File Uploads is used to determine the wait time (in milliseconds) after a successful file is sent. For example, this can be used if the server is only able handle one file per second (in this case, the delay would be 1000ms). The minimum value is 0, which means that the next file will be sent as soon as possible after the current file finishes.
- The Upload Retries setting specifies how many times the module will try to upload a file to the FTP server before moving to the failed folder or deleting.
- The Keep Files After Failed Upload setting specifies whether or not to store files locally after failing to be uploaded to the server.
- The Failed Files Local Buffer specifies the maximum number of failed files to store locally before older files are deleted. The minimum value is 1.
Group Configuration
Each Agent can have one or several groups. Each group corresponds to an XML or CSV file in the .zip.
Available Group options can be seen in the following screenshot:
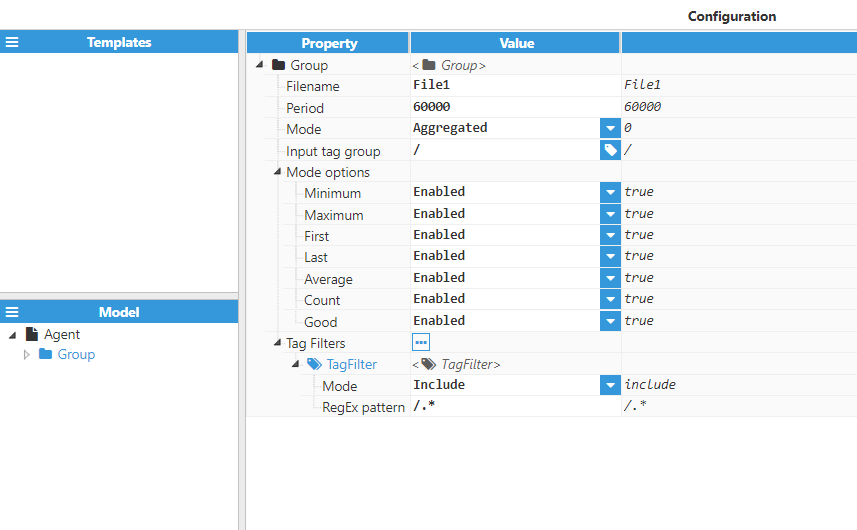 Figure 9: Group options
Parameters:
- Filename is the name of the XML or CSV file created by this group. In this example, assuming this is a CSV file, the file would be named 1min-POWER.csv.
- Period specifies the group execution period, displayed in milliseconds. The minimum value is 10000 milliseconds
- Mode specifies whether or not the data will be aggregated when uploaded to the server. When this setting is set to “Aggregated”, the Mode options menu will appear.
- Input Tag Group is the group from the tag model that will be used as a base path for all tags forming part of this group. Tag filters only apply to tags contained in the group that has been defined in this setting.
Whenever Mode is set to “Aggregated”, the Mode Options menu will become available. This is used to select which of the following values should be calculated for this group:
- Average: Time weighted average of the values received in the specified interval.
- Minimum: Lowest value received in the interval.
- Maximum: Highest value received in the interval.
- First: The first value that occurs in the interval. This is not the first value received, but the value present at the start of the interval (typically, this would be the last value from the last interval).
- Last: Last value received in the interval.
- Count: Total number of events received in the interval. This includes both good and bad quality events, as well as good quality events with a null value.
- Good: Ratio of good quality events to total received events, expressed as a decimal. 1 means all events had good quality, 0 means all events had bad quality.
The Tag Filters setting allows users to define rules based on Regular Expressions, which is used to select which tags will be included or excluded from the result. Tag filters options include:
- Mode: Specifies whether the filter will include or exclude tags from the result.
- RegExp Pattern: Specifies the regular expression used to select which tags should be included or excluded in the exported file. If set to default, all tags contained within the input tag group will be exported.