Microsoft Azure IoT Hub
Connection via security token (SAS)
Connecting using token:
- Download the Device Explorer from the following URL: Device Explorer.
- Access the Microsoft Azure Portal and select or create a new IoT-Hub. Once done, click “Shared access policies”, then “iothubowner” and copy the “Connection string—primary key”.
.png) Figure 10. Step 2: Obtaining connection strings
Figure 10. Step 2: Obtaining connection strings - Start the Device Explorer and paste the connection string in the “IoT Hub Connection String” text area and click Update.
.png) Figure 11. Step 3: Configuring the Device Explorer
Figure 11. Step 3: Configuring the Device Explorer - Click on management, then “Create”, select “Security Keys” as the authentication method and introduce a Device ID, leaving the “Auto Generate Keys” checkbox checked.
.png) Figure 12. Step 4: Creating security keys
Figure 12. Step 4: Creating security keys .png) Figure 13. Step 4: Creating security keys
Figure 13. Step 4: Creating security keys - Next, click “SAS Token”, select the device you want to connect to and specify a Time to Live (TTL) for the token. Once created, copy everything after “SharedAccessSignature =”
.png) Figure 14. Step 5: Obtaining SAS
Figure 14. Step 5: Obtaining SAS - Finally, configure the MqttClient with the following settings:
- URL: ssl://HostName:8883 or mqtts://HostName:8883
- ClientId: deviceId
- Username: HostName/deviceId
- Password: SAS Token (see previous screenshot)
- Topic: devices/deviceId/messages/events/properties
Properties are a list of key-value pairs in URL encoded format, for example:
devices/TestDevice/messages/events/sensor=Temperature&unit=celsius
This topic will now send a message to the TestDevice device and should have two properties: sensor and unit (which are equal to Temperature and Celsius). This can then be used to route messages to other end points via Routes.
Connection via X.509 Certificates
- Download the Device Explorer from: https://github.com/Azure/azure-iot-sdk-csharp/tree/master/tools/DeviceExplorer.
- Download OpenSSL from https://www.npcglib.org/~stathis/blog/precompiled-openssl/.
- Access the Microsoft Azure Portal and select or create a new IoT-Hub. Once done, click “Shared access policies” then “iothubowner” and copy the “Connection string—primary key”
.png) Figure 15. Step 3: Obtaining connection strings
Figure 15. Step 3: Obtaining connection strings - Start the Device Explorer and paste the connection string in the “IoT Hub Connection String” text area and click Update.
.png) Figure 16. Step 4: Configuring the Device Explorer
Figure 16. Step 4: Configuring the Device Explorer - Generate the relevant certificate and private key or use the following commands to create one:
openssl req -newkey rsa:2048 -nodes -keyout private.key -x509 -days 1000 -out certificate.crt - Obtain the certificate thumbprint by running the following command:
openssl x509 -in certificate.crt -fingerprint -noout > fingerprint.txt - The thumbprint will be generated in a textfile called “fingerprint.txt”. The format of the thumbprint is as follows: xx:xx:xx:xx:…
- Remove all ‘:’ characters and copy the resulting thumbprint.
- In device explorer, click on management, then "Create", select "X509" as the authentication method. Introduce a device ID and paste the certificate thumbprint as the primary thumbprint.
.png) Figure 17. Step 9: Creating X509 authentication tokens
Figure 17. Step 9: Creating X509 authentication tokens .png) Figure 18. Step 9: Creating X509 authentication tokens
Figure 18. Step 9: Creating X509 authentication tokens - Finally, configure your MQTT client with the following settings:
- URL: ssl://HostName:8883 or mqtts://HostName:8883
- ClientId: deviceId
- Username: HostName/deviceId
- Password: HostName=HostName;DeviceID=deviceId;x509=true
- Topic: devices/deviceId/messages/events/properties
Properties are a list of key-value pairs in URL encoded format, for example:
devices/TestDevice/messages/events/sensor=Temperature&unit=celsius
This topic sends a message to the TestDevice device and has two properties: sensor and unit (which are equal to Temperature and Celsius). This can be used to route messages to other end points via Routes.
Example password: “HostName=test-hub.azure-devices.net;DeviceID=TestDevice;x509=true”
Amazon IoT
- Log into AWS and create or select an IoT service. Next, select “Manage” followed by “Things” from the panel and click create:
.png) Figure 19. Step 1: Creating a Thing
Figure 19. Step 1: Creating a Thing - After creating a Thing, users will be asked to create a certificate for authentication or provide your own root CA. In this case, users should use the automatically created certificates from AWS by clicking “One-Click certificate creation”. Finally, download the private key, the root CA, and the Thing certificate.
- Once the Thing has been created, users must create a policy and attach it to the certificates that were just created. Policies are used to grant different permissions to each certificate that they are associated with. In this case, we’ll grant all permissions to the new certificate. To create a policy, click “Security” and then “Policies” and hit “create”.
- The system will now require users to enter a name for the policy and provide a list of actions and resource ARNs. Actions define what a client is able do with a Thing, for example, “iot:Publish” will allow clients to publish on the defined ARNs. See the following screenshot for an example of this: The ARN can be obtained by selecting the Thing created in the previous steps and should also autocomplete when entering a valid action. Click here for a list of the different ARN formats. For more information about policies, you can consult AWS IoT help.
.png) Figure 20. Step 4: Creating a Policy
Figure 20. Step 4: Creating a Policy - Once the policy has been created, it needs to be attached to the certificate that is attached to the Thing. To do this, go to “Secure”, then “Certificates”, click on the 3 small dots near the certificate name and then click “Attach policy”.
.png) Figure 21. Step 5: Attaching a Policy to a certificate
Figure 21. Step 5: Attaching a Policy to a certificate - Once that has been done, the certificate can be activated which will allow users to connect to AWS using MqttClient. It can be attached to more than one Thing if necessary by selecting “Attach thing”.
- In order to connect to AWS, a broker URL associated with our IoT Service is required. This URL is common to all Things. To obtain the URL, click settings to show the custom endpoint at the top of the page.
- Finally, when setting up connections to AWS, use the following MqttClient settings:
- Protocol: MQTTS
- Host: AWS Endpoint
- Port: 8883
- Certificate: thing.pem.crt
- Private key: thing.prive.prm.key
- Root CA: rootCA.pem
These are the essential configuration settings required for establishing a connection. The rest can be customized as desired.
Google IoT Core
- Login to Google IoT Core and create a new registry, as shown in the following screenshot:
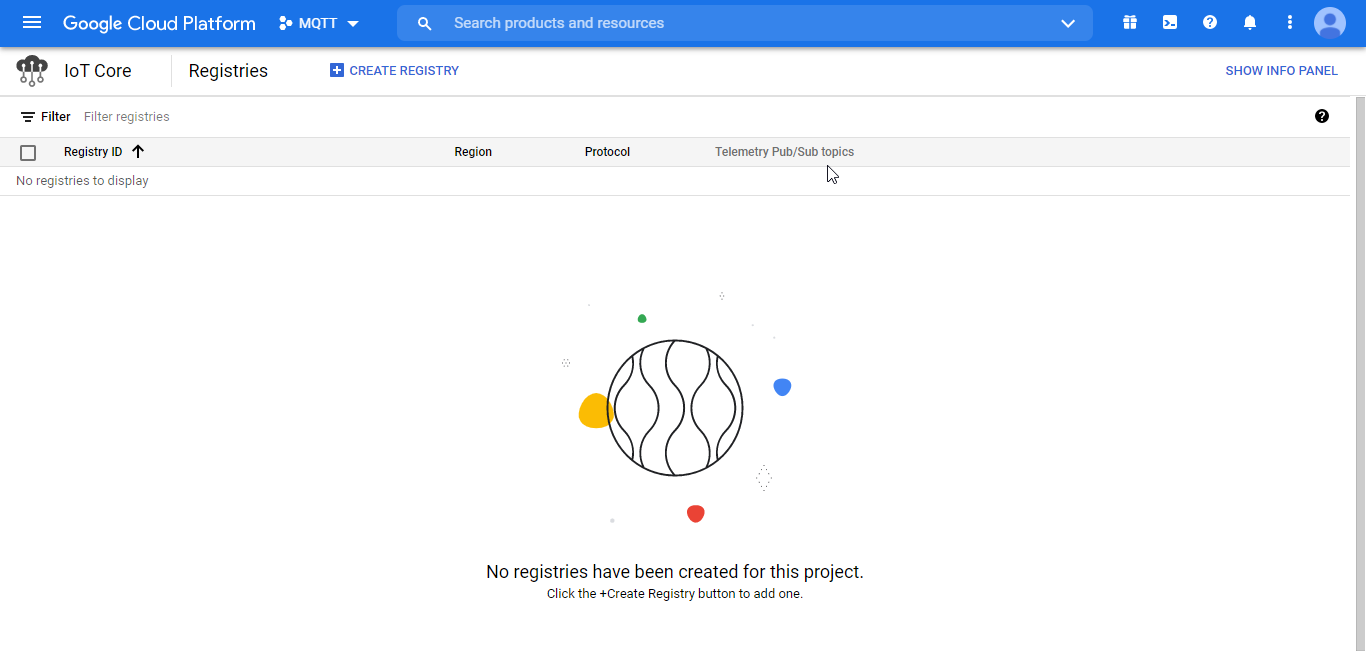 Figure 22. Creating a new registry
 - Fill in the required fields with the details of the new Registry:
- Registry ID: Used as part of the client ID for the MQTT connection
- Region: Determines where data is stored for devices in this registry. Note that this cannot be changed after the registry has been created
- Protocol: Selects which protocols are permitted to connect to this registry. MQTT is required to be able to send data using MqttClient
- Client Pub/Sub Topics: Selects the Google Pub/Sub topics for both telemetry events and device state events.
- Stackdriver Logging: Sets the default logging for this registry
The following screenshot shows the configuration settings for this new registry:
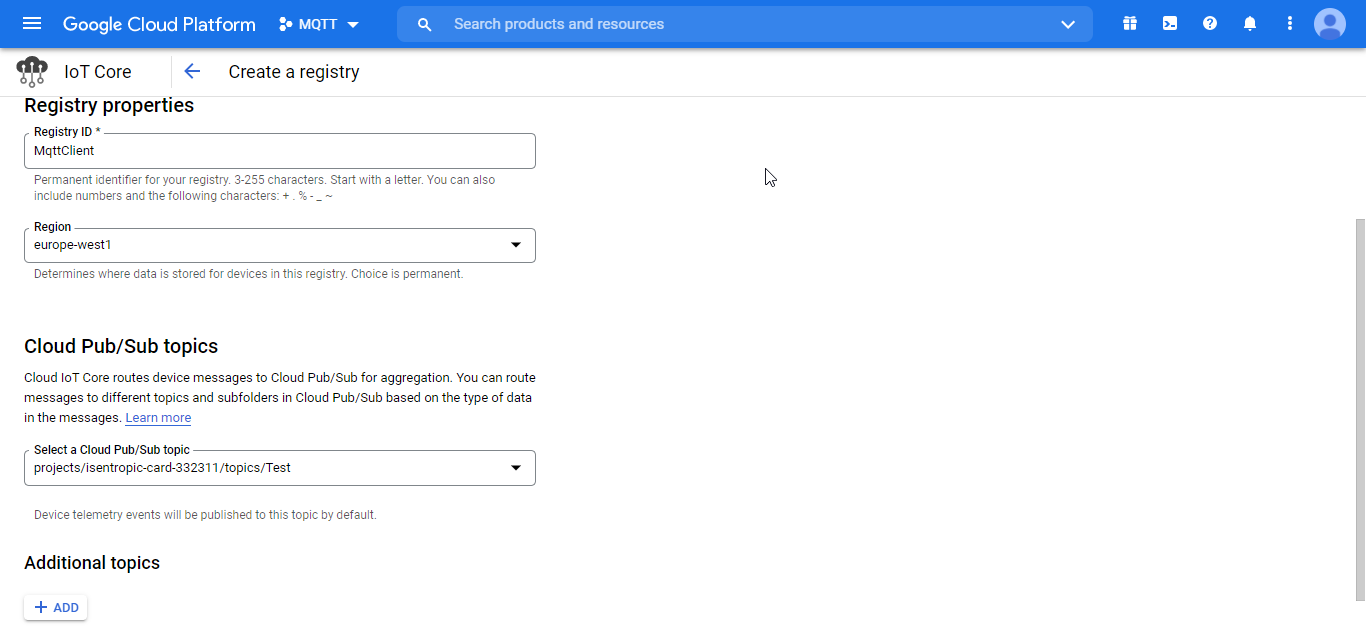 Figure 23.a. New registry settings
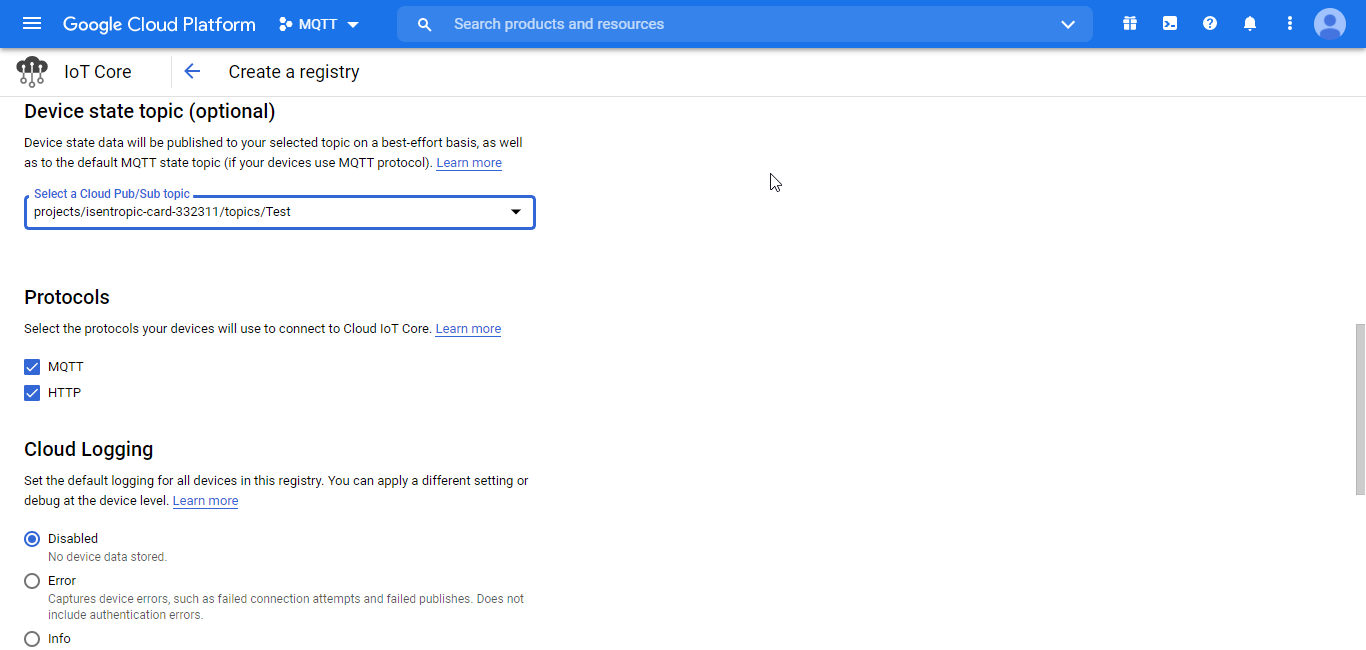 Figure 23.b. New registry settings
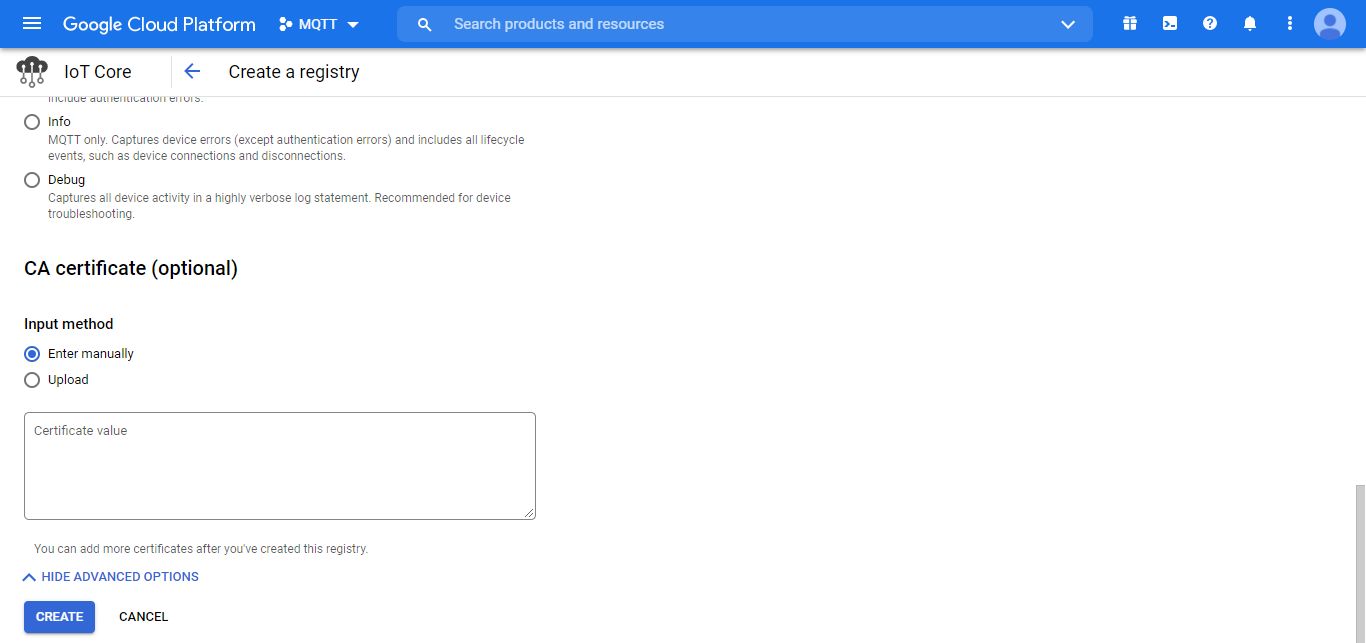 Figure 23.c. New registry settings
3. Once the registry has been created, it will need one or more devices in order to receive messages from a MqttClient:
.png) Figure 24. Creating a new device
Figure 24. Creating a new device
Each device needs a private-public key pair in order to authenticate with IoT Core. This can be done using the following OpenSSL commands:
openssl genpkey -algorithm RSA -out rsa_private.pem -pkeyopt
rsa_keygen_bits:2048
openssl rsa -in rsa_private.pem -pubout -out rsa_public.pem
This creates two PEM encoded files, rsa_private.pem - containing the private key and rsa_public.pem - containing the public key.
3. Once the key pairs have been created, the public key needs to be applied in the device configuration. See the below screenshot for configuration:
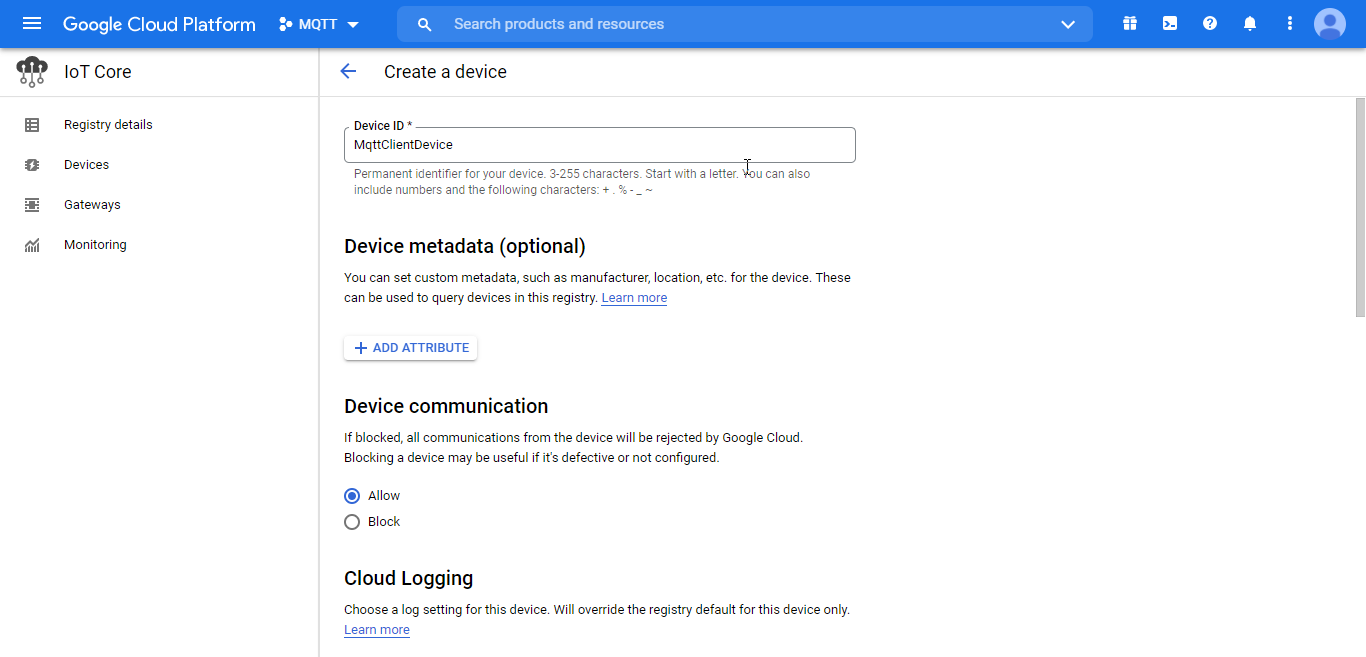 Figure 25.a. New device settings
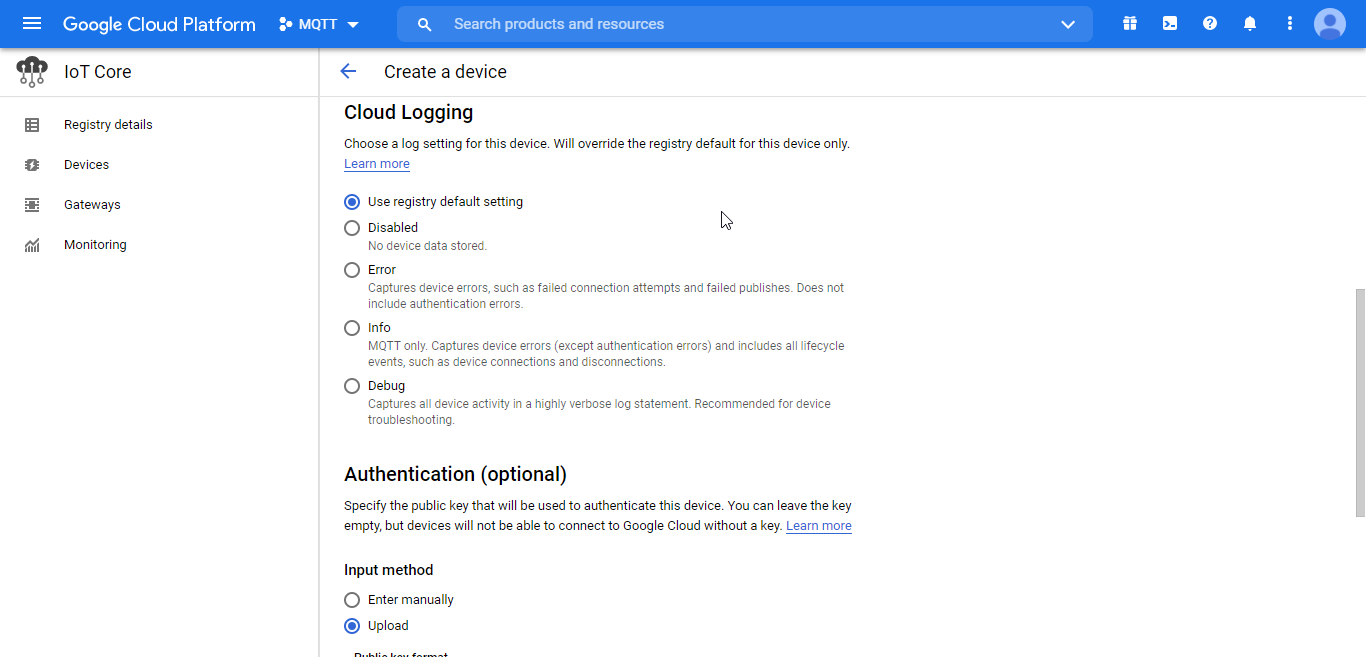 Figure 25.b. New device settings
- Device ID: Used both in the MQTT client ID and the topic for this device.
- Authentication: Used to determine how to input the key, as well as to establish the format of the key. If the key is generated using the previous Open SSL command, it will be in RS256 format.
4. Once the device is created, MqttClient can be connected to IoT Core using the following configuration settings:
- Destination broker: Google IoT Core
- Authentication Mode: JSON Web Tokens
- Token duration: Any value equal to or less than a full day (86400000 ms)
- Algorithm: RS256 (ES256 is also supported for any keys generated as an elliptical curve key).
- Private key: Keys generated in .pem format.
- Audience: Google cloud project ID.
- Protocol: MQTTS
- Host: mqtt.googleapis.com
- Port: 8883
- Client ID: projects/PROJECT ID/locations/CLOUD REGION/registries/REGISTRY ID/devices/DEVICE ID
- QoS: 0 or 1 (QoS 2 is not supported and will cause the connection to be dropped)
- Publish topic: /devices/DEVICE ID/events/
- The publish topic can have as many sublevels as needed, providing that the first three sublevels match these sublevels. See the below screenshot for an example of the configuration settings:
.png) Figure 26. Google IoT Core MqttClient settings
Figure 26. Google IoT Core MqttClient settings
Generic Broker
In order to connect to a generic broker (for example Mosquitto), the following settings are used (this assumes that the broker is using an unsecure MQTT and does not require a username or password):
- Protocol: MQTT
- Host: www.example.com
- Port: 1883
These are the minimum settings required for a successful connection. However, if the broker requires authentication, whether that be with a username and password, certificate, or both, these options can be applied accordingly. The following screenshot shows the basic settings used to connect to a Mosquitto server without authentication:
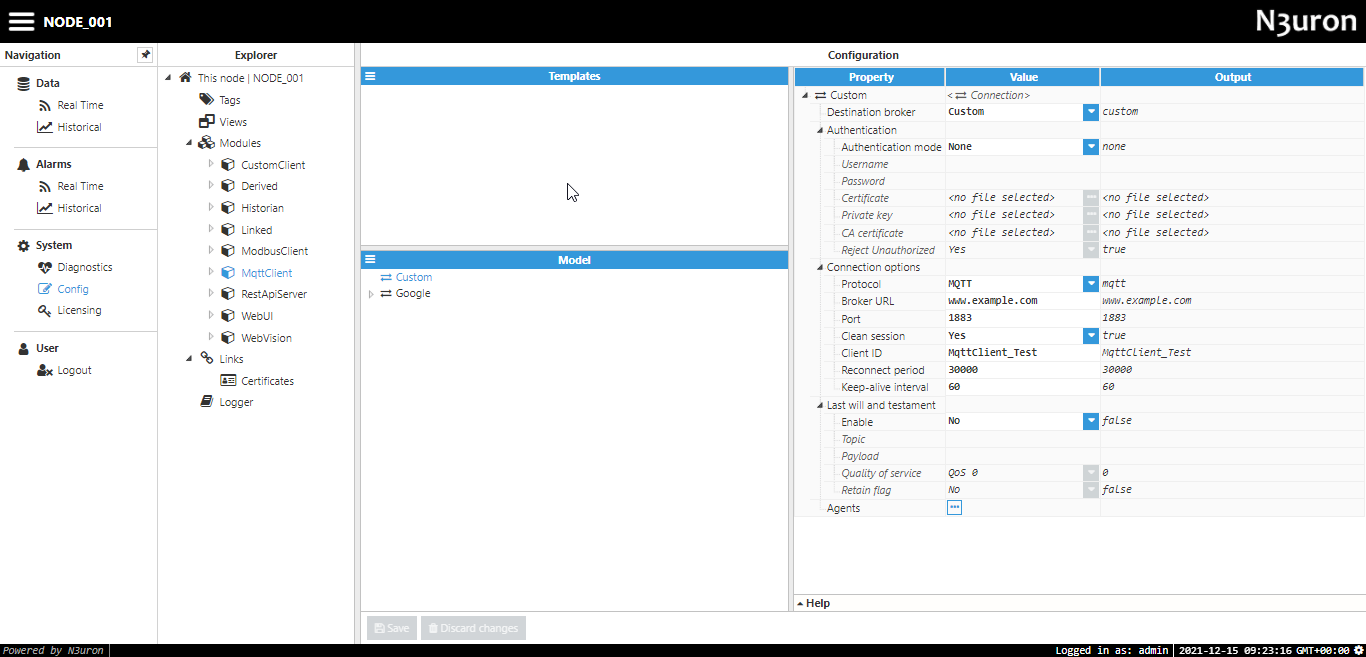 Figure 27. Mosquitto connection settings