Getting N3uron up and running is quick and easy. Installation takes less than a minute and the system will then be ready to immediately start collecting data. Simply download the installer from the N3uron website, run the installer and the WebUI will automatically open as soon as the installer has finished.
Windows Setup
N3uron is compatible with the following Windows versions:
- Windows XP SP2, 7, 8, 8.1 and 10, including all editions (Home, Pro, IoT Enterprise).
- Windows Server 2003, 2008, 2008 R2, 2012, 2012 R2, 2016 and 2019.
Step 1: Right click on the setup file and select “Run as administrator”.
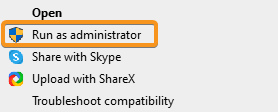
Figure 1. N3uron must be installed using the “Run as administrator” option
Step 2: Choose the functionalities to be installed.
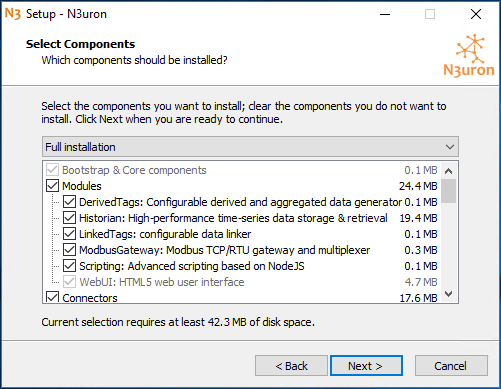
Figure 2. Component selection
Step 3: Choose the required TCP ports and finish the installation.
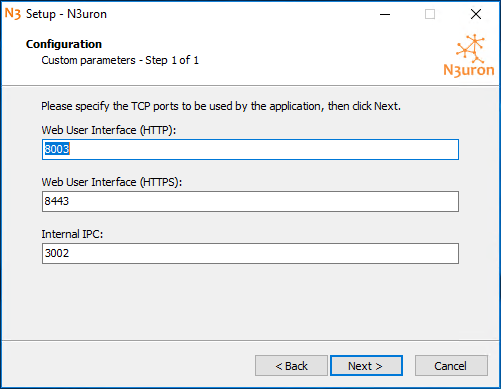 Figure 3. Default ports used by N3uron
TCP ports used by the N3uron default installation:
- 8003: Web interface (HTTP)
- 8443: Secure web interface (HTTPS)
- 3002: Internal N3uron communication
TCP ports assigned to N3uron must not be in use by any other application.
Step 4: The WebUI will automatically launch in the default web browser. To access N3uron WebUI from a different machine, use the machine’s IP and the port that was configured for the WebUI during setup (by default 8003 for HTTP or 8443 for HTTPS).
Default N3uron WebUI credentials.
Full access | Read-only access | |
|---|---|---|
| User: | admin | user |
| Password: | n3uron | n3uron |
Step 5: Set User Account Control to the lowest level possible.
The UAC may prevent loading of a backup configuration from the N3uron Web interface. In order to avoid this problem, the UAC must be set to the lowest possible level.
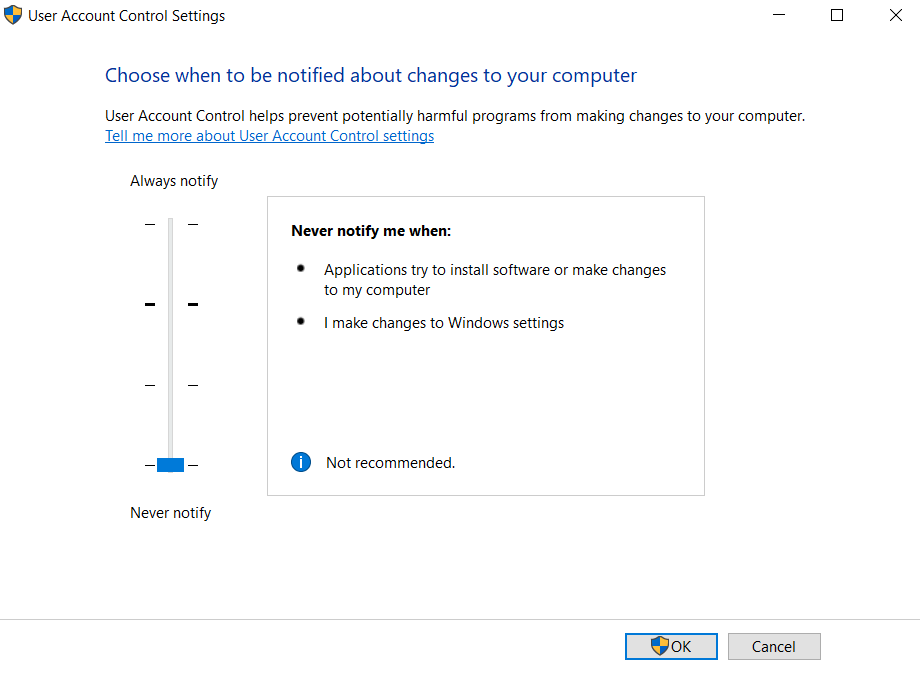
Figure 4. In order to load backup configurations from the N3uron Web interface, User Account Control must be configured to the lowest possible level.
N3uron runs as a service and is automatically initiated when Windows is started. The service can also be stopped/started manually from the Start menu.
.png) Figure 5. N3uron Start Menu to Stop/Start the service
Figure 5. N3uron Start Menu to Stop/Start the service
Uninstalling N3uron in Windows
To uninstall N3uron from a Windows device, click the ‘Uninstall’ option in the N3uron Start menu.
Upgrading N3uron in Windows
To update N3uron on a machine running on Windows, follow these steps:
Step 1: Create a backup of \N3uron\bin and \N3uron\config folders. If something goes wrong during the update, restoring these folders will return the system to its original state.
Step 2: Stop the service.
Step 3: Run the installer for the new version using the "Run as Administrator" option in order to update the binary files to the new version. N3uron will start automatically once the installation process is complete.
Step 4: Login into the WebUI to check that everything is running properly.
Linux Setup
N3uron has been tested on the following Linux distributions:
- Debian and derived from Debian like Ubuntu, Mint, Raspbian, DietPi and other specific distros.
- RHEL and derived like CentOS, Oracle Linux and Amazon Linux 2.
- Yocto Linux (depending on the specific compilation) and Gentoo.
For other distros please contact your N3uron distributor or info@n3uron.com
N3uron does not require Linux GUI, which means that it can be installed on any headless device. It can either be installed using the console or an SSH connection. It can then be configured from the Web interface. This User Guide assumes a basic knowledge of Linux systems and their administration.
The following procedure will install N3uron to the /opt folder. It is also possible to install N3uron to a different folder, depending on the end user’s preferences.
Step 1: Download N3uron setup file.
A Linux setup file for all the different distributions can be downloaded from www.n3uron.com and uploaded or copied to the target machine.
Step 2: Decompress the file, where <distro> is the Linux distribution in the target machine and <version> corresponds to the N3uron version downloaded.
sudo tar -xvzf n3uron-setup-linux-<distro>-<version>.tar.gz -C /opt/Step 3: Install N3uron
sudo /opt/n3uron/bin/n3uron installIn x64 bit systems, external databases are not required to run Historian, as a MongoDB instance will automatically be installed in the N3uron folder to provide Historian storage. For other architectures (x32 and ARM), a MongoDB instance can be manually installed and used as a database for Historian.
In order to use the embedded MongoDB database in Debian 9 x64 several dependencies must be installed using the following command:
sudo apt install libboost-chrono1.62.0 libboost-filesystem1.62.0 libboost-program-options1.62.0 libboost-regex1.62.0 libboost-system1.62.0 libboost-thread1.62.0 libgoogle-perftools4 libpcap0.8 libpcrecpp0v5 libsnappy1v5 libstemmer0d libtcmalloc-minimal4 libunwind8 libyaml-cpp0.5v5Step 4: Start the service
sudo systemctl start n3uronTCP ports used by the N3uron default installation:
- 8003: Web interface (HTTP)
- 8443: Secure web interface (HTTPS)
- 3002: Internal N3uron communication
TCP ports assigned to N3uron must not be in use by any other applications.
To access the N3uron WebUI from a different machine, use the machine’s IP and the port that was configured for the WebUI (by default 8003 for HTTP or 8443 for HTTPS).
Default N3uron WebUI users.
Full access | Read-only access | |
|---|---|---|
| User: | admin | user |
| Password: | n3uron | n3uron |
To access the N3uron WebUI from a different machine, make sure that the N3uron host machine is reachable and that there are no firewalls blocking the port assigned to N3uron WebUI (8003 and/or 8443 by default).
In demo mode, each module runs with full functionality for one hour. In order to restart the demo mode, simply restart the module from the Web interface.
N3uron service can be controlled from the console using the following commands:
sudo systemctl stop n3uron
sudo systemctl start n3uron
sudo systemctl restart n3uron
systemctl status n3uron
For older Linux versions, like Debian 7, a different command must be used to control the service
sudo service n3uron stop
sudo service n3uron start
sudo service n3uron restart
service n3uron status
Uninstalling N3uron in Linux
To uninstall N3uron from the host machine, run the following commands:
Step 1: Uninstall N3uron service
sudo <n3uron folder>/bin/n3uron uninstallFor example, if N3uron is installed in the ‘/opt/n3uron’ folder, the command would be:
sudo /opt/n3uron/bin/n3uron uninstall
Step 2: Delete N3uron folder (optional)
sudo rm -r <n3uron folder>For example, if the N3uron folder is /opt/n3uron the command would be:
sudo rm -r /opt/n3uronUpgrading N3uron in Linux
To update N3uron on a machine running Linux, follow these steps:
Step 1: Create a backup of /n3uron/bin and n3uron/config folders. If something goes wrong during the update, restoring these folders will return the system to its original state.
Step 2: Stop the N3uron service:
sudo systemctl stop n3uronStep 3: Extract the new version of the binary files from the installer, where <distro> is the Linux distribution on the target machine and <version> corresponds to the N3uron version that has been downloaded. The following command assumes N3uron is installed in /opt/n3uron:
sudo tar -xvzf n3uron-setup-linux-<distro>-<version>.tar.gz -C /opt/ ./n3uron/binStep 4: Restart the service again and login into the WebUI to check that everything is running correctly:
sudo systemctl start n3uron