This guide explains in detail how to generate the digital certificates required to securely connect N3uron Sparkplug clients to a Mosquitto broker using OpenSSL 1.1.1 in Linux and acting as your own CA. Here is a summary of the steps required:
- Become your own CA generating the signing key and CA certificate. All digital certificates for the broker and clients must be signed by the same CA.
- Generate the broker’s key and certificate.
- Modify the broker configuration to use encrypted communications.
- Generate the key and certificate for the Sparkplug Client.
If you are using Windows OS, the procedure and commands are the same. Only the location of the files is different.
Now, follow these steps:
- Step 1: Install openSSL if required (most Linux distros come with OpenSSL installed):
apt install openssl- Step 2: Generate your own CA private key. A password will be required to protect the key. This password will be requested later when the key is used to sign the digital certificates:
openssl genrsa -des3 -out myCA.key 2048This generates the file myCA.key
- Step 3: Generate the root certificate for the CA:
openssl req -x509 -new -nodes -key myCA.key -sha256 -days 1826 -out myCA.crtProvide the information requested for the company acting as CA. You should now have two files:
myCA.key (the CA private key) and myCA.crt (the CA root certificate).
- Step 4: Create a private key for the MQTT broker:
openssl genrsa -out server.key 2048- Step 5: Create the CSR (Certificate Signing Request) for the MQTT broker:
openssl req -new -key server.key -out server.csrProvide the information requested for the company in charge of the MQTT broker.
Important: Common Name must be the domain name/hostname of the machine where the MQTT broker is running.
This file is usually sent to the CA, but in this case, you are acting as your own CA.
- Step 6: Generate a config file in the working directory to generate the certificate at a later time. The config file is needed to define the Subject Alternative Name (SAN) extension. This is an example of the config file (named request.conf in this example)
authorityKeyIdentifier=keyid,issuer

basicConstraints=CA:FALSE

keyUsage = digitalSignature, nonRepudiation, keyEncipherment, dataEncipherment

subjectAltName = @alt_names

[alt_names]

IP 1 = 10.101.8.114
All alternative names must include the URL, hostname, or IP used by the MQTT clients to connect to the MQTT broker so that the certificate is not rejected by the MQTT clients whenever they have the “Reject unauthorized” option enabled. In this example, the MQTT clients are connecting directly using the IP, so the SAN includes the IP of the MQTT broker.
- Step 7: Generate the certificate for the MQTT broker:
openssl x509 -req -in server.csr -CA myCA.crt -CAkey myCA.key -CAcreateserial -out

server.crt -days 1826 -sha256 -extfile request.conf
There are three files in the working directory: server.key (the private key), server.csr (the certificate signing request), and server.crt (the signed certificate).
- Step 8: Copy the certificates to the Mosquitto broker
- Copy myCA.crt to /etc/mosquito/ca_certificates
- Copy server.crt and server.key to /etc/mosquito/certs
- Step 9: Modify Mosquitto config to force the use of encrypted communications by adding the following configuration /etc/mosquitto/mosquitto.conf
allow_anonymous false

#MQTT over TLS/SSL


listener 8883

cafile /etc/mosquitto/ca_certificates/myCA.crt

keyfile /etc/mosquitto/certs/server.key

certfile /etc/mosquitto/certs/server.crt

require_certificate true

use_identity_as_username true- Allow_anonymous false disables anonymous connections
- Listener defines the port listening for incoming network connection on the specified port.
- cafile defines the path to a file containing the PEM encoded CA certificates that are trusted when checking incoming client certificates.
- keyfile path to the PEM encoded server key. This option and certfile must be present to enable certificate based TLS encryption.
- certfile path to the PEM encoded server certificate. This option and keyfile must be present to enable certificate based TLS encryption.
- require_certificate true client connecting to this listener must provide a valid certificate in order for the network connection to proceed.
- use_identity_as_username true use the CN value from the client certificate as a username.
- Step 10: Generate the private key for the SparkplugClient:
openssl genrsa -out client.key 2048- Step 11: Create a certificate request and use the client private key to sign it
openssl req -new -out client.csr -key client.keyYou will be presented with a form that you need to complete. The most important entry is the common name. This name can be used by the broker to identify the client instead of a username. Normally, this certificate would be sent to a Certificate authority, but in this case we are our own Certificate authority, so we complete the request to create a client certificate
- Step 12: Generate the client certificate:
The client and server must use the same CA (certificate Authority) for the client and server certificates.
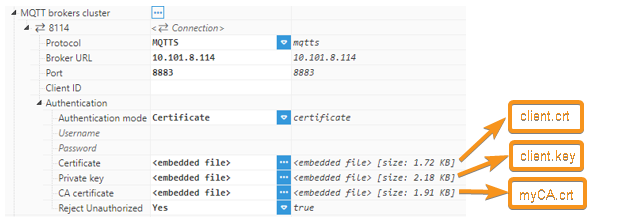
openssl x509 -req -in client.csr -CA myCA.crt -CAkey myCA.key -CAcreateserial -out client.crt -days 1825Step 13: Provide the certificates to the Sparkplug client:

The Sparkplug client should now be able to connect to the Mosquitto broker. It's also possible to use the same certificates for all the Sparkplug clients (all of them using the same user). Alternatively, it's also possible to generate different certificates for each Sparkplug Client.