Introduction
WebUI is the interface used to configure N3uron and can also be used to quickly monitor any data collected by N3uron. WebUI is a pure HTML5 web application, meaning that it can be opened in any modern web browser, which makes it very convenient for remote access.
By default, WebUI can be reached using plain HTTP (port 8003 by default) and secure HTTPS (port 8443 by default). To force secure connections only, HTTP mode can be disabled.
WebUI is automatically installed in N3uron and does not require a license. More than one instance of the WebUI can be created in the same node, which is especially useful for customizing access roles (for instance, when configuring a different logo, access from different networks, etc.). In this case, all new instances would run in demo mode unless a valid license is provided.
To access N3uron WebUI you will require a web browser. Use the machine’s IP and the port that was configured for the WebUI during setup (by default, 8003 for HTTP or 8443 for HTTPS).
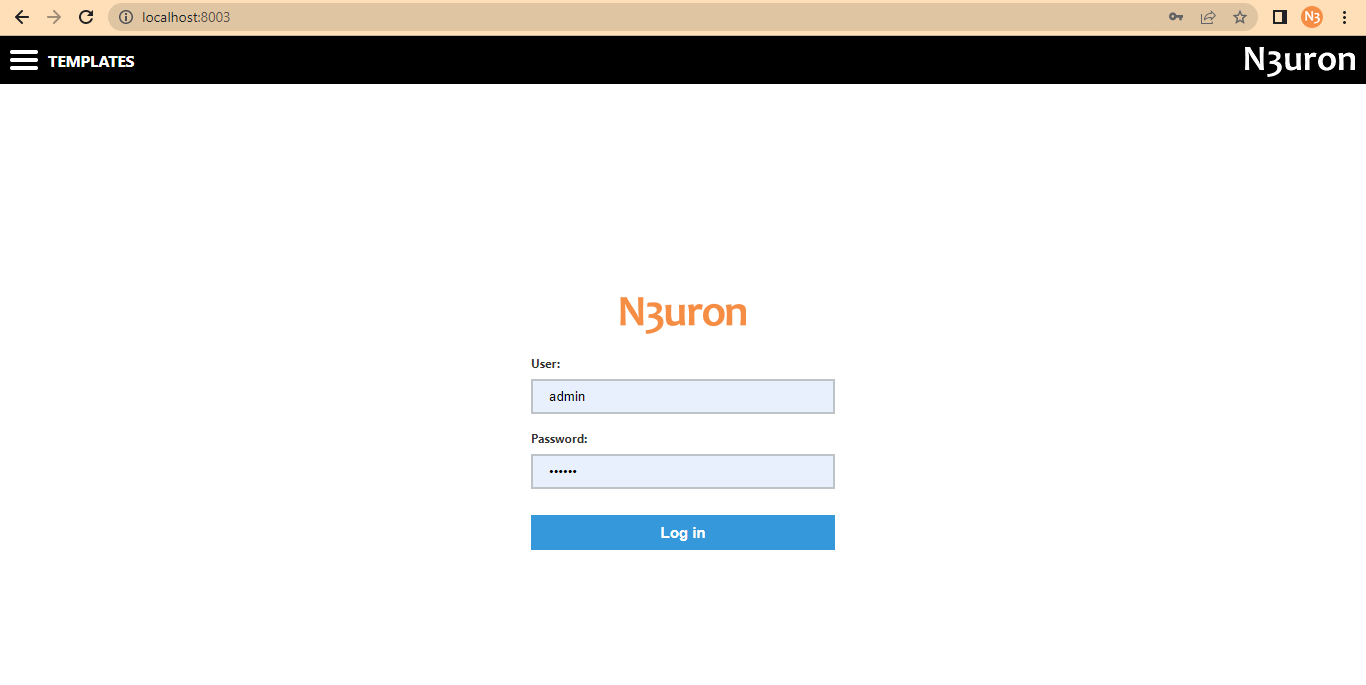
After N3uron installation, the default users/passwords configured within N3uron are as follows:
Full access | Read-only access | |
|---|---|---|
User: | admin | user |
Password: | n3uron | n3uron |
Note:
To access N3uron WebUI from a different machine, make sure that the Windows Firewall on the host machine is not blocking the port that was assigned to N3uron WebUI during setup.
WebUI has the following sections:
Section | Description |
|---|---|
Data |
|
Alarms |
|
System |
|
Configuration
One of the first steps after installing N3uron is to configure the WebUI.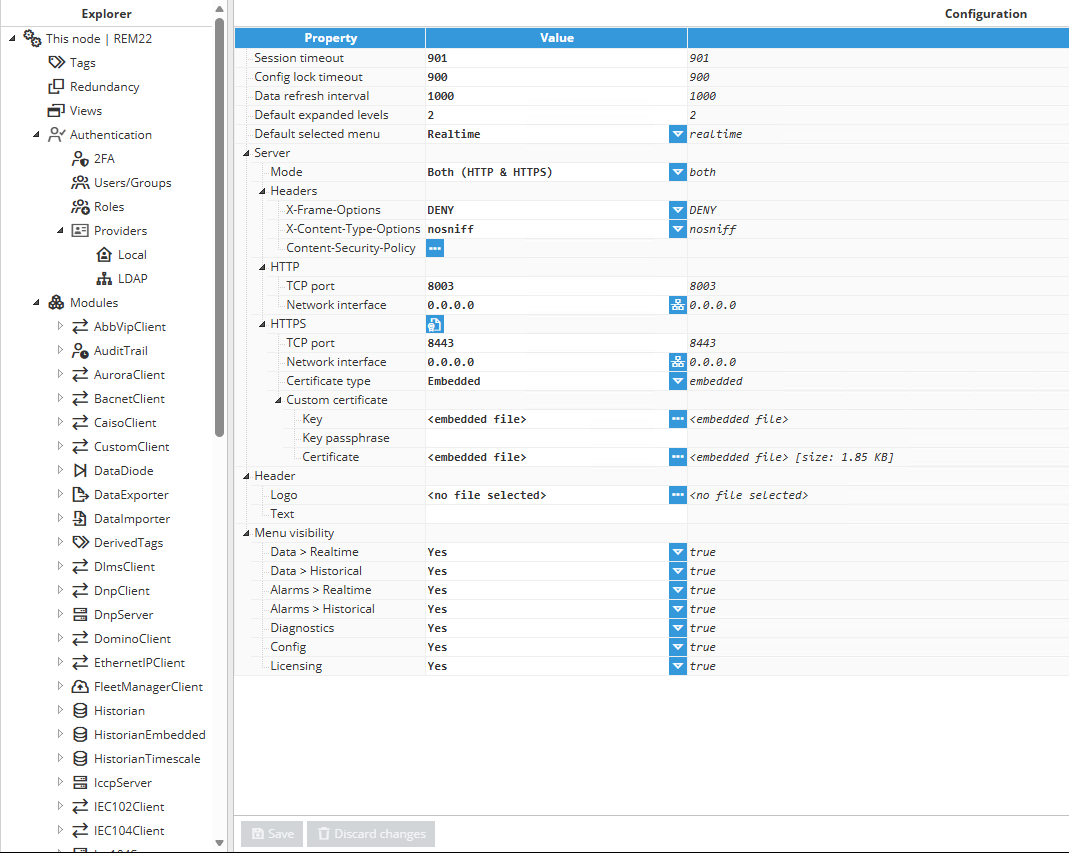
The different parameters that can be configured to suit each user's needs and customize access to the node are as follows:
Setting | Description |
|---|---|
Session timeout | Timeout (in seconds) manages user inactivity and offline session memory storage. User sessions will expire after this period of inactivity. 0 will disable inactivity checks. If a user session loses connection, session data will be retained in the memory so that it can be recovered when the user reconnects. Session data will be erased after the timeout elapses. 0 will set a default timeout of 12 hours to avoid memory leaks. |
Config lock timeout | This parameter specifies the amount of time (in seconds) a user can keep a config file locked while not modifying it. |
Data refresh interval | The interval at which the data is polled from the server, in milliseconds. |
Default expanded levels | Depth of the automatically expanded levels in the real-time tree. |
Default selected menu | Default selected menu at starting. |
Note
A lock is also released when the user session expires. This means that if the Lock timeout is greater than the Session timeout, the lock may be released because of session expiration instead of lock expiration.
Server
Setting | Description |
|---|---|
Mode | Select how the web server will accept connections: users can select HTTP, HTTPS, or both. |
Headers | HTTP security headers are additional directives sent by a web server to enhance security by mitigating various types of attacks and vulnerabilities. |
X-Frame-Options
X-Frame-Options: This header determines whether your webpage can be displayed within a frame, iframe, embed, or object tags in other websites.
Note:
The Content-Security Policy (CSP) HTTP header includes a frame-ancestors directive, making it obsolete for modern browsers; however, it's maintained for backward compatibility purposes.
Option | Description |
|---|---|
SAMEORIGIN | Only allows the page to be displayed in a frame on the same origin as the page itself. |
DENY | Prevents the page from being displayed in a frame, regardless of the origin. |
Custom value / =<expressions..> | Users can input their own text. For example, the deprecated "ALLOW-FROM origin" directive, which is ignored by modern browsers. |
X-Content-Type-Options
X-Content-Type-Options: This header prevents the browser from interpreting files with a MIME type different from the one specified by the server. It’s a measure to stop MIME type sniffing attacks.
Option | Description |
|---|---|
nosniff | Instructs the browser to follow the MIME types provided and not alter them. |
Content Security Policy (CSP)
Content Security Policy (CSP): It is a robust layer of security that helps to detect and mitigate certain types of attacks, such as Cross-Site Scripting (XSS) and data injection attacks.
Directive:
Directive | Description |
|---|---|
frame-ancestors | Specifies valid parents that may embed a page. |
report-uri | Instructs the browser where to send reports if the content violates the policy. |
report-to | Sets a reporting group for sending violation reports. |
upgrade-insecure-requests | Forces the browser to use HTTPS instead of HTTP when possible. |
Custom value / =<expressions..> | Users can input their own text. For example, "block-all-mixed-content" directive, which prevents loading of insecure resources on a secure webpage, such as loading HTTP content on an HTTPS page, to enhance security and prevent mixed content vulnerabilities. |
Value:
Value | Description |
|---|---|
none | Won't allow loading of any resources. |
self | Only allow resources from the current origin. |
strict-dynamic | Applies a nonce or hash to script elements, granting trust to a script on the page and extending this trust to the scripts it loads, enhancing security by ensuring only trusted scripts execute. |
report-sample | Requires the inclusion of a sample of the violating code within the violation report, ensuring that the specific code causing the violation is included for analysis and remediation. |
inline-speculation-rules | Allows the inclusion of speculation rules in scripts. |
Custom value / =<expressions..> | Users can input their own text. For example, in the "frame-ancestors" directive, the value "*.n3uron.com" can be used to permit embedding of the page within any webpage under the n3uron.com domain. |
HTTP
Setting | Description |
|---|---|
TCP port | This parameter specifies the port number to open the web interface. The valid range is 1 to 65535. The default setting is 8003. |
Network interface | Specifies the interface through which the module will be accessible via HTTP. All interfaces are configured by default (0.0.0.0). The option to browse and discover a network interface is also available by clicking on the button to the right. |
HTTPS
Setting | Description |
|---|---|
TCP port | This parameter specifies the HTTPS port number for opening the web interface. The valid range is 1 to 65535. The default setting is 8443. |
Network interface | Specifies the interface through which the module will be accessible via HTTPS. All interfaces are configured by default (0.0.0.0). The option to browse and discover a network interface is also available by clicking on the button to the right. |
Certificate helper | Facilitates establishing HTTPS connections with custom self-signed certificates, offering control over the certificate generation process. |
Note:
Please make sure the port is not used by any other application running on the same machine.
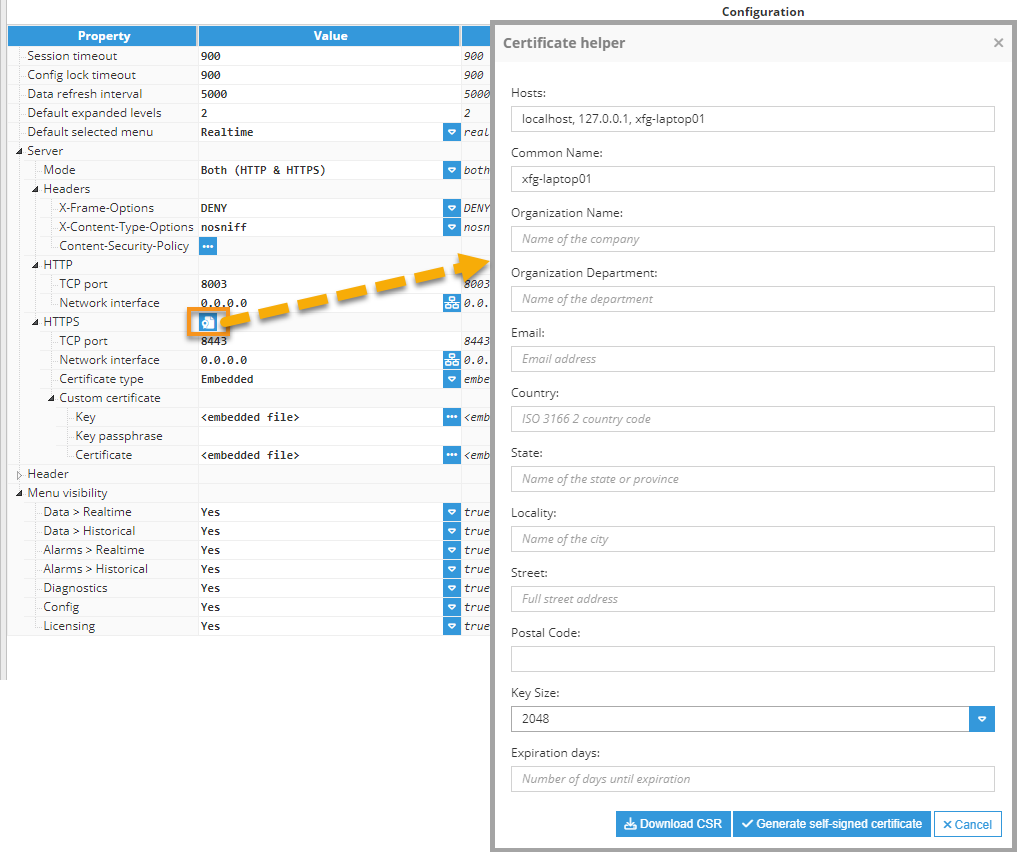
To open the self-signed Certificate helper, right-click on the icon next to the HTTPS title section, and then fill out the form.
Certificate helper fields
Field | Description |
|---|---|
Hosts | This field in the CSR (Certificate Signing Request) form is used to specify the Subject Alternative Names (SANs) for the certificate. This field allows you to include multiple domain names, IP addresses, and other identifiers that the certificate should cover. The identifiers must be separated by commas. |
Common Name | The fully qualified domain name (FQDN) for which the certificate is being requested. This is typically the domain name of the server where the certificate will be installed (e.g., www.example.com). |
Organization Name | The legal name of the organization or company that is requesting the certificate. |
Organization Department | The specific department or division within the organization that is requesting the certificate. |
The email address associated with the organization or individual requesting the certificate. | |
Country | The two-letter ISO code representing the country where the organization is located (e.g., US for United States, CA for Canada, ES for Spain). |
State | The full name or abbreviation of the state or province where the organization is located. |
Locality | The city or locality where the organization is located. |
Street | The street address of the organization's physical location. |
Postal Code | The postal or ZIP code of the organization's location. |
Key Size | The size of the cryptographic key pair to be generated for the certificate, measured in bits. Common key sizes include 2048 bits or 4096 bits. |
Expiration Days | The number of days until the certificate expires. This determines the validity period of the certificate before it needs to be renewed. |
When filling out the form to generate the CSR, ensure that all information provided is accurate and matches the organization's official details. This information will be embedded in the CSR and subsequently used to issue the SSL/TLS certificate.
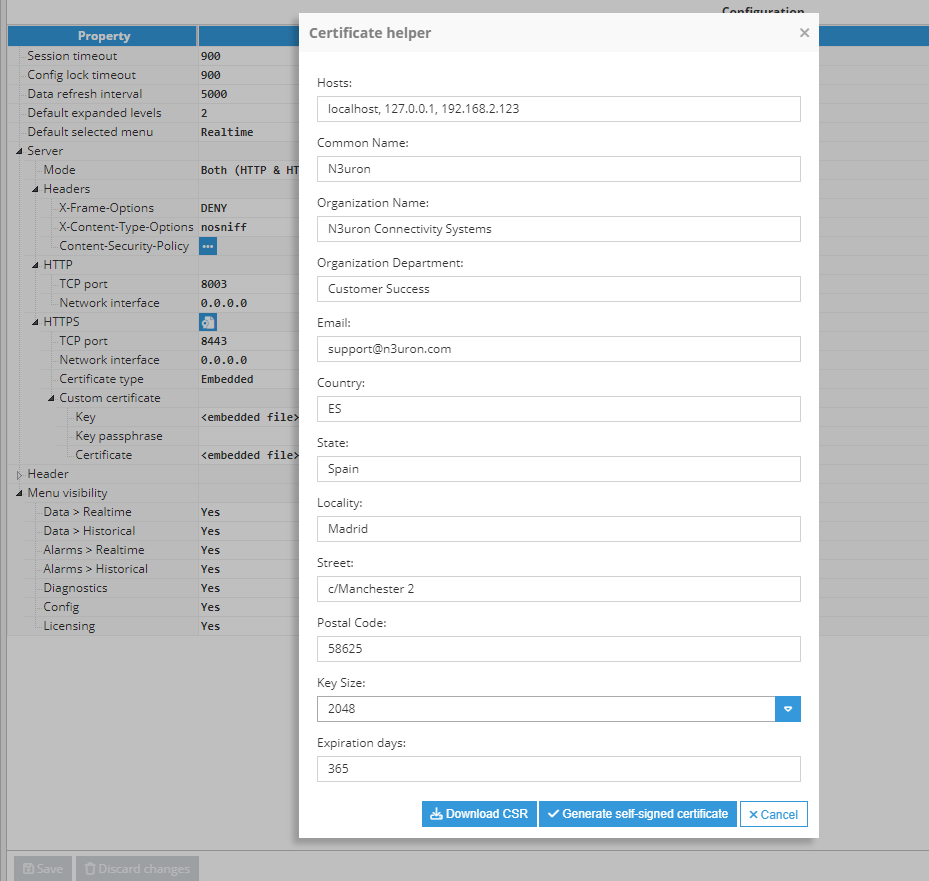
Certificate type
Select the server HTTPS certificate.
Embedded
Users are required to provide both the key and certificate files.
Setting | Description |
|---|---|
Key | Private key certificate file used for secure connections. The file must be in .pem format. |
Key passphrase | Enter the passphrase associated with the certificate if it was generated with one; otherwise, leave this field empty. |
Certificate | Certificate file used for secure connections. The file should must be in .pem format. |
File Path
Setting | Description |
|---|---|
Key passphrase | Enter the passphrase associated with the certificate if it was generated with one; otherwise, leave this field empty. |
Key and Certificate paths | Users must specify the paths for both the Key and Certificate files, relative to the data/<instance name>/cert folder. |
Reload Interval | Specify the interval in seconds for reloading the certificate if changes are detected. Set this field to 0 to disable. |
This option is particularly suitable for scenarios involving automatic certificate renewal processes.
Header
Setting | Description |
|---|---|
Logo | The logo that will be shown on the right side of the header. If no logo is selected, the one in config/files/logo.png will automatically be loaded. |
Text | The title of the web interface is displayed on the top-left side of the window. This is an easy way to identify the node. If left empty, the node name will be shown instead. |
Menu visibility
Menu element | Description |
|---|---|
Data > Real Time | When disabled, the Data > Real Time menu element will be hidden. |
Data > Historical | When disabled, the Data > Historical menu element will be hidden. |
Alarms > Real Time | When disabled, the Alarms > Real Time menu element will be hidden. |
Alarms > Historical | When disabled, the Alarms > Historical menu element will be hidden. |
Diagnostics | When disabled, the Diagnostics menu element will be hidden. |
Config | When disabled, the Config menu element will be hidden. |
Licensing | When disabled, the Licensing menu element will be hidden. |
Access
In this area, you will assign the corresponding permissions to the Roles previously created in the Roles section.
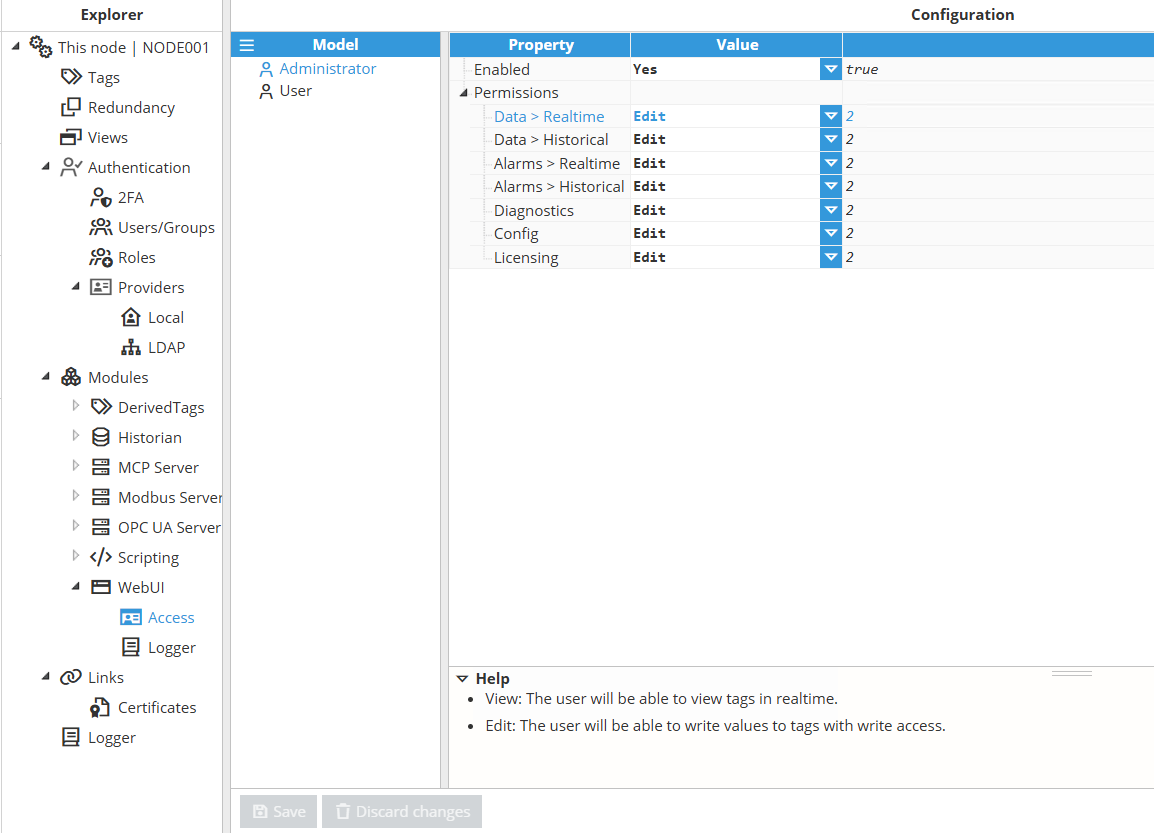
Permissions
Setting | Description |
|---|---|
Enabled | A disabled role will block any login attempt. |
Data > Real Time |
|
Data > Historical |
|
Alarms > Real Time |
|
Alarms > Historical |
|
Diagnostics |
|
Config |
|
Licensing |
|
Appendix: How to import the self-signed certification authority
Windows (Chrome and Internet Explorer)
Step 1: Open the certificate.
Step 2: Click on Install Certificate... and then click Next.
Step 3: Select to place the certificate in a store and click Browse.
Step 4: Select Trusted Root Certification Authorities and click OK.
Step 5: Click Next and Finish.
Firefox
Step 1: Click on the top right menu and go to Options.
Step 2: Go to Advanced and click on the Certificates tab.
Step 3: Click View Certificates and go to the Authorities tab.
Step 4: Click Import... and load the certificate.